
View Poll Results: Should this become a sticky?
Yes


38
90.48%
No


5
11.90%
Multiple Choice Poll. Voters: 42. You may not vote on this poll
CAI/Ram Air ideas
 03-15-2003, 09:01 PM
#1
Supreme Member

Thread Starter
Join Date: Jul 2001
Location: BFE, MD
Posts: 4,461
Likes: 0
Received 0 Likes
on
0 Posts
Car: 13 Ram 1500/ 78 Formy
Engine: 5.7 / 7.4
Transmission: 6sp / TH350
Axle/Gears: 3.55 posi / 3.23
CAI/Ram Air ideas
I'm hoping to get this to be a sticky:
With so many people asking about CAI/Ram Air intakes, I think we should give a brief discription of our set ups & post LINKS to them. This will let the page load faster for those of us w/dial-up and let people choose which ones they want to view first.
Mine is for an 85 Bird w/the MAF set up using the 3"pvc construction. The fillter is underneath the pass side "spare " battery tray. I have the AIT sensor on the engine bay side of the 90* elbow. I used rubber adapters to seal the air filter to the elbow, & the elbow to the MAF. I dremeled out the inside of the pvc tube & sealed the MAF to it. Next is the 30* bend into the stock air flex intake. I used the factory clip to secure this. Inside is another tube of pvc to keep the air from getting too much turbulence. This inner sleve stops right before the pcv return pipe.
Elbow & MAF
Front view of intake
Side view
Where the filter sits as seen underneath the car
Better front view
With so many people asking about CAI/Ram Air intakes, I think we should give a brief discription of our set ups & post LINKS to them. This will let the page load faster for those of us w/dial-up
and let people choose which ones they want to view first. Mine is for an 85 Bird w/the MAF set up using the 3"pvc construction. The fillter is underneath the pass side "spare " battery tray. I have the AIT sensor on the engine bay side of the 90* elbow. I used rubber adapters to seal the air filter to the elbow, & the elbow to the MAF. I dremeled out the inside of the pvc tube & sealed the MAF to it. Next is the 30* bend into the stock air flex intake. I used the factory clip to secure this. Inside is another tube of pvc to keep the air from getting too much turbulence. This inner sleve stops right before the pcv return pipe.
Elbow & MAF
Front view of intake
Side view
Where the filter sits as seen underneath the car
Better front view
 03-15-2003, 11:58 PM
#2
Supreme Member

Join Date: Jul 2001
Location: Palm Bay, Florida, USA
Posts: 3,931
Likes: 0
Received 0 Likes
on
0 Posts
Car: 95 E-150 & 07 Kawasaki ZX-6R
Engine: A slow one & a fast one
Transmission: A bad one & a good one
Axle/Gears: A weak one & a chained one
I like the idea..and there ARE a LOT of people that ask about intakes. Hey, the headers became a sticky...and a lot less people are interested in headers than intake..so..why the hell not???
03-16-2003, 09:17 AM
#3
TGO Supporter
iTrader: (12)

Join Date: Jun 2002
Location: AR
Posts: 6,819
Likes: 0
Received 2 Likes
on
2 Posts
Car: 1991 Camaro RS Vert
Engine: 350 S-TPI
Transmission: T5
Axle/Gears: GU5/G80/J65
I went with the late 80's v8 TPI intake "dual snorkle", painted to match the car. Since I don't use a maf, I put a short section of 3" pipe in for right now. This summer I plan on having a actual pipe made to go from it, to the TB.
BTW, link is in the siggy.
BTW, link is in the siggy.
03-17-2003, 02:02 PM
#4
Supreme Member
Join Date: Jul 2001
Location: Palm Bay, Florida, USA
Posts: 3,931
Likes: 0
Received 0 Likes
on
0 Posts
Car: 95 E-150 & 07 Kawasaki ZX-6R
Engine: A slow one & a fast one
Transmission: A bad one & a good one
Axle/Gears: A weak one & a chained one
My best system of intake was actually my most accident-prone system. 3 in. flex hose came off the throttle body and did a gradual sweep to the passenger side, where the old filtercan was. (This is in a 3.1 motor). Attached to that was a conical filter. Then, the passenger side highbeam, I yanked it out. Yes, that's right...buh bye, gone! (Took me FOREVER to reinstall it for sale. All the damn springs and clips, and screws that you can't get in without damaging the front clip of the car.). So a 3 in. duct tube ran from the inlet where the headlight used to be into a 3 in. to 5 in. adapter that fit neatly over the front of the conical. So it was effectively a simple under-the-hood short ram intake, BUT with a SLIGHT ram air effect. Problem was..I hit highway speeds. Let's just say that ram air + cheap flex ducting + duct tape joints = one hell of a mess when you pull it and park it to make sure it's all ok. ")

03-23-2003, 07:58 PM
#5
Supreme Member
Thread Starter
Join Date: Jul 2001
Location: BFE, MD
Posts: 4,461
Likes: 0
Received 0 Likes
on
0 Posts
Car: 13 Ram 1500/ 78 Formy
Engine: 5.7 / 7.4
Transmission: 6sp / TH350
Axle/Gears: 3.55 posi / 3.23
just 3 people? 
there are more of you than that. even if it's the camaro free ram air, or Karls "hokey" set up. It's for a good cause
edit: those who link to "thenebula".. that site has been down a few days, I hope it comes up soon
there are more of you than that. even if it's the camaro free ram air, or Karls "hokey" set up. It's for a good cause
edit: those who link to "thenebula".. that site has been down a few days, I hope it comes up soon
Last edited by Project: 85 2.8 bird; 03-23-2003 at 08:00 PM.
03-23-2003, 08:02 PM
#6
Supreme Member
Join Date: Jul 2001
Location: Palm Bay, Florida, USA
Posts: 3,931
Likes: 0
Received 0 Likes
on
0 Posts
Car: 95 E-150 & 07 Kawasaki ZX-6R
Engine: A slow one & a fast one
Transmission: A bad one & a good one
Axle/Gears: A weak one & a chained one
I'll donate some photos and ideas..I've gone through intakes like a pervert through porno tapes.
These are a few ideas I sketched out on paper.
The top and bottom are two different ideas.
The next post will be my creation of the top one..which was put together extremely hokey....it didn't take very well to highway speeds.
These are a few ideas I sketched out on paper.
The top and bottom are two different ideas.
The next post will be my creation of the top one..which was put together extremely hokey....it didn't take very well to highway speeds.
03-23-2003, 08:05 PM
#7
Supreme Member
Join Date: Jul 2001
Location: Palm Bay, Florida, USA
Posts: 3,931
Likes: 0
Received 0 Likes
on
0 Posts
Car: 95 E-150 & 07 Kawasaki ZX-6R
Engine: A slow one & a fast one
Transmission: A bad one & a good one
Axle/Gears: A weak one & a chained one
My headlight ram. Picked up decent air, had decent throttle respose, pulled better once I got some speed picked up...good all-around system but the whole missing high-beam got a little annoying...although people did get curious when they saw me coming behind them and noticed there was duct in the empty hole.
Trending Topics
03-23-2003, 08:08 PM
#8
Supreme Member
Join Date: Jul 2001
Location: Palm Bay, Florida, USA
Posts: 3,931
Likes: 0
Received 0 Likes
on
0 Posts
Car: 95 E-150 & 07 Kawasaki ZX-6R
Engine: A slow one & a fast one
Transmission: A bad one & a good one
Axle/Gears: A weak one & a chained one
My short ram. Hauled nuts when the engine was cold but once it heated up, it sucked nothing but hot air, which is obvious seeing as it's located directly in front of the radiator. Hey, I saw a V8 guy with a similar setup once and it looked cool so I figured why not?!
 03-23-2003, 08:13 PM
#10
Supreme Member
Join Date: Jul 2001
Location: Palm Bay, Florida, USA
Posts: 3,931
Likes: 0
Received 0 Likes
on
0 Posts
Car: 95 E-150 & 07 Kawasaki ZX-6R
Engine: A slow one & a fast one
Transmission: A bad one & a good one
Axle/Gears: A weak one & a chained one
A good system in theory, but the effect of the cold air was cancelled out because there were way too many bends in the system, making it too hard for the car to pull the air in.
03-23-2003, 08:15 PM
#11
Supreme Member
Join Date: Jul 2001
Location: Palm Bay, Florida, USA
Posts: 3,931
Likes: 0
Received 0 Likes
on
0 Posts
Car: 95 E-150 & 07 Kawasaki ZX-6R
Engine: A slow one & a fast one
Transmission: A bad one & a good one
Axle/Gears: A weak one & a chained one
Ha ha ha..it kind of resembles one doesnt it? Urgggh....didnt wanna think about that...
But..ok people, I'm out of pics..hope those helped! By the way...will someone PLEASE do the 2nd one on paper? I just want to do it sometime before I die to find out if it really works as well as I think it would...I always referred to it as 'the ultimate CAI'....
But..ok people, I'm out of pics..hope those helped! By the way...will someone PLEASE do the 2nd one on paper? I just want to do it sometime before I die to find out if it really works as well as I think it would...I always referred to it as 'the ultimate CAI'....
03-24-2003, 10:39 AM
#12
Supreme Member
Thread Starter
Join Date: Jul 2001
Location: BFE, MD
Posts: 4,461
Likes: 0
Received 0 Likes
on
0 Posts
Car: 13 Ram 1500/ 78 Formy
Engine: 5.7 / 7.4
Transmission: 6sp / TH350
Axle/Gears: 3.55 posi / 3.23
Karls take on it :
I'll have to include other pics of other items I used for my Firebird air entry set up.
I found the 90* bend from throttle body at a swap meet & paid one dollar for it.
I used 3" flex dryer hose to mate the MAS to 90* bend.
BOY DOES IT LOOK HOEKY!
YET IT WORKS SUPERB.
How I know?
I was made to change back to the plastic box from MAS to the factory flex hose to TB. I can feel lack of power from air blockage.
What else I did....
I have the MAS in factory location using the factory bend from air box.
My airbox lid I took a heat gun to it & made it flat. I have a spare original lid to be used for CA smog testing, too.
I also lowered my passenger side headlight cover to gain more air flow to the air box lid.
I also cut into the underside of hood to make into a air scoop. This is quite effective.
I ain't done yet.
I found again at wrecking yard or swap meet (not sure) a 90* bend in hard plastic and I have that under front fender. Thru the fender I used my old 1975 Opel Fuel Injector Sport Wagon Flex Air Hose, to bring the air from under bumper to the FRONT of the air box (behind the radiator support).
Meaning, I am feeding fresh air from under bumper to infront of the air box, in that empty cavitiy area. I have the top lid, acting as a scoop to be fed fresh air from behind the headlight door.
How I know this works?
My K & N filter for FIRST TIME IS DIRTY!
By going back to the air silencer box (factory) I am ramming so much air into the narrow transistion air box, it gets backed up by that narrow passage & creates an air dam, thus I can feel lose of full on power.
This is how I solved my lack of air to engine. Having a 3.4 I need to push more air thru the air entry for better top end high speed power.
Rain problems & puddles? NONE
NONE of the water gets into the filter as none of the air is injected directly into the air box.
I plan on cutting top of my headlight door to see if that helps out better, yet the underside of my hood insulation is quite "changed" since I allowed more air entry under the hood in that area.
I'll show ya more butchered pics if ya like of how I did the hood cutting & my lower air scoop idea.
This really worked for me.
Suck in hot engine compartment air
GOT TO BE KIDDING WRONG! YA LOOSE HP THAT WAY!!!!
ALWAYS FEED OUTSIDE AIR TO ENGINE
NEVER HOT ENGINE COMPARTMENT AIR
PS Have ya cleared the ECM of codes cause ya changed the MAS?
How I know ya need to?
CAUSE I DIDN'T AND THAT CAUSED ME LOTS OF PROBLEMS, TOO!
See my "BUCK THIS THREAD!"
Karls HOEKY setup
:I'll have to include other pics of other items I used for my Firebird air entry set up.
I found the 90* bend from throttle body at a swap meet & paid one dollar for it.
I used 3" flex dryer hose to mate the MAS to 90* bend.
BOY DOES IT LOOK HOEKY!
YET IT WORKS SUPERB.
How I know?
I was made to change back to the plastic box from MAS to the factory flex hose to TB. I can feel lack of power from air blockage.
What else I did....
I have the MAS in factory location using the factory bend from air box.
My airbox lid I took a heat gun to it & made it flat. I have a spare original lid to be used for CA smog testing, too.
I also lowered my passenger side headlight cover to gain more air flow to the air box lid.
I also cut into the underside of hood to make into a air scoop. This is quite effective.
I ain't done yet.
I found again at wrecking yard or swap meet (not sure) a 90* bend in hard plastic and I have that under front fender. Thru the fender I used my old 1975 Opel Fuel Injector Sport Wagon Flex Air Hose, to bring the air from under bumper to the FRONT of the air box (behind the radiator support).
Meaning, I am feeding fresh air from under bumper to infront of the air box, in that empty cavitiy area. I have the top lid, acting as a scoop to be fed fresh air from behind the headlight door.
How I know this works?
My K & N filter for FIRST TIME IS DIRTY!
By going back to the air silencer box (factory) I am ramming so much air into the narrow transistion air box, it gets backed up by that narrow passage & creates an air dam, thus I can feel lose of full on power.
This is how I solved my lack of air to engine. Having a 3.4 I need to push more air thru the air entry for better top end high speed power.
Rain problems & puddles? NONE
NONE of the water gets into the filter as none of the air is injected directly into the air box.
I plan on cutting top of my headlight door to see if that helps out better, yet the underside of my hood insulation is quite "changed" since I allowed more air entry under the hood in that area.
I'll show ya more butchered pics if ya like of how I did the hood cutting & my lower air scoop idea.
This really worked for me.
Suck in hot engine compartment air
GOT TO BE KIDDING WRONG! YA LOOSE HP THAT WAY!!!!
ALWAYS FEED OUTSIDE AIR TO ENGINE
NEVER HOT ENGINE COMPARTMENT AIR
PS Have ya cleared the ECM of codes cause ya changed the MAS?
How I know ya need to?
CAUSE I DIDN'T AND THAT CAUSED ME LOTS OF PROBLEMS, TOO!
See my "BUCK THIS THREAD!"
Karls HOEKY setup
03-26-2003, 02:50 PM
#13
Supreme Member

Join Date: Feb 2002
Location: Moved... GA still, more garage space!
Posts: 3,266
Likes: 0
Received 1 Like
on
1 Post
Car: 87 Red/Blk Bird loaded 3.4L & 700R4
Transmission: Th700R4
Axle/Gears: 3.73
EDIT Totally revamped my site(s)
Redraif's old CAI
This is on my performance site... Figured I had to put the old CAI/RAI somewhere. I might give it its own page. I need to add some info to it I'm sure...
My current RAI with SunCoast hood
SunCoast RAI
Redraif's old CAI
This is on my performance site... Figured I had to put the old CAI/RAI somewhere. I might give it its own page. I need to add some info to it I'm sure...
My current RAI with SunCoast hood
SunCoast RAI
Last edited by redraif; 03-28-2005 at 01:36 PM.
 03-28-2003, 09:01 PM
#15
Supreme Member
Join Date: Jul 2001
Location: Palm Bay, Florida, USA
Posts: 3,931
Likes: 0
Received 0 Likes
on
0 Posts
Car: 95 E-150 & 07 Kawasaki ZX-6R
Engine: A slow one & a fast one
Transmission: A bad one & a good one
Axle/Gears: A weak one & a chained one
Where's the fun in that??
03-29-2003, 08:33 AM
#17
Supreme Member

Join Date: Jan 2001
Location: ****SoCal, USA****
Posts: 7,604
Likes: 0
Received 0 Likes
on
0 Posts
I'll convert my other HOKEY air set up pics for ya now. It is a COMPLETE system.
Get ready to be shocked, as it's really butch!
PS I already have a spare hood, undamaged, and I got this car with the hood slightly tweeked (Monkey wrenches really work well on removing bends in metal!).
I'll be back!
Get ready to be shocked, as it's really butch!
PS I already have a spare hood, undamaged, and I got this car with the hood slightly tweeked (Monkey wrenches really work well on removing bends in metal!).
I'll be back!
03-29-2003, 08:44 AM
#18
Supreme Member
Join Date: Jan 2001
Location: ****SoCal, USA****
Posts: 7,604
Likes: 0
Received 0 Likes
on
0 Posts
AS I said I have a spare free hood.
I did this with a drill, just kept at it, until the effect was completed.
NOTICE, the hood support is still there and there is an opening. Notice the insulation, so you can tell the effectiveness.
I did this with a drill, just kept at it, until the effect was completed.
NOTICE, the hood support is still there and there is an opening. Notice the insulation, so you can tell the effectiveness.
03-29-2003, 08:54 AM
#20
Supreme Member
Join Date: Jan 2001
Location: ****SoCal, USA****
Posts: 7,604
Likes: 0
Received 0 Likes
on
0 Posts
I also have a spare headlight door, too.
I may slice the top of this door.
I bought car with the chipped/cracked off headlite door corner. I loosened the assembly to gain the "advantage", then puched down.
The result is as you see.
PS I also have another new front bumper I am have fixed, and sanded off the paint (almost to my liking) then spray can it body color. One day I'll repaint the whole car, until then, my spray can work is close enough for government work.
03-29-2003, 09:10 AM
#21
Supreme Member
Join Date: Jan 2001
Location: ****SoCal, USA****
Posts: 7,604
Likes: 0
Received 0 Likes
on
0 Posts
I bought my car from a VERY CUTE GIRL & it was WRECKED in this front corner. To get the car to run cooler, I just removed stuff until the car stopped overheating! Now I'm putting back in a great front nose, still minus the "front heavy behind bumper stuff"-which I have anyway. I installed a house rain gutter deflector, to SHOVE cooler air into the radiator, boy does that work!
My idea here?
I got this plastic scoop from a swap meet for a few pennies or found on road (serious!)-not sure. This scoop exits, only so far. I then took my old 1975 Opel Fuel Injected Sport Wagon (used same FI setup as a 1970's Porsche-BOSCH! - & Opel is GM of Germany!) air inlet flex hose, bent, ran air thru that curve INSIDE THE FENDER. This hose exits IN FRONT OF THE AIR CAN. Into that cavity area. The air coming in thru the hood mixes with this air, so I get air from below & air fron hood.
I warned ya this is a butch set up!
03-29-2003, 09:12 AM
#22
Supreme Member
Join Date: Jan 2001
Location: ****SoCal, USA****
Posts: 7,604
Likes: 0
Received 0 Likes
on
0 Posts
I bought my car from a VERY CUTE GIRL & it was WRECKED in this front corner. To get the car to run cooler, I just removed stuff until the car stopped overheating! Now I'm putting back in a great front nose, still minus the "front heavy behind bumper stuff"-which I have anyway. I installed a house rain gutter deflector, to SHOVE cooler air into the radiator, boy does that work!
My idea here?
I got this plastic scoop from a swap meet for a few pennies or found on road (serious!)-not sure. This scoop exits, only so far. I then took my old 1975 Opel Fuel Injected Sport Wagon (used same FI setup as a 1970's Porsche-BOSCH! - & Opel is GM of Germany!) air inlet flex hose, bent, ran air thru that curve INSIDE THE FENDER. This hose exits IN FRONT OF THE AIR CAN. Into that cavity area. The air coming in thru the hood mixes with this air, so I get air from below & air fron hood.
I warned ya this is a butch set up! When I install the new front bumper, I have those under bumper shields/panels, too. I will have to "cut" that panel to keep using my below bumper scoop. So back to teh yard, one day, to score another passenger under bumper panel, in perfect shape for "one day".
03-29-2003, 09:15 AM
#23
Supreme Member
Join Date: Jul 2001
Location: Palm Bay, Florida, USA
Posts: 3,931
Likes: 0
Received 0 Likes
on
0 Posts
Car: 95 E-150 & 07 Kawasaki ZX-6R
Engine: A slow one & a fast one
Transmission: A bad one & a good one
Axle/Gears: A weak one & a chained one
Ked...you are the king of ugly crap! But if it works, who can complain?!
03-29-2003, 09:42 AM
#24
Supreme Member
Join Date: Jan 2001
Location: ****SoCal, USA****
Posts: 7,604
Likes: 0
Received 0 Likes
on
0 Posts
In this shot, ya notice the air can lid?
I used a HEAT GUN to melt lip, so I could bend it FLAT to act as a scoop to catch the air I am sending from the butchered hood/headlight opening.
Of course I have a spare one in perfect shape.
It took a long time to find that spare can top lid.
Inside the air can I have a K & N CONE FILTER, that I cut off the TOP so it is like the proper cylinder air cleaner. I paid $5 for that K & N cone, so no loose there, too!
Let's add.
K & N $5, underbumper scoop p19lastic, free or $1, 90* bend was a $1, left over 75 Opel Fuel Injected air hose - free, air can lid was maybe $3, dryer hose (I need new stuff now) free, beating on the car for a day of fun-PRICELESS.
I have all stuff to go to CA smog & pass without a complaint then back home to re-install this set up & I do not remove about 80% of my already set up/installed stuff.
This set up almost assures no rain water enters FI system.
NO I don't go thru puddle like a four wheel drive, tho! Ever get water into a FI system?
This is a very effective system.
My proof?
My airfilter actually gets DIRTY!
Think this is butch?
Should see what I did to my Wife's 1968 6 cylinder Camaro air cleaner! Of course I have a spare 6 cylinder air cleaner for her car!
Serious, under bumper air scoops are the best! That statement is confirmed by the guys next to my machinist that creates those 10 sec Honda CRX cars at drag strip.
They confirmed that the air/headlight idea is "ok", YET ya get an air "pocket" that battles the air entering the engine.
Try GM 1968-1972 442 W-30 air package (anyone know what I mean?) as my design inspiration.
Under bumper scoops FLOW-SHOVE AIR into the engine.
How they know? TIMESLIPS!
PS LOOK AT NASCAR! They have air enter at WINDSHIELD BASE! Just like GM did back in 60's on Chevelles & Camaros & my 1974 Corvette.
Hope ya got a real good laugh, I enjoyed sharing this with ya.
Told ya it's totally Hokey!
This is part of the pleasure of getting a $300 car.
Have fun!
OH by going back to that narrow plastic box connection thing from factory (that goes from the MAS to the factory air flex hose to TB) I HAVE LOST TOP END SPEED.
That narrow air box thing creates an air dam, preventing the easy flow of air to engine. Back to finding better hose set up (to replace that white dryer hose!).
03-30-2003, 11:10 PM
#25
Member

Join Date: Feb 2002
Location: Fort Worth, Tx
Posts: 401
Likes: 0
Received 0 Likes
on
0 Posts
Car: 92 RS 25th Anniversary
Engine: 3.1
Transmission: 700r4
i got 2 4 inch bilge fans that ima goin to fabricate into a dual air intake system. the cones r going to be placed behind the grill and the pvc or alumiminum is going to run through till there is a straight shot from the pipe to the TB, thats where ima goin to throw in these bilge fans, which r going to operate on a full throttle switch (only come on when fully gassed) i should, if everything goes to plan have it up and workin by this weekend, im having problems finding my switch, grant it i can install it w/o the switch and it will still work just not as well as i want it too 
gotta fond a shop that sells NOS wet system full throttle switch!
gotta fond a shop that sells NOS wet system full throttle switch!
03-31-2003, 04:13 AM
#26
Supreme Member
Thread Starter
Join Date: Jul 2001
Location: BFE, MD
Posts: 4,461
Likes: 0
Received 0 Likes
on
0 Posts
Car: 13 Ram 1500/ 78 Formy
Engine: 5.7 / 7.4
Transmission: 6sp / TH350
Axle/Gears: 3.55 posi / 3.23
not sure about the bilge pump fans, they gotta move some serious air. maybe do a search for the "e-ram". You could always order a switch & other items from Jegs, Summit, or PAW.
11-10-2004, 07:16 AM
#27
Member
Join Date: Nov 2004
Location: North Jersey
Posts: 316
Likes: 0
Received 0 Likes
on
0 Posts
Car: 1990 Pontiac Firebird
Engine: 3.1 V6 soon to be gone
Transmission: 700r4 Automatic soon to be a T56
Maybe you have seen this before but this is my setup for all those interested. Just some painted PVC and a K&N air filter. I drilled a hole for the IAT sensor which sits neatly right behind the filter.


Thanks,
Adam
Thanks,
Adam
11-10-2004, 10:56 PM
#28
Supreme Member
Thread Starter
Join Date: Jul 2001
Location: BFE, MD
Posts: 4,461
Likes: 0
Received 0 Likes
on
0 Posts
Car: 13 Ram 1500/ 78 Formy
Engine: 5.7 / 7.4
Transmission: 6sp / TH350
Axle/Gears: 3.55 posi / 3.23
hey, a "dredges up from the past" post that contributes, AND demonstrates teh power of the 
11-11-2004, 05:11 PM
#29
Supreme Member

Join Date: Dec 2002
Location: Central FL
Posts: 2,564
Likes: 0
Received 1 Like
on
1 Post
Car: 91 Camaro
Engine: 3.1...not hardly stock
Transmission: 700r4....not stock either
Axle/Gears: 3.73
very nice, looks real similar to the one that i had on my car before i put the TPI dual snorkel setup on it. except i had mine painted black.
 11-11-2004, 08:41 PM
#31
Member
Join Date: Nov 2004
Location: North Jersey
Posts: 316
Likes: 0
Received 0 Likes
on
0 Posts
Car: 1990 Pontiac Firebird
Engine: 3.1 V6 soon to be gone
Transmission: 700r4 Automatic soon to be a T56
Hey AM91Camaro_RS, do you have a picture of your new setup? Wondering how you did that.
And thanx myvmax1. I had built it and then decided that PVC was very ugly so I painted it and put a Firebird Decal on it (which is hard to see, the camera doesnt pick it up well).
And thanx myvmax1. I had built it and then decided that PVC was very ugly so I painted it and put a Firebird Decal on it (which is hard to see, the camera doesnt pick it up well).
11-11-2004, 09:00 PM
#32
Supreme Member
iTrader: (1)
Join Date: Aug 2004
Location: Calgary, AB
Posts: 1,989
Likes: 0
Received 0 Likes
on
0 Posts
Car: 1993 Nissan 240sx
Engine: Turbo KA24DE
Transmission: 5 spd
Axle/Gears: 4.08 VLSD
I have fabbed intakes on both my v6 and my lg4 cars. In compliance with the pic rule, you can follow the links in my sig for detailed info. Sufficed to say, I noticed huge gains in power and response. The plan now is to get a l69 air cleaner for the TA and have a dual ram air setup from behind the mini foglights. THat way I still have fog lights, but also have ram air from behind them, because the mini ones dont fill the entire space.
Here's a small pic of the TA's current (ghetto) intake...
Here's a small pic of the TA's current (ghetto) intake...
11-11-2004, 09:03 PM
#33
Supreme Member
Join Date: Dec 2002
Location: Central FL
Posts: 2,564
Likes: 0
Received 1 Like
on
1 Post
Car: 91 Camaro
Engine: 3.1...not hardly stock
Transmission: 700r4....not stock either
Axle/Gears: 3.73
yea, there's pics of my setup on my cardomain site, www.cardomain.com/id/am91camaro_rs the engine stuff is on pg 3 but feel free to check it all out.
11-15-2004, 11:15 AM
#34
Supreme Member
Join Date: Feb 2002
Location: Moved... GA still, more garage space!
Posts: 3,266
Likes: 0
Received 1 Like
on
1 Post
Car: 87 Red/Blk Bird loaded 3.4L & 700R4
Transmission: Th700R4
Axle/Gears: 3.73
Wow back from the dead....
Must update my links! Here you go!
Raif's old CAI


My current RAI with SunCoast hood
SunCoast RAI


Must update my links! Here you go!
Raif's old CAI
My current RAI with SunCoast hood
SunCoast RAI
Last edited by redraif; 03-28-2005 at 01:54 PM.
11-23-2004, 06:23 PM
#35
Member
Join Date: May 2004
Location: San Diego CA
Posts: 279
Likes: 0
Received 0 Likes
on
0 Posts
Car: Badass 1991 Firebird
Engine: Screamin' 305 TBI
Transmission: 700R4
Axle/Gears: 2.73, 3.42's waiting to go in!
On a 91-92 Bird, what about making a couple of holes in the sheetmetal between top of radiator and the plastic nose, like the TPI cold air induction on Camaros?
I'm thinking the air dam under the rad would push some air up through those holes and get some cold air under the hood, for open element guys like myself. I'm also looking into a cowl scoop. Used to have a duct under the front bumper, but it sucked up too much dirt.
Must..have...cold air! :lala:
I'm thinking the air dam under the rad would push some air up through those holes and get some cold air under the hood, for open element guys like myself. I'm also looking into a cowl scoop. Used to have a duct under the front bumper, but it sucked up too much dirt.
Must..have...cold air! :lala:
11-23-2004, 06:45 PM
#36
Supreme Member
iTrader: (1)
Join Date: Aug 2004
Location: Calgary, AB
Posts: 1,989
Likes: 0
Received 0 Likes
on
0 Posts
Car: 1993 Nissan 240sx
Engine: Turbo KA24DE
Transmission: 5 spd
Axle/Gears: 4.08 VLSD
Hmm.. I htink the space between the hood and the top of the rad would be too small to help an open element. On the other hand, you could probably fab up some ducting to get air from the signal light area... Heck, mine's right under the rad, attatched to the air dam, and I never get any dirt through it..
01-05-2005, 12:14 AM
#37
Supreme Member
Join Date: Dec 2000
Location: Tucson, AZ, USA
Posts: 2,375
Likes: 0
Received 0 Likes
on
0 Posts
Car: '99 Trans Am, '86 Camaro
Engine: LS1, Scrap
Transmission: T56, T5
Axle/Gears: 3.42 Stock ZT, 3.42 Open
Couple images of the stock 85-89 camaro dual snorkel to help round out the thread for FAQ purposes. Courtesy of bru333.
01-05-2005, 02:17 AM
#39
Member
Join Date: May 2004
Location: San Diego CA
Posts: 279
Likes: 0
Received 0 Likes
on
0 Posts
Car: Badass 1991 Firebird
Engine: Screamin' 305 TBI
Transmission: 700R4
Axle/Gears: 2.73, 3.42's waiting to go in!
Okay, I've got a Firebird, with the same piece of metal where the Camaro CAI filters are located. Wondering if just cutting out the square holes would feed in enough air. Someone here says no, I kind of agree, plus the Bird hood comes down pretty low.
My friend has a Bird, and he said no way, don't start cutting holes in your car. Think I might just get a cowl hood and be done with it. Gotta feed the open element somehow. Or the ram air hood, or a TBI hat with the intake pipe plumbed down by the battery.
Could also run a functional shaker hood scoop off of a second gen, was really considering doing that a few months back, but got cold feet after thinking about taking cutting tools to my stock hood.
01-05-2005, 03:09 AM
#40
Member
Join Date: May 2004
Location: San Diego CA
Posts: 279
Likes: 0
Received 0 Likes
on
0 Posts
Car: Badass 1991 Firebird
Engine: Screamin' 305 TBI
Transmission: 700R4
Axle/Gears: 2.73, 3.42's waiting to go in!
Here's a link to some more CAI stuff. Check out the aluminum carb/TBI hat. Also used for supercharging, turbocharging:
https://www.thirdgen.org/techbb2/sho...hlight=TBI+hat
https://www.thirdgen.org/techbb2/sho...hlight=TBI+hat
01-05-2005, 05:29 AM
#41
Supreme Member
Join Date: Dec 2000
Location: Tucson, AZ, USA
Posts: 2,375
Likes: 0
Received 0 Likes
on
0 Posts
Car: '99 Trans Am, '86 Camaro
Engine: LS1, Scrap
Transmission: T56, T5
Axle/Gears: 3.42 Stock ZT, 3.42 Open
That carb/tbi adapter isn't particularly likely to help any of the V6 folks..... those V6s that did come with carbs didn't get a 5 1/4" air cleaner base... cowl induction is only likely to help the carb folks... ditto on the shaker...
I do agree that cutting holes simply for the sake of airflow without some aesthetic dual purpose is not something that's going to help your car maintain its value.
I do agree that cutting holes simply for the sake of airflow without some aesthetic dual purpose is not something that's going to help your car maintain its value.

 03-27-2005, 01:53 AM
#43
Supreme Member
Thread Starter
Join Date: Jul 2001
Location: BFE, MD
Posts: 4,461
Likes: 0
Received 0 Likes
on
0 Posts
Car: 13 Ram 1500/ 78 Formy
Engine: 5.7 / 7.4
Transmission: 6sp / TH350
Axle/Gears: 3.55 posi / 3.23
posted here for the knowledge base
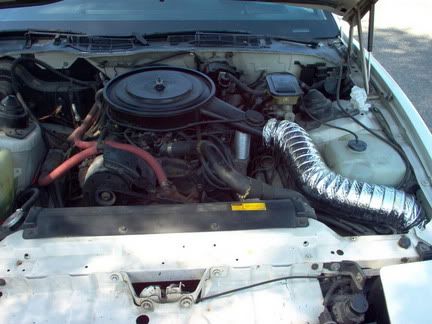
OK, here's an update for my new engine setup. It's the airbox off a mid/late 90's mustang w/K&N filter from e-bay, $21 shipped, 3" metal ducting & a hubless clamp to connect to the airbox, $13 from Lowes. The rubber boot connecting the ducting to the tb was cut from the original 2.8 boot from where it would connect to the stock air box.
I will be mounting the airfilter box underneath the radiator cover sheold thing ( where the hood latch catches, w/the opening facing down. Not much chance of any splashed water getting up there & good CAI for now (ram air planned for later). There's enough room between the back of the headlight bracing & the radiator to rout the ducting thru there. The power steering fluid resovoir has not been moved yet in the pic.
The brakets underneath the cover will need to be moved, but that shouldn't be too much of a problem.
New Intake 1
New Intake 2
Last edited by Project: 85 2.8 bird; 03-27-2005 at 01:57 AM.
 03-27-2005, 02:30 PM
#45
Supreme Member
Join Date: Jul 2001
Location: Palm Bay, Florida, USA
Posts: 3,931
Likes: 0
Received 0 Likes
on
0 Posts
Car: 95 E-150 & 07 Kawasaki ZX-6R
Engine: A slow one & a fast one
Transmission: A bad one & a good one
Axle/Gears: A weak one & a chained one
The IAT sensor location is flexible...it's not VITAL that it lies in the intake stream. It just needs to be as close to the filter location as possible, so that the air temperature that it measures is close to the air temperature in the intake stream. Any large difference will cause problems, but as long as they're close it's fine. I've usually duct-taped it to the side of the intake duct, or to a fenderwell somewhere....away from the radiator, exhaust, and other heat sources that could give a false-hot reading.
03-28-2005, 08:06 AM
#46
Senior Member
Join Date: Mar 2003
Location: Ogden, UT
Posts: 615
Likes: 0
Received 0 Likes
on
0 Posts
Car: 95 Z28
Engine: LT1
Transmission: Built 4L60E with 3000 Stall
Axle/Gears: 3.23? I'm not sure

Ignore that the car is wrecked lol, that is loonngg since fixed... But that Y intake thing isnt stock for V6 or what? It Came with my car
 Mine has a sensor on the drivers side of it that my Friends IROC doesnt have, whats up with that. the IAT I guess.
03-28-2005, 08:35 AM
Mine has a sensor on the drivers side of it that my Friends IROC doesnt have, whats up with that. the IAT I guess.
03-28-2005, 08:35 AM
#47
Supreme Member
Join Date: Jul 2001
Location: Palm Bay, Florida, USA
Posts: 3,931
Likes: 0
Received 0 Likes
on
0 Posts
Car: 95 E-150 & 07 Kawasaki ZX-6R
Engine: A slow one & a fast one
Transmission: A bad one & a good one
Axle/Gears: A weak one & a chained one
Yep, the screw-in piece that looks like a spark plug is your IAT sensor.
That Y intake was stock on V6's for only a few years...then they switched over to the canister intake. Apparently, the Y is very good though because it's a popular conversion.
That Y intake was stock on V6's for only a few years...then they switched over to the canister intake. Apparently, the Y is very good though because it's a popular conversion.
03-28-2005, 09:36 AM
#48
Member

Join Date: Jan 2004
Location: VA
Posts: 284
Likes: 0
Received 0 Likes
on
0 Posts
Car: 1991 Firebird
Engine: V6
Transmission: ATOD
honestly i have a firebird and it looks like the modifeid IAC on the one's that go "next to the radiator" are the same as my stock so whats the point beisdes looks??
03-28-2005, 02:12 PM
#49
Supreme Member
Join Date: Feb 2002
Location: Moved... GA still, more garage space!
Posts: 3,266
Likes: 0
Received 1 Like
on
1 Post
Car: 87 Red/Blk Bird loaded 3.4L & 700R4
Transmission: Th700R4
Axle/Gears: 3.73
Less restriction, bigger ducting, so the air flows freer. If it is done right you also have less harsh bends then the factory sys, this also alsows for a freer flow!
04-01-2005, 12:15 AM
#50
Supreme Member
Thread Starter
Join Date: Jul 2001
Location: BFE, MD
Posts: 4,461
Likes: 0
Received 0 Likes
on
0 Posts
Car: 13 Ram 1500/ 78 Formy
Engine: 5.7 / 7.4
Transmission: 6sp / TH350
Axle/Gears: 3.55 posi / 3.23