
Sorting out 305 TPI
 04-02-2018, 12:29 PM
#1
Junior Member

Thread Starter

Join Date: May 2004
Location: Phoenix, AZ
Posts: 19
Likes: 0
Received 0 Likes
on
0 Posts
Sorting out 305 TPI
I am going through maintenance items on a 30k mile, stock 1989 305TPI engine. It runs relatively well. The two things I still notice both before and after parts I have replaced are a little bit of roughness at idle and lack of instant responsiveness at throttle. The throttle response I believe gets better once warm.
This forum has been wonderful in getting this far as most of the little issues I've been able to sort out due to the wealth of info here.
So far I have replaced the distributor and cap, spark plugs with Delco Platinum, Delco wires, ignition coil, IAC sensor, manifold temp sensor, coolant temp sensor, PCV valve and rubber grommet, Delco fuel regulator, Bosch 3 injectors, Racetronix fuel pump, fuel filter, O2 sensor, I might be forgetting some things.
When I try to hook up an Actron 9190 scanner I get a connection error that it can't communicate with the car. From some videos and forum responses I have seen that an OBD I scanner may do that if a fuse is blown or a sensor is malfunctioning but not triggering a code. Does anyone have that experience with scan tools on a 3rd Gen?
It makes it a little hard to diagnose without being able to read so I'm not sure where else to look, or what other sensors it could be at this point. I have checked the TPS voltage and it is perfect. Set timing after new distributor and went through the IAC process. Should I run through the IAC reset again? I haven't since I put in new injectors.
I did the injectors because at least one was leaking the fuel pressure down causing a hard start. That has gone away. I will tonight go back to new copper plugs just to make sure the couple hundred miles of old fuel injectors dumping fuel didn't foul plugs.
Any suggestions are welcome. I'm running out of ideas.
 04-02-2018, 06:06 PM
#2
Re: Sorting out 305 TPI
I can scan my '86 with a Snap On MT-2500 without problems, as well as control some outputs.
Please describe what you did with the "IAC reset" procedure. I'm dumb enough to not know what that entails. I thought the IAC stepper motor was simply a two-phase slave to the ECM, and that there was no such thing as an adjustment.
Please describe what you did with the "IAC reset" procedure. I'm dumb enough to not know what that entails. I thought the IAC stepper motor was simply a two-phase slave to the ECM, and that there was no such thing as an adjustment.
04-02-2018, 06:15 PM
#3
Junior Member
Thread Starter
Join Date: May 2004
Location: Phoenix, AZ
Posts: 19
Likes: 0
Received 0 Likes
on
0 Posts
Re: Sorting out 305 TPI
04-02-2018, 07:03 PM
#4
Re: Sorting out 305 TPI
That's pretty close. However, the IAC does not actually get "adjusted" but instead the throttle minimum air position gets adjusted. This might be clearer. Keep in mind that the TB may be worn or has alignment issues, and that the stop screw may have been moved. Those should be addressed first. After that, clean the TB bores and plates (front and rear), and then set the position:
Throttle Minimum Air Position
Tools needed:
1. Torx driver # T-20
2. Paper Clip
3. Small Punch
4. Tachometer
GENERAL NOTE: The engine should be at normal operating temperature before performing any adjustments. Never rely on the dash mounted instruments for diagnostics and adjustments. The oil pressure and temperature gauges and the voltmeter and tachometer just aren't calibrated accurately enough for diagnosis, but are a relative indication for monitoring the vehicle while driving.
For this adjustment, the transmission will be in DRIVE while you're under the hood. You will need to securely set the parking brake and block the drive wheels. It would also be a good idea to have an assistant hold the service brakes while you perform the adjustments.
In order to successfully complete the adjustment, the IAC air passages and pintle need to be clean. The throttle plates and bores need to be clean as well. If this is not the case, you'll need to remove the air cleaner from TBI engines or the intake air bellows from TPI engines to gain access to the area to be cleaned. A spray-type carburetor cleaner works well for this. Cleaning the IAC passages on a TPI/MAF engine will set a DTC, but we'll be clearing that later. With the engine idling, direct the spray cleaner into the IAC air passages and around the throttle plates. Shut off the engine and continue cleaning the throttle plates by opening the throttle manually. Once everything is satisfactorily cleaned, replace the air bellows on TPI engines. Many times, this alone can solve IAC/idle speed problems.
If this doesn't solve the problem, you may need to remove and clean the IAC stepper motor. If the IAC appears to be clean and functioning properly, continue with the adjustment procedure.
- - - - - - - - - - - - - - - - - - - - - - - - - - - - - - - - - - - - - - - -
Idle Air Control Cleaning
You can remove the IAC and service it. Remove the electrical connector from the IAC. Unscrew the IAC unit from the throttle body.
You can gently rock the pintle back and forth and allow the spring to extend it until it comes apart in your hands. Clean everything with lint-free cloths and a mild solvent. Harsh solvents can affect the insulation of the stepper motor coils. It's generally the dirt and buildup on this worm shaft that causes sluggish IAC operation.
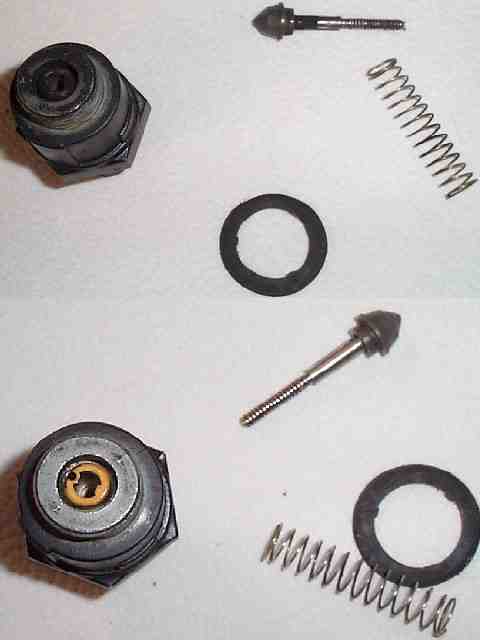
Measure the free length of the spring, and stretch it carefully if necessary to make the free length at least 2�". Very frequently they have taken a set from being compressed.
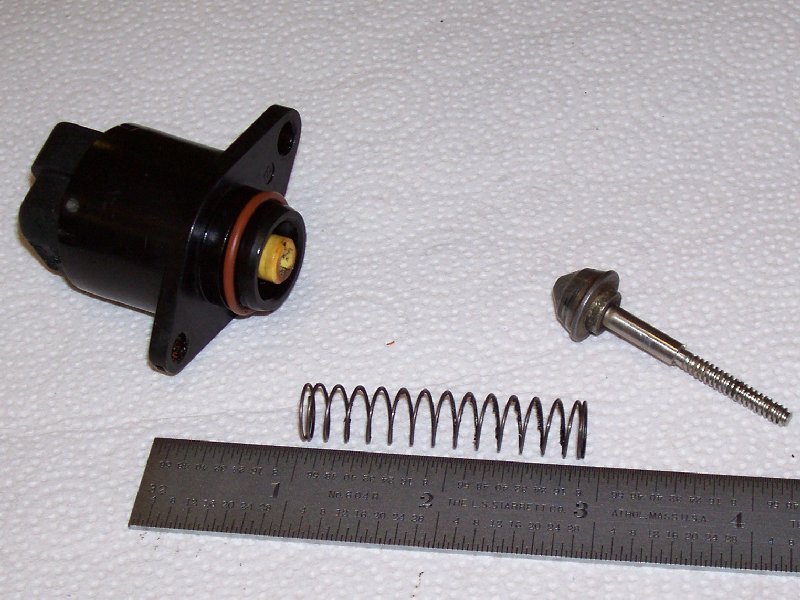
When the worm gear on the pintle shaft is clean and dry, apply one big drop of clean light oil to the shaft. Assemble the parts in proper order, start the pintle shaft into the stepper motor in the correct orientation (paying attention to the keyways), and work the pintle back into the rack gears of the motor by the same rocking motion. It takes a while to get the pintle back into the worm gears, but you'll get it. It is important to get the pintle fully retracted into the housing so that the pintle is not forced against the gears when reinstalling the IAC unit in the throttle body.
While the IAC is out, clean the air passages in the throttle body. The orifice in the TB where the IAC resides is the seat which the IAC valve pintle closes against, and it can accumulate a lot of carbon, dirt, and debris. The easy way to do this is with carburetor cleaner and a small stiff brush.
When everything is clean and dry, replace the gasket if it is damaged, apply a little anti-seize to the threads, and torque the IAC to the proper specs. (13 ft/lb for '85-'89 , 30 in/lb for 1990-on.) Proceed with setting the TPS and minimum air position.
- - - - - - - - - - - - - - - - - - - - - - - - - - - - - - - - - - - - - - - -
Locate the Assembly Line Diagnostic Link connector under your dash panel. Remove the cover if it is still there.
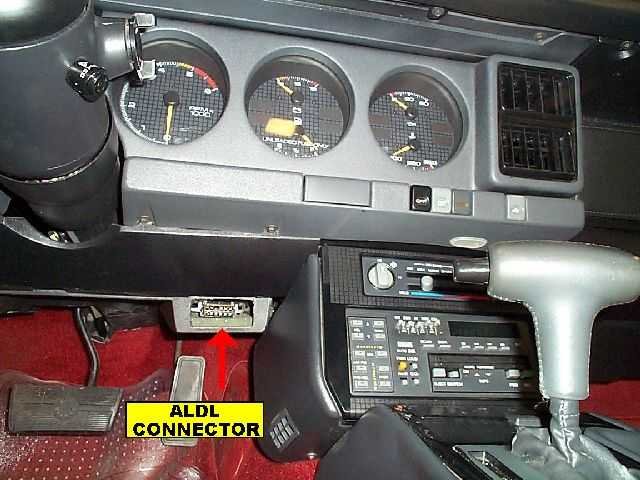
Cut and form a paper clip into a "U" shape. Insert the clip ends into the ALDL in the 'A' and 'B' sockets.
Turn on the ignition, but DO NOT start the engine. This will force the ECM into its diagnostic mode. Wait 30 seconds to allow the IAC pintle to fully extend. With the ignition still on, go under the hood, remove the electrical connector from the IAC, then turn off the ignition and remove the paper clip jumper from the ALDL. With the IAC pintle fully extended (closed) all idle air will be controlled by the position of the throttle plates. Some manuals indicate that the EST bypass connector should be disconnected for this procedure, while some make no mention of it. While timing is a factor in idle speed, the EST should only operate as a function of engine RPM, temperature, and detonation sensor inputs. To remove all doubt, disconnect the EST bypass connector is your car is so equipped. Some TBI and V-6 engines do not have this bypass connector, and therefore must be set with no regard to the EST system. The EST can be bypassed on some cars by grounding the diagnostic terminal at the ALDL and continuing with the procedure, but the fuel mixture will be skewed to the rich side, affecting idle speed as well. In any event, the minimum air position idle speed range is wide enough to allow for some variations. As always, it is best to consult your service manual for the exact procedure for your system.
Locate the Torx screw on the left side of the throttle body. It may be equipped with a protective metal cap from the factory. This was intended to discourage adjustment. If the cap is present, use a small punch to knock it out. Once the screw is accessible, start the engine and place the transmission in DRIVE. Adjust the throttle stop to obtain 400-450 RPM with the transmission in "DRIVE" on an automatic transmission car, 450-550 in neutral on a manual transmission car, rotating the Torx screw clockwise to raise speed and counter-clockwise to lower speed. Once the idle RPM is set, place the transmission in PARK and turn off the engine.
Re-connect the electrical connector onto the IAC. Start engine. Idle speed should be governed by the ECM at approximately 600-650 rpm in "DRIVE" (for unmodified cars). Idle speed in NEUTRAL or PARK is less significant, and will be higher.
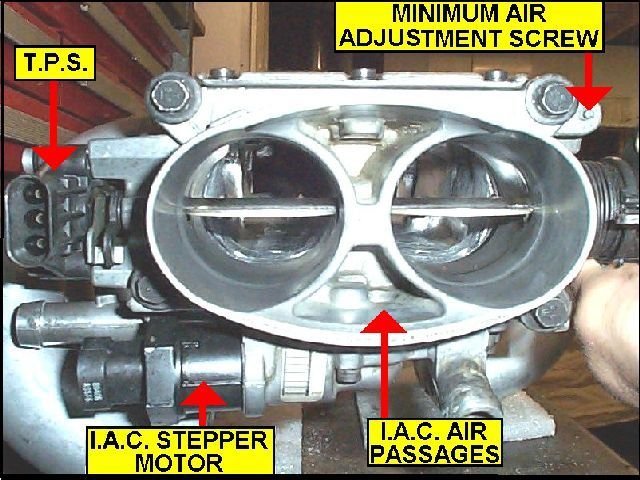
Throttle Position Sensor (TPS)
Tools needed:
1. Digital Volt-Ohm-Meter (VOM)
2. Breakout jumper wires or probes (make your own)
3. AutoXray, Snap On, Tech II, or similar scanner will replace the VOM and jumper wires.
Turn on ignition, but don't start the engine.
With a diagnostic scanner: plug in the scanner and read the TPS voltage. It should be 0.54Volts +/- 0.07 VDC.
Connect the VOM to the TPS electrical connector terminals ‘A' and ‘B'.
With a breakout jumper: Disconnect the electrical connector from the TPS. Install the breakout in-line, between the TPS and wiring harness connector. Connect the meter probes to terminals 'A' and 'B' on the connector. (‘B' is the positive connection, ‘A' the signal ground, or negative.)
With probes: If you have very slender probes on your VOM, you can back-probe the TPS connector while it is attached to the TPS. If you have made probes of large dressmakers pins or a similar item, you can back-probe the connector as well. Connect the meter probes to terminals 'A' and 'B' on the connector.
Turn on the ignition to read the TPS output voltage at the idle position. The reading should be 0.54VDC +/- 0.07VDC. The ideal is the center of the range, 0.54VDC for a stock engine. To adjust the output voltage, loosen the two Torx screws holding the TPS to the throttle body, and slightly rotate the TPS up or down, reading the voltage until it comes into specification. Tighten screws. Using the throttle lever, rotate the throttle to WOT (wide open throttle). The TPS voltage should be over 4.0 volts. Close the throttle again, and then slowly open it to WOT, observing the voltage reading. It should increase progressively and in a linear fashion. If it sticks or jumps or falls off at all while doing this check, the TPS sensor may be failing and could be a cause of stumbling and driveability problems.
After achieving the desired setting, turn off the ignition switch. Remove all jumpers or the scanner and reconnect the TPS connector as required.
Reinitializing the ECM
If you set a DTC during the procedure, the SES light should be illuminated on the dash. This ECM retains DTC data for the previous 50 engine starts, so the codes will eventually be cleared. If you want more immediate results, after shutting down the engine disconnect the negative battery terminal for five minutes. This will clear the ECM of all diagnostic trouble codes. Clearing the ECM also clears any data learned about your engine, and clears the radio presets. If you have a Delco-Loc or Theft Loc II radio, make sure you follow the procedure to unlock the radio protection before disconnecting the battery. This five minutes is also just about long enough to clean both battery cables. Reconnect the battery. When you first start the engine after clearing the ECM, the engine will operate with base parameters programmed into the ECM PROM. These parameters may not be optimum for your engine, but the ECM will enter a Block Learn Mode soon after the engine is warm and enters Closed Loop Mode. The ECM will write new data tables specific to your engine and will eventually rely on those tables instead of the base tables of the factory program. You can expedite this process by driving the car for 20 minutes under varying conditions to allow the ECM to initialize. Or you can wait and drive the car normally at your convenience. The BLM tables are constantly being updated as sensor input ranges change, but the greatest change will occur within the first twenty minutes of Closed Loop operation.
Throttle Minimum Air Position
Tools needed:
1. Torx driver # T-20
2. Paper Clip
3. Small Punch
4. Tachometer
GENERAL NOTE: The engine should be at normal operating temperature before performing any adjustments. Never rely on the dash mounted instruments for diagnostics and adjustments. The oil pressure and temperature gauges and the voltmeter and tachometer just aren't calibrated accurately enough for diagnosis, but are a relative indication for monitoring the vehicle while driving.
For this adjustment, the transmission will be in DRIVE while you're under the hood. You will need to securely set the parking brake and block the drive wheels. It would also be a good idea to have an assistant hold the service brakes while you perform the adjustments.
In order to successfully complete the adjustment, the IAC air passages and pintle need to be clean. The throttle plates and bores need to be clean as well. If this is not the case, you'll need to remove the air cleaner from TBI engines or the intake air bellows from TPI engines to gain access to the area to be cleaned. A spray-type carburetor cleaner works well for this. Cleaning the IAC passages on a TPI/MAF engine will set a DTC, but we'll be clearing that later. With the engine idling, direct the spray cleaner into the IAC air passages and around the throttle plates. Shut off the engine and continue cleaning the throttle plates by opening the throttle manually. Once everything is satisfactorily cleaned, replace the air bellows on TPI engines. Many times, this alone can solve IAC/idle speed problems.
If this doesn't solve the problem, you may need to remove and clean the IAC stepper motor. If the IAC appears to be clean and functioning properly, continue with the adjustment procedure.
- - - - - - - - - - - - - - - - - - - - - - - - - - - - - - - - - - - - - - - -
Idle Air Control Cleaning
You can remove the IAC and service it. Remove the electrical connector from the IAC. Unscrew the IAC unit from the throttle body.
You can gently rock the pintle back and forth and allow the spring to extend it until it comes apart in your hands. Clean everything with lint-free cloths and a mild solvent. Harsh solvents can affect the insulation of the stepper motor coils. It's generally the dirt and buildup on this worm shaft that causes sluggish IAC operation.
Measure the free length of the spring, and stretch it carefully if necessary to make the free length at least 2�". Very frequently they have taken a set from being compressed.
When the worm gear on the pintle shaft is clean and dry, apply one big drop of clean light oil to the shaft. Assemble the parts in proper order, start the pintle shaft into the stepper motor in the correct orientation (paying attention to the keyways), and work the pintle back into the rack gears of the motor by the same rocking motion. It takes a while to get the pintle back into the worm gears, but you'll get it. It is important to get the pintle fully retracted into the housing so that the pintle is not forced against the gears when reinstalling the IAC unit in the throttle body.
While the IAC is out, clean the air passages in the throttle body. The orifice in the TB where the IAC resides is the seat which the IAC valve pintle closes against, and it can accumulate a lot of carbon, dirt, and debris. The easy way to do this is with carburetor cleaner and a small stiff brush.
When everything is clean and dry, replace the gasket if it is damaged, apply a little anti-seize to the threads, and torque the IAC to the proper specs. (13 ft/lb for '85-'89 , 30 in/lb for 1990-on.) Proceed with setting the TPS and minimum air position.
- - - - - - - - - - - - - - - - - - - - - - - - - - - - - - - - - - - - - - - -
Locate the Assembly Line Diagnostic Link connector under your dash panel. Remove the cover if it is still there.
Cut and form a paper clip into a "U" shape. Insert the clip ends into the ALDL in the 'A' and 'B' sockets.
Turn on the ignition, but DO NOT start the engine. This will force the ECM into its diagnostic mode. Wait 30 seconds to allow the IAC pintle to fully extend. With the ignition still on, go under the hood, remove the electrical connector from the IAC, then turn off the ignition and remove the paper clip jumper from the ALDL. With the IAC pintle fully extended (closed) all idle air will be controlled by the position of the throttle plates. Some manuals indicate that the EST bypass connector should be disconnected for this procedure, while some make no mention of it. While timing is a factor in idle speed, the EST should only operate as a function of engine RPM, temperature, and detonation sensor inputs. To remove all doubt, disconnect the EST bypass connector is your car is so equipped. Some TBI and V-6 engines do not have this bypass connector, and therefore must be set with no regard to the EST system. The EST can be bypassed on some cars by grounding the diagnostic terminal at the ALDL and continuing with the procedure, but the fuel mixture will be skewed to the rich side, affecting idle speed as well. In any event, the minimum air position idle speed range is wide enough to allow for some variations. As always, it is best to consult your service manual for the exact procedure for your system.
Locate the Torx screw on the left side of the throttle body. It may be equipped with a protective metal cap from the factory. This was intended to discourage adjustment. If the cap is present, use a small punch to knock it out. Once the screw is accessible, start the engine and place the transmission in DRIVE. Adjust the throttle stop to obtain 400-450 RPM with the transmission in "DRIVE" on an automatic transmission car, 450-550 in neutral on a manual transmission car, rotating the Torx screw clockwise to raise speed and counter-clockwise to lower speed. Once the idle RPM is set, place the transmission in PARK and turn off the engine.
Re-connect the electrical connector onto the IAC. Start engine. Idle speed should be governed by the ECM at approximately 600-650 rpm in "DRIVE" (for unmodified cars). Idle speed in NEUTRAL or PARK is less significant, and will be higher.
Throttle Position Sensor (TPS)
Tools needed:
1. Digital Volt-Ohm-Meter (VOM)
2. Breakout jumper wires or probes (make your own)
3. AutoXray, Snap On, Tech II, or similar scanner will replace the VOM and jumper wires.
Turn on ignition, but don't start the engine.
With a diagnostic scanner: plug in the scanner and read the TPS voltage. It should be 0.54Volts +/- 0.07 VDC.
Connect the VOM to the TPS electrical connector terminals ‘A' and ‘B'.
With a breakout jumper: Disconnect the electrical connector from the TPS. Install the breakout in-line, between the TPS and wiring harness connector. Connect the meter probes to terminals 'A' and 'B' on the connector. (‘B' is the positive connection, ‘A' the signal ground, or negative.)
With probes: If you have very slender probes on your VOM, you can back-probe the TPS connector while it is attached to the TPS. If you have made probes of large dressmakers pins or a similar item, you can back-probe the connector as well. Connect the meter probes to terminals 'A' and 'B' on the connector.
Turn on the ignition to read the TPS output voltage at the idle position. The reading should be 0.54VDC +/- 0.07VDC. The ideal is the center of the range, 0.54VDC for a stock engine. To adjust the output voltage, loosen the two Torx screws holding the TPS to the throttle body, and slightly rotate the TPS up or down, reading the voltage until it comes into specification. Tighten screws. Using the throttle lever, rotate the throttle to WOT (wide open throttle). The TPS voltage should be over 4.0 volts. Close the throttle again, and then slowly open it to WOT, observing the voltage reading. It should increase progressively and in a linear fashion. If it sticks or jumps or falls off at all while doing this check, the TPS sensor may be failing and could be a cause of stumbling and driveability problems.
After achieving the desired setting, turn off the ignition switch. Remove all jumpers or the scanner and reconnect the TPS connector as required.
Reinitializing the ECM
If you set a DTC during the procedure, the SES light should be illuminated on the dash. This ECM retains DTC data for the previous 50 engine starts, so the codes will eventually be cleared. If you want more immediate results, after shutting down the engine disconnect the negative battery terminal for five minutes. This will clear the ECM of all diagnostic trouble codes. Clearing the ECM also clears any data learned about your engine, and clears the radio presets. If you have a Delco-Loc or Theft Loc II radio, make sure you follow the procedure to unlock the radio protection before disconnecting the battery. This five minutes is also just about long enough to clean both battery cables. Reconnect the battery. When you first start the engine after clearing the ECM, the engine will operate with base parameters programmed into the ECM PROM. These parameters may not be optimum for your engine, but the ECM will enter a Block Learn Mode soon after the engine is warm and enters Closed Loop Mode. The ECM will write new data tables specific to your engine and will eventually rely on those tables instead of the base tables of the factory program. You can expedite this process by driving the car for 20 minutes under varying conditions to allow the ECM to initialize. Or you can wait and drive the car normally at your convenience. The BLM tables are constantly being updated as sensor input ranges change, but the greatest change will occur within the first twenty minutes of Closed Loop operation.
04-02-2018, 11:09 PM
#5
Junior Member
Thread Starter
Join Date: May 2004
Location: Phoenix, AZ
Posts: 19
Likes: 0
Received 0 Likes
on
0 Posts
Re: Sorting out 305 TPI
I will go back through this as mine was done with a little less detail. I pulled and cleaned the IAC but didn�t really clean the throttle plates or run cleaner through the intake. My idle holds well but I�ve had other cars with more miles where a throttle body cleaning did wonders.
Still not sure what to make of the lack of scan tool connection.
Still not sure what to make of the lack of scan tool connection.
04-03-2018, 06:00 AM
#6
Re: Sorting out 305 TPI
The scan tool connectivity may be an "Actron" thing. It also may be a connection. Does the tool power up?
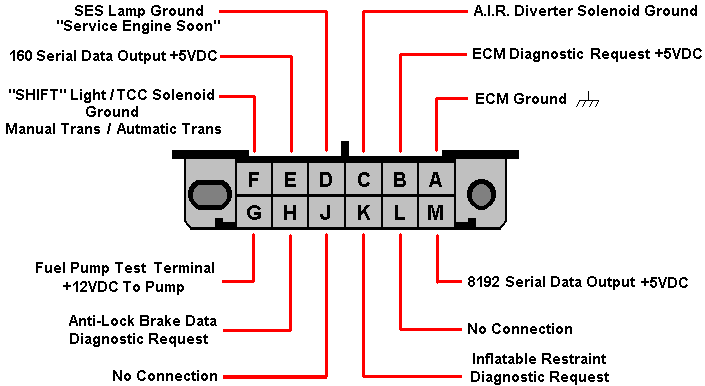
Are there generic breakout boxes or connectors for the tool? If so, connect the ground and data lines to the A, B, E, and M terminals as shown above. The tool must present a 10KΩ resistance across the A and B terminals to invoke the Diagnostic Data Request/ALDL Mode. This sends a request for serial data string to be sent from the ECM via the E terminal at 160 baud. If handshaking occurs within X seconds or after the first data string is send, the ECM switches to 8192 baud at the M terminal and will remain in the data request/serial data string mode until the ignition is turned off. It works just fine with the MT-2500, and a Tech II, both with the GM ALDL adapters.
Are there generic breakout boxes or connectors for the tool? If so, connect the ground and data lines to the A, B, E, and M terminals as shown above. The tool must present a 10KΩ resistance across the A and B terminals to invoke the Diagnostic Data Request/ALDL Mode. This sends a request for serial data string to be sent from the ECM via the E terminal at 160 baud. If handshaking occurs within X seconds or after the first data string is send, the ECM switches to 8192 baud at the M terminal and will remain in the data request/serial data string mode until the ignition is turned off. It works just fine with the MT-2500, and a Tech II, both with the GM ALDL adapters.
04-03-2018, 06:11 AM
#7
Re: Sorting out 305 TPI
Looking at some user reviews of the Actron scanner, you may not be the first one to realize this. From Amazon:
3.0 out of 5 starsDoes not work correctly on my OBD1 vehicle
ByGerry Conwayon July 28, 2016
For OBD2 it works well, It has a problem with GM OBD1 (early models 88,89 and 90 tested.) The unit will drive the idle RPM up around 1000 RPM as soon as you request it to read PID live data. Idle RPM will not return to normal until scanner disconnected and vehicle restarted. Obviously, the scanner is most critical at idle, so in effect, useless in my environment. Actron Tech support said the problem was with my vehicle, so I arraigned to test it on 3 other C1500 trucks with the same engine, and it had the problem on all of them.
I returned and purchased the Actron CP9690 at the suggestion of the Manufacturer, but it had the same problem. I had an old CP9110 (from actron / auto xray) that worked fine until the scanner died. The unit DOES read computer codes without the issue, it just can't display the live data without causing an RPM jump.
I didn't give it a lower rating because it would not be fair to judge it on the earliest OBD1 vehicles.
- - - - - - - - - - - - - - - - - - - - - - - - - - - - - - - - - - - - - - - - - - - - - - - - -
Another one:
Lots of bugs that need fixing, but don't hold your breath
ByTiggeron June 12, 2012
Verified Purchase
I bought this after returning an Innova that was terrible. It's better and I'm going to keep it, but it still has a lot of its own problems- mostly on OBD-I. It won't connect to my 1989 Camaro. I found other people at Thirdgen.org that were having the same problem who figured out if you set it to a 1986 model it will connect. However, it then puts the car in ALDL diagnostic mode, fixing the RPM's at 1000's and fixing spark advance. This makes the numbers you are going to get very skewed. It also seems to be missing decimal points on some of the data, so the numbers makes no sense initially. I tested it with my multi-meter and found that it is putting 10K ohm's across the A and B terminals, which is correct to connect with the car, but it should then be stopped. It stays at 10K ohms, which incorrectly locks the car in ALDL mode.
I called the company and pointed out these problems. They were friendly enough, but seemed to have no intention of fixing it. There are members at Thirdgen.org who pointed these problems out to them in 2009 and it's still not fixed. In fact, the latest software update for this tool is is from back in 2007?!? Weird, since this is still supposed to be their latest, top-of-the-line scanner. The latest model year listed in it's menus is 2006. Their latest 'Scanner Suite 3.0' just says there's an error when I open the installer. Looks like I'm not the only one with that problem.
It generally works in OBD-II mode, but my 2007.5 Duramax truck for example, only shows limited live data. It does not show oil pressure, while I know this is outputted through the OBD-II port because I have seen other scan-tools display it.
The real problem is that all of the scan tools in this moderate price range seem to have numerous flaws, this one being the least of all the evils. If this didn't have all these glitches it would be 4 stars. I will get by on this for a while and eventually buy cables and software to make a laptop-based scan tool.
Trending Topics
04-03-2018, 12:53 PM
#9
Supreme Member
iTrader: (7)

Join Date: May 2004
Location: Lexington, SC
Posts: 5,297
Likes: 0
Received 59 Likes
on
53 Posts
Car: 1987 SC/1985 TA
Engine: 350/vortec/fitech
Transmission: T56
Axle/Gears: 3.27 9-bolt
Re: Sorting out 305 TPI
for my 85 and 87 LG4 the autoxray scanner connection would disable spark knock/retard and not display this live data. essentially the same behavior with the ECM in diagnostic mode. any rpm jump for those systems was slight though.
04-03-2018, 02:05 PM
#10
Junior Member
Thread Starter
Join Date: May 2004
Location: Phoenix, AZ
Posts: 19
Likes: 0
Received 0 Likes
on
0 Posts
Re: Sorting out 305 TPI
I�ll order a different scanner and see where I can get. Would help a lot in understanding what is going on. Driving blind now. Thank you for the suggestions, I�ll let you know how it goes.
04-03-2018, 06:48 PM
#11
Supreme Member
iTrader: (7)
Join Date: May 2004
Location: Lexington, SC
Posts: 5,297
Likes: 0
Received 59 Likes
on
53 Posts
Car: 1987 SC/1985 TA
Engine: 350/vortec/fitech
Transmission: T56
Axle/Gears: 3.27 9-bolt
Re: Sorting out 305 TPI
my fear is that you'll discover that it's a car issue and not a scanner issue
04-03-2018, 08:18 PM
#12
Junior Member
Thread Starter
Join Date: May 2004
Location: Phoenix, AZ
Posts: 19
Likes: 0
Received 0 Likes
on
0 Posts
Re: Sorting out 305 TPI
Thank you for the link.


 04-07-2018, 04:08 PM
#14
Junior Member
Thread Starter
Join Date: May 2004
Location: Phoenix, AZ
Posts: 19
Likes: 0
Received 0 Likes
on
0 Posts
Re: Sorting out 305 TPI
These were the readings as I had the Scan Tool running a few minutes ago.
As some have noted on Actrons before, connecting it makes the RPM idle high above 1000. This seems to have an affect on the BLM as giving it any gas immediately settles the reading to around 128. Letting it idle has the count slowly rise to the mid-140s.
The other thing that seemed odd to me is the temperature went from cold to above 240 in a very short period of time. I noticed within the first couple minutes the fan kicked on and it only ran about five minutes before it was reading as pictured above. The engine certainly didn't seem to be giving off that much heat and when I used a heat gun around cooling lines and the engine block I wasn't getting much more than 100-125 degrees anywhere. I have replaced the temperate sensor at the front of the block before, is there something else that would be giving a false high reading? What performance effects would this have?
04-08-2018, 10:24 AM
#15
Re: Sorting out 305 TPI
Is the cooling system full, and with no air pockets? That could explain the unexpected high CTS numbers.
The O� seems to be happy.
The high/lean idle with an inactive ESC could explain the BLM showing a lean idle.
Just for curiosity, what is the current running fuel pressure? Is your FRP adjustable?
The O� seems to be happy.
The high/lean idle with an inactive ESC could explain the BLM showing a lean idle.
Just for curiosity, what is the current running fuel pressure? Is your FRP adjustable?
04-08-2018, 12:25 PM
#16
Junior Member
Thread Starter
Join Date: May 2004
Location: Phoenix, AZ
Posts: 19
Likes: 0
Received 0 Likes
on
0 Posts
Re: Sorting out 305 TPI
Don�t know yet on cooling other than surge tank is properly full. I�m already planning to empty the old water, replace thermostat which is thirty years old and refill. Do knock sensors go in these cars often? Would be an easy time to do that too.
04-08-2018, 05:02 PM
#18
Junior Member
Thread Starter
Join Date: May 2004
Location: Phoenix, AZ
Posts: 19
Likes: 0
Received 0 Likes
on
0 Posts
Re: Sorting out 305 TPI
Is the cooling system full, and with no air pockets? That could explain the unexpected high CTS numbers.
The O� seems to be happy.
The high/lean idle with an inactive ESC could explain the BLM showing a lean idle.
Just for curiosity, what is the current running fuel pressure? Is your FRP adjustable?
The O� seems to be happy.
The high/lean idle with an inactive ESC could explain the BLM showing a lean idle.
Just for curiosity, what is the current running fuel pressure? Is your FRP adjustable?
04-15-2018, 05:30 PM
#20
Junior Member
Thread Starter
Join Date: May 2004
Location: Phoenix, AZ
Posts: 19
Likes: 0
Received 0 Likes
on
0 Posts
Re: Sorting out 305 TPI
Flushed coolant system. Replaced both fan sensor and the temperature sensor up under the throttle body just in case the new one was not good. Still reads 242 degrees fairly quickly.
Backed the car out to take it for a drive, got out of driveway, about to put into Drive and it stalled. Code reader said 042. This thing is killing me....
Backed the car out to take it for a drive, got out of driveway, about to put into Drive and it stalled. Code reader said 042. This thing is killing me....
04-16-2018, 09:27 PM
#22
Junior Member
Thread Starter
Join Date: May 2004
Location: Phoenix, AZ
Posts: 19
Likes: 0
Received 0 Likes
on
0 Posts
Re: Sorting out 305 TPI
Tuned Performance - Thank you for the diagnostic chart.
I started working through it last night but wasn't real comfortable without a test light in confirming answers beyond the first one. I have access to a new ECM so switched it out and the car runs much better. I don't know 100% if that is the entire problem, or if a short or issue will show itself in time with the new computer but it was at least part of the issue.
I'll post the newest datastream below. The only thing after letting it run to temperature in the garage and then driving it for about ten minutes is the BLM count is in the mid- to high-140s. Not sure if that will continue to adjust with time. I don't have much experience with what the numbers mean but am under the impression I'd like to see 128-low-130s.


 04-16-2018, 10:36 PM
#26
Junior Member
Thread Starter
Join Date: May 2004
Location: Phoenix, AZ
Posts: 19
Likes: 0
Received 0 Likes
on
0 Posts
Re: Sorting out 305 TPI
Are the BLM numbers the only thing telling you that or one/some of the other data points?
The O2 sensor kept toggling back and forth between lean and rich so seemed to be adjusting but was obviously reading a lean state the second I took this picture.
The O2 sensor kept toggling back and forth between lean and rich so seemed to be adjusting but was obviously reading a lean state the second I took this picture.
04-17-2018, 03:41 PM
#27
Junior Member
Thread Starter
Join Date: May 2004
Location: Phoenix, AZ
Posts: 19
Likes: 0
Received 0 Likes
on
0 Posts
Re: Sorting out 305 TPI
Vader, is the simple way to adjust the Lean reading I am seeing, without getting into the PROM settings, to get an adjustable fuel regulator and add PSI? If 38 at idle is normal, is there a range that I need to stay within and is it likely I can add PSI, stay within that range and still see BLMs drop closer to 128?
Feel like I am getting closer as it runs noticeably better but I'd still like to prevent any problems or performance issues by running toward one end of the tables.
Feel like I am getting closer as it runs noticeably better but I'd still like to prevent any problems or performance issues by running toward one end of the tables.

Thread
Thread Starter
Forum
Replies
Last Post