
Tricks for bearing cap removal

 04-28-2007, 08:48 PM
#3
Supreme Member


Re: Tricks for bearing cap removal
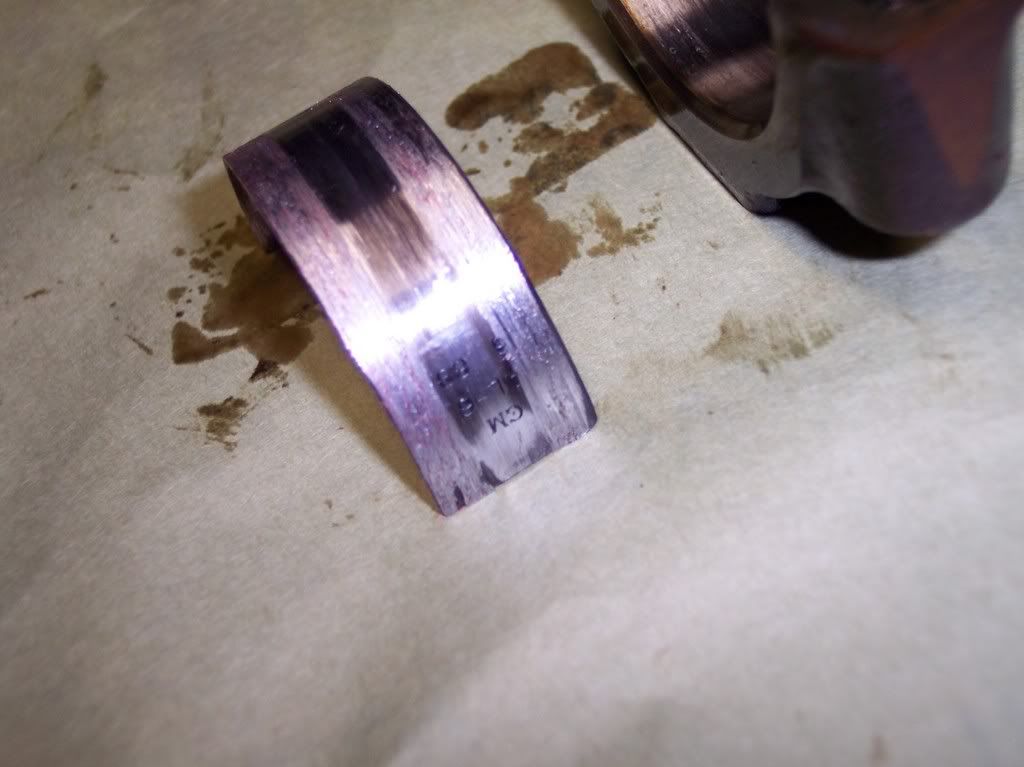
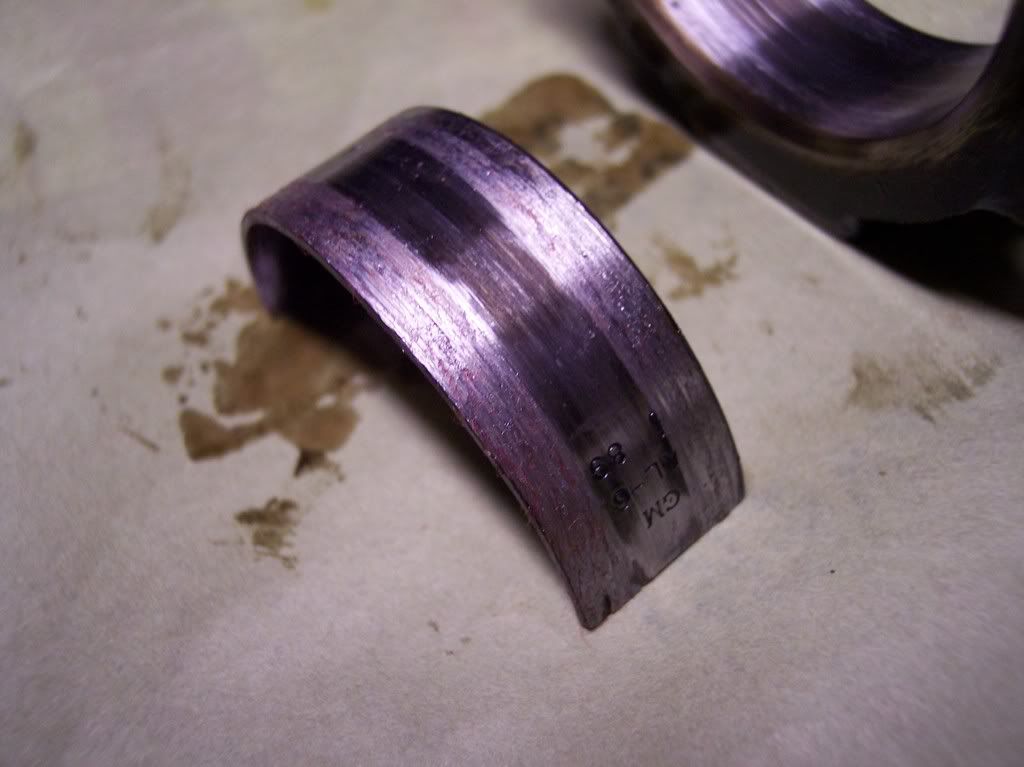
That bearing done been spun in the rod, my friend! Doesn't matter how you get them out, the rod has to be resized anyway, so who cares if you drive the rod bolt out?
Long story short... doesn't look good!
Long story short... doesn't look good!
04-28-2007, 09:04 PM
#4
Supreme Member
iTrader: (3)
Join Date: Dec 2005
Location: Sayreville NJ
Posts: 2,472
Likes: 0
Received 0 Likes
on
0 Posts
Re: Tricks for bearing cap removal
ouch holy **** man,how did u do that????
yeah time for the heads to come off, and the shortblock to come apart.
edit
how much oil was leakign when u tried to weld in that drain fitting for the turbo???
i didnt think it was leaking enough for u to lose enough oil to starve the bearings
----------
what does the crankshaft look like?
yeah time for the heads to come off, and the shortblock to come apart.
edit
how much oil was leakign when u tried to weld in that drain fitting for the turbo???
i didnt think it was leaking enough for u to lose enough oil to starve the bearings
----------
what does the crankshaft look like?
Last edited by daves12secV6; 04-28-2007 at 09:08 PM. Reason: Automerged Doublepost
04-28-2007, 09:28 PM
#6
Re: Tricks for bearing cap removal
ouch holy **** man,how did u do that????
yeah time for the heads to come off, and the shortblock to come apart.
edit
how much oil was leakign when u tried to weld in that drain fitting for the turbo???
i didnt think it was leaking enough for u to lose enough oil to starve the bearings
----------
what does the crankshaft look like?
yeah time for the heads to come off, and the shortblock to come apart.
edit
how much oil was leakign when u tried to weld in that drain fitting for the turbo???
i didnt think it was leaking enough for u to lose enough oil to starve the bearings
----------
what does the crankshaft look like?
When I first started the car, I looked under it and shut it off when I saw the oil comming out. Welded some more and started it again, that's when I heard the knock and shut down. Welded some more, added oil and the knock went away, so I thought I was cool (oil was down to a drip).
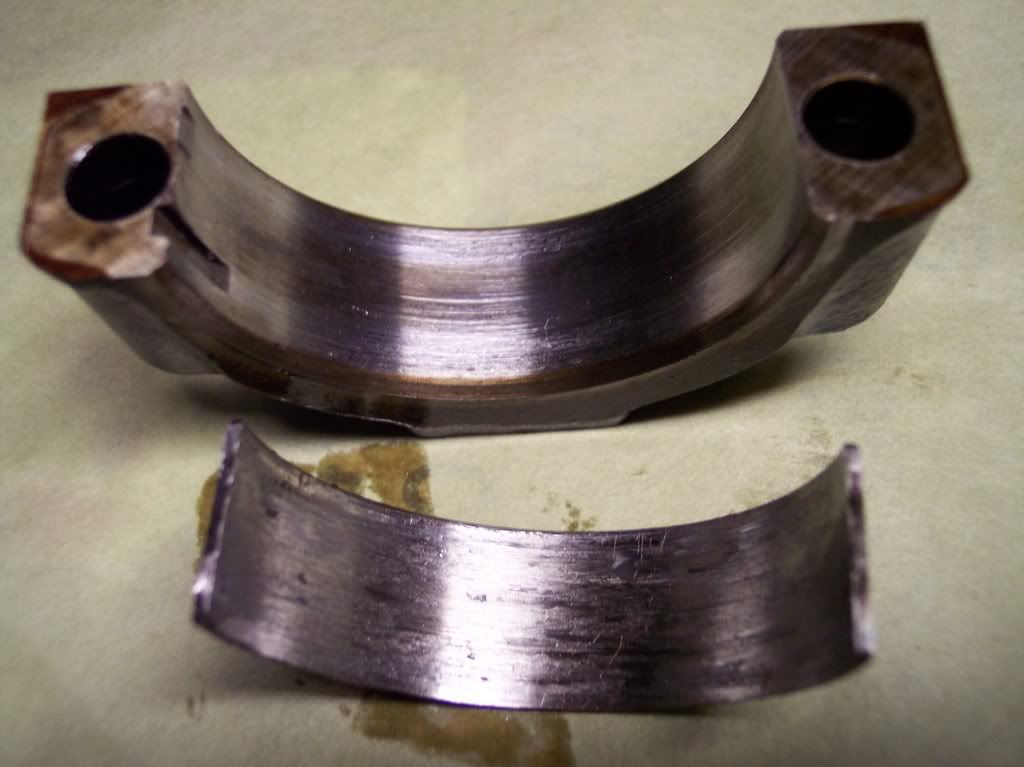
Crank looks the same *sigh*
Apparently I must have been low on oil to begin with, it doesn't leak and it was full when I parked it. This also may have been the result of the overheat when I was at the track about a month ago and lost my pump just as I pulled into the staging and ran anyways. I then filled it with coolant after it cooled and went to drive home and it heated again, so I called AAA. I think a combination is what caused this.
Guess that picker is going to be purchased sooner than thought, humph!
04-28-2007, 09:35 PM
#7
Re: Tricks for bearing cap removal
 weird, huh? I guess it didn't matter if the bolt got driven out, just one less headache as the motor is still in the car.
If the rod bearings look like this, do you think I'll need to have the block bored, or might I get away with crank/rod rebuild? Guess I'm going to need to look at the mains first to see.
Last edited by firstfirebird; 04-28-2007 at 09:38 PM.
Trending Topics
04-28-2007, 09:53 PM
#8
Supreme Member
Join Date: Aug 2005
Location: Yellowknife, NWT, Canada
Posts: 3,004
Likes: 0
Received 2 Likes
on
2 Posts
Car: 84 Z28
Engine: 357
Transmission: TH-350C
Axle/Gears: 3.43
Re: Tricks for bearing cap removal
What happens on the rod bearing has no effect on the wear the piston induces on the cylinder wall 
The block itself should be fine, unless it has had prior damage.
Definately want to find another rod and either get the crank cleaned up or find a new one.
The block itself should be fine, unless it has had prior damage.
Definately want to find another rod and either get the crank cleaned up or find a new one.
04-28-2007, 09:53 PM
#9
Supreme Member
Join Date: Jul 2005
Location: Arab, Alabama
Posts: 1,675
Likes: 0
Received 3 Likes
on
3 Posts
Car: 1988 Trans Am GTA
Engine: 350 4BBL
Transmission: 700R4
Axle/Gears: 3.27
Re: Tricks for bearing cap removal
Umm, how many pounds of boost were you running? (just for the rest of the folks that don't know it's boosted)
04-28-2007, 10:02 PM
#10
Re: Tricks for bearing cap removal
Umm, how many pounds of boost were you running? (just for the rest of the folks that don't know it's boosted)
During the overheat, it was in stock form. As I was saying in post #6, the oil issue was the first start under boost, actually not technically because after the oil was down to a drip and toped off, I revved it a couple of times and saw 0psi (knock was gone).
This is my fault, the engine was in perfect condition when I broke the "if it ain't broke don't fix it" rule, lol. But it is just a project for me, not my driver.
I'll just have to make sure the mains are ok and I will rebuild the bottom form under the car since I'm already in position to do so (just have to get the heads off).
04-28-2007, 10:38 PM
#11
Supreme Member
iTrader: (3)
Join Date: Dec 2005
Location: Sayreville NJ
Posts: 2,472
Likes: 0
Received 0 Likes
on
0 Posts
Re: Tricks for bearing cap removal
well the crank has to come out regardless to be cut and polished.
throw the shortblock away.go get a 3.4 from the bone yard,give it the once over replace anything as needed and drop it in.
all in all u know ur prolly gonna blow another motor while u keep upping the boost and trying to tune the ms.
ur best bet is gonna be a jy shortblock for now,then once u get the tunning down build the aluminum head hybrid motor.
lol ive taken out a few shortblocks myself when i first started witht he turbo cause i kept turning up the boost and didnt have it tuned right
04-28-2007, 11:04 PM
#12
Supreme Member
iTrader: (2)

Join Date: Jan 2002
Location: Moorestown, NJ
Posts: 9,962
Likes: 0
Received 3 Likes
on
3 Posts
Car: 88 Camaro SC
Engine: SFI'd 350
Transmission: TKO 500
Axle/Gears: 9-bolt w/ 3.23's
Re: Tricks for bearing cap removal
It also kinda looks like those bearings where way overloaded from the fatigue cracks on the surface. If the unspun ones look like that as well, then you may want to unboost it a bit.
04-29-2007, 10:51 AM
#14
Member
iTrader: (1)
Join Date: Jun 2006
Location: Lubbock, Tx
Posts: 423
Likes: 0
Received 0 Likes
on
0 Posts
Car: 1991 Camaro Z28
Engine: L98 5.7 350 TPI
Transmission: Brand New (again) 700r4
Axle/Gears: GM 10 bolt 7.625 W/ TrueTrac 3.23
Re: Tricks for bearing cap removal
Damn john... we have some time.... moroso closes at the end of may.... we just might have to go over to opa locka and race in the 1/8th.... until moroso opens again in september....
04-30-2007, 04:29 PM
#15
Senior Member
iTrader: (2)

Join Date: May 2005
Location: Baltimore, MD
Posts: 841
Likes: 0
Received 0 Likes
on
0 Posts
Car: 09 Cobalt SS Sedan. 92 Z28 vert
Engine: 2.0T EFR6758; 5.0TT T3/T4 8psi
Transmission: F40; 700r4
Axle/Gears: 3.76 LSD; 3.23 posi
Re: Tricks for bearing cap removal
Welcome to the spun bearing right after I fabricated a turbo kit club!
 Was your pan weld leaking too? lol.
04-30-2007, 08:07 PM
Was your pan weld leaking too? lol.
04-30-2007, 08:07 PM
#17
Senior Member
iTrader: (2)
Join Date: May 2005
Location: Baltimore, MD
Posts: 841
Likes: 0
Received 0 Likes
on
0 Posts
Car: 09 Cobalt SS Sedan. 92 Z28 vert
Engine: 2.0T EFR6758; 5.0TT T3/T4 8psi
Transmission: F40; 700r4
Axle/Gears: 3.76 LSD; 3.23 posi
Re: Tricks for bearing cap removal
a small rear main seal leak got big, fast. I'm not exactly sure how the rear main seal is supposed to work, but there was a mess all over the tranny, the oil pan, and up inside the bell housing. A mess that wasn't that bad when I was welding the exhaust.
I only welded the bottom of the pan fitting and used the Permatex brand of JB Quik all the way around. It didn't leak, but the turbo drain flange oozed a little.
I only welded the bottom of the pan fitting and used the Permatex brand of JB Quik all the way around. It didn't leak, but the turbo drain flange oozed a little.
04-30-2007, 09:07 PM
#18
Re: Tricks for bearing cap removal
a small rear main seal leak got big, fast. I'm not exactly sure how the rear main seal is supposed to work, but there was a mess all over the tranny, the oil pan, and up inside the bell housing. A mess that wasn't that bad when I was welding the exhaust.
I only welded the bottom of the pan fitting and used the Permatex brand of JB Quik all the way around. It didn't leak, but the turbo drain flange oozed a little.
I only welded the bottom of the pan fitting and used the Permatex brand of JB Quik all the way around. It didn't leak, but the turbo drain flange oozed a little.
The -4an fittings kept oozing on me, not at the flange, but the actual fitting (I believe it's the -4an to 1/8"npt adapter). Should I have teflon'd the pipe thread?
04-30-2007, 10:59 PM
#19
Supreme Member
iTrader: (2)
Join Date: Jan 2002
Location: Moorestown, NJ
Posts: 9,962
Likes: 0
Received 3 Likes
on
3 Posts
Car: 88 Camaro SC
Engine: SFI'd 350
Transmission: TKO 500
Axle/Gears: 9-bolt w/ 3.23's
Re: Tricks for bearing cap removal
Yes. All NPT threads or bare threads with pressurized liquid behind them need some form of sealing. Good teflon paste is even better. That stuff seals anything.
04-30-2007, 11:04 PM
#20
Senior Member
iTrader: (2)
Join Date: May 2005
Location: Baltimore, MD
Posts: 841
Likes: 0
Received 0 Likes
on
0 Posts
Car: 09 Cobalt SS Sedan. 92 Z28 vert
Engine: 2.0T EFR6758; 5.0TT T3/T4 8psi
Transmission: F40; 700r4
Axle/Gears: 3.76 LSD; 3.23 posi
Re: Tricks for bearing cap removal
I thought I could get away without taping the 1/8" pipe threads. It was dripping as soon as I started the car for the first time. I revved it a little to make sure everything was working and shut it down to put tape on the threads before it got hot. I needed different sealant on the drain flange that bolts to the turbo.
05-01-2007, 06:41 AM
#21
Re: Tricks for bearing cap removal
I thought I could get away without taping the 1/8" pipe threads. It was dripping as soon as I started the car for the first time. I revved it a little to make sure everything was working and shut it down to put tape on the threads before it got hot. I needed different sealant on the drain flange that bolts to the turbo.
May have found a motor, it's a 2.8 but it is strong with low miles since rebuild for $400. The guy is swapping it for a 350 in his s-10.
05-01-2007, 07:18 AM
#22
Senior Member
iTrader: (2)
Join Date: May 2005
Location: Baltimore, MD
Posts: 841
Likes: 0
Received 0 Likes
on
0 Posts
Car: 09 Cobalt SS Sedan. 92 Z28 vert
Engine: 2.0T EFR6758; 5.0TT T3/T4 8psi
Transmission: F40; 700r4
Axle/Gears: 3.76 LSD; 3.23 posi
Re: Tricks for bearing cap removal
I guess since you're gonna use mega squirt, the fact that you'll have to custom tune it isn't any different than the 3.1.
I know every junk yard around my way sell complete engines (intake to oil pan) for $150. If you found a wrecked 4th gen 3.4L your chances of the engine still being good are pretty high.
I know every junk yard around my way sell complete engines (intake to oil pan) for $150. If you found a wrecked 4th gen 3.4L your chances of the engine still being good are pretty high.
05-01-2007, 07:28 PM
#23
Re: Tricks for bearing cap removal
I guess since you're gonna use mega squirt, the fact that you'll have to custom tune it isn't any different than the 3.1.
I know every junk yard around my way sell complete engines (intake to oil pan) for $150. If you found a wrecked 4th gen 3.4L your chances of the engine still being good are pretty high.
I know every junk yard around my way sell complete engines (intake to oil pan) for $150. If you found a wrecked 4th gen 3.4L your chances of the engine still being good are pretty high.
What do you mean by the tune isn't different?
05-01-2007, 07:30 PM
#24
Senior Member
iTrader: (2)
Join Date: May 2005
Location: Baltimore, MD
Posts: 841
Likes: 0
Received 0 Likes
on
0 Posts
Car: 09 Cobalt SS Sedan. 92 Z28 vert
Engine: 2.0T EFR6758; 5.0TT T3/T4 8psi
Transmission: F40; 700r4
Axle/Gears: 3.76 LSD; 3.23 posi
Re: Tricks for bearing cap removal
I mean the fact that you'll have to custom tune it anyway isn't any extra work
----------
I can walk down one row in the junk yard and count at least 5 rwd 60*v6's. The fwd can't be counted.
----------
I can walk down one row in the junk yard and count at least 5 rwd 60*v6's. The fwd can't be counted.
Last edited by ttypecamaro; 05-01-2007 at 07:32 PM. Reason: Automerged Doublepost
05-01-2007, 07:40 PM
#25
Re: Tricks for bearing cap removal
When I lived on the West coast of FL, we had good yards around. Here in the city =P nothing.
05-01-2007, 07:49 PM
#26
Senior Member
iTrader: (2)
Join Date: May 2005
Location: Baltimore, MD
Posts: 841
Likes: 0
Received 0 Likes
on
0 Posts
Car: 09 Cobalt SS Sedan. 92 Z28 vert
Engine: 2.0T EFR6758; 5.0TT T3/T4 8psi
Transmission: F40; 700r4
Axle/Gears: 3.76 LSD; 3.23 posi
Re: Tricks for bearing cap removal
Thats funny 'cause I have to drive INTO the city to get to the better yard. All the prices are exactly the same around here.
If you buy a motor can I buy a "good" rod off of you for my brother's car?
My uncle loaded three 2.8's into a junk car and scrapped them for steel the week before my brother's motor went up.
If you buy a motor can I buy a "good" rod off of you for my brother's car?
My uncle loaded three 2.8's into a junk car and scrapped them for steel the week before my brother's motor went up.
05-01-2007, 08:00 PM
#27
Re: Tricks for bearing cap removal
Thats funny 'cause I have to drive INTO the city to get to the better yard. All the prices are exactly the same around here.
If you buy a motor can I buy a "good" rod off of you for my brother's car?
My uncle loaded three 2.8's into a junk car and scrapped them for steel the week before my brother's motor went up.
If you buy a motor can I buy a "good" rod off of you for my brother's car?
My uncle loaded three 2.8's into a junk car and scrapped them for steel the week before my brother's motor went up.
05-01-2007, 08:06 PM
#28
Senior Member
iTrader: (2)
Join Date: May 2005
Location: Baltimore, MD
Posts: 841
Likes: 0
Received 0 Likes
on
0 Posts
Car: 09 Cobalt SS Sedan. 92 Z28 vert
Engine: 2.0T EFR6758; 5.0TT T3/T4 8psi
Transmission: F40; 700r4
Axle/Gears: 3.76 LSD; 3.23 posi
Re: Tricks for bearing cap removal
he already bought the bearings and a new crank... so all he needs is one rod.
05-01-2007, 08:09 PM
#29
Re: Tricks for bearing cap removal
05-01-2007, 08:37 PM
#30
Supreme Member
iTrader: (3)
Join Date: Dec 2005
Location: Sayreville NJ
Posts: 2,472
Likes: 0
Received 0 Likes
on
0 Posts
Re: Tricks for bearing cap removal
a small rear main seal leak got big, fast. I'm not exactly sure how the rear main seal is supposed to work, but there was a mess all over the tranny, the oil pan, and up inside the bell housing. A mess that wasn't that bad when I was welding the exhaust.
I only welded the bottom of the pan fitting and used the Permatex brand of JB Quik all the way around. It didn't leak, but the turbo drain flange oozed a little.
I only welded the bottom of the pan fitting and used the Permatex brand of JB Quik all the way around. It didn't leak, but the turbo drain flange oozed a little.
05-01-2007, 10:11 PM
#33
Senior Member
iTrader: (2)
Join Date: May 2005
Location: Baltimore, MD
Posts: 841
Likes: 0
Received 0 Likes
on
0 Posts
Car: 09 Cobalt SS Sedan. 92 Z28 vert
Engine: 2.0T EFR6758; 5.0TT T3/T4 8psi
Transmission: F40; 700r4
Axle/Gears: 3.76 LSD; 3.23 posi
Re: Tricks for bearing cap removal
I suspected this very much at the time, but couldn't find a source other than guessing it was the piston rings. I had the breather to atmosphere, which was the best I could do. I thought about the pcv valve, but I can't remember how I ruled that out... maybe i messed up? I had 20W-50 oil in it. The rear main seal leaked bad before. Almost 1 quart per tank of gas, but the last time it leaked 4 quarts in less than a tank.
05-01-2007, 10:27 PM
#34
Re: Tricks for bearing cap removal
I suspected this very much at the time, but couldn't find a source other than guessing it was the piston rings. I had the breather to atmosphere, which was the best I could do. I thought about the pcv valve, but I can't remember how I ruled that out... maybe i messed up? I had 20W-50 oil in it. The rear main seal leaked bad before. Almost 1 quart per tank of gas, but the last time it leaked 4 quarts in less than a tank.
I found a crank, rods, pistons that came out of a running 3.1 for $45 + shipping,
 and the pistons are even still pressed on.
05-01-2007, 10:34 PM
and the pistons are even still pressed on.
05-01-2007, 10:34 PM
#35
Senior Member
iTrader: (2)
Join Date: May 2005
Location: Baltimore, MD
Posts: 841
Likes: 0
Received 0 Likes
on
0 Posts
Car: 09 Cobalt SS Sedan. 92 Z28 vert
Engine: 2.0T EFR6758; 5.0TT T3/T4 8psi
Transmission: F40; 700r4
Axle/Gears: 3.76 LSD; 3.23 posi
Re: Tricks for bearing cap removal
yeah, I have been to that site... I just forgot about it.
edit:
If you picked up that rotating assembly you could slap it all in your motor right?
edit:
If you picked up that rotating assembly you could slap it all in your motor right?
05-01-2007, 10:42 PM
#36
Re: Tricks for bearing cap removal
Dave could tell me if the mains are the same size.
Either way, wht I am getting the assy for is the cost of the core on a reman crank!
05-01-2007, 11:50 PM
#37
Senior Member
iTrader: (1)

Join Date: Sep 2006
Location: Canada
Posts: 962
Likes: 0
Received 13 Likes
on
10 Posts
Car: 1979 Malibu
Engine: Blown LSx
Transmission: T56 Magnum
Axle/Gears: 9"/wavetrac/35's/3.70
Re: Tricks for bearing cap removal
when i helped my friend build his turbo festiva, i just tig welded in a bung and it has leaked yet, jb weld dosnt seem like a good idea to me
05-02-2007, 12:50 PM
#40
Senior Member
iTrader: (1)
Join Date: Sep 2006
Location: Canada
Posts: 962
Likes: 0
Received 13 Likes
on
10 Posts
Car: 1979 Malibu
Engine: Blown LSx
Transmission: T56 Magnum
Axle/Gears: 9"/wavetrac/35's/3.70
Re: Tricks for bearing cap removal
i think flux core is what your problem was, a regular gas mig dosnt create such a poor quaality weld, flux core seems to create a aerated(spelling?) weld
05-03-2007, 06:15 PM
#44
Supreme Member
Join Date: Jul 2005
Location: Arab, Alabama
Posts: 1,675
Likes: 0
Received 3 Likes
on
3 Posts
Car: 1988 Trans Am GTA
Engine: 350 4BBL
Transmission: 700R4
Axle/Gears: 3.27
Re: Tricks for bearing cap removal
Maybe they just melt real well in the smelter...
05-03-2007, 10:39 PM
#45
Supreme Member
iTrader: (2)
Join Date: Jan 2002
Location: Moorestown, NJ
Posts: 9,962
Likes: 0
Received 3 Likes
on
3 Posts
Car: 88 Camaro SC
Engine: SFI'd 350
Transmission: TKO 500
Axle/Gears: 9-bolt w/ 3.23's
Re: Tricks for bearing cap removal
I think the main reason is that its basically like doing a 350 swap in a V6 car. Some V6 owners may not want to go through the hassle of swapping it out, or may want to stick with the 60 degree platform.
----------
I had this issue with a flux core welder as well (cheap *** lincoln electric). Had to double weld it to get the bung to be leak proof.
----------
I had this issue with a flux core welder as well (cheap *** lincoln electric). Had to double weld it to get the bung to be leak proof.
Last edited by dimented24x7; 05-03-2007 at 10:42 PM. Reason: Automerged Doublepost
05-04-2007, 06:32 AM
#46
Re: Tricks for bearing cap removal
I think the main reason is that its basically like doing a 350 swap in a V6 car. Some V6 owners may not want to go through the hassle of swapping it out, or may want to stick with the 60 degree platform.
----------
I had this issue with a flux core welder as well (cheap *** lincoln electric). Had to double weld it to get the bung to be leak proof.
----------
I had this issue with a flux core welder as well (cheap *** lincoln electric). Had to double weld it to get the bung to be leak proof.
I don't think it was the fact that it was a flux core welder, but the position and angle I had to work, along with the fact that I am not a good enough welder to be able to do it blind. On a bench I can lay a nice bead (after some helpful tips from 83 crossfire ta and junkcltr).
On a side note, my favorite swap was a SBC 355 into an 86 Mustang LX, it ran 11.8x on the motor and 10.3x on the nitrous. I helped build it, but I wasn't the owner/driver, he was a 19yr old kid (his uncle owned the shop).
Last edited by firstfirebird; 05-04-2007 at 06:37 AM.
06-11-2007, 03:18 AM
#47
Re: Tricks for bearing cap removal
Just poking my head in here following a link from another thread…
Bearings don’t spin like that from lack of oil or on their own, usually it’s caused by detonation, the impact from the detonation causes the main to hit the bearing surface like the peen end of a ball peen hammer, which will cause the sides of the bearing to tuck in and at that point there is nothing to keep it from spinning. It probably happened when you overheated it, you may have aggrevated it by running it low on oil, but you definitely didn’t cause it that way.
As far as welding fittings to a pan… that’s a tough one with the pan in the car even under perfect conditions. Get it perfectly prepped and try to run the whole bead with as little starting and stopping as possible. If you have to stop and restart you really need to grind the bead down where you will restart almost down to nothing if you’re not going to get a pinhole there.
Once you have a pinhole, unless you’re willing to grind the whole thing down and make another pass at it, you can spend forever getting it right, I’ve even tried cheating and heating the pinhole with a tig and melting it back together, that rarely works. Honestly, once I get myself in that mess I’ll usually resort to something else to fix it. Either some JB weld or epoxy putty can work well, or in a pinch, wipe down he area with some solding flux, heat it with a propane torch and sweat some solder over the weld to seal it off (on an oil pan I’d just use the epoxy putty, something like PC7, won’t add any more heat to the thin, sheet metal pan with flammable oil inside it, and the thick putty style epoxy won’t run once you position it where you want it).
It’s funny, I’ve welded whole pans together without any problems (I’ve even done things like welded the bottom half of a Pontiac pan to the top half/rails of a Cadillac pan, adapting the 2 together making a pan that fits well in a chassis that never came with that engine), but I believe that everyone runs across the occasional bung that just doesn’t want to play nice. I honestly think that is why air tanks are always painted... I've run across a bunch that if you clean the paint off welds you find some pinholes.
06-11-2007, 06:17 PM
#48
Re: Tricks for bearing cap removal
Yeah, I know what you mean about the welding,  . Once I got the pan out, it took me about 20min to grind it down and another 10-15 to have it welded nice and re-painted.
I'm glad to know somebody else is with me on the overheat. I have spun many a rod bearings, this was the weirdest one. When I took the cap off the bearing was back in the correct location. Somebody said to me that they may have been 108* out, but wouldn't the oil hole be at the cap? This would mean it spun at least 360*.
The upadate is:
I got a rotating assy from somebody on another board (crank, rods, pistons) and they were damaged upon arrival. I really don't want to go with oversized bearings, but may have to in the end...
http://60degreev6.com/showthread.php?t=37080
. Once I got the pan out, it took me about 20min to grind it down and another 10-15 to have it welded nice and re-painted.I'm glad to know somebody else is with me on the overheat. I have spun many a rod bearings, this was the weirdest one. When I took the cap off the bearing was back in the correct location. Somebody said to me that they may have been 108* out, but wouldn't the oil hole be at the cap? This would mean it spun at least 360*.
The upadate is:
I got a rotating assy from somebody on another board (crank, rods, pistons) and they were damaged upon arrival. I really don't want to go with oversized bearings, but may have to in the end...
http://60degreev6.com/showthread.php?t=37080
06-11-2007, 10:19 PM
#49
Supreme Member

Join Date: Oct 2006
Posts: 1,974
Likes: 0
Received 0 Likes
on
0 Posts
Car: 91 RS
Engine: 350 vortec
Transmission: T-5
Axle/Gears: not the best not the worst
Re: Tricks for bearing cap removal
man thats just **** luck but you know all ups drivers are trying out for Nascar... my company had ups lose a $15,000 gps/autopilot system...
should have seen the look on my bosses face when the driver said he knew it was on the truck this morning but he just cant seem to find it

should have seen the look on my bosses face when the driver said he knew it was on the truck this morning but he just cant seem to find it
06-13-2007, 01:51 PM
#50
Re: Tricks for bearing cap removal
I'm an id10t, the rod bearings don't have oil passages, duh.
Anyways, I took of the mains and the other rod caps adjacent to the bad one (2more rods and a main) and they are all mirror smooth, the bad bearing is #4. Actually taking a closer examination of the crank, it's not even as bad as the one I just got in the mail :P. I almost couldn't feel the grooves with my fingernail, so I went to the parts store and a new bearing will be here this afternoon.
Before you flame me about doing a "band-aid" repair, I have a new 3.4 comming and am getting the crank from the mail turned/polished to rebuild this motor once I do the swap.