When you click on links to various merchants on this site and make a purchase, this can result in this site earning a commission. Affiliate programs and affiliations include, but are not limited to, the eBay Partner Network.
Iv been really interested in putting in a weight Jack setup on my car for a few years. I know ground control makes a kit for something in the ball park of $450, but i was wondering if anyone has peace together there own. There are tons of parts out there in sprint, circle and other forms of racings that use weight jacks so im wounding if anyone has put one together for cheaper.
after i purchased my Ground control weight jacks, I looked around to see where i could find springs for sale. I found some circle track sites that sell thee weight jacks in peices to be assembled by you, i think they were around $25 a side forthe front and didn't even see anything for the rears, the springs run around $50 a corner. mayber $250-300 is the cheapest for a good setup I eneded up paying $515 total with sales tax and shipping
Niiice! Im still in the process of building my car but once its done im going to see about putting it on wheel scales, then select the appropriate springs to be used with weight jacks front and rear.
Since my pro-kits are a little soft up front and I'll be going into a new class next year, I've also been considering this. I keep checking ebay but there hasn't been much.
I think I remember reading a thread somewhere where a guy made a weight jack setup from scratch. He started with plate steel, a welder, and the weight jack bolts and he made them. He made it seem like it was A LOT of work but I think he saved like ~$100 or something. I'll get you a link when/if I find it.
The fronts would be fairly "simple" to build. Just some measureing & welding correctly. The rear ones would be trickier to home-fab, if you built them the samw way, with the threaded sections & threaded collars.
Here is what I was talking about when I mentioned the DIY route someone took. Look at post #12 by StanIROCZ. I think his username on TGO is "Big_Modz." Maybe it was with an s instead of a z... not really sure. http://www.frrax.com/rrforum/index.p...hl=weight+jack
Here is what I was talking about when I mentioned the DIY route someone took. Look at post #12 by StanIROCZ. I think his username on TGO is "Big_Modz." Maybe it was with an s instead of a z... not really sure. http://www.frrax.com/rrforum/index.p...hl=weight+jack
Enjoy,
Mike
Sorry, an error occurred. If you are unsure on how to use a feature, or don't know why you got this error message, try looking through the help files for more information.
The error returned was:
Sorry, the link that brought you to this page seems to be out of date or broken.
Sorry, an error occurred. If you are unsure on how to use a feature, or don't know why you got this error message, try looking through the help files for more information.
The error returned was:
Sorry, the link that brought you to this page seems to be out of date or broken.
Curious about the bumpsteer part as well... I know SPOHN makes one... I got a UMI tie rod adjuster... It will replace that part, right? And also, I'm wondering if it's needed when lowering the car as well.. What does it do??
a tie rod adjuster is for setting your toe. these two parts are different but are connected by the tie rod, itself. Most likely if you use this stud for bumpsteer, you'll be using heim joints on the tie rods rather than stock replacement tie rods.
name='StanIROCZ' date='Jun 8 2007, 01:01 AM' post='105512']
I'm just finishing up my DIY weight jacks. This is one of the many reasons why it is June and my car is still on jack stands.
I bought a bunch of parts from Stock Car products. Some of which I won't be using, so they are for sale if you want to take this on yourself.
4 - SCPSB57 Spring plate 5.5" steel (2 for sale)
2 - SCPSB18S Weight jack bolt 8" steel (for the rear) note, get 4" instead
2 - SCPSB16S Weight jack bolt 6" steel (for the front) note, get 4" instead
4 - 500TC815 Wedge Bolt, thrust bearing
8 - 500TWA815 thrust bearing washer
4 - SCPSB20 Nut wedge bolt
4 - SBB (I forgot to order this)
Total cost 147.48 + 10.23 shipping + the bolts that I forgot
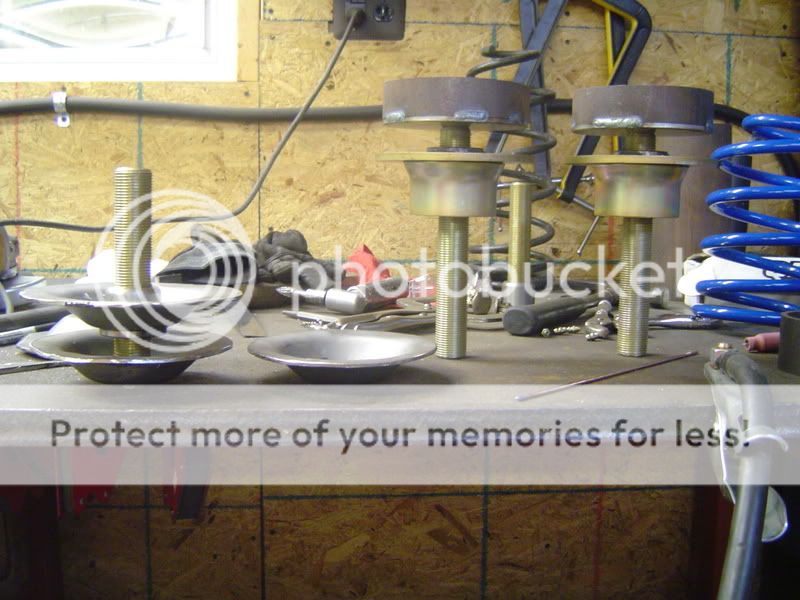
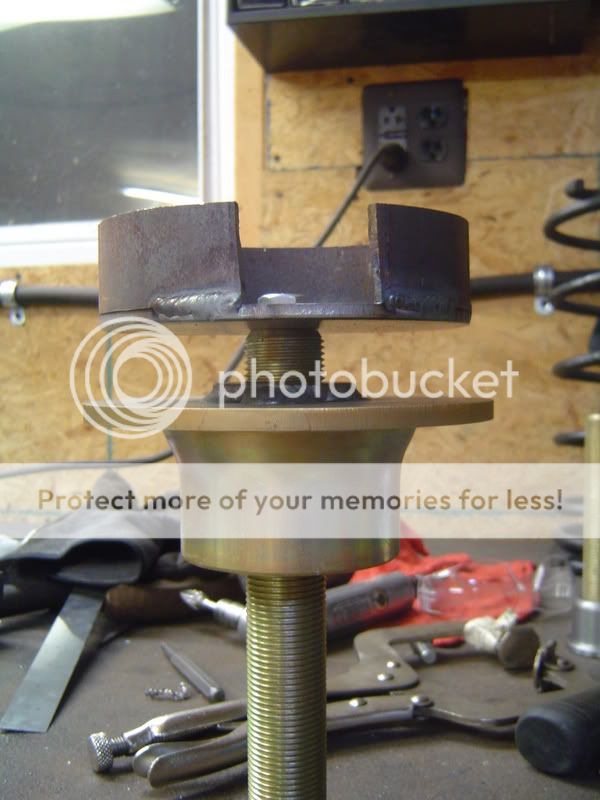
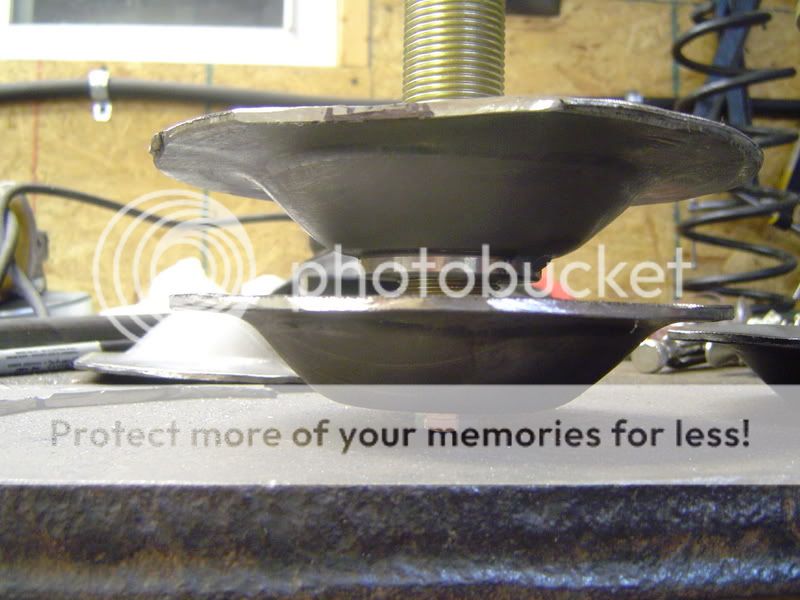
It is fairly easy to copy GC's front weight jacks.
The very top is a 4" schedule 40 pipe (4" ID, ~4.5 PD) that I sliced and then spread open to expand it to a 5" OD. Instead of pipe you could uses some 3/16" x 1.5 or 1.25 stock and bend it to form a circle. Hindsight being 20/20, thats what I'd do.
Below that is a 5" spring spacer that I got from Coleman Racing. I had to drill a hole in it for the 7/16 bolt.
Not shown, but between the weight jack bolt and the plate a thrust bearing will go. I got it from Stock Car Products but I don't see it listed on the website. The guy on the phone sold it too me. Go to the link in my sig and you will see a pic of this.
Below that the weight jack bolt. It is 1-1/8" IIRC. In the picture is a 8" which is way way too long. The guy told me to get this, so I did. I think 4" will be enough. The bottom of this bolt has a 1/2" square hole so you can turn it with a rachet and extension.
Below that is the wedge bolt nut SB20 from SCP which is welded to the spring seat Part No SB57. Most of the nut is hidden in the spring seat (you only see the top of it). I had to hole saw a 1.75" hole in the seat to get the nut to fit. They come with a 7/16 hole since they are designed to be used on the opposite end of the way the jack bolt installed.
The rears are a PITA. The first problem I noticed was that the spring seat didn't do a good job of keeping the rear springs from falling off the edge.
Then I started doing math and realized that there will be a height problem if I want to us high rate springs, like 200 - 300 lb/in. If you are going to lower your PHB, you can significatly increase your rear spring rate. Higher rate springs don't compress near as much (duh).
stock spring
14x107 lbs/in. Assume 600 lbs of weight on each spring and your spring height at ride height is ~8"
The shortest pig tale spring that I could find is 9"
9x200 lb/in spring = 6" at ride height. If the weight jacker is built like it is for the fronts it will take away about 1.5" of height, so the total spring height is 7.5" which only leaves .5" to lower the car
9x300 lb/in spring = 7" at ride height + 1.5 =8.5 total height. Now I'm actually .5" higher than stock! Not what I want!
So I'm somewhat determined to make this work. I decided to "stamp" the plates that you see in this picture because I thought it might be fun, or something(?). These plates started as a sheet of 1/8" steel. I drew 6.5" circles in the plate and then found some misc circular objects that were the proper size and put it in a big *** press and pushed. They ended up being wavy, but I straightened them out. Then I had to cut the OD again because they didn�t shrink as much as I thought they would in the press.
The top plate fits around the stock spring seat in the car perfectly. The second one holds the spring and they fit inside each other so I don't loose near as much height. I'm going to drill a 1.75" hole in the car to allow the nut and the bolt to go up through the floor. I will adjust the jack from the top.
The GC rear perches sit on the axle and are made of aluminum (I think), and don't take away much height as-is.
So are you thinking "that's a hell of a lot of work"? Your right, it was, and there really isn't any particular advantage to what I did over the GC kit.
My costs were about probably about $175 for the jacks and $212 for the springs, so about $387. GC sells you the kit for $459? How much is your time worth?
I have done front and rear weight jacks in my car. The rear I had to do because the 11" tall circle track springs I use are to tall. The rear was a complete Homemade fab job and I had to cut the old perches out of the car. basically it was a complete PITA and would be easier with shorter springs and putting the adjuster on the lower spring perch but that would add a little unsprung weight.
The front was easier. I found some circle track weight jack perches and adjuster bolts on EBAY. I had to drill a 1 1/4 inch hole down through the subframe and K-member in the center of the upper spring perch. That part actually went easier then I thought it would. Then I bought a large nut that fit the adjuster bolt and welded it to the underside of the K-member. The biggest problem is where the nut needs to go isen't flat on the K-member so I just welded around it as far as I could and so far after a season of autocross it is still holding fine. The better option would be to cut the upper perch out of the K-member and use one of the plates that is available from circle track suppliers but that would require removeing the K-member to do right. I am able to adjust it by going through the hole I drilled through the subframe with a 5/8 socket and long extension, Many weight jack bolts just use an extension.
The rear took me about a week to build and is tied in with my cage because I wasen't comfortable just welding them to the light sheetmetal where the factory perches where. Like I said the rear was a complete fab job and requiered a lot of cutting fabricating and welding. The front took me the better part of an afternoon to install. I am sure I have less then $50 in materials in the entire setup.
BTW, I didn't add any $ for springs. If you have time you can find the rates and lengths you need on EBAY for about $20 each shipped. If you buy from a circle track supplier expect at least $50 each shipped. You don't need pigtailed springs on the rear as rear circle track spring are flatend on both ends. The lower rear perch is a little small for these springs but in 5 years of running this style spring I have yet to loose a spring. If your concerned you can always add a couple of tabs on the lower perch that are taller and center the spring better.
The biggest problem is where the nut needs to go isen't flat on the K-member ... The better option would be to cut the upper perch out of the K-member and use one of the plates that is available from circle track suppliers but that would require removeing the K-member to do right.
The rind is elevated in the spring perch. Once you've drilled a small centering hole, cut most of the rind out (took patience with a cutting wheel), increment cut, and hammer flat - this will aid in welding. Removing the k-member was not necessary, but if I had known I was going to do the LS swap, I would have.
Springs are 9.5" #850 Uncut. I can remove them by hand. An 11" is doable, but might need compressor.
Wow, thanks for the fast reply. I was thinking of going with the AFCO 1000# 9.5 long coils. By my math the should sit like 3.5" to 4" lower then the weight Jack's would raise it to something more reasonable.
What I mean about the 8 or 11 inch question was the weight jack bar (big bolt type thing). Now that I clicked the links I see its a 6" swiveller
Also nice control arms, where'd you find those?
Last edited by monkey-leader; 12-15-2015 at 07:58 PM.
Awesome, you did a lot of good work. I especially like your interior.
You welded the weight jack plate directly to the frame? I was thinking of welding it to the K-Member. Was there any rational behind your choice? The k-member seems like it would be stronger...
Thanks for the compliment.
The plates are welded to the k-member - I actually stacked some washers between the frame and plate while welding to ensure a 1/2" distance (might be slightly less). The increment cuts in the rind were hammered flat and used to weld the plate - get good fill between the cuts.
The pic in post #24 shows the plate is not touching the frame and the whole k-member and plate slathered in POR-15 during the LS2 swap.

 11-24-2009, 05:07 PM