When you click on links to various merchants on this site and make a purchase, this can result in this site earning a commission. Affiliate programs and affiliations include, but are not limited to, the eBay Partner Network.
Auto Detailing and AppearanceShare tips and tricks on how to make your Third Gen shine! Get opinions on products or how something tasteful looks on your Chevrolet Camaro or Pontiac Firebird.
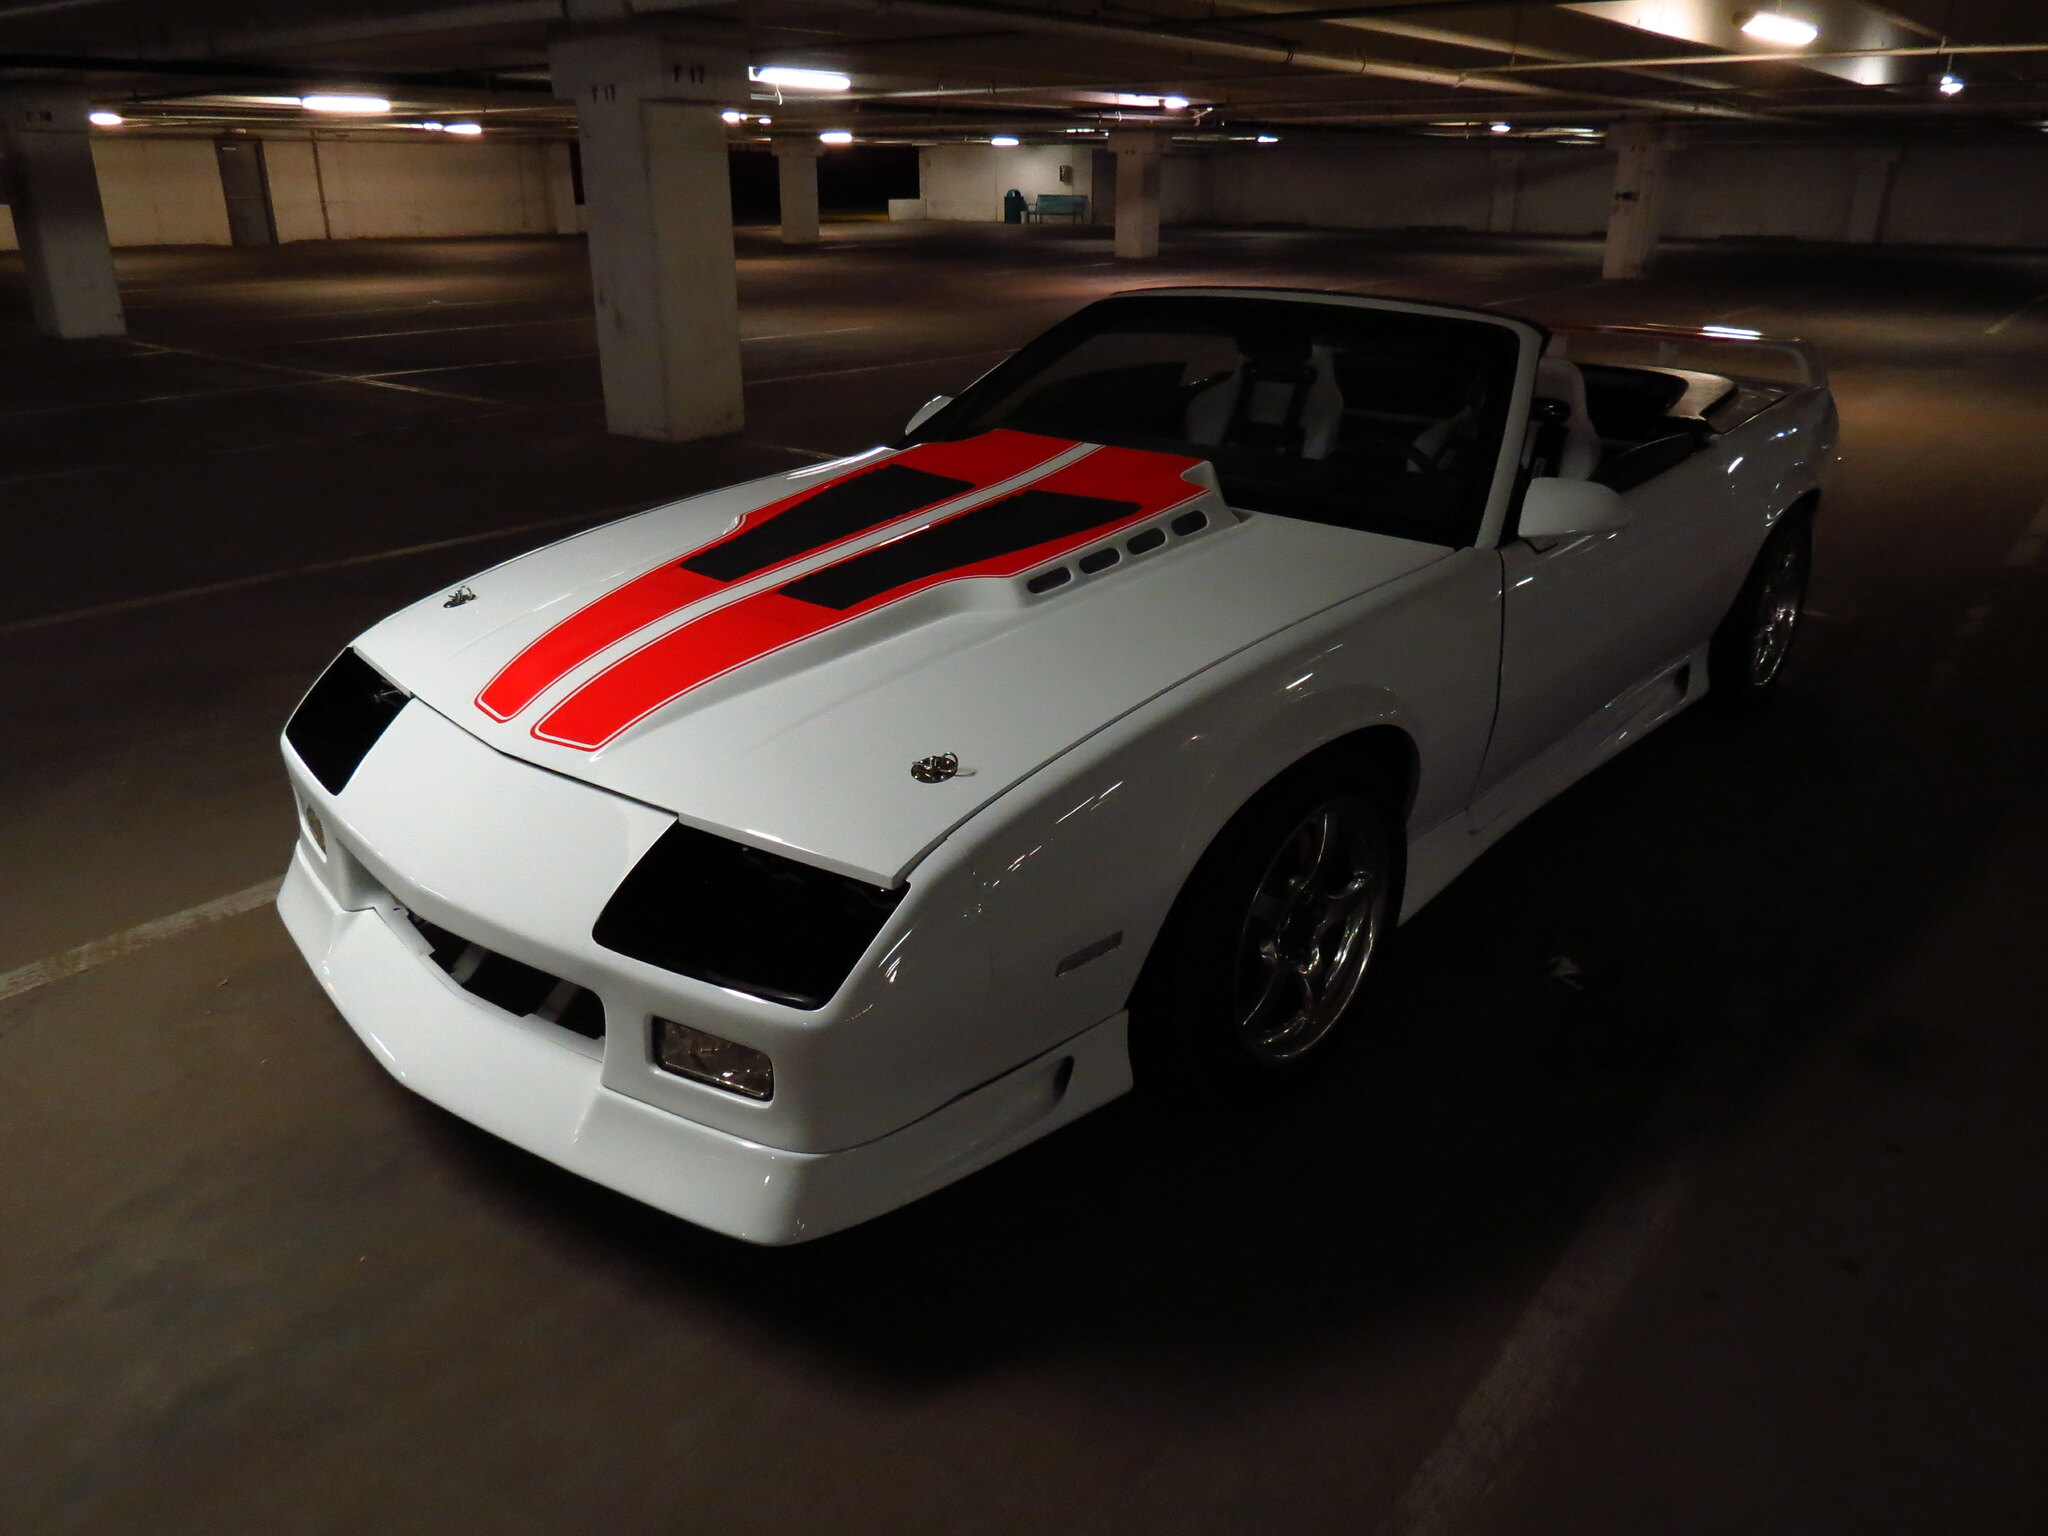
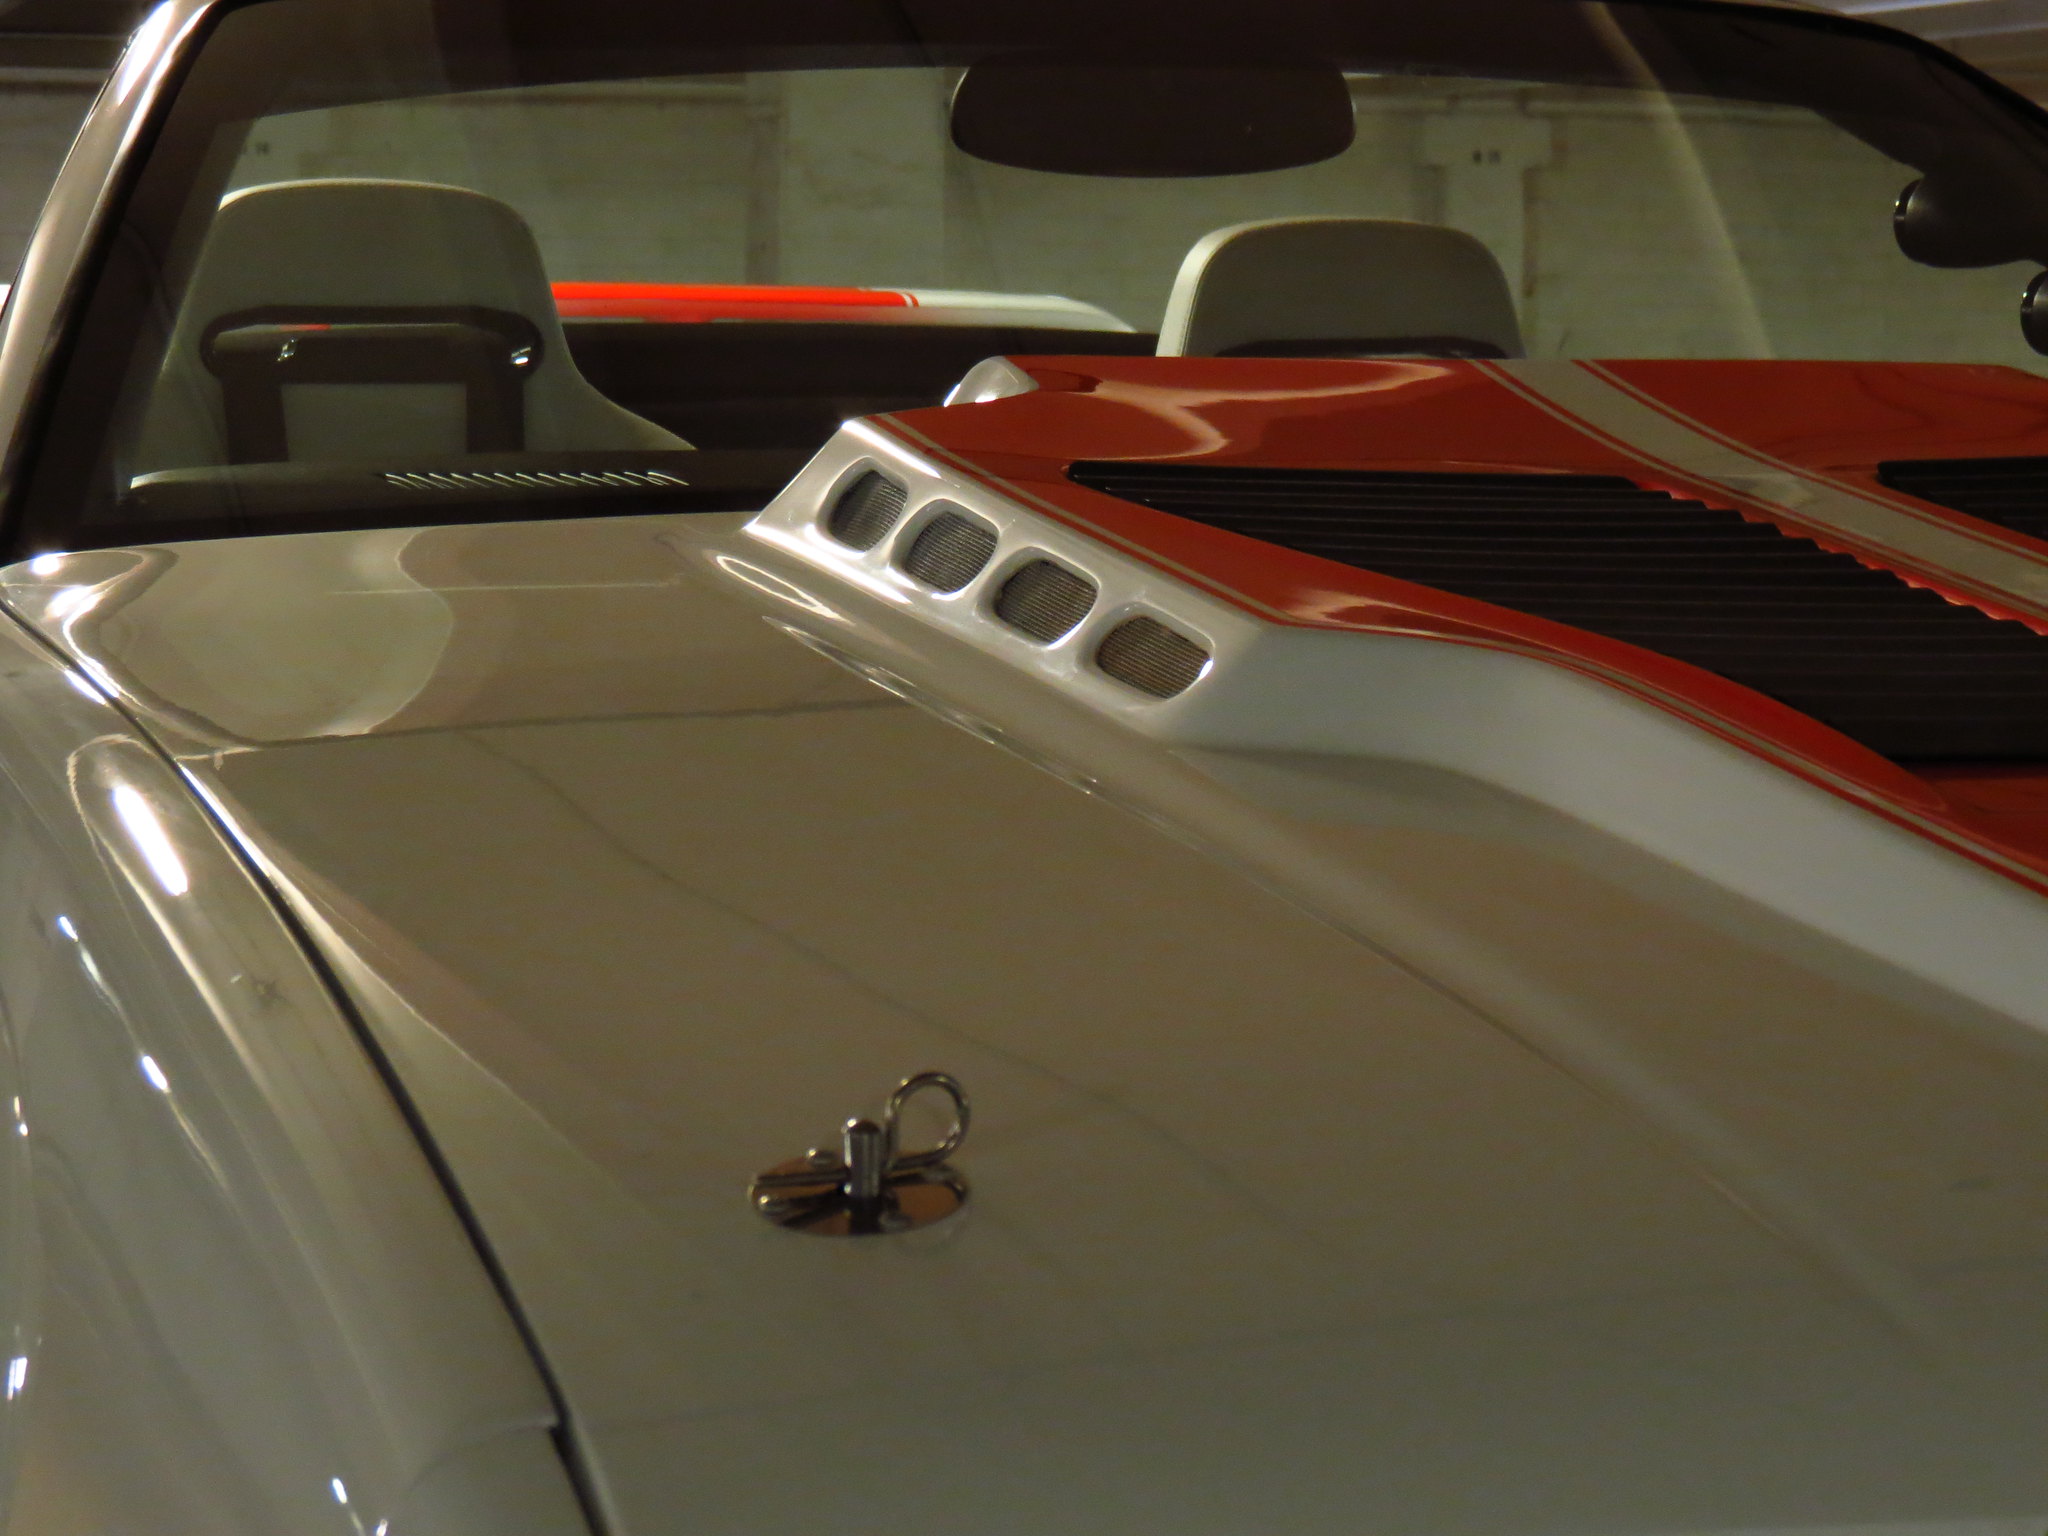
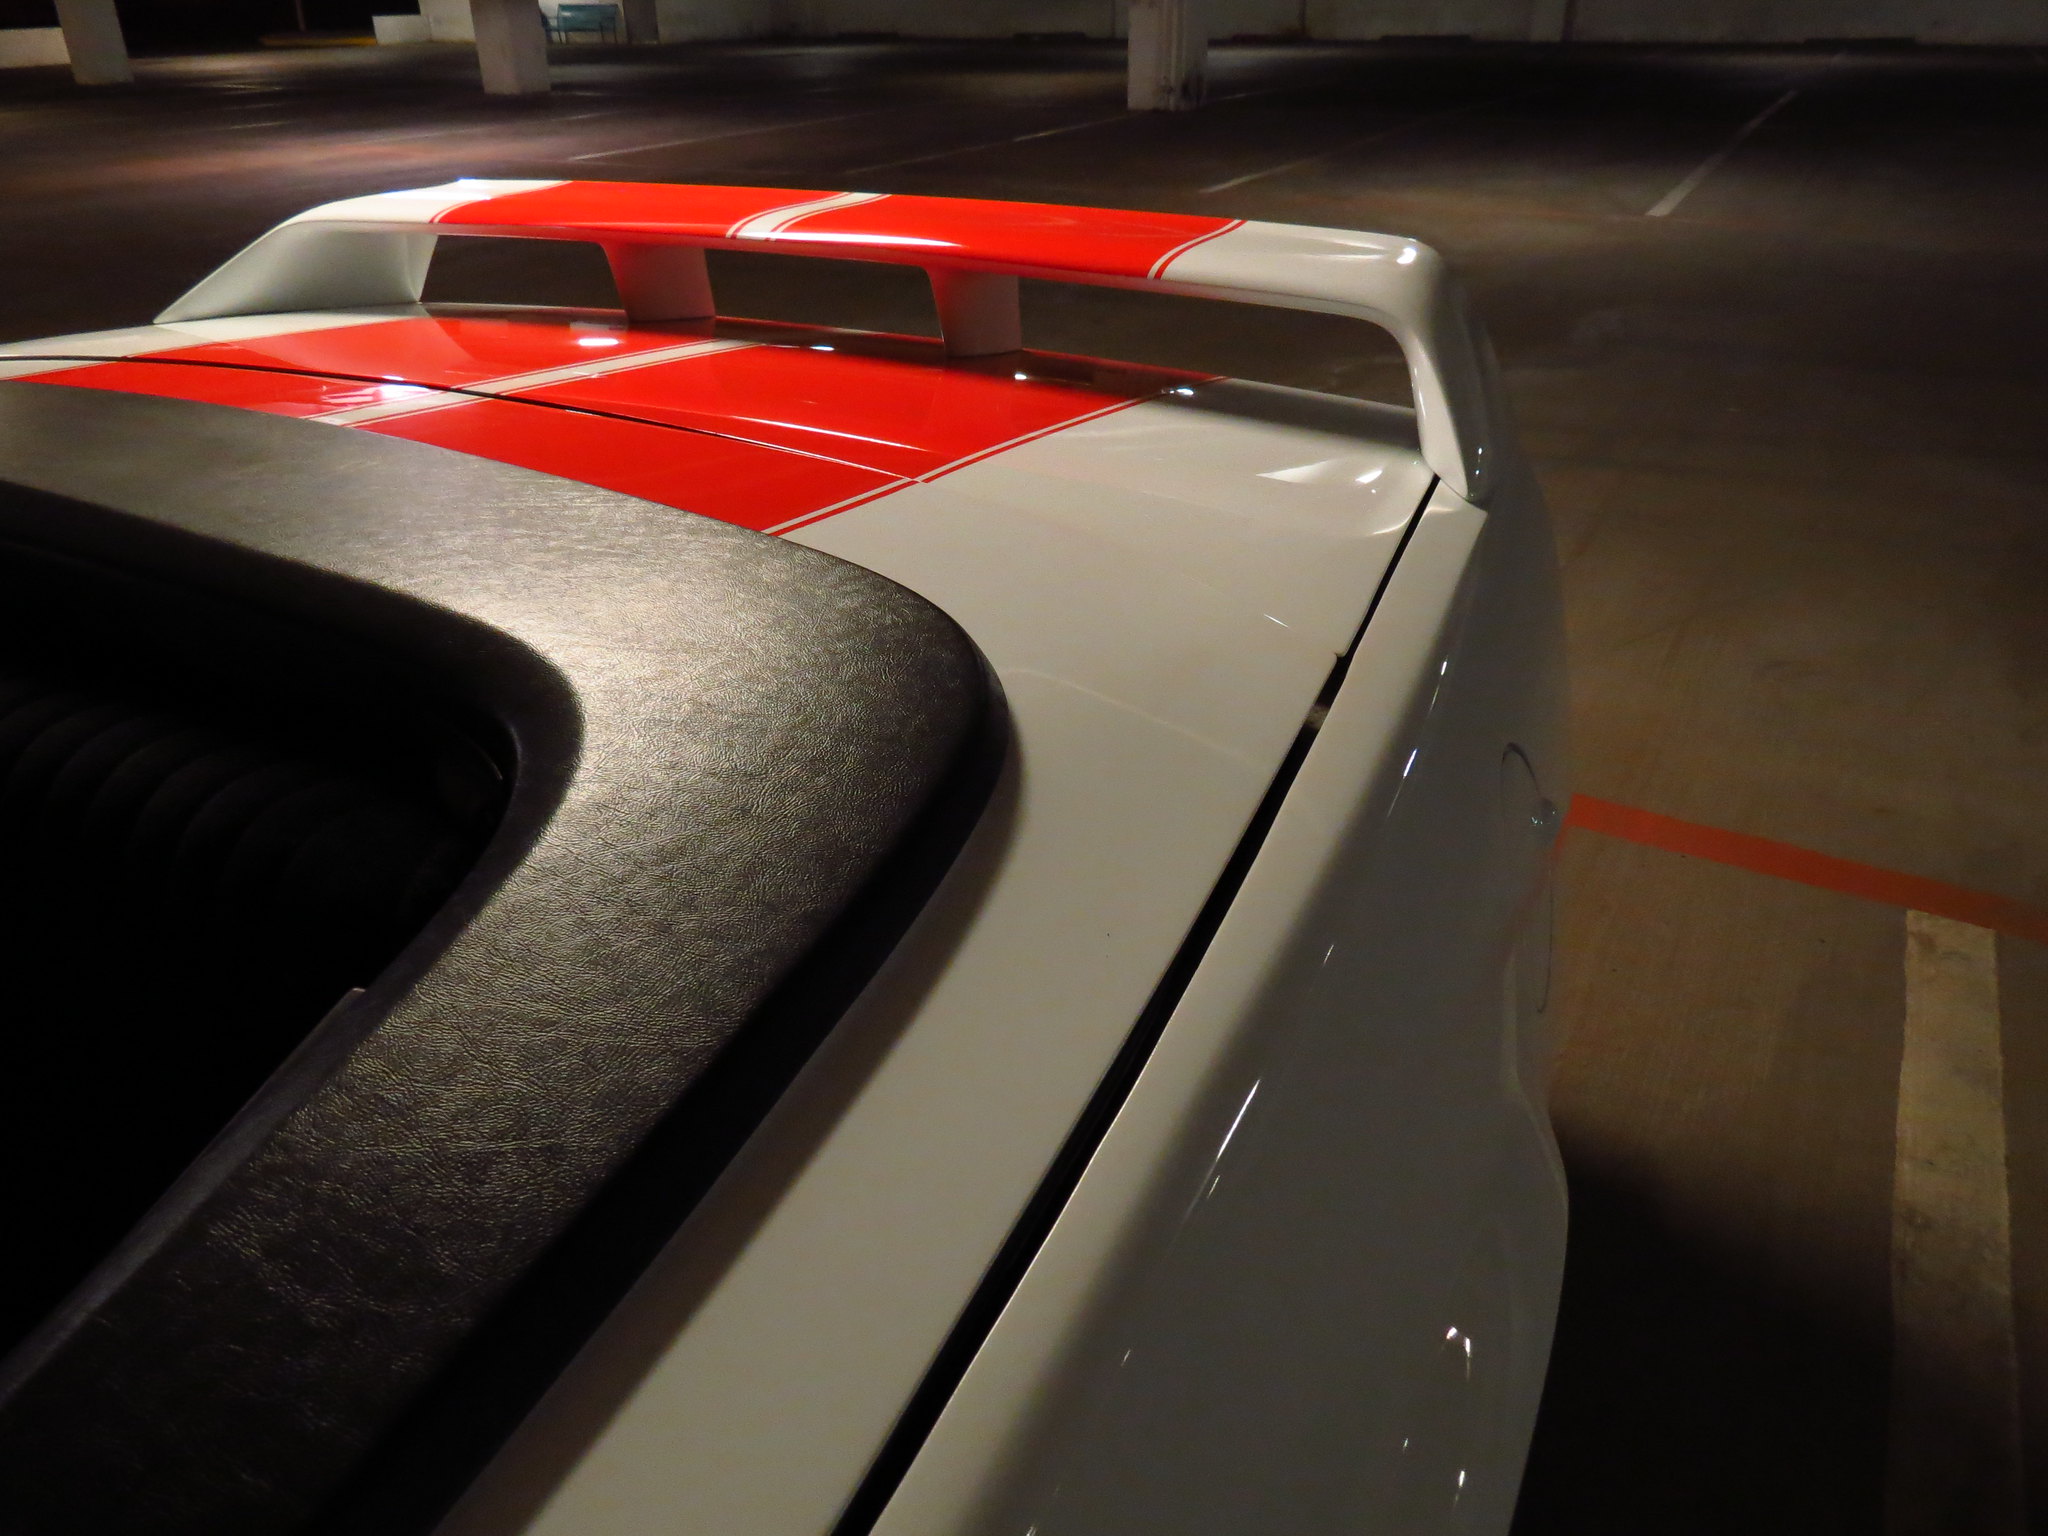
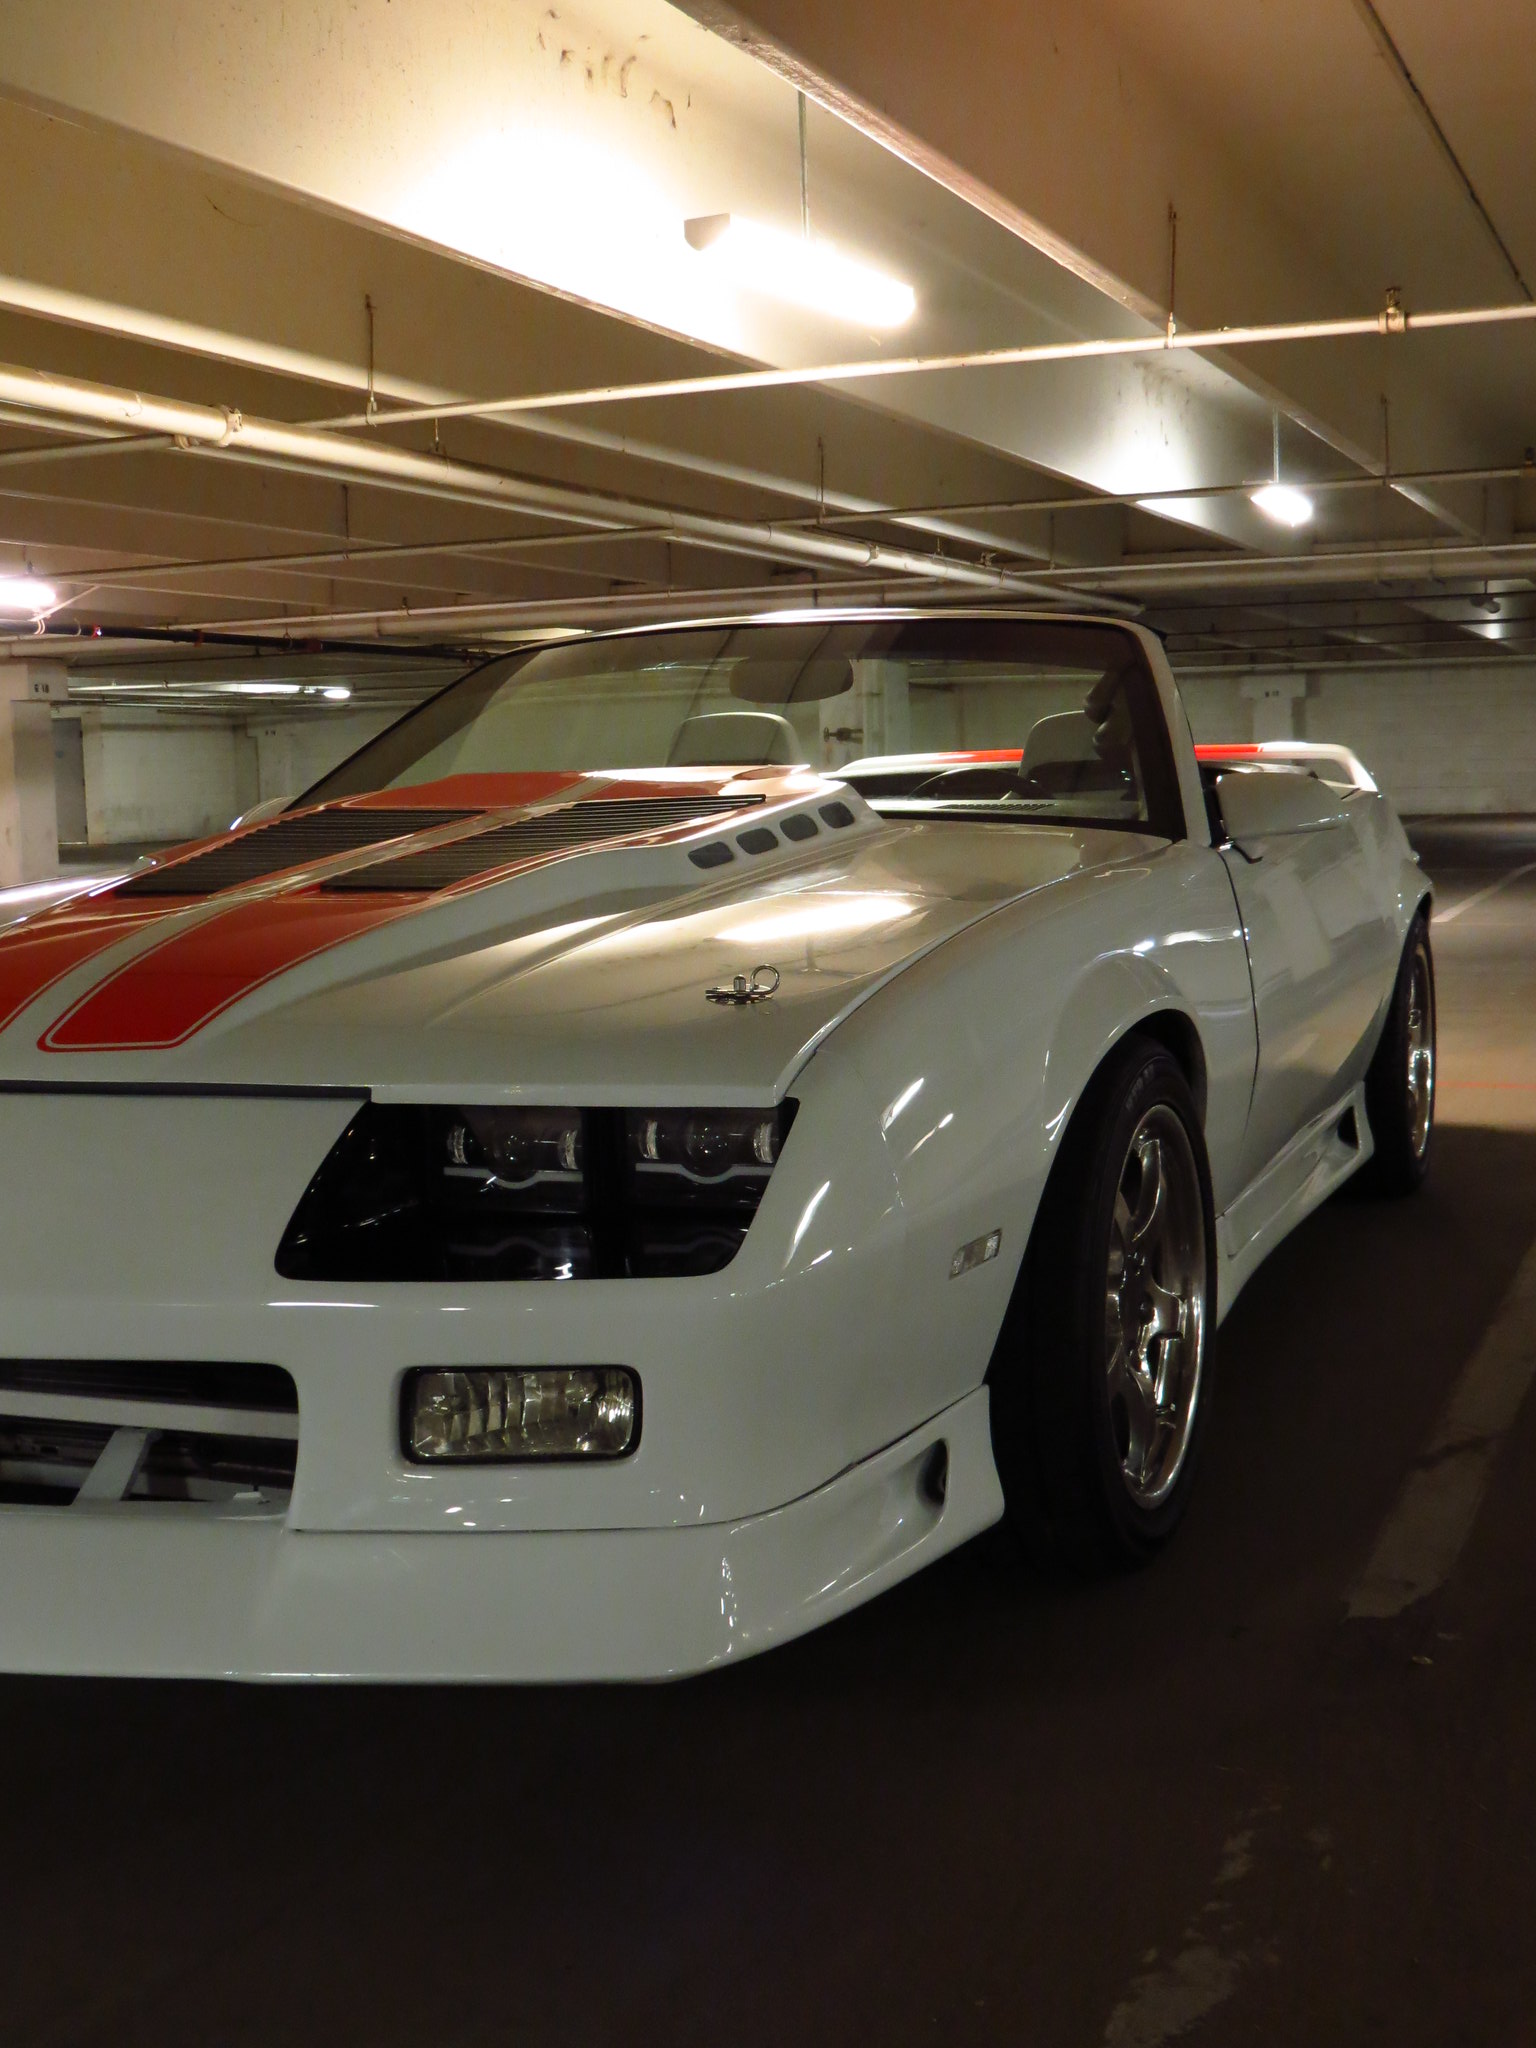
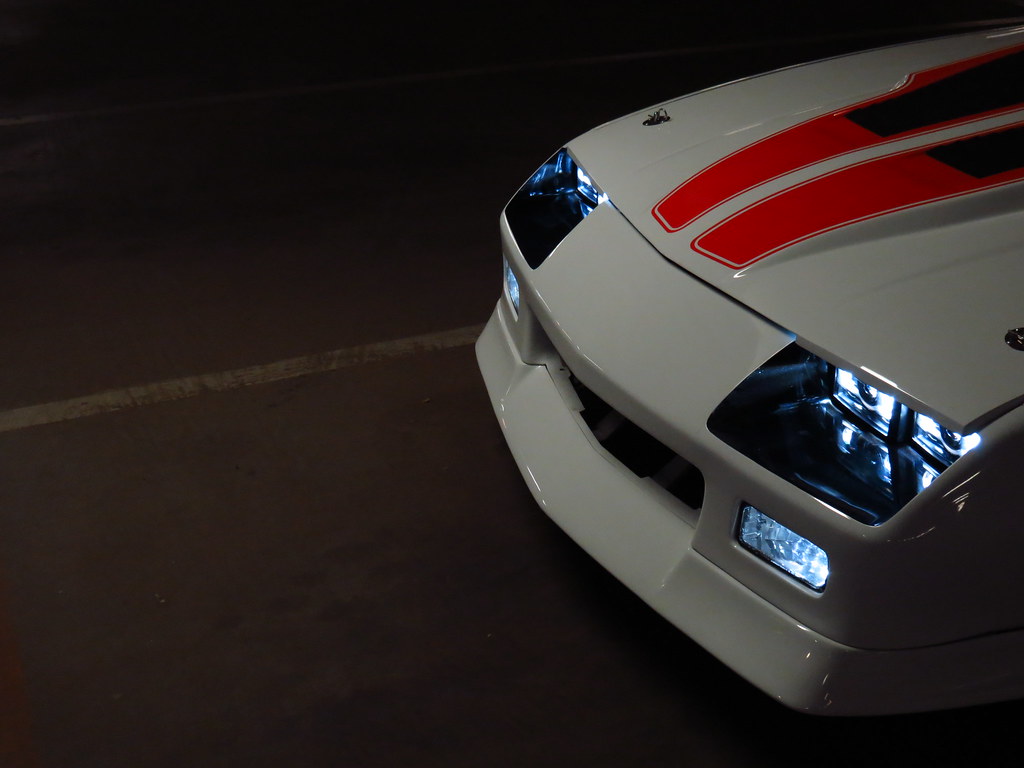
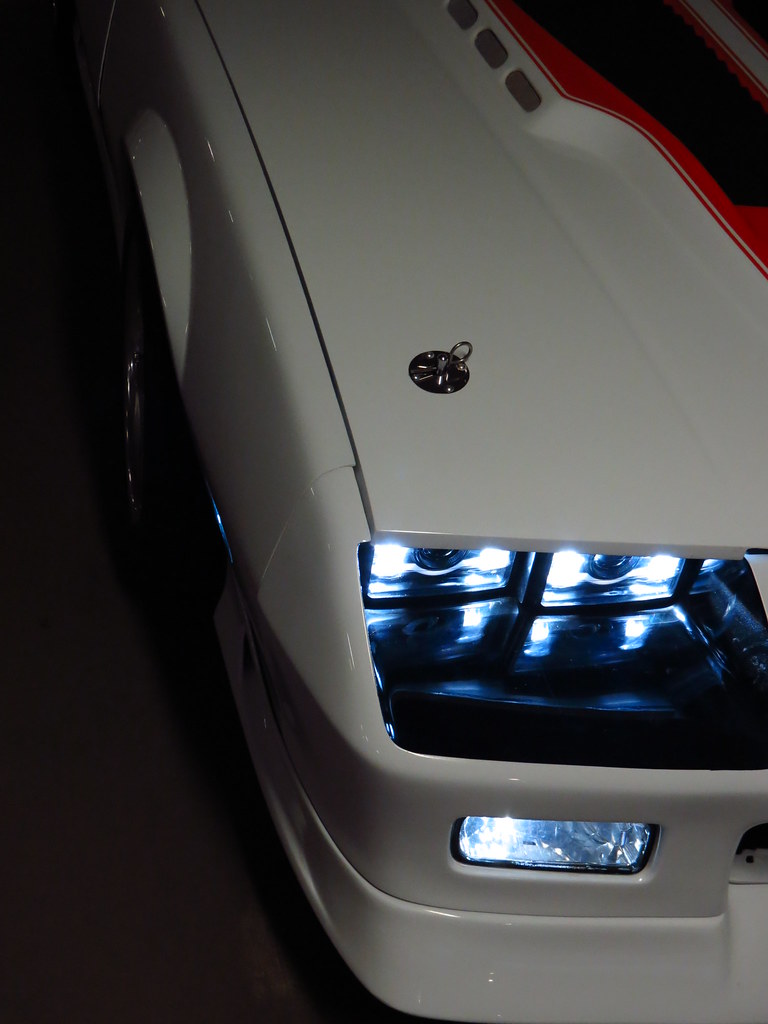
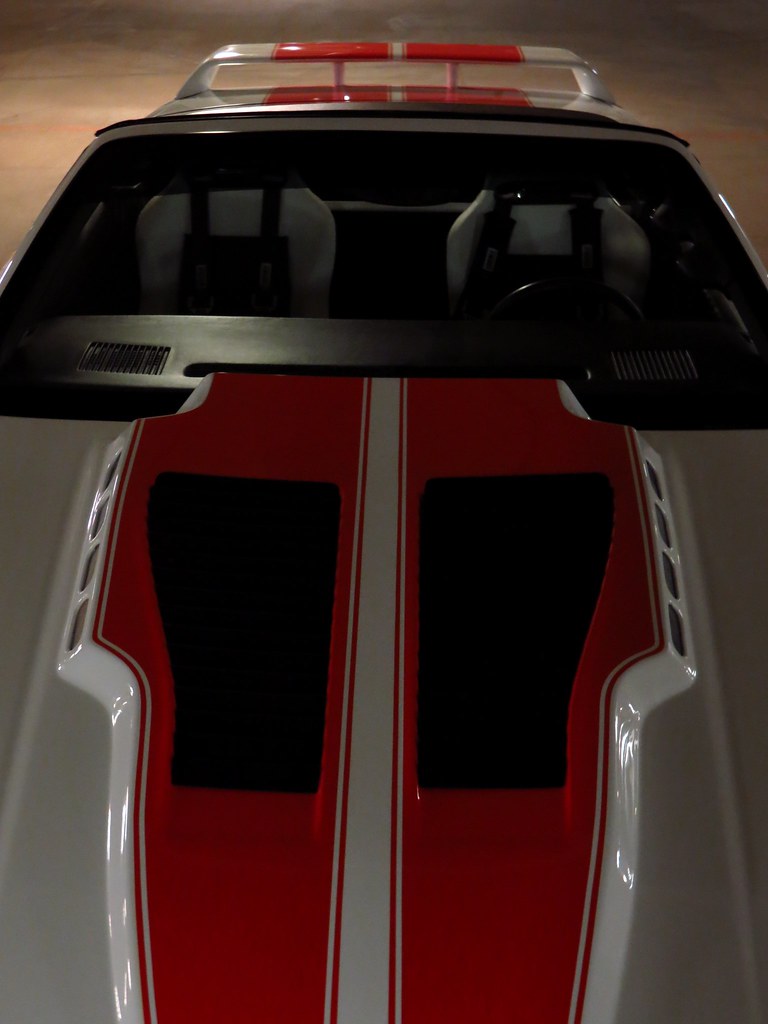
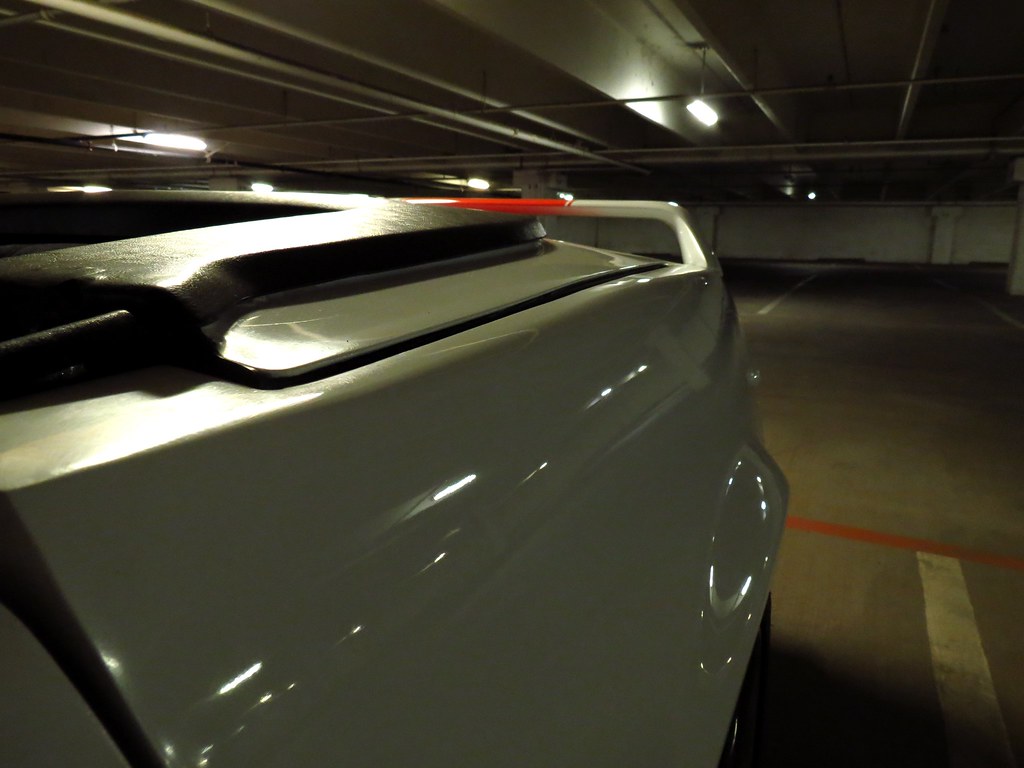
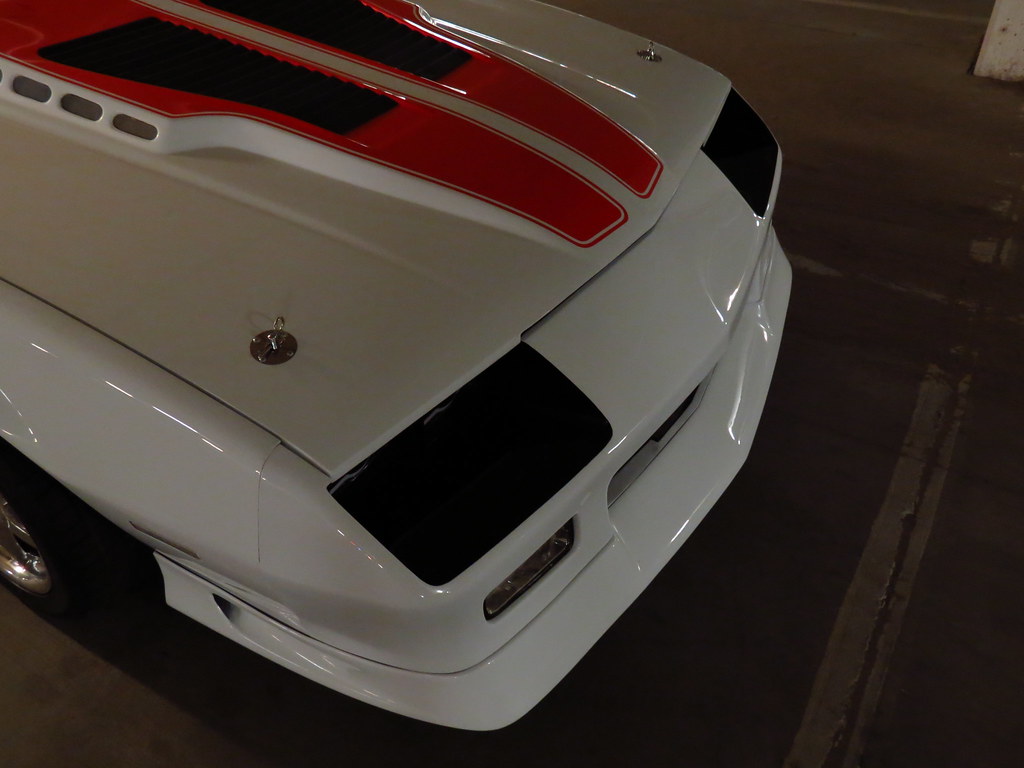
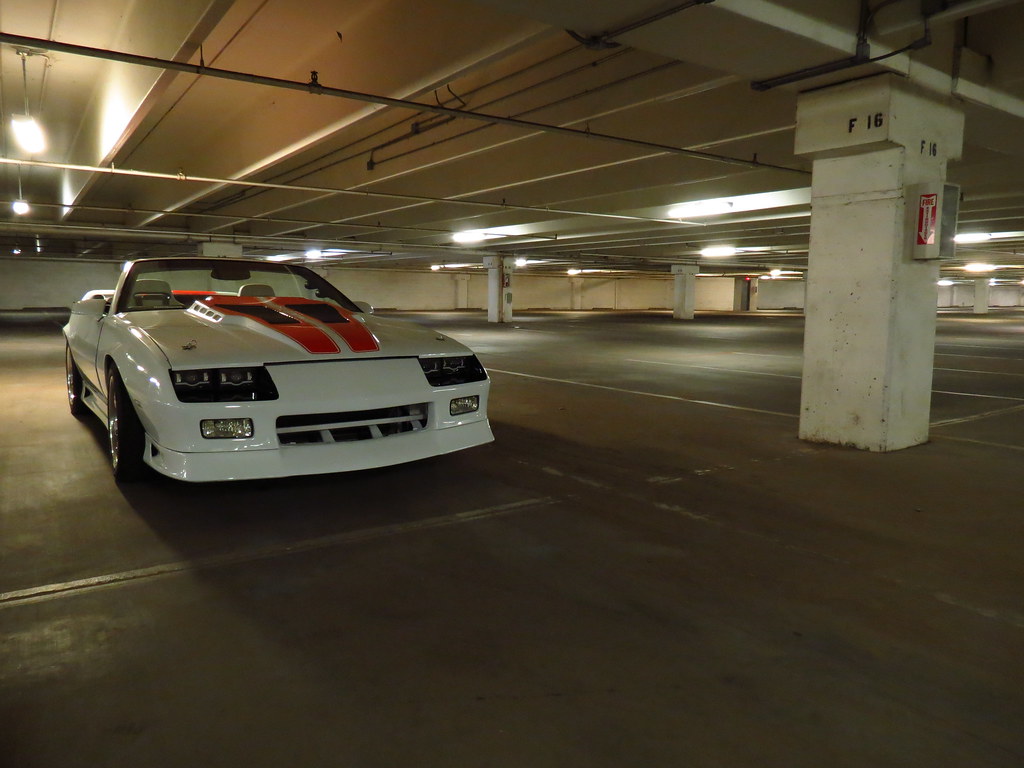
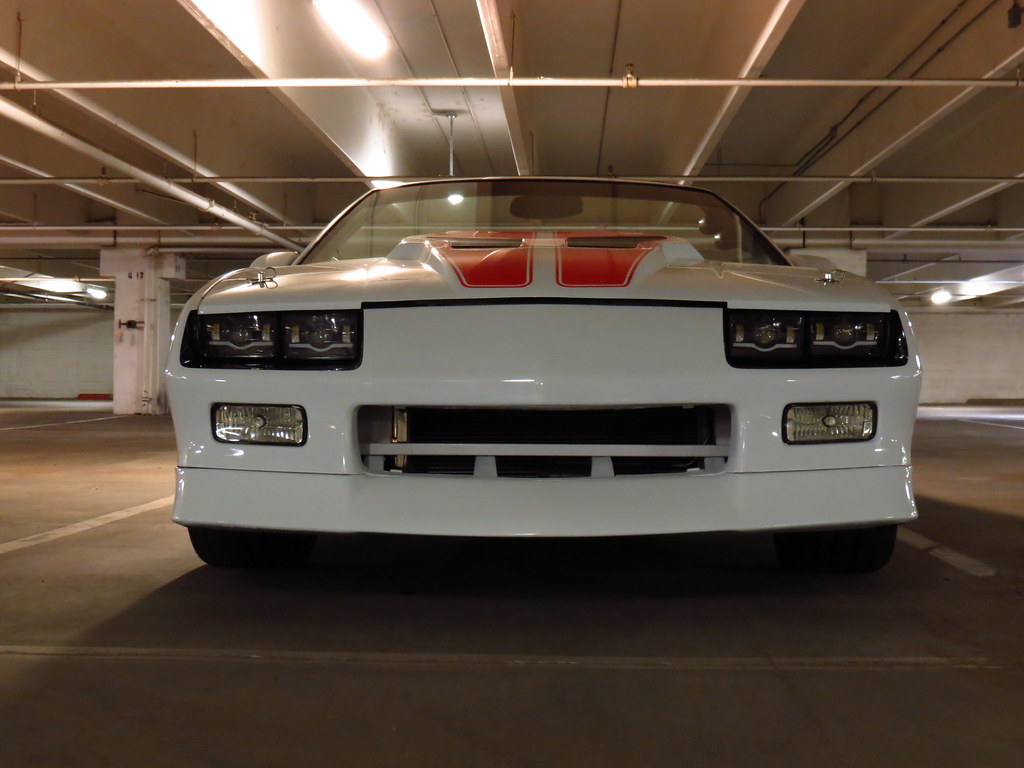
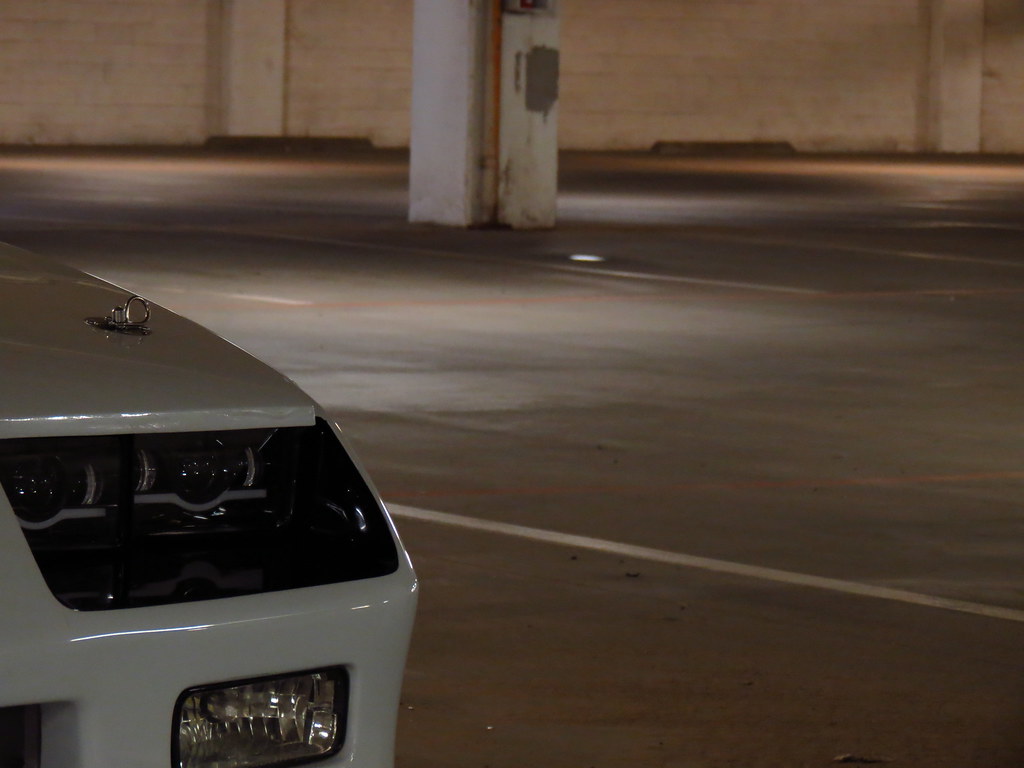
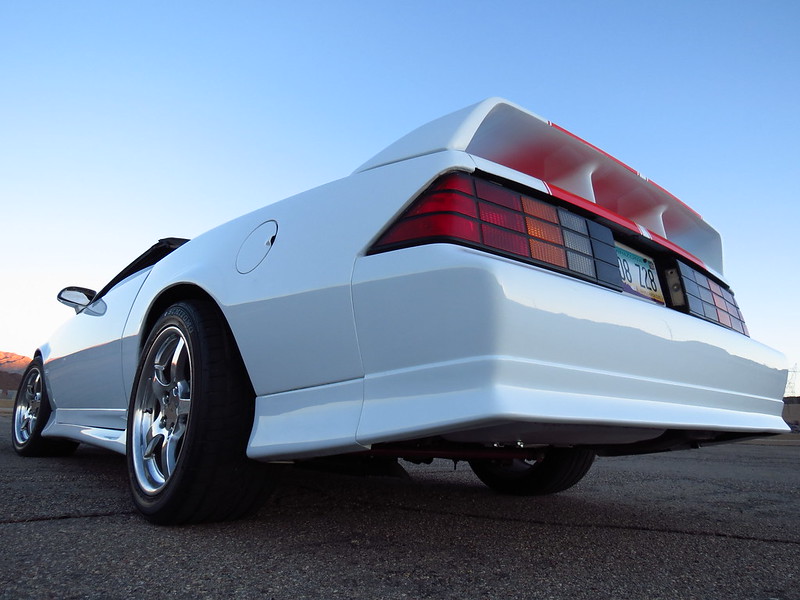
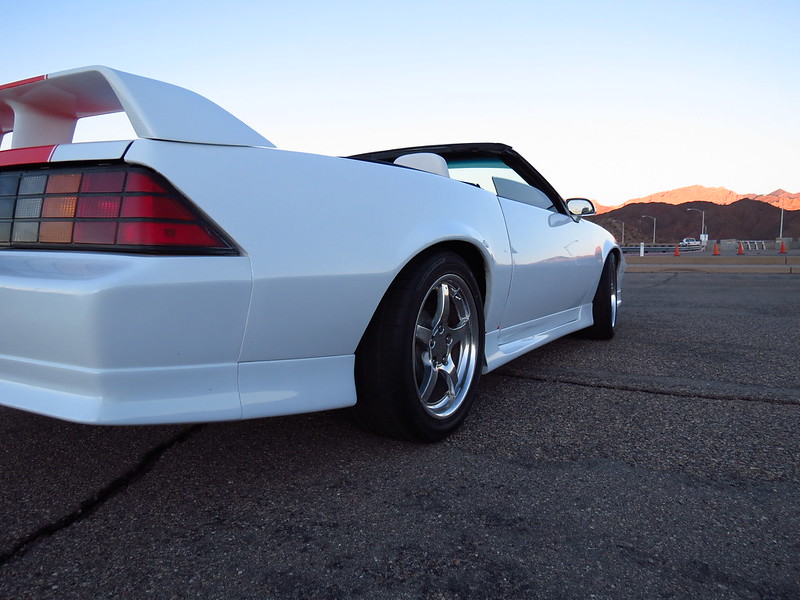
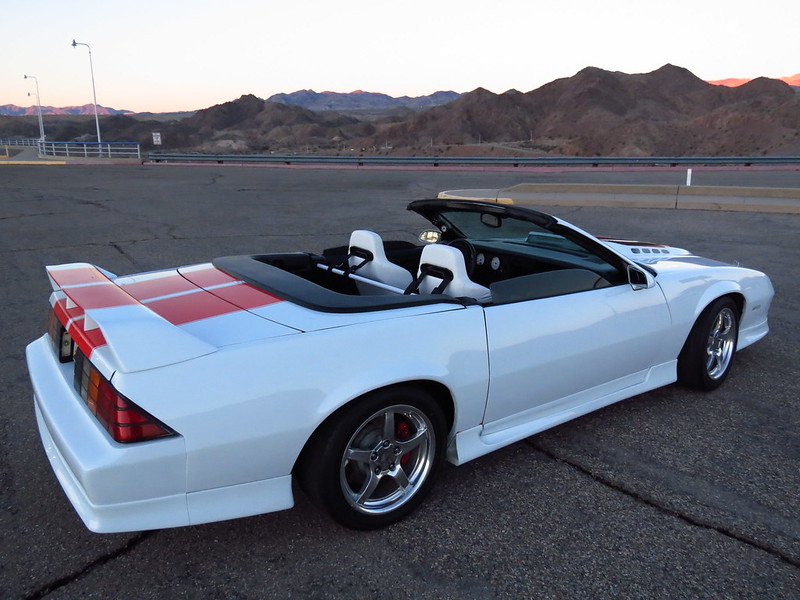
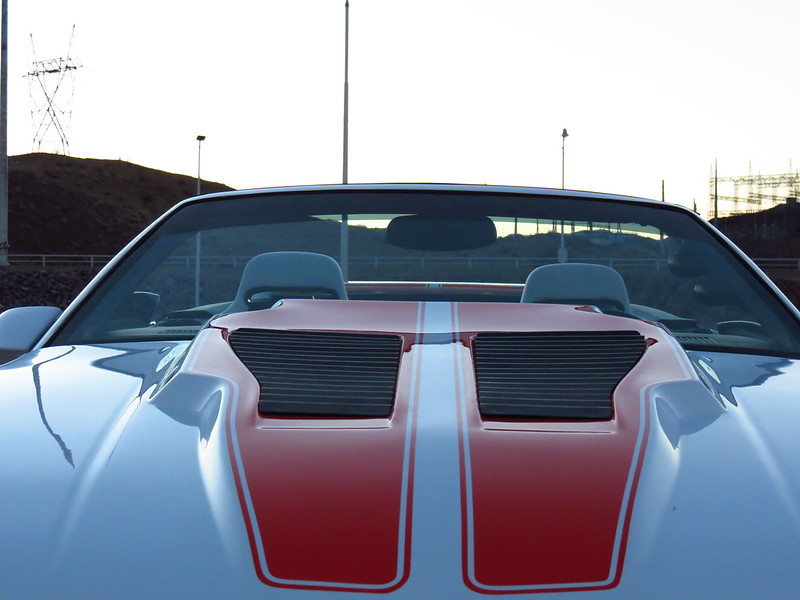
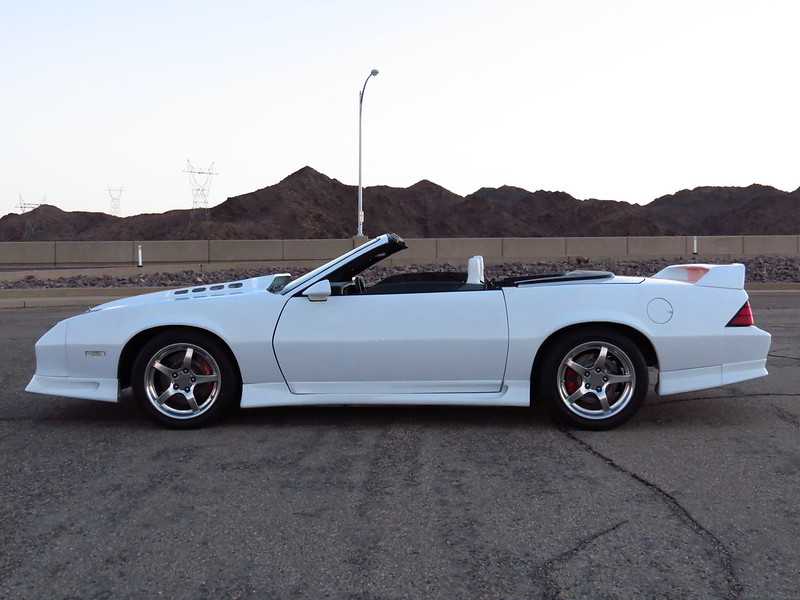
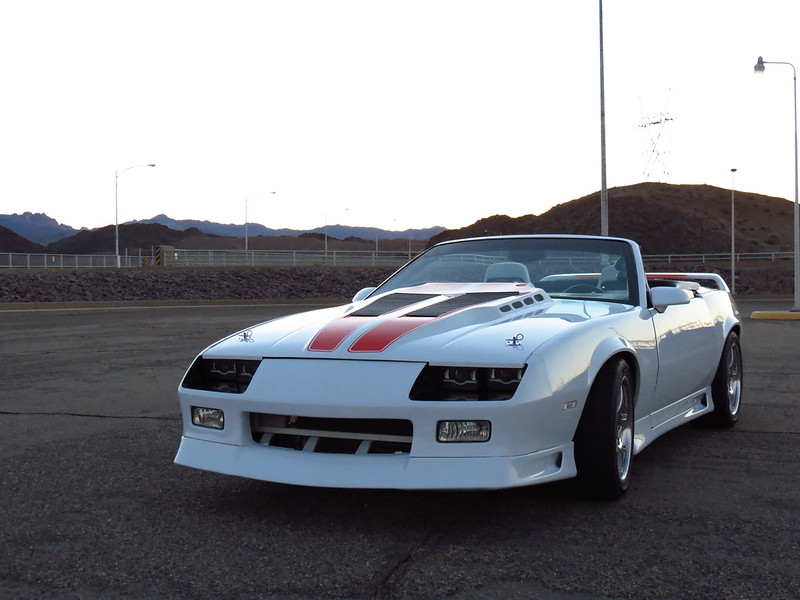
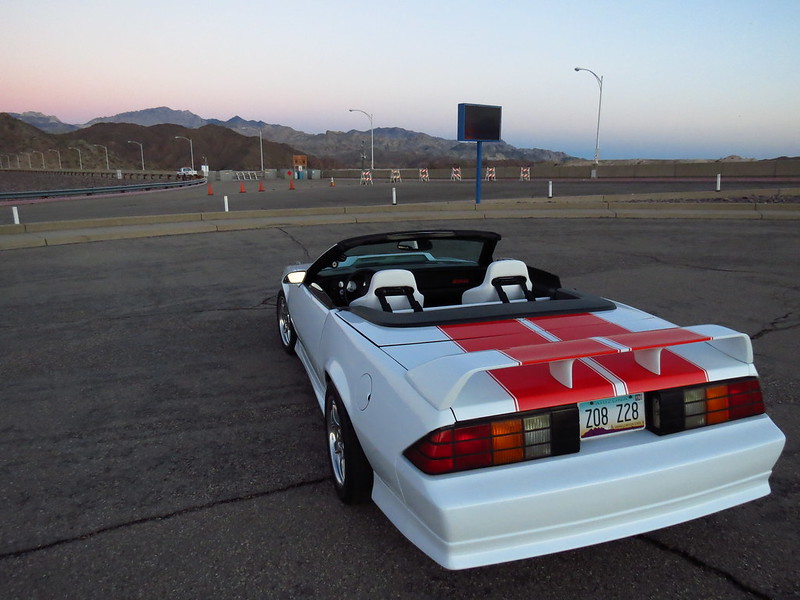
I had been looking forward to taking some pictures of my *finished* convertible and I finally had a night that allowed me to. It really has been a long time coming to get the car to where it is, especially after the fire last year so I had really been looking forward to this. Took me a week to find a good spot and I settled on the second floor of this parking garage. I found another parking garage whose top floor was open and you could see the casinos from it but the angle was too steep between the incline and parking floors. I found another parking garage where one whole side was the mirrored windows of a casino (which would have looked cool) but there were too many cars scattered around. The first night I had everything ready to go and then as I opened up the garage it started to rain. What are the odds of living in the desert and the night you want to take pictures it starts to rain? So I made it out and took a bunch of photos. I've looked at them on 4 different screens and on some screens the pictures look good and others they look underexposed so some may appear dark. I tried taking some artistic shots rather than the run of the mill front side and back and I tried taking some that show the work that I did to the body. The entire rear bumper has been filled in, all emblems removed, antennae removed, shaved door handles, egregious convertible wrap around spoiler removed and replaced with the Hardtop spoiler, etc. It was too dark to do any interior shots and certain exterior shots so I'll be going out a morning this week before dawn to get some in early daylight. Enjoy.
* Is any project car really ever finished?
Nice touch with the spoiler, very unique! I wonder why they didn’t just use that spoiler on the 91/92 Z28 Vert..
I'll get some interior shots this week, it was too dark and either the gauges were overexposed or the interior was underexposed.
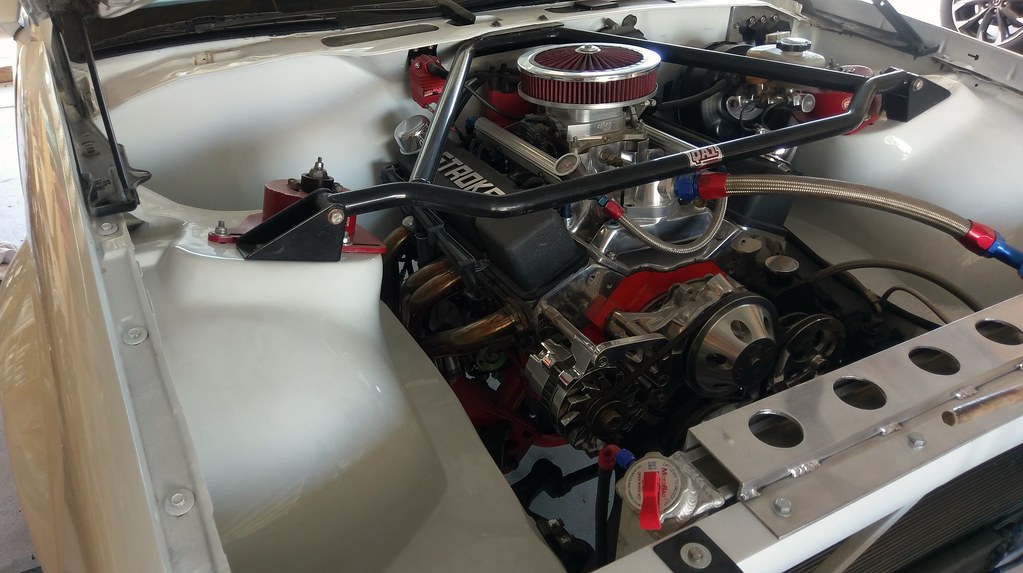
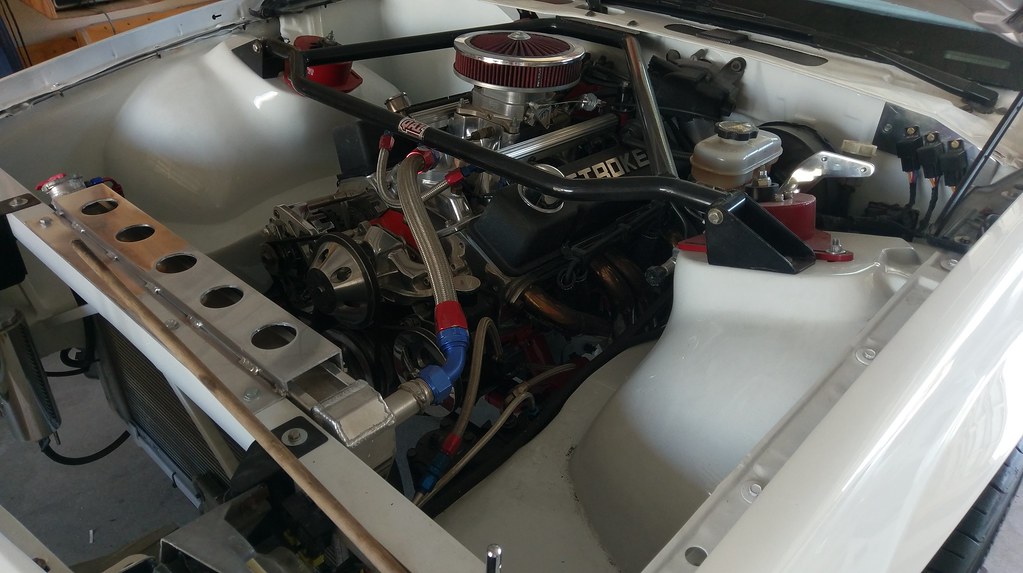
As far as the spoiler goes, ASC just cut the top off, folded over the metal and plug welded it down. you can see in the first picture how uneven iand just unfinished they left it. The trunk lid would line up but only without the weatherstripping. The second picture shows the trunk lid height difference with weatherstripping installed and the lid shut. You can also see the wide gap that they left between the trunk lid and fender and tonneau cover and fender.
And this is what the stock spoiler looked like when set in place. I had to lengthen the side legs.
Looks great man! I recognize and appreciate all of the time and effort you put into that car. Awesome job!
I was going to do the exact same paint scheme with this car about 17 years ago.....but I had a little wreck with it and sold the car. I had a vortec engine bought and was going with the ram jet...I had all the orange emblems bought, had new 17" ROH wheels and new Sumitomo tires bought, and was just about to start tearing into it when this happened.....
After seeing your car, I really wish I would have just kept the car, fixed it, and finished what I had planned for it. Your car is awesome.
Car looks great!!! Love the hood, stance, LEDs, looks like white race seats? And paint all match well. Great work! Always loved the 91-92 z and thought I�d have one in that exact paint scheme. Also side note from the more serious work, but the radiator support looks awesome! I need to learn to weld!
I have been watching this build. You did a great job man. Enjoy her!
Thanks, still have a few things on the old to do list. These cooler months I'll re-do the exhaust in hopes of quieting it down and mating a Ford 8.8 and GM 10 bolt.
Thanks NufNuff. I had some good threads like yours (https://www.thirdgen.org/forums/tpi/...ged-tpi-w.html) that I remembered following and I'd look over them periodically again as I was working on this car. For any newer members NufNuff has a car that is every bit as impressive, not to mention he is a fellow MegaSquirt guy. I was looking at it again when I was researching making an 8.8 with ten bolt tubes, when you were welding your 9" did you use a truing bar or did you flame straighten it or just let it ride?
Thanks NufNuff. I had some good threads like yours (https://www.thirdgen.org/forums/tpi/...ged-tpi-w.html) that I remembered following and I'd look over them periodically again as I was working on this car. For any newer members NufNuff has a car that is every bit as impressive, not to mention he is a fellow MegaSquirt guy. I was looking at it again when I was researching making an 8.8 with ten bolt tubes, when you were welding your 9" did you use a truing bar or did you flame straighten it or just let it ride?
Thank you so muh for the compliments. I sold that car to start another build on my yellow Iroc(not the original one I have) I've had since 1996.
Honestly, I'm not sure as my friend built it for me. I'd bet it was with a truing bar though!
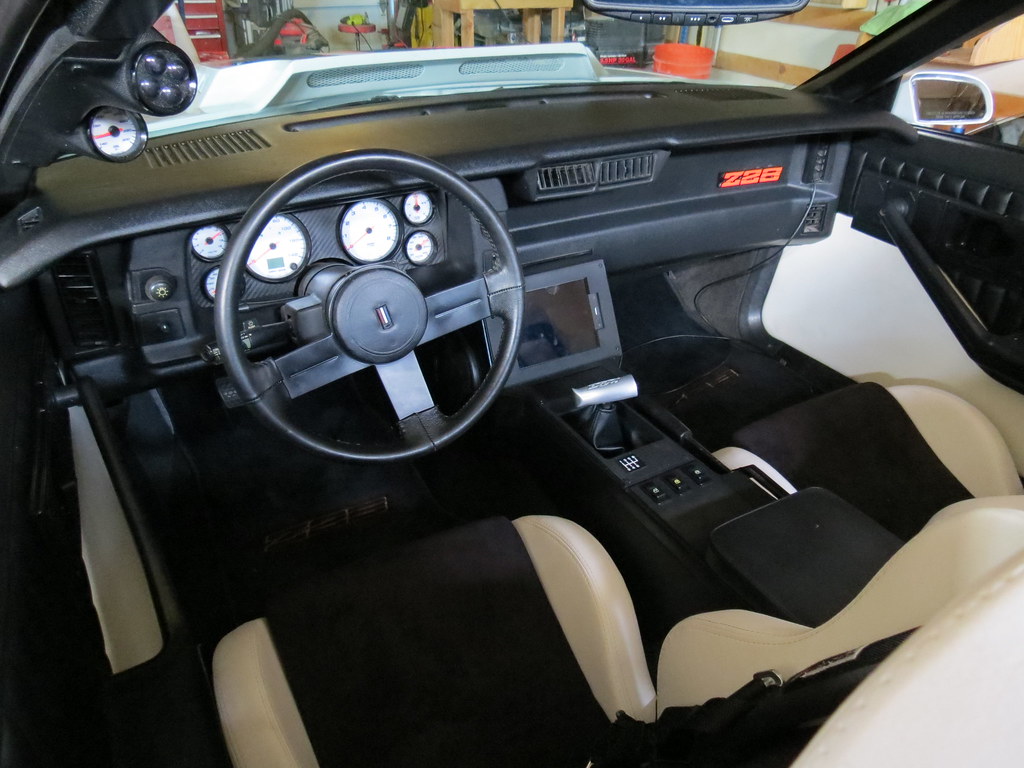
I tried taking the interior shots a couple different places in different lighting and I settled on sunrise in the garage with the overhead lights off. Outside was too bright and inside with lights was too dark and threw shadows.
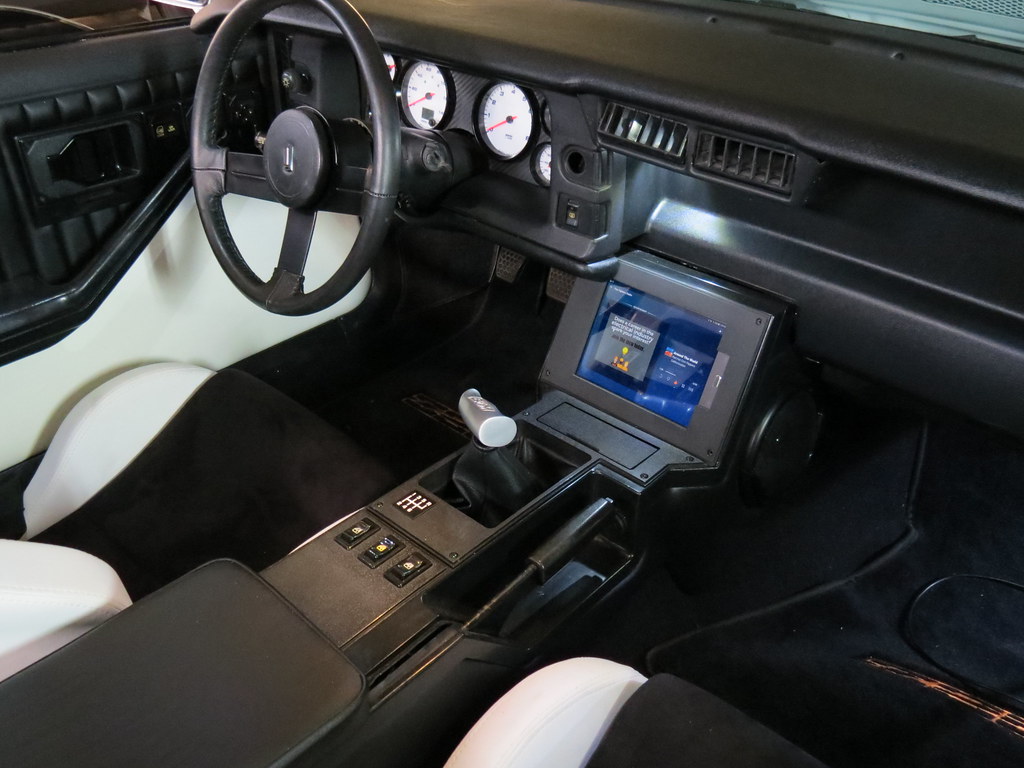
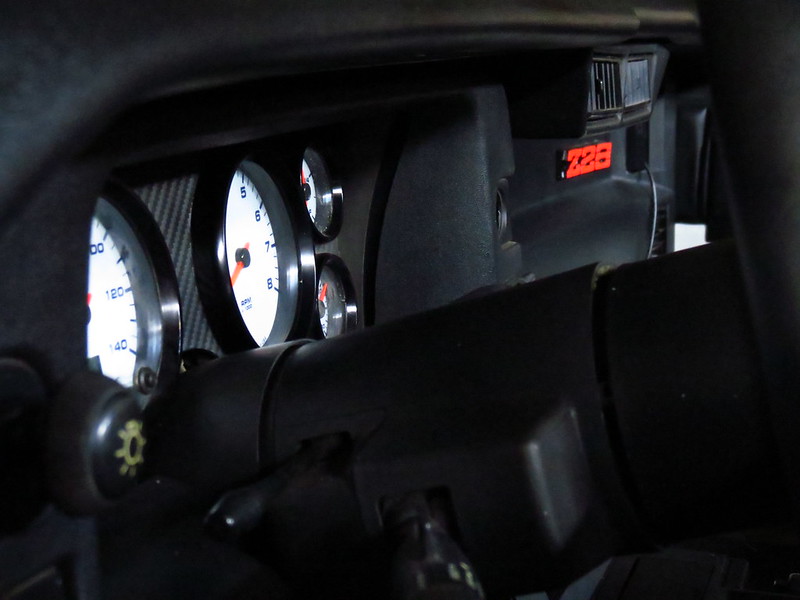
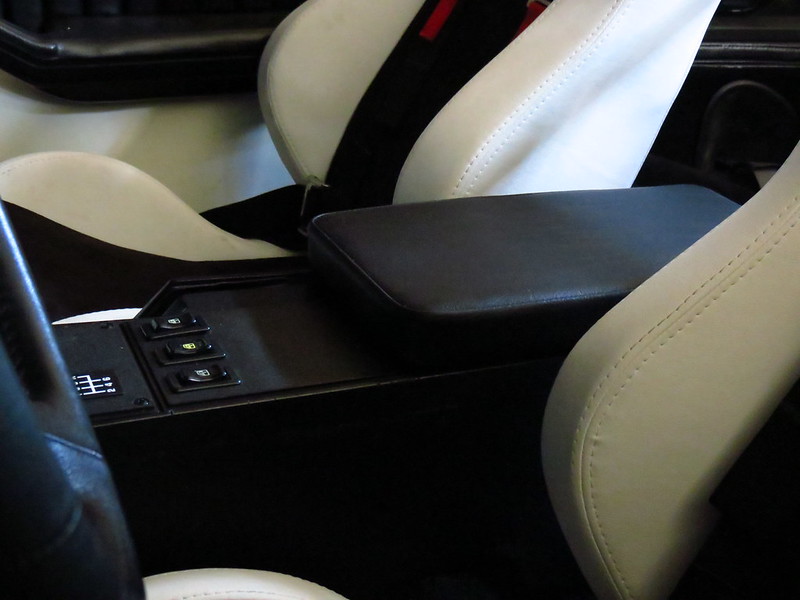
The tablet mount I made based off a file of the double din 3D printable mount that another member made. It uses a Samsung 8" tablet that connects to MegaSquirt with BluTooth and the stereo with the headphone output. I relocated the front dash speakers that were 4x6" to a 6" and mounted them on the sides of the front of the center sonsole. The Z28 emblem I also made on a 3D printer.
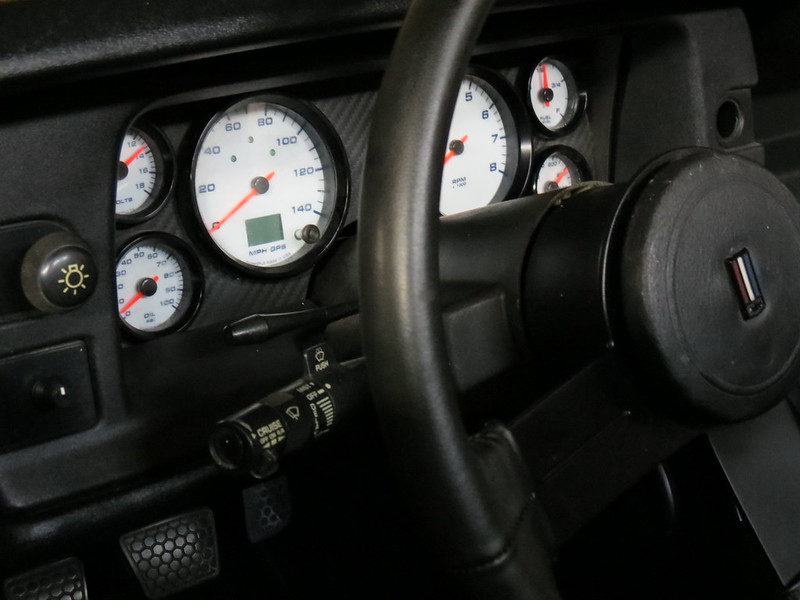
The gauge on the pillar is an oil temp gauge and the four black dots in the gauge above it are smoked LED lights. At 4,500 RPM two yellow LED turn on and at 6,000 RPM two red LED turn on. MegaSquirt controls them.
The gauges are SpeedHut. The speedometer is a GPS unit and all the gauges in the cluster are the gauges you would see in a normal 91/92 Camaro gauge cluster.
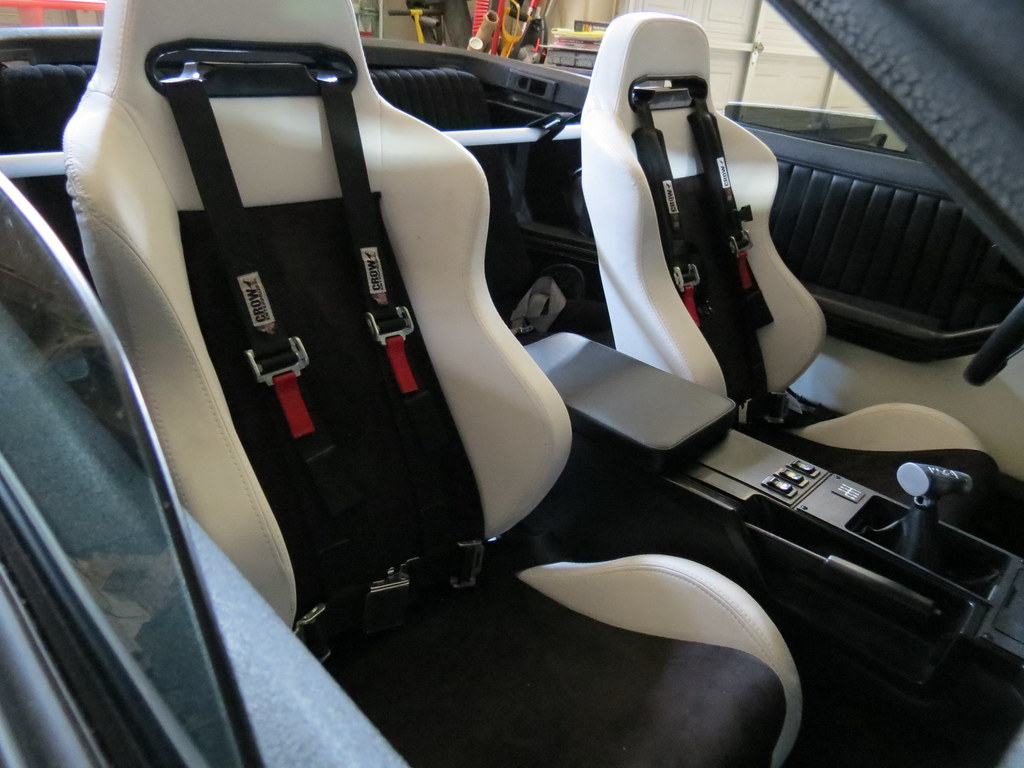
I made the padded leather center console cover from scratch. The reproductions are $150 and I thought I'd rather make my own than pay that.
The switch in the middle is "third" window switch, I wired the door poppers to that window switch- window up pops driver's door, window down pops passenger door.
And I bought the six speed sticker since it's a T56.
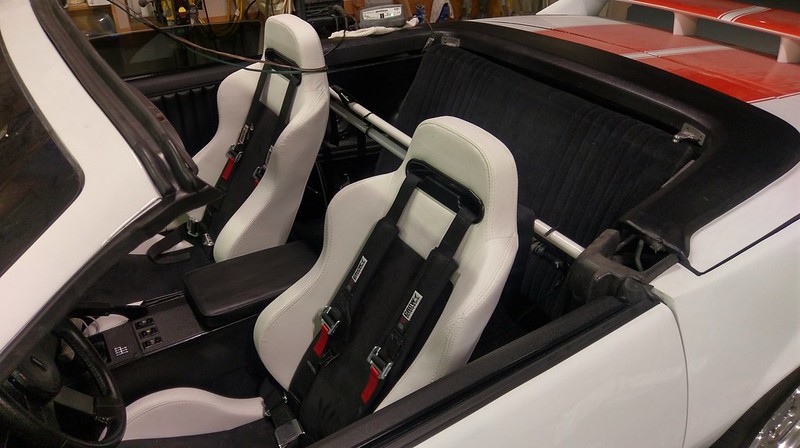
The rear seat is just for show but it is there. With the harness bar I understand that it would be too dangerous to use.
I just use the manual pulls. The tonneau cover poppers do not work and I can't find anything to replace them with. I have the switch wired up, its just sitting underneath the center console.
I just use the manual pulls. The tonneau cover poppers do not work and I can't find anything to replace them with. I have the switch wired up, its just sitting underneath the center console.
Hey that works too! I was just curious because it seems like you figured out a lot of clever mods for this car and I don�t see any shortcuts.. bravo!
Nice love it!!! What did you use to fill in the back bumper? That under hood smoothing looks ridiculous!! I did a light smoothing to mine.
I cut strips of plastic the size of the gap. I drilled holes into those strips and the bumper to make fingers to help the adhesive have something to grab onto and then used flexible bumper adhesive for adhering them together and Evercoat Polyflex for any spots that needed filled.
You'll be glad you spent the time on yours to smooth out some stuff. Just smoothing/blending the big overlapping metal seams goes a long way aesthetically.
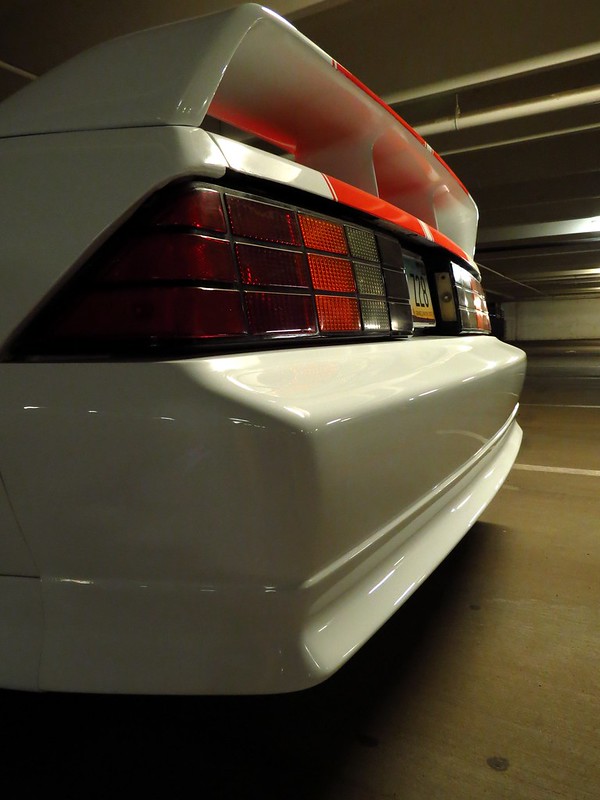
Did nobody notice the rear bumper?
Here is a stock 91/92 rear bumper with the inset running across the entire bumper that opens up for the emblem:
As I tried to figure out a polite way to say I didn't like the smoothed bumper.....I stared at the picture of if and a though occured to me: DUDE....I REALLY like that smoothed bumper!!!!!!!!!!!!!!
Awesome car.
Great pics. Excellent angles.
For the sake of variety though (as it pertains to COTM purposes), I do hope to see at least a couple of "daytime-outdoors" pics.
Awesome car.
Great pics. Excellent angles.
For the sake of variety though (as it pertains to COTM purposes), I do hope to see at least a couple of "daytime-outdoors" pics.
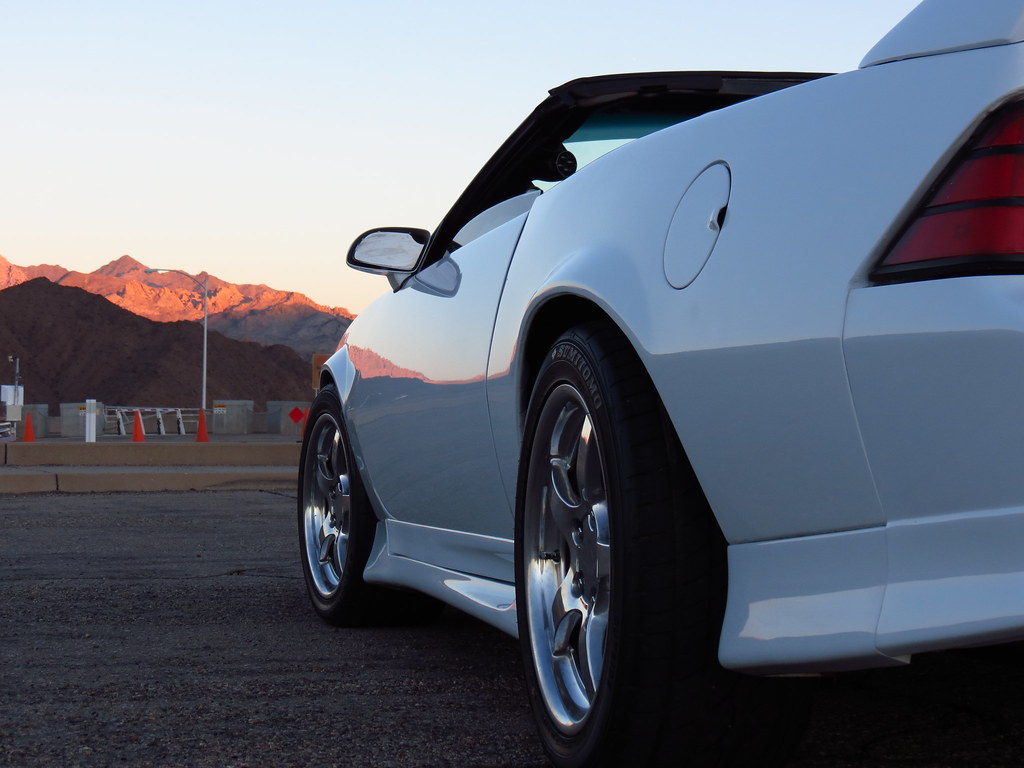
I'm going to try to make some time to drive it to Lake Mohave at sunrise and take the pictures at one of the scenic spots people always stop for pictures.
I noticed the smoothed bumper right away. I love it, too. Looks like you filled in the ornament spot on the front bumper cover, too. It looks super clean that way. The engine compartment is stellar. Very, very clean! It looks like the hood doesn't fit at all, though. The nose needs a little alignment on the pass side. I'm not picking it apart, so please don't take it the wrong way.... that car is soooooo damn cool, and it truly deserves to have every little thing lined up perfectly. I said before that I recognize and appreciate all of the work that you've done on this gorgeous machine, and I mean it. Great work man. GREAT WORK!
It looks like the hood doesn't fit at all, though. The nose needs a little alignment on the pass side.
I'll agree that it needs some work in that area. One of the other guys brought it up (think it was Dennisbernal) Most of the blame is Harwood, some other members (Anesthes? and another guy I'm forgetting) have switched from their Harwood hoods because of the less than factory perfect fitment. The hood is a two piece fiberglass so I'll probably add some fiberglass on the front to get more of a factory fitment. That lip that comes over the headlight bucket might have to stay, pretty sure it's for strength. The passenger side bumper in that top corner, I can't remember if it wouldn't come in anymore or not.
They were all taken from atop the dam, Would have been nice if I could have gotten the lake in some of them. Once I finish the new exhaust setup and reinstall the weight jacks with different springs I'm going to take some pictures of it outside at night. Want to try some shots of it underneath street lights and then in the darkness with some light painting effects.
Wow, I wish I had 1/10th of that talent. I know it's an old thread but looks great! I stumbled on this trying to find 3d print models of the actual gauge cluster not the bezel.
Nice work fixing the cheap, lazy, sloppy convertible conversion that GM should've been embarrassed about approving.
Modern 4x6 halo headlights look nice on 3rdgen Camaros.
The black and white interior is an excellent choice for a white convertible. "Classic."
The bumper looks nice too, clean.
And the third brake light delete cleans up the hatch. With so many people having fitment issues with the 85-90 fiberglass Firebird aero wing, if I ever have to replace my factory aero wing and run into similar issues, then I'll also be considering deleting the third brake light and going 85-style.
 10-07-2018, 02:48 PM