When you click on links to various merchants on this site and make a purchase, this can result in this site earning a commission. Affiliate programs and affiliations include, but are not limited to, the eBay Partner Network.
The TruckersAC website does have an FLX7 model (4868) that is universal with a single pulley. The price is reasonable too! That part of the equation I can figure out fairly easy. The bracket is the part I'm wondering about. The Sanden would be a great option if the original compressor dies. I don't feel the need to re-invent the wheel; if someone has already done this reliably, I'm content to pursue that avenue. I was hoping that someone who had might chime in.
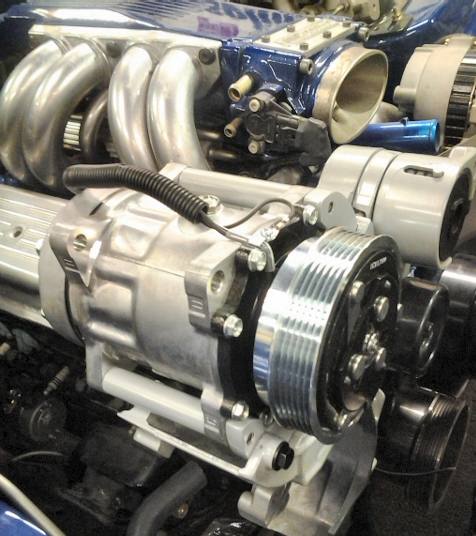
i cant tell by the pictures. is there enough room to fit tall valve covers?
looks great by the way..
Thanks guys!
Lone, I don't know how much higher tall valve covers are over stock. Mine are not stock but, I'm reasonably sure they are not tall (as compared to the old M/T covers on my 71). I wanted the compressor fairly tight in clearance to what I have...
Stock GM connector has a Green wire from Accumulator Low Pressure switch. Connect to wire coming out of compressor (IIRC, there is only one wire on the compressor). Other stock wire is ground, and you should not need it, but can ground it to the compressor body if there is a ground connection.
So since my wires from my car harness is a green wire with a resister built into it, is there anything I would need to modify on mine to get it to work?
I also have the single wire which I think is the pressure line wire. I'll get a picture up here in a bit to show you what I mean.
It's not a resistor, but a diode. Not needed on the Sanden ( it's built in I think). You may have a High Pressure switch on the back of the R4. The power runs from the Accumulator low pressure switch, thought the green wire to the R4, then out the black wire either to ground or to the High Pressure switch ( which interrupts the ground when 450PSI is exceeded). On the Sanden, you go Green to sanden. Can't remember if the Sanden has a seperate ground wire, or if it just grounds through the bolts.
You may have a third set of wires to the High Pressure switch in the High Side Pressure Line. Just leave these alone- they trigger the fan ( at least that's what I use it for).
darby is correct. the sanden is grounded to itself. you can see the blk/wht ground wire in post #52. it has a ring terminal and is screwed to the black part of the compressor.
Some of those brackets that can be used to convert the stock Harrison compressors on the right (passenger) side, over to the Sanden compressors are from Old Air, in South Fort Worth, Tx. I'm not aware of any from Vintage Air.
I haven't started mocking up my project yet, but I plan on also trying to have 1" or so spcaers made to move everything out away from the block farther for more valve cover clearance.
The Sanden is a couple of inches longer. You can Google Sanden compressors and they have a site somewhere that gives the dimensions.My R4 is mounted on the driver's side and I don't think the Sanden will fit without hitting the stock valve covers.
Some of the early posts mention the Vintage Air brackets that adapt the compressor to the compressor bracket. I don't have access to the car right now but if I remember correctly there is around 1 or 2 inches of clearance between the compressor and the stock valve cover. Here is one photo I took before putting the car in storage unfortunately I can't find the other pictures I took during the install. Thanks to the pioneering work of darbysan this whole conversion was very simple.
just done this coversion on my 89 S-10 worked great. vintage air brackets worked just fine on the FLX7 compressor. stock hoses worked fine also. put in a Parallel flow condensor new dryer orifice tube. vacumed the system charged. works better than it ever has.cooling to 40 F on a 90 degree day.
I just did this swap. Holy crap... vents are blowing 36�F air now!
I'm running a Classic Auto Air system on my 1971 Camaro, but was running a serpentine system... so I was running a R4 before and was getting 42-43�F (which I thought was cold at the time). Decided to try the Sanden... glad I did.
I literally can't point the vents directly at me as it literally gets too cold now...
Can anyone tell me whether or not if my 1990 Formula already has a usable condenser? It only has 16,500 miles on it and I'm going to be converting to Sanden/R134a. Current R4 isn't bad, but it's short-cycling due to being low on R12. Not sure if I could get by with the condenser currently installed or if I should just buy a new one. Money is not the problem, but it would be nice to not have to pull the old condenser if I don't need to. True parallel flow condensers are $280 at Original Air...
I doubt that yours has the parallel flow, as those came later. You can check by looking at your current condenser. If the ends of each row have a 180 loop into the next row, then it is not parallel flow. It will still work- it's just not as efficient.
If yours is installed in a similar fashion as mine, then it can be replaced by simply unbolting the radiator and tipping it back toward the engine. No need to remove the radiator hoses or fluid, but you might have to remove the fan. The condenser will be held in with two brackets ( 1 bolt each). Unbolt and lift up. I place a piece of cardboard between the radiator and condenser just to keep from messing up the fins.
Thanks. I see that Original Air sells a complete conversion for 88-92 F-body cars. A bit pricey (~$850 shipped), but it includes everything except the refrigerant and the oil. Takes out some of the guess work about what works well together. Of course, piecing it together is gonna be cheaper and probably work fine, as many on here have demonstrated.
I doubt that yours has the parallel flow, as those came later. You can check by looking at your current condenser. If the ends of each row have a 180 loop into the next row, then it is not parallel flow. It will still work- it's just not as efficient.
If yours is installed in a similar fashion as mine, then it can be replaced by simply unbolting the radiator and tipping it back toward the engine. No need to remove the radiator hoses or fluid, but you might have to remove the fan. The condenser will be held in with two brackets ( 1 bolt each). Unbolt and lift up. I place a piece of cardboard between the radiator and condenser just to keep from messing up the fins.
I purchased and have installed the Original Air Stage 3 conversion (includes everything from evaporator to condenser). I can't get it to take more than 5 or 6 oz of refrigerant. After 30" vacuum for an hour, I let it suck in all it would take (vapor only), then started and turned on the A/C on max. The compressor short-cycles (~1 second bursts) but will not suck in any more refrigerant. Low side runs about 70 psi (at 85 degree ambient) and drops briefly to 30 psi when compressor cycles. High side won't get any higher than 110 psi. What am I doing wrong?
I purchased and have installed the Original Air Stage 3 conversion (includes everything from evaporator to condenser). I can't get it to take more than 5 or 6 oz of refrigerant. After 30" vacuum for an hour, I let it suck in all it would take (vapor only), then started and turned on the A/C on max. The compressor short-cycles (~1 second bursts) but will not suck in any more refrigerant. Low side runs about 70 psi (at 85 degree ambient) and drops briefly to 30 psi when compressor cycles. High side won't get any higher than 110 psi. What am I doing wrong?
Check high side pressure. Might have to short the low pressure switch to get the compressor to pull down long enough to continue charging
A thank you to the guys who did the leg work on this.
I used the Dirty Dingo adapter kit and it worked fine. One of the spacers was a bit short, but it works without any issue. https://www.dirtydingo.com/shop/prod...oducts_id=1622
I got everything from Napa other than the compressor itself which I sourced online. I reused my existing low pressure switch, and high pressure switch (on the hard line below accumulator). And since my car is a 91 it already had the ~sort of~ parallel condenser. Make sure you guys remember to jumper/splice the high pressure cut out switch/connector that was on the back of the R4. I forgot and had a hour of WTF!!?? why wont cycle!!!
The only real issue I ran into was the angle of one of hoses. It was kinking pretty hard, and while I know it would have pressurized without a problem I bent the tubing a bit to relive the kink a bit. Its working great!!! and today it hit 35F from the center vent!!! After owning thirdgens for 20+ years this life changing. Even R12 never worked this well.
Random pics:
hitting AIR system, and not even all the way back.
Suction side needs to be bent so it more of a 90 degree bend.
Word of warning. That variable orifice tube took a **** on me. Howling and vibrating. (And AC no longer worked). Replaced it with a .062 orifice tube. I just got it from napa by asking for a 2006 F250 orifice. Blowing cold now.
Botken varible orifice Granted this is at 10am and it was only about 87F.
You know, what's funny is I think I'd be ok with it at first, but then it would bug the crap out of me if it wasn't sitting level. I'm again back to the, you want to make another set? hehe
Did deadbird ever decide to make these, or provide a dimension drawing? I much prefer the look of what he has done with that bracket.
Another question for Deadbird.... it is not clear to me if he made or had the 6 rib pulley made or if he purchased the 6 rib from the source he linked in the thread. The pix look like his pulley is machined whereas the link is a black poly piece.
DynoDave, no, neither. Since the 'finishing' of the brackets, I lost a small wrestling match with some metal and had to have some procedures done to regain use of my left hand functions.
Turned out to be rather expensive and set me back quite a bit, in more than one way. S--t happens tho..
Popper, the pulley I provided the link to is still correct. The image is most likely a generic (or old) photo of the pulley with a crap gloss black paint job on it. Mine came with the pulley
non painted and the cluch painted oxide (satin) black. The 8 rib pulley that came with the compressor was the same way.
I'm getting ready to order the Original Air stage one kit and want the 6 rib pulley.
I spoke to them and they said they don't have the 6 rib as they use the universal 8 rib.
I looked on the Sanden site and didn't see one listed with the 6 rib.
Has anyone seen one that comes with the 6 rib? I know you can buy the clutch but hoping to save on the expense of purchasing another clutch.
I used the 8 rib pulley with the 6 rib belt. No issues so far, and it's been several years. Just had to line up the pulley with the others, which was not much of a problem.
 02-27-2015, 10:07 AM