When you click on links to various merchants on this site and make a purchase, this can result in this site earning a commission. Affiliate programs and affiliations include, but are not limited to, the eBay Partner Network.
Re: Long time coming AKA My 91 Z28 Vert build thread
Originally Posted by Tibo
I finished those side B pillar trim caps that the top goes through. I fiberglassed the sides and then slapped body filler on the top to smooth it out. I decided to try the sprayable bedliner after so many members had reported it's uncanny ability to mimic the look of the stock textured items like the dashboard and other interior plastics. I was skeptical but wow(!) this looks and feels original now! I'm very impressed, so impressed that I will probably spray the dash (not the dashboard though).
Re: Long time coming AKA My 91 Z28 Vert build thread
Some pictures of how the exhaust is going. I'm making pie cuts with my band saw and mig welding it together. The process is exactly the same as making the subframe connectors. Find the length and cut. Find the angle needed, divide by 2 and then cut. Weld together and then repeat for the next section. I have the long tube headers with a 3" collector bolted to a 3" to 2.5" reducer and then of course I'm using 2.5" pipe. They pass the transmission mount I made and then the drivers side makes a 75* turn between the torque arm and transmission mount to turn towards the passenger side and then makes another 75* turn to meet up with the passenger pipe and they will be welded to a 2.5" to 3" collector and then into a Bullet style muffler. I've had this style setup for a few years and it's a bit loud, louder then I would like but this is the least obtrusive setup for our cars. As a last ditch effort I'm adding a pair of short bullet style mufflers just after each header. If it's still too loud I will replace the bullet style mufflers with a section of straight pipe and route the pipe over the axle and use a two chamber flowmaster I have sitting around.
Re: Long time coming AKA My 91 Z28 Vert build thread
I thought I would show how I weld them together in case someone is wondering or someone can tell me a better way. I fit the two pieces together under the car and then I draw a circle between the two pieces so I know where they line up. I slip my little MIG spacers in between the pipes and then I clamp the two with a pair of Vise Grips so they don't move. A couple of spot welds and it's on to the next piece. I also found out that the angles can be safely mismatched if the discrepancy in the two angles is 10* or less. So a 90* cut can still line up with an 80* cut, once it's welded (MIG especially) it's smooth and you can't tell. That really helps to fudge the angle bigger or smaller if you miscalculated it.
Re: Long time coming AKA My 91 Z28 Vert build thread
Originally Posted by Tibo
Some pictures of how the exhaust is going. I'm making pie cuts with my band saw and mig welding it together. The process is exactly the same as making the subframe connectors. Find the length and cut. Find the angle needed, divide by 2 and then cut. Weld together and then repeat for the next section. I have the long tube headers with a 3" collector bolted to a 3" to 2.5" reducer and then of course I'm using 2.5" pipe. They pass the transmission mount I made and then the drivers side makes a 75* turn between the torque arm and transmission mount to turn towards the passenger side and then makes another 75* turn to meet up with the passenger pipe and they will be welded to a 2.5" to 3" collector and then into a Bullet style muffler. I've had this style setup for a few years and it's a bit loud, louder then I would like but this is the least obtrusive setup for our cars. As a last ditch effort I'm adding a pair of short bullet style mufflers just after each header. If it's still too loud I will replace the bullet style mufflers with a section of straight pipe and route the pipe over the axle and use a two chamber flowmaster I have sitting around.
I think that you are going to find, that between the engine torque (twist) and the suspension movement (rearend, torque arm and driveshaft) , that there's going to be some interference/banging. I have seen other's do something similar to this, so I could be wrong... Just suggest triple checking clearances with drivetrane flexed/twisted as much as possible.
curious as why you choose not to buy mandrel bends for the exhaust? You could buy bends and then pie cut for better fitment and smoother transition from turn to the next..
Re: Long time coming AKA My 91 Z28 Vert build thread
Originally Posted by rb85TA
I think that you are going to find, that between the engine torque (twist) and the suspension movement (rearend, torque arm and driveshaft) , that there's going to be some interference/banging. I have seen other's do something similar to this, so I could be wrong... Just suggest triple checking clearances with drivetrane flexed/twisted as much as possible.
curious as why you choose not to buy mandrel bends for the exhaust? You could buy bends and then pie cut for better fitment and smoother transition from turn to the next..
also, check out the DSE build on their 3rd gen... got a pretty sweet setup on the exhaust (Just for another approach/idea for getting what you want).
still digging your build man, stay cool😎
Re: Long time coming AKA My 91 Z28 Vert build thread
Originally Posted by rb85TA
also, check out the DSE build on their 3rd gen... got a pretty sweet setup on the exhaust (Just for another approach/idea for getting what you want).
still digging your build man, stay cool��
The DSE threads are a publicity stunt, they are only interested in using thirdgen.org for free publicity/product advertisement. That's all I will say about that.
Re: Long time coming AKA My 91 Z28 Vert build thread
Originally Posted by rb85TA
I think that you are going to find, that between the engine torque (twist) and the suspension movement (rearend, torque arm and driveshaft) , that there's going to be some interference/banging. I have seen other's do something similar to this, so I could be wrong... Just suggest triple checking clearances with drivetrane flexed/twisted as much as possible.
curious as why you choose not to buy mandrel bends for the exhaust? You could buy bends and then pie cut for better fitment and smoother transition from turn to the next..
You're right about twisting. I foresaw that and left 1/2"-1" clearance between the pipes and body/suspension pieces. If I do still run into excessive banging I will remove the pair of mufflers behind the headers in favor or those expensive flex mesh tube pieces. I don't have much faith that those little mufflers will quiet it down enough to my liking anyway but it's a last ditch effort.
As for the mandrel bent pipes, I'm trying to do as much of this myself as possible and that has really been my theme for the entire build. I have never done a pie-cut exhaust and I wanted to try it. It's turning almost as good as I hoped so I'm happy with it. The mandrel bends would also cost more money and I would most likely end up ordering too much (money down the drain) or having to order more. Murphy's law. Pie cuts allow for far more customization than mandrel bent pipes welded to straight pipes could offer. For instance, I have a few double angles around the transmission mount.
Re: Long time coming AKA My 91 Z28 Vert build thread
Originally Posted by Tibo
The DSE threads are a publicity stunt, they are only interested in using thirdgen.org for free publicity/product advertisement. That's all I will say about that.
LOL, ok... If you say so, I've been following it on Facebook ,never knew that it was on this forum... but, personally I don't care , they've been making solid aftermarket parts that they produce and race themselves... and are finally doing stuff for our car's. Nevermind the fact that their "publicity stunt" is pretty damn righteous!
I try to learn something from everyone, I would never build a convertible myself, but have learned a few things from your build that I will be doing the same or similar to mine... Just sayin, weather you like someone or not, weather you agree with their motives or not, doesn't mean that you can't get idea's from what they're doing.
God Bless
Re: Long time coming AKA My 91 Z28 Vert build thread
Originally Posted by J. Chris Davis
Getting there. Looks good. Are you going to do dual pipes or are you tying into the right side intermediate pipe?
Thanks, progress has slowed because the opportunity for overtime has come available for the last 2-3 months and I have a week or two left. Basically as much as I want to work they will let me, so I'm doing 65 hour work weeks. Hospitals can't close ya know!
I'm going to have them come together with a 3" Y adapter and then go straight into a bullet style muffler that has a turn down to dump before the rear axle. If it's not too loud I'll keep it this way, if it is I'll remove the bullet mufflers and run a muffler in the stock location or the way Twim_Turbo did here: https://www.thirdgen.org/forums/exha...ml#post6004979
Re: Long time coming AKA My 91 Z28 Vert build thread
Originally Posted by rb85TA
LOL, ok... If you say so, I've been following it on Facebook ,never knew that it was on this forum... but, personally I don't care , they've been making solid aftermarket parts that they produce and race themselves... and are finally doing stuff for our car's. Nevermind the fact that their "publicity stunt" is pretty damn righteous!
I try to learn something from everyone, I would never build a convertible myself, but have learned a few things from your build that I will be doing the same or similar to mine... Just sayin, weather you like someone or not, weather you agree with their motives or not, doesn't mean that you can't get idea's from what they're doing.
God Bless
I followed their threads at first but when they wouldn't answer anything other than softball questions I lost interest. Sure their car will look and handle great but I'm more interested in the why or the thought process for something, take that away and I'm bored.
Re: Long time coming AKA My 91 Z28 Vert build thread
Originally Posted by Tibo
You're right about twisting. I foresaw that and left 1/2"-1" clearance between the pipes and body/suspension pieces. If I do still run into excessive banging I will remove the pair of mufflers behind the headers in favor or those expensive flex mesh tube pieces. I don't have much faith that those little mufflers will quiet it down enough to my liking anyway but it's a last ditch effort.
As for the mandrel bent pipes, I'm trying to do as much of this myself as possible and that has really been my theme for the entire build. I have never done a pie-cut exhaust and I wanted to try it. It's turning almost as good as I hoped so I'm happy with it. The mandrel bends would also cost more money and I would most likely end up ordering too much (money down the drain) or having to order more. Murphy's law. Pie cuts allow for far more customization than mandrel bent pipes welded to straight pipes could offer. For instance, I have a few double angles around the transmission mount.
I hear you there, I've bought some bends and straight pipe to do mine. I bought enough to mess up a couple of times and still be able to get it done... I hope ,lol... but , like you, I'd rather do the work myself and that means learning from my mistakes as well as other's. I'm not rich, I don't own a business, I work way too much making mine and my bosses company money. For me, I'd rather waste a little bit of money learning how to get the best that I can possibly do, than skimp and not be happy with the results.
I like what you are attempting to do with the exhaust, but I'm doubtful that it will be as quite as you're wanting.
either way, can't wait to hear it when it's done...😉😎
Re: Long time coming AKA My 91 Z28 Vert build thread
Originally Posted by Tibo
I followed their threads at first but when they wouldn't answer anything other than softball questions I lost interest. Sure their car will look and handle great but I'm more interested in the why or the thought process for something, take that away and I'm bored.
I can understand that, for some reason the aftermarket and many "car guy's" have adopted the idea that keeping other's in the dark about how and why they do or did something is top secret and simply have no interest in helping anyone else out... but they'll sell it to you, lol.
I grew up in a garage with my Dad and his buddies, they always help each other and any one else that wanted to learn... I was taught, that "hotrodding" isn't a particular type of car or car's, it isn't bound bye a set of particular year's or even a certain style... hotrodding is about a person, their car(no matter the make ,model or year), & their journey to meld together their persona with their machine... making it an extension of themselves and what they like, what they think is cool... no matter if anyone else gets it or not.
so, I understand your flooding interest in someone that has no interest in helping other's.
God Bless
Re: Long time coming AKA My 91 Z28 Vert build thread
Got the exhaust done, I'm happy with the exhaust in that it does hug the underbody but it is still lower than I wanted. As was probably predicted, it's also not much quieter. In the future I will remove the glass packs and route the tubing over the axle for a bigger muffler. I did all the welds (except for the reducer) as an open root but weld and I only blew through in one spot that I easily fixed. I cut up the prior exhaust set I had and it was horribly welded by the exhaust shop. There was MIG wire poking through every welded joint and all the welds were globbed on. He also treated the joint between the reducer and pipe as a slip fit rather than a but weld, so I had 1-2" of pipe protruding into the reducer. I bet the flow on that was abysmal.
Re: Long time coming AKA My 91 Z28 Vert build thread
I also used a Metric nut (M18 x 1.5) that I cut down for the Oxygen sensor bung. The actual oxygen sensor bungs that I found were crazy over priced so I went this route.
Re: Long time coming AKA My 91 Z28 Vert build thread
Originally Posted by Tibo
I also used a Metric nut (M18 x 1.5) that I cut down for the Oxygen sensor bung. The actual oxygen sensor bungs that I found were crazy over priced so I went this route.
I'm glad you were able to get it done... sorry it didn't get you where you want to be, but better to have tried and failed, than to never have tried at all.
I'm confident that you will succeed in the next setup ,as all of your work exceeds everything else to date that I've witnessed on a 3rd gen.
Re: Long time coming AKA My 91 Z28 Vert build thread
I think the stainless O2 bungs I bought were $8/pair, but using a nut is a great alternative.
If you ever have some money burning a hole in your pocket, get a tig welder. You'll love it I promise! Mig is great of course, but tig opens up a world of home fab options!
Re: Long time coming AKA My 91 Z28 Vert build thread
I've been starring at an alpha tig for the last year or two and I think I'm finally buying it this summer. With the car mostly done I'll have more free time to devote to practice.
I put the car on the ground for the first time and while looking great, the exhaust clearance sucks. I will have to redo it somehow and drive like a granny around incline and declines and speed bumps until then. I'll be getting it aligned and the crane measured in two weeks also.
Re: Long time coming AKA My 91 Z28 Vert build thread
I timed the engine and put the 3 point strut tower brace on and took some pictures. Engine bay is 95% of the way done.
Afterwards I took the car for a drive around the block. I quickly discovered that I need the front wheels aligned. I also live on the side of hill and at the top of the hill is a stop sign. When I got to the stop sign I shifted into neutral and then, POP! Clutch pedal went dead. I discovered that the clutch pedal bushing popped off and the car was now basically dead in the water. Luckily though (again I live on the side of a hill) I just let off the brakes and coasted backwards back to my house. I still don't know if the clutch pedal bushing was installed backwards or not all the way on, I believe it's on now. I hope. I also discovered that my starter is beginning to suffer from heat soak. It is a Power Master and has been a great starter but it is turning over much slower now when the engine is up to temp and sitting. I purchased another Powermaster and I went with their Master Torque series. https://www.summitracing.com/parts/pwm-9000
Re: Long time coming AKA My 91 Z28 Vert build thread
Finally finished the cowl vent screen for the drivers side. The linkage for the wipers just pokes above the cowl so I had to make a hump and this is what I have now.
It doesn't look great but it works. In the future I will press mold a screen similar to what is done with speaker grills that this video demonstrates.
Re: Long time coming AKA My 91 Z28 Vert build thread
Your strut tower brace reminded me that my car must have had one on it because it has 2 holes drilled in the same location as yours. I found the QA1 brace here: https://www.qa1.net/suspension/stree...t-tower-braces
But I'm sure other companies make that style brace too. Any idea who?
Remember to pick up thinner tig gloves, adjust your masks lens darkening, and at least wear long sleeves. I should probably get a jacket but I just throw on something with sleeves. Like Mig, you will get uv skin burns (sunburn) if you don't keep your skin protected.
Remember to pick up thinner tig gloves, adjust your masks lens darkening, and at least wear long sleeves. I should probably get a jacket but I just throw on something with sleeves. Like Mig, you will get uv skin burns (sunburn) if you don't keep your skin protected.
I will order on of the kits, thanks. I received some UV sunburns two or three times since I've been working on this. I bought some welding sleeves but I wasn't using them because it can get so hot out here. I do need to get thinner gloves for TIG. I have seen guys using regular work gloves... what do you think of that?
Re: Long time coming AKA My 91 Z28 Vert build thread
Originally Posted by robguitargod1
Your strut tower brace reminded me that my car must have had one on it because it has 2 holes drilled in the same location as yours. I found the QA1 brace here: https://www.qa1.net/suspension/stree...t-tower-braces
But I'm sure other companies make that style brace too. Any idea who?
Edelbrock makes one that looks identical, in fact I wouldn't be shocked if they came out of the same jig. I've been running it for years.
Re: Long time coming AKA My 91 Z28 Vert build thread
Originally Posted by ShiftyCapone
Edelbrock makes one that looks identical, in fact I wouldn't be shocked if they came out of the same jig. I've been running it for years.
I believe you are right, I thought there was a thread about this a while ago. I may have bought mine (at least five years ago) as an Edelbrock and it had the QA1 sticker on it.
Re: Long time coming AKA My 91 Z28 Vert build thread
Work golves are fine, just remember to not grab anything hot. With tig gloves you can get a way with briefly grabbing something hot, but not with work gloves.
Re: Long time coming AKA My 91 Z28 Vert build thread
I installed the new starter last week. When I pulled the old one I realized that I did not have a Powermaster (One of those things in life where you swear up and down it's one thing and then you find out it's not). I had a Nippondenso style starter. So I thought what the heck, I'll try a Hitachi (went with the Power Master 9000).
Couple of obvious differences between the two are that the 'Denso based starter has a shorter and thinner main housing (the part that is attached to the aluminum mounting block) when compared to the Hitachi. But the opposite is true when comparing the side housings, the Hitachi's secondry housing is much smaller than the side body of a 'Denso style. In fact with the Denso style starter the main housing is smaller than it's side housing.
I'm running Hooker Long tube headers (1 3/4" primaries) and the clearance with the Hitachi is better so I heat sink may or may not be less with the Hitachi. I think the 'Denso starter had about 1/2" of clearance. Both starters I had to clock with the secondary/side housing below the main housing. If I had shorty headers I don't think I would have any clearance issues and heat soak probably wouldn't be as big of a deal. Yes, my headers are heat wrapped. If I am able to build my own set of headers in a mid or shorty design and I have to replace the starter again in the short term (highly unlikely but possible) I will go with a starter from a mid-90's corvette. They used a Nippondenso style starter, had just under 11:1 compression and from parts stores have a lifetime warranty.
The 'Denso electrical connections are on the side whereas the Hitachi connections are on the back. I had to change the end of my cables to hook up to the Hitachi starter, I almost sent it back and bought another 'Denso just because of that.
They weigh about the same but they sound different. I almost want to say that the Denso style was quieter.
I was also having troubles with resetable breakers for my main power cable. Basically they would trip once and unless they were allowed to completely cool they would trip much more easily. Started reading about how they work and decided to switch to the ANL style fuses. Sounds like they are a thermal snap breaker. I read about the fuses and circuit breakers here:
fuses: http://www.bcae1.com/fuses.htm
circuit breakers: http://www.bcae1.com/cirbrakr.htm
Jump to the important stuff:
"They use the shape of the diaphragm (made of bi-metal material) to prevent the breaker from opening and closing too often/quickly when there is an overload. This breaker uses a different method to slow down the action of the breaker. The wires wrapped around the bi-metal strip form what is essentially a heater. When the circuit opens because the bi-metal strip has overheated, current will begin to flow through the coil of wire (which is connected to both terminals of the breaker). If there is a short circuit that has not cleared, current will flow through the wire and will keep the bi-metal strip hot. Since the bi-metal strip cannot cool, it cannot straighten out and close the contacts. This breaker won't open the circuit completely but the current flow through the tiny wire is limited so the circuit (which can safely carry the rated current for the breaker -- 30 amps here) is in no danger of being damaged."
Re: Long time coming AKA My 91 Z28 Vert build thread
I think for my first TIG welding project (after some practice) I will make a set of solid motor mounts similar to these solid mounts by Spohn for LS engines.
I currently have UMI solid motor mounts. Nothing wrong with them but I just don't see the need for the large through bolt if there is no longer a rubber/poly insert.
Interestingly enough i talked to my dad about what way to weld them. He's a welding engineer. He recommended against using my short circuit transfer MIG. He said when he was blueprinting the welds for Navy Vessels they were unable to make the short circuit MIG welds pass QC. Even with automatic welding machines when they would ultrasoniclly examine the welds there would be a lack of fusion. Since the motor mounts would see lots of vibration MIG should be passed. O/A welding might be the best since it would still be somewhat malleable and more vibration resistant but there may be too much distortion with my skills with an O/A. TIG will probably be my best bet.
Re: Long time coming AKA My 91 Z28 Vert build thread
Found the dimensions for the engine side of the mount and I already have a spare set of motor mounts for the frame side.
I'll use some 3/16" steel plate, cut it out and drill the holes. Then it's just cutting some tubing to the right size and angle (bandsaw to the rescue!) and throw on some spot welds after a mock up. I'm wanting to use some 2" x 2" square or circular x 1/8" tubing. The distance the tube has to traverse is 3.5" from K member to engine block or 2-3/4 after the thickness of the mounting plates is added in, should be plenty strong. On the LS solid mounts it looks like Spohn used 2" circular tubing.
To easily make the mounting holes for the flat plate mounts I follow the KISS method. Go online and print out free Graph paper (http://www.printfreegraphpaper.com/) Print out graph paper to 1/4" grids and verify with a real ruler and then just count out your squares and make your marks and center punch on the metal. And you thought graphing paper had no use after high school.
Re: Long time coming AKA My 91 Z28 Vert build thread
You may be over thinking the mig welded motor mounts "is a bad idea" option. Unless someone was a poor welder - which it does not look like you are ☺ I would not be so concerned.
I have built many solid custom motor mounts and crossmembers over the years that saw plenty of high torque abuse and none ever failed. A few simple gussets welded in place like what is shown on the Spohn ones will make them incredibly strong as well. I would also suspect that the Spohn mounts are migged in a jig.
The likelihood is whatever you end up designing and building will be overkill for the application anyway.
Re: Long time coming AKA My 91 Z28 Vert build thread
MIG may be perfectly fine and I could probably do a good job on the weld. If my dad lived closer I would feel comfortable having him check the welds with an ultrasonic tester but if he advised against welding that part that way and he recommended O/A, TIG or flux core (in that order too), I'll take the advice. I have TIG now anyway.
I want to add two gussets and it looks like I'll have the room on the mounting pad(s) and still have adequate bolt clearance. I had seen others online use the rubber mounting pad but I want to stay with totally solid mounts.
Re: Long time coming AKA My 91 Z28 Vert build thread
I bought some 2" round tubing to connect the two pieces. I found the center on my template and used a compass to make the circle, cut out the center and just traced it onto the metal mounting pad. Easy stuff. This way before I weld I know exactly when it's centered. [/url]
Enough room for a bolt head and washer and ratchet socket [/url]
Re: Long time coming AKA My 91 Z28 Vert build thread
Mounting the plates in their respective locations. I didn't have the bolt holes perfect on all of them, one I did. I think the drill bit(s) wandered a little even on the drill press. I ended up just enlarging the holes on 2 and slotting one hole on another of the mounting pads. [/url]
Re: Long time coming AKA My 91 Z28 Vert build thread
Everything setup and ready for spot welds. On both sides it seemed the pads were not completely parallel and needed a 5* angle on the engine side of the tubes and positioned so the back of the engine was angled down. I took care when removing the prior solid mounts and I measured everything and left the transmission mount bolted in place so I believe I'm accurate. [/url]
[/url]
I had a bubble level on the top side of the engine also and while in the picture it looks slightly off, it is in the same place as it was with the prior solid mounts. [/url]
Re: Long time coming AKA My 91 Z28 Vert build thread
Spent about a week practicing laying beads on sheet metal and then butt welds on sheet metal. After that moved up to 1/8" plate doing the same thing and later practicing fillet joints. I set up a bunch of mock joints using the same metals so I would have my setting and technique down and all I would have to do is mash the pedal and start. So the pictures are one of the test mock ups and then one side of the new solid motor mount.
[/url] [/url] [/url]
I'm thinking the welds are definitely solidly fused but my travel speed was slower then it could have been. The heat input looks too wide for this thickness of material. But it looks good and considering I've only been doing TIG for a week, I'm thrilled! I'd like to practice some weave welds for corner joints and put one on in the future.
Re: Long time coming AKA My 91 Z28 Vert build thread
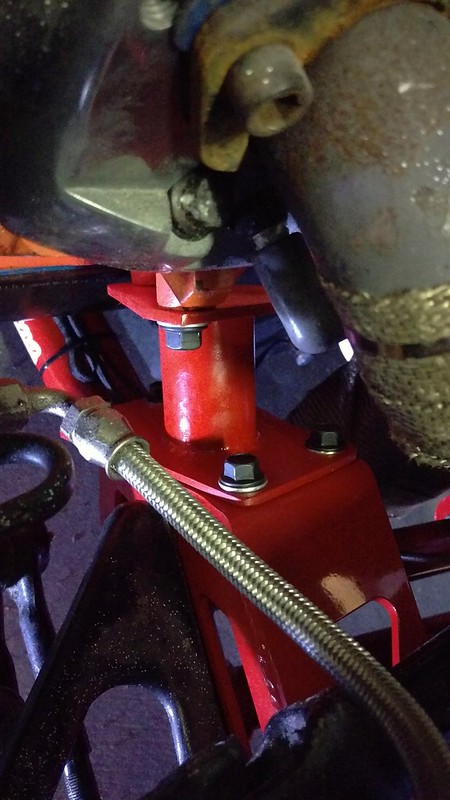
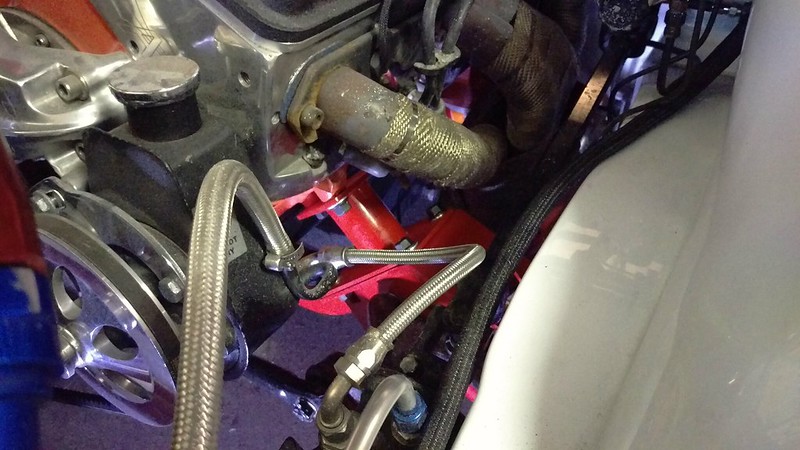
Sprayed the necessary coat of red and bolted in place. I switched to all flange head fasteners for the K member and the motor mounts. Anytime I have holes that are slotted or larger than the fasteners the washers always end up in a conical shape or with the bolt head grinding into it.
EDIT: I used washers under the flange head bolts and nuts because I didn't know if I needed the washer under them or not. After some light research it appears that the automotive industry in recent years is using lots of flange head bolts and they are not using washers on them unless it is to preserve the spotface/mating surface or it is mating a carbon bolt to a stainless surface. It sounds like I don't need the washers, next time I have them apart I will pull the washers out.
Re: Long time coming AKA My 91 Z28 Vert build thread
Originally Posted by robguitargod1
Look great to me!
Thanks Rob. I used a 3/32" electrode and a 3/32" filler rod. The Tig chart I had said you could use 3/32" or 1/8" and I went with 3/32" for less heat input. I'm thinking that had I used a 1/8" filler rod the welds wouldn't have been so concave. Knowledge for next time.

 05-25-2017, 10:36 AM


 [/url]
 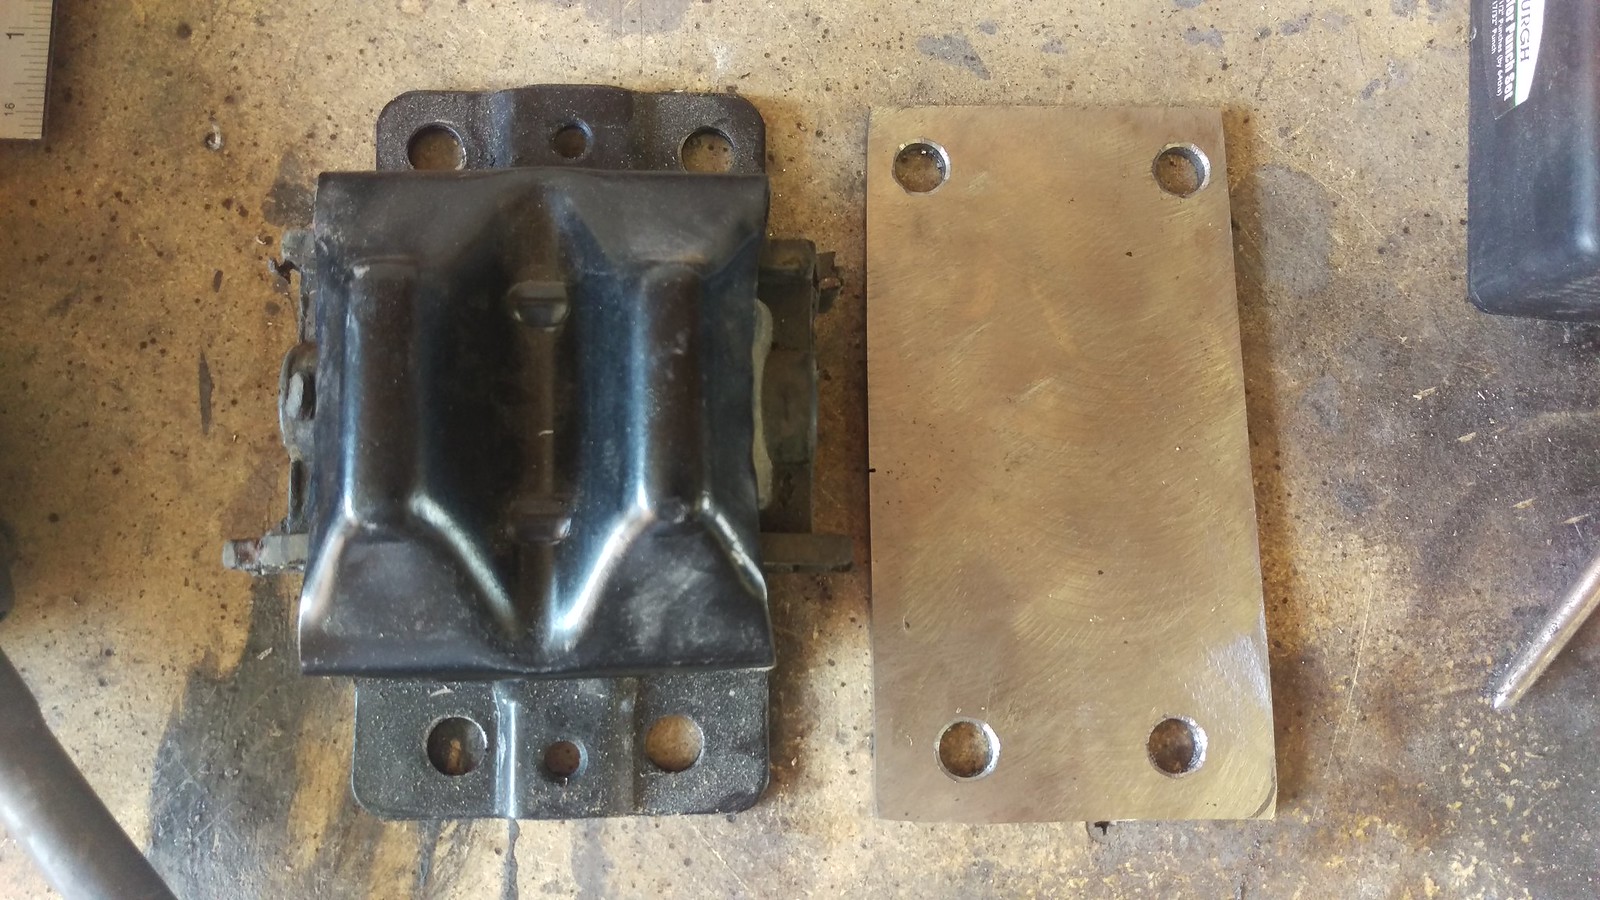 [/url]
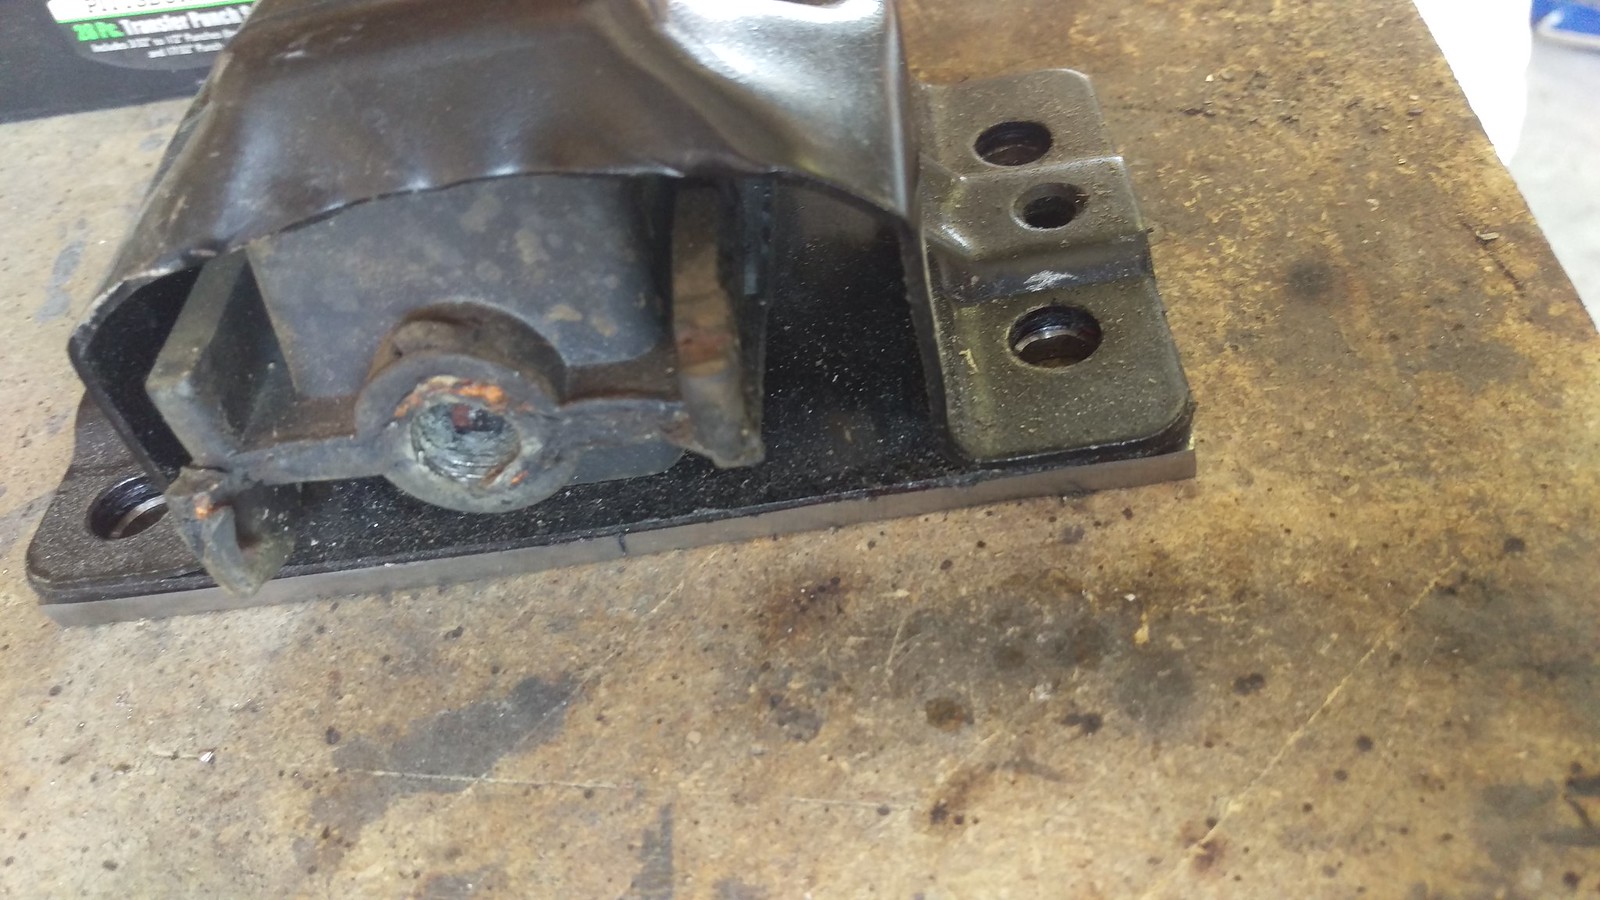 [/url]
 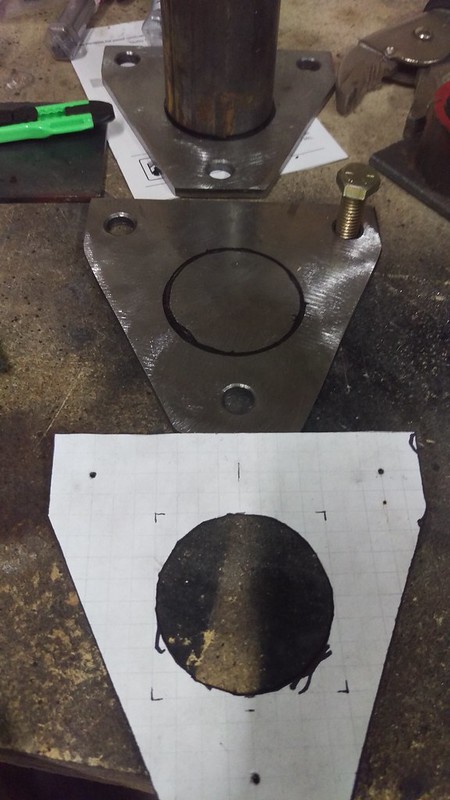 [/url]
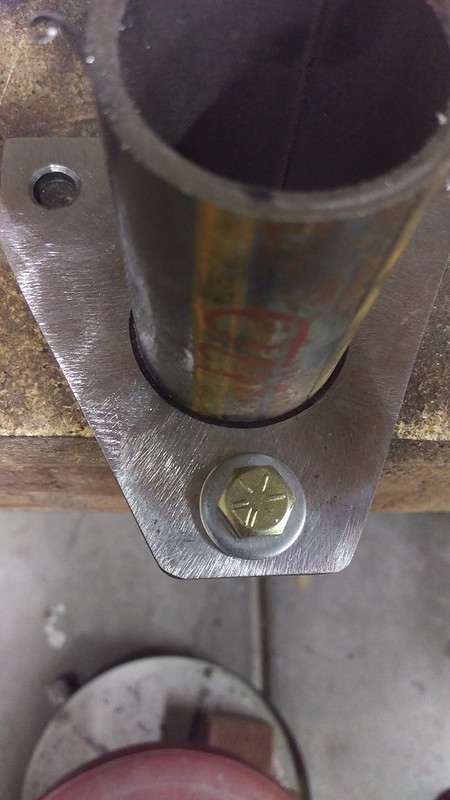 [/url]
 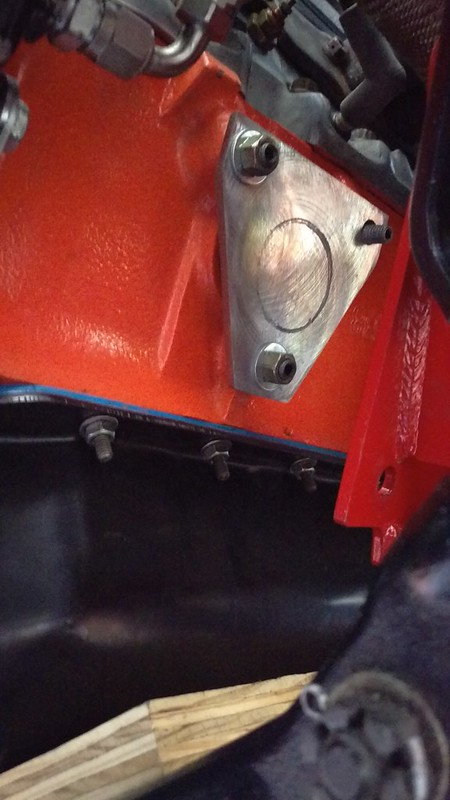 [/url]
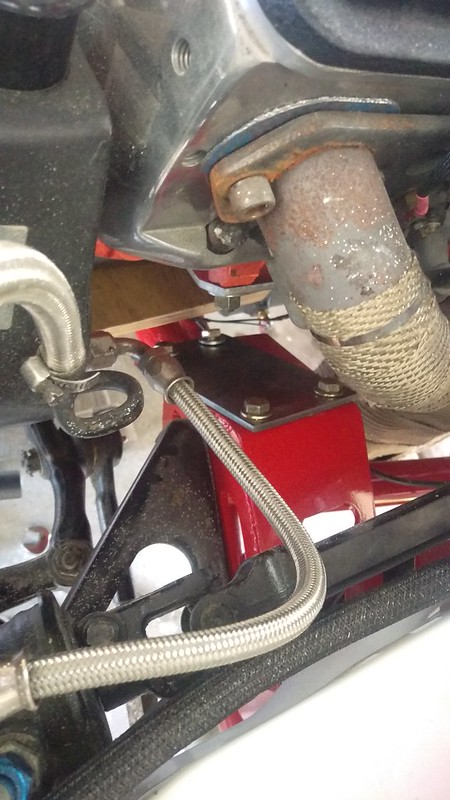 [/url]
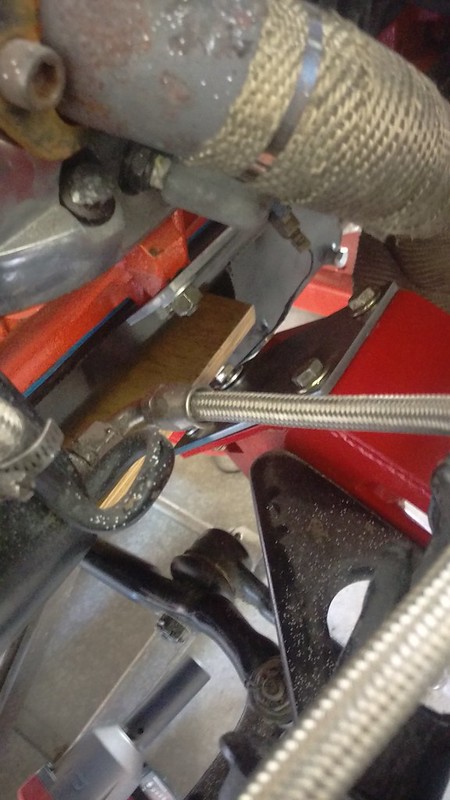 [/url]
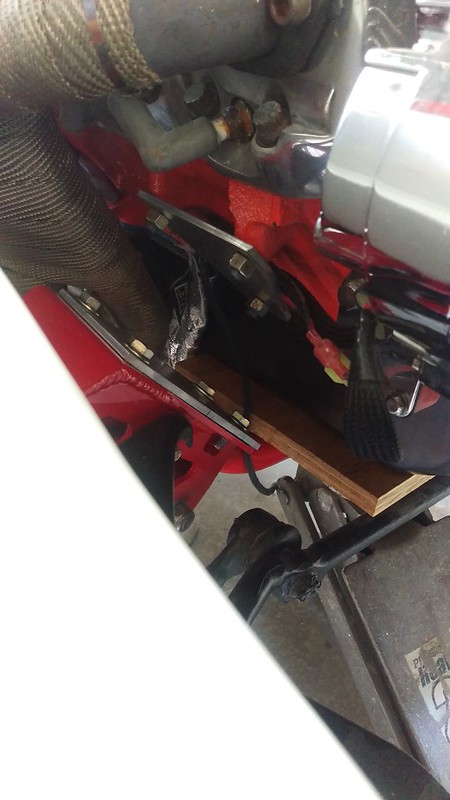 [/url]
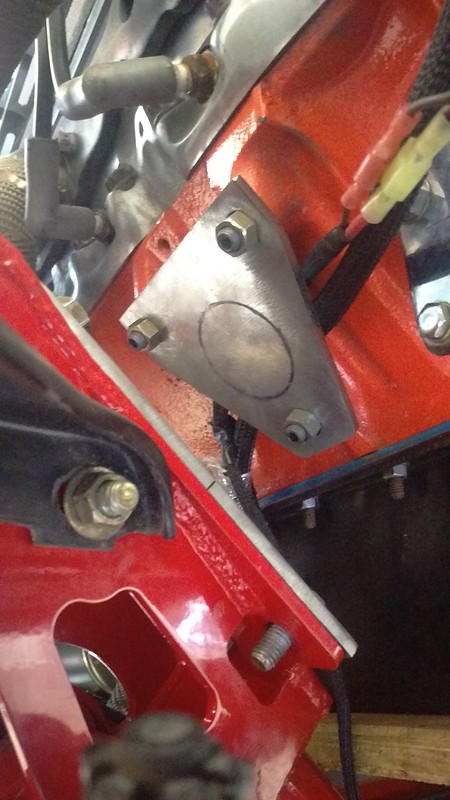 [/url]
 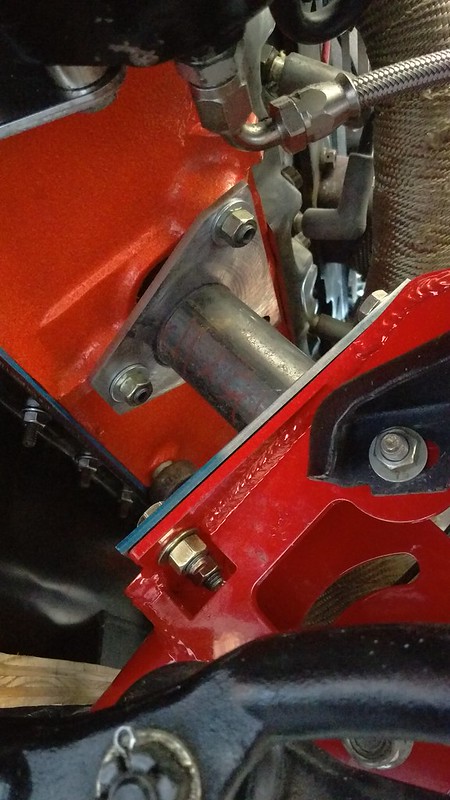 [/url]
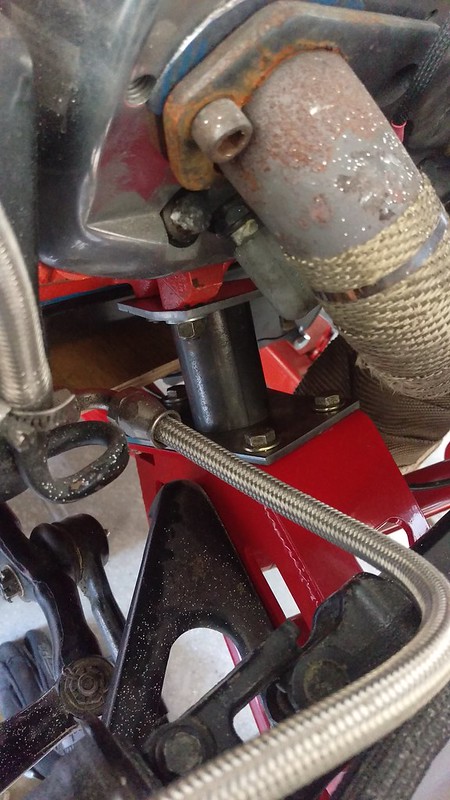 [/url]
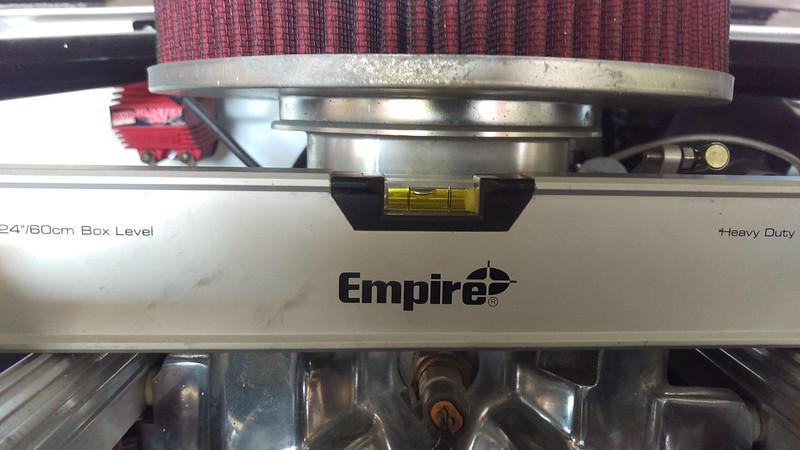 [/url]
 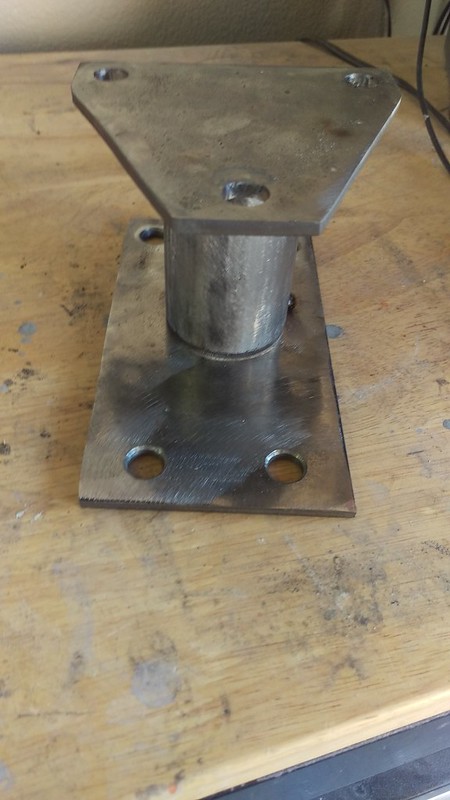 [/url]
  [/url]
 [/url]
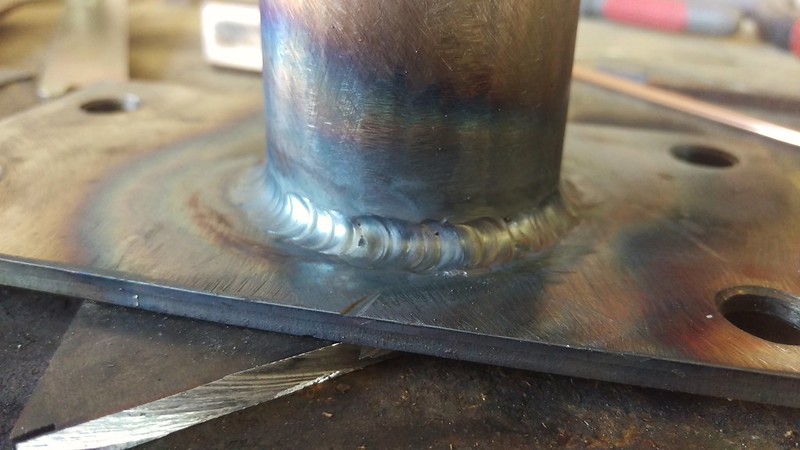 [/url]