When you click on links to various merchants on this site and make a purchase, this can result in this site earning a commission. Affiliate programs and affiliations include, but are not limited to, the eBay Partner Network.
Why wasn't it? You are giving everyone the numbers that you measured and provided a rendering of both instances, and based on what you said, 0.19 is the difference between both pulleys because the first picture embellishes the straight edge going into the s/c pulley. Again, we can only go by what you are saying, and if this is the case, then if you measured the s/c pulley back to the crank pulley from where it lines up with the groove on the s/c pulley it would have embellished 0.19 as being the difference. It has to be because the math does not lie. Unless of course the way you initially explained it was wrong.
Originally Posted by anesthes
This was a little harder to measure by myself, but it appears to be about the same .240" gap between the edge of the pulley and the edge of the straight edge. So it seems to me that I should probably take about a quarter inch off the back of the bracket, giving me .010" or to perfectly align it with shims....
As I said above; 0.19 = 19% of a difference in pulleys (and this was based on your measurement of .280 (28%) minus .090 which equals 9% in which derives the 0.19 or 19% I mentioned above), now you're saying the difference is .240 which = 24% because of a new measurement you made. The math is perfect, how could you possibly say that what I pointed out wasn't the problem at all? It most certainly was the problem. The difference between 19% and 24% is very small, and the 5% difference is because of the varying measurements you are giving...
Last edited by Street Lethal; 06-24-2016 at 10:26 AM.
Why wasn't it? You are giving everyone the numbers that you measured and provided a rendering of both instances, and based on what you said, 0.19 is the difference between both pulleys because the first picture embellishes the straight edge going into the s/c pulley. Again, we can only go by what you are saying, and if this is the case, then if you measured the s/c pulley back to the crank pulley from where it lines up with the groove on the s/c pulley it would have embellished 0.19 as being the difference. It has to be because the math does not lie. Unless of course the way you initially explained it was wrong.
re-read what I said. My dial caliper must have had a low battery, and I was getting different measurements. When I grabbed another caliper, I get exactly the same measurement. The S/c pulley is too far forward by .240"
Originally Posted by Street Lethal
As I said above; 0.19 = 19% of a difference in pulleys (and this was based on your measurement of .280 (28%) minus .090 which equals 9% in which derives the 0.19 or 19% I mentioned above), now you're saying the difference is .240 which = 24% because of a new measurement you made. The math is perfect, how could you possibly say that what I pointed out wasn't the problem at all? It most certainly was the problem. The difference between 19% and 24% is very small, and the 5% difference is because of the varying measurements you are giving...
I still don't get why you are subtracting those numbers. If you look at my pictures with the straight edge, I'm establishing the location of the FACE of the pulley which is how vortech tells you to align them. The face of one pulley is .240" back (crank) from the face of the other pulley (s/c).
See the circled area in the pictures below. Again, the straight edge is AGAINST the face of one pulley, so simply measuring the distance from it to the other pulley shows the offset. The problem was a bad battery.
I don't have access to all the tools you do, my simple behind would have just shimmed the blower backwards towards the firewall with washers to get the pulleys to line up. That is what i did with mine. I used a cheap laser level from lowe's to put on the blower pulley and shoot it to the other pulleys to make sure it was lined up correctly.
Mcmaster carr has washers in various thicknesses that i bought to get the alignment just right. It is a pain in the butt ordering a bag of 10 washers/shims, but no one around here sells washers in different thicknesses that you need to get the alignment correct.
I like fabricating things. Plus I bought a new MIG last month and wanted to try it out. It has a fancy transformer, weld was really nice.
Anyway, it's together now. I've got some 928 motorsports pulley shims so I'll fine tune the pulley in a week or so when I have time to get back in the shop.
I've also got to weld my MAF mount to the discharge pipe, and do all the plumbing. Still on the fence about that.
Looks great so far. What MIG did you get? Fancy transformer has me curious.
If it warped from welding and you surface it then it might need to be shimmed again unless you made it too long so that it needs surfacing no matter.
Looks great so far. What MIG did you get? Fancy transformer has me curious.
If it warped from welding and you surface it then it might need to be shimmed again unless you made it too long so that it needs surfacing no matter.
Thanks!
Millermatic 190.
Just seems better than the Lincoln stuff.
The way I redesigned the bracket, it's 2pc now so it's easy to shim. One part bolts to the head, then the plate bolts to it.
Yeah, the MIGs are finally seeing inverter technology. Some people love it and some hate it. Pros and cons for the inverter HF (small transformer) technology vs the large transformer technology. In the end though, the inverter stuff will win out.
I read in another post you mentioned fuel distribution on various intakes. The MS has two injector drivers so you can do crude fuel trim. Put 4 injectors on the 4 leaner holes, and the other 4 on the richer holes and trim.
Yeah I was thinking about that. It's been so many years I forget which cyls on the miniram go lean vs rich, but I'll check the plugs after I get some driving time and more than likely trim them.
I've got about 2 weeks left working on the house, and then I can play with the car more than 1 day a week.
Brand? I know with the innovate it will flash a pattern if something is wrong. Also you have the free air test/configure those every 6 month to a year for a street car.
Brand? I know with the innovate it will flash a pattern if something is wrong. Also you have the free air test/configure those every 6 month to a year for a street car.
It's an lc1 controller, with a Bosch 7014 sensor.
Was working fine. Car was idling around 14:1. Then it just burried at like 22:1.
I was playing with ae trying to tune out a tip in bog. I dunno if a pop did it or what. I dont have an egt but my external header temp never went over 600 with the ir gun.
Just took mine out at night for a quick beat session testing BOV springs.
Wait till you hear that thing constantly open when your foots out of it. Gona annoy the hell outa u lol. I had to add a 2nd BOV and I was running a 4lb wastegates Spring which opened and closed around 10-15" vacuum and it was uber annoying on the street, crazy loud street sweeper all the time till I got on it and it closes up and then vrooooom! I just swapped the 10-15" spring for a 17-19" spring and it's much better but think I'm getting alittle flutter at light light throttle. Prob going to keep it the way it is honestly. U'll see!
Triple check everything Joe before you go out stomping on it.
Are you running any vacuum lines that may need a check valve?
The only one I'm unsure of is the modulator for the TH350. I have no HVAC controls, and obviously no emissions/evap. I know they make a little checkvalve thing specifically for the TH350:
http://www.ebay.com/itm/260134015180?_trksid=p2060353.m1438.l2649&ssPageName=STRK%3AMEBIDX%3AIT
Although I've spoken to people who have said they never used one..
Just took mine out at night for a quick beat session testing BOV springs.
Wait till you hear that thing constantly open when your foots out of it. Gona annoy the hell outa u lol.
This is a Greddy type S, it won't open at idle. I used it on my P1SC for about a year. You had to kind of go out of your way to get it to open.
When I used to run an S-Trim I used a modified 1G DSM bov valve, which was held open by vac and was always open off throttle. I still couldn't hear it over the blower whine.
The only one I'm unsure of is the modulator for the TH350. I have no HVAC controls, and obviously no emissions/evap. I know they make a little checkvalve thing specifically for the TH350
Although I've spoken to people who have said they never used one..
-- Joe
I would use one anyway just to save the modulator from any possible damage. I use a check valve on my brake booster too, despite the system already having one, I do this to keep the stock one from breaking. Even with the PCV valve, I run one just before it, as well as on the other side because I have both vacuum lines on the valve covers connected...
I would use one anyway just to save the modulator from any possible damage. I use a check valve on my brake booster too, despite the system already having one, I do this to keep the stock one from breaking. Even with the PCV valve, I run one just before it, as well as on the other side because I have both vacuum lines on the valve covers connected...
My covers are vented with breathers, and I have manual brakes. I've thought about the modulator a few times. Probably should have went with a TH400 or 2004R.. Oh well.
Waiting on some things to come in the mail, and hopefully I can get the car moving again this weekend. I need to spend a day putting the interior in it, weatherstrip, etc.
Vibrant makes 3.75" aluminum tubing. You could always cut a 180 in half and have your BOV welded in the middle to minimize the number of rubber fittings.
Vibrant makes 3.75" aluminum tubing. You could always cut a 180 in half and have your BOV welded in the middle to minimize the number of rubber fittings.
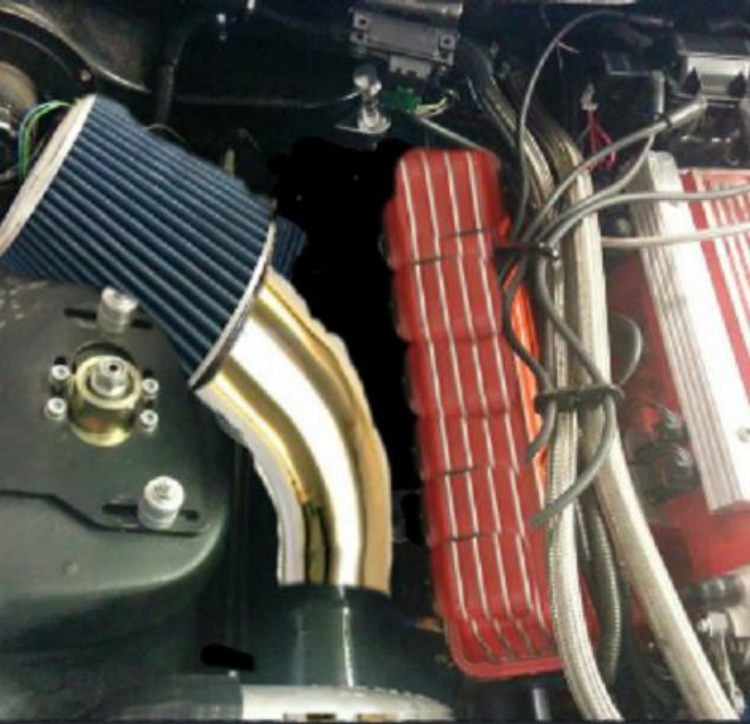
It's on the air filter side I need it, not the discharge side.
I wanted to try and get two cast elbows as the radius is usally tight. I want to try and get the air filter to be right over the valve cover.
Vortech makes some plastic ones, but they are 3.5" for the smaller S trim blowers.
Won't fit. I have a 4" filter and a 3.75-4" 45 degree adapter, and some 4" tube. I tried working it last night but the filter won't fit between the valve cover and the shock tower.
If I had a smaller log style 4" filter it might work, but the K&N cone style is absolutely huge. I tried re-using the one I had on my turbo.
3.5" and 4" stuff is very hard to come by. Couplers and tubing is MUCHO $$. 3.5" or 3" extra long leg silicone coupler is like $30+ lol for one coupler... you can get standard 90* couplers for like $6 all day.
Maybe just run a coupler pipe and then another 45 and push the filter level with the motor towards the firewall? single 3.5"DIA 4" long aluminum/SS coupler, another 45* silicone and the filter. Might be too long but you can always trim the coupler at the supercharger inlet to pull it toward the SC and away from the firewall. Might need to move the tranny dipstick and the MAP sensor over alittle. Your goign to be sucking in hot air from the motor though, maybe push it over toward the HVAC motor?
Never seen that type of BOV, interesting design. However superchargers are suppose to be open at idle under high vacuum and close at lower vacuum and right before boost begins. This helps with stress on the blower, IAT temps etc as the blowers can make positive pressure even at idle. with mine open at idle its pushing a considerable amount of air out at idle pre IC. This is why TIAL only sells the supercharger BOV with a 2-3" vacuum spring (open right before 0")
If the above has a metal chrome air cone in the inside pull it out before installing bc they tend to get sucked in from the SC/turbo and destroys it lol.
3.5" and 4" stuff is very hard to come by. Couplers and tubing is MUCHO $$. 3.5" or 3" extra long leg silicone coupler is like $30+ lol for one coupler... you can get standard 90* couplers for like $6 all day.
Maybe just run a coupler pipe and then another 45 and push the filter level with the motor towards the firewall? single 3.5"DIA 4" long aluminum/SS coupler, another 45* silicone and the filter. Might be too long but you can always trim the coupler at the supercharger inlet to pull it toward the SC and away from the firewall. Might need to move the tranny dipstick and the MAP sensor over alittle. Your goign to be sucking in hot air from the motor though, maybe push it over toward the HVAC motor?
Never seen that type of BOV, interesting design. However superchargers are suppose to be open at idle under high vacuum and close at lower vacuum and right before boost begins. This helps with stress on the blower, IAT temps etc as the blowers can make positive pressure even at idle. with mine open at idle its pushing a considerable amount of air out at idle pre IC. This is why TIAL only sells the supercharger BOV with a 2-3" vacuum spring (open right before 0")
It's a Greddy type S BOV. Left over from a twin turbo 350z project. It's like a $300 BOV so I felt compelled to use it haha.
I've got a lot of 4" couplers, silicone elbows, and a few feet of aluminum pipe. Maybe try one of those mushroom filters.
Are those safe to run? I know the import guys love them.
If I was in that scenario this is what I would do. The front lower end of the strut tower was already modified to fit the Vortech supercharger, I would do the same exact thing on the other end to allow me to squeeze the air filter in between the strut tower and the heater box, just enough. This is a quick picture of what I mean...;
If I was in that scenario this is what I would do. The front lower end of the strut tower was already modified to fit the Vortech supercharger, I would do the same exact thing on the other end to allow me to squeeze the air filter in between the strut tower and the heater box, just enough. This is a quick picture of what I mean...;
If by modified you mean beaten with a BFH, yup haha
I was thinking of putting it there, but then I picked up a 3" cowl hood and I wonder if hanging out over the valve cover would draw more cold air from the cowl ??
Years ago someone on the forum, I don't know if it was Todd Hess or whoever, but they had a box they made that fit over the miniram. The vortech connected to the box, it had a flat filter, and a rubber seal so when the hood was closed it drew 100% of it's air from the cowl. Some impressive fabrication skills.
It's a Greddy type S BOV. Left over from a twin turbo 350z project. It's like a $300 BOV so I felt compelled to use it haha.
I've got a lot of 4" couplers, silicone elbows, and a few feet of aluminum pipe. Maybe try one of those mushroom filters.
Are those safe to run? I know the import guys love them.
-- Joe
Yes they work, alot of guys just run screens. But the filter has to flow enough or it becomes a restriction and limits boost capabilities/ makes the SC work harder. Remember any bends/length increase of tubing will thus affect restriction into the SC and decrease boost/SC will work harder.
As long as you pull the inside metal cone (if equipped) then your good. They are glued in but can be detached and fly right into your impeller lol.
Greddy style Ive had (cheap chinese version type S) but didnt have that floating piston design. I would love to plumb a recirculating style BOV to help with blow off noise but its not needed (performance wise). Ive also thought about running a wastegate instead of a BOV which would be overkill but would make re-circulation easy too.
Last edited by customblackbird; 08-11-2016 at 09:51 AM.
If you were to sandwich the filter in between the strut tower and heater box, what would really be the icing on the cake was if you were running Trans Am fender vents, but substantially opened them up to bring in cold air...
Speaking of cowls, check this out, this guy installed a GN engine into a '71 TA and make the hood scoop functional for the turbo. One of the nicest installs I ever seen...
If I was in that scenario this is what I would do. The front lower end of the strut tower was already modified to fit the Vortech supercharger, I would do the same exact thing on the other end to allow me to squeeze the air filter in between the strut tower and the heater box, just enough. This is a quick picture of what I mean...;
Thats how I have mine. but I dont run the HVAC so i pushed mine all the way to the fender. The SC inlet tubing still gets heated by the headers right below tho. Can't really win per say. I did create a heat shield to help and is lowered SC inlet temps by like 20* or so.
If you were to sandwich the filter in between the strut tower and heater box, what would really be the icing on the cake was if you were running Trans Am fender vents, but substantially opened them up to bring in cold air...
Speaking of cowls, check this out, this guy installed a GN engine into a '71 TA and make the hood scoop functional for the turbo. One of the nicest installs I ever seen...
No trans-am vents. I painted the car 2 years ago (and it's already got a half dozen dings from being in the shop), so no more body work for me. I just need to get around to shooting the hood, wing, mirrors.
I've.. Also got a Ram-air I hood, but I think it would be a lot of fabrication to try and suck air out of it.
That Buick setup looks nice, and is beyond my skill level. I'm not big on pretty.
I guess I'll take some more measurements tonight and figure out what to do.
You think I should replace that bottom 3" 90 on the discharge side with like a 105 or something degree? I noticed the angle of the pipes is kinda pinching the top 90 transition coupler. I guess another option is I could weld a 90 right on the BOV tube to try to reduce the radius.
If the 4" oval coupler was about 2" longer off the throttle body it would help too. Or if I had enough room to go OVER the s/c pulley.
If by modified you mean beaten with a BFH, yup haha
I was thinking of putting it there, but then I picked up a 3" cowl hood and I wonder if hanging out over the valve cover would draw more cold air from the cowl ??
Years ago someone on the forum, I don't know if it was Todd Hess or whoever, but they had a box they made that fit over the miniram. The vortech connected to the box, it had a flat filter, and a rubber seal so when the hood was closed it drew 100% of it's air from the cowl. Some impressive fabrication skills.
-- Joe
Cowl will create a low pressure zone at the base of the windshield. However the tubing etc will become heat soaked. Also when I had my 4.5" cowl at idle/low speed you could see heat pouring out of the cowl, so it funnels the hot air out of the engine bay (good for removing the heat) but bad if your filter is their sucking in that hot air thus heating everything up more.
You should look into the NACA duct, I would run one of these to hook right into the filter/pipe for a nice clean cold air induction setup. Opening on the hood or in the fender would look sweet. http://carssimplified.com/img/body/naca-duct.png
What I should do is stick the 412 in my '75 Stingray, stick the 5.3 in the Firebird and run the blower like yours haha
I wouldnt worry about the coupler. I have 2 90* couplers that aren't at 90* lol. the one on my TB should be a 100-105* but its fine and I have a 90* thats more like an 80* or so with no issue.
When the charge pipes pressurize they are gona expand and stiffen up, you'll be fine.
My long term plan is to take it apart, bore it out to 5.7, build it with a mild cam. I might be off base but i think I can make a 600-700hp 5.3 (boosted) that idles like my stock 6.0.
I could then take my 412 and put it in the stingray. The stingray has a 350 with 2.02 fuelie heads, about 350hp.
My long term plan is to take it apart, bore it out to 5.7, build it with a mild cam. I might be off base but i think I can make a 600-700hp 5.3 (boosted) that idles like my stock 6.0.
I could then take my 412 and put it in the stingray. The stingray has a 350 with 2.02 fuelie heads, about 350hp.
This is assuming the 412 doesn't explode.
-- Joe
I dont think that all that is neccessary. You should be able to hit 600hp with everything stock (crank not whp). My fuel calculations put me around 500-550hp at 9-10psi all stock. Throw a cam in it and up the boost and youll hit 600-700 all day. I actually already picked up a used LQ9 cam which has been shown to not loose any power below 3500 on a 5.3 but gain 40hp at 6500 with no engine tuning and thats on a stock 5.3 which made like 380hp or something. Throw boost into that and I'm looking at a 90hp cam upgrade prob. Light porting to the stock heads Im over 600hp easily withe the stock bottom end. A mild 205/210 or 210-218 cam will more than wake it up more and still idle like stock, keep it below .575" lift and stock LS6 valve springs are all thats needed. I might still go with a trickflow cam but haven't decided yet.
I wouldnt bore the 5.3, thicker cylinder walls are better for the boosted applications. Gotta remember the 6.0 had a larger cam, more cubes and much higher flowing heads (large valves) and only made 30-40hp more than the 5.3.
Well. That all makes sense, though the 5.3 I have has wicked low compression so I think the cylinders are pooched. I'll have to take it apart and check it.
You would use stock pistons at 700hp? I know the bottom ends are stout but I figure the pistons would break at even moderate detonation.
I saw the LS2 chinese intakes are like $200 on ebay. I gotta dig into it more, but if I could use full height injectors that would be nice. I noticed the stock injectors on my 5.3 are short.
The only other thing to work out is the oil pan.
-- Joe
eh... might be lol. Might wanna do a leakdown test. I think the 5.3 only had 160-180psi cranking. Stock pistons are good as long as you dont detonate them. Only thing you gotta worry about is ring gap, usually not a problem on high mileage due to wear. best thing to do is run meth/IC to lower chamber temps and keep the rings from getting hot. and keep the tune safe. Its all in tune honestly. Dont get greedy and stock pistons will be good. Ive seen 8s trucks on 24lbs with stock 5.3s, car craft or CHP did a 1300hp 5.3 with a turbo stock motor.
4.8/5.3 use same block and pistons (4.8 pistons are flat top) so you can swap into a 5.3 and gain compression . 5.3/5.7/6.0 have the same crank. only difference was block bore, piston sizes and rod lengths. So the 5.3 has the same stroke as the 5.7/6.0, smaller bore & lighter pistons, thicker cylinder walls and lower compression which is all a plus for boost.
Your prob looking at the procomp/speedmaster aluminum intakes, stay away, they aren't bad for the price but the OEM intake will make more power below 5500 and not heat soak. Also the OEM intakes use OEM style usuable o-ring gaskets where the china style use paper old school gaskets.
Truck intakes are better than LS1 and even with LS6 (about same peak HP but much more tq under the curve), taller so its better designed but height means it fits into less. Truck intakes will pull to 6500 no prob if the cam is there. And they are like $50 used and can handle 20+PSI without an issue.
5.3s are shorter than LS1 style full height injectors, you can get high flowing truck injectors or you can run LS1 style injectors. I run full height LS1 style 72lb bosch's from FIC on my truck intake and $35 ebay billet LS1 fuel rails. Just need to fab or bend 4 brackets to connect the fuel rails to the intake and your done. That way you can run an aftermarket universal FPR etc and hook into AN lines much easier. Or I just thought about this, run the stock truck fuel rails and just add spacers under the brackets to make up the difference in heights... its only like 1/4" or 3/8" height.
Last edited by customblackbird; 08-11-2016 at 02:58 PM.
 06-24-2016, 10:21 AM