
Ever think about making IROC hood louvers functional?
 07-07-2005, 09:21 AM
#1
Member
Thread Starter

Join Date: Jan 2002
Location: Morrison, Colorado
Posts: 266
Likes: 0
Received 0 Likes
on
0 Posts
Car: 1986 IROC-Z
Engine: 355 ci TPI, 10:1 cr, Isky cam, ported heads, dual exhaust
Transmission: 700R4, ratchetting shifter, 3.23 rear
Ever think about making IROC hood louvers functional?
I've got a great idea to make the hood louvers on the IROC functional. This is useful especially for the carbureted engines because of the carb's need to stay cool. But I'm thinking the inability for the tight engine bay to get rid of its heat might be hampering cooling efforts by the radiator, since intake air into the radiator of F-bodies is so ludicrously little anyway.
Anyhow, I found a guy who cuts louvers into street rodders and charges $1.50 per cut. He'll cut any size or length louver you want. I've got some 18 gauge mild steel sheet that I'm going to mark the outline of the IROC plastic hood louver inserts that are non-functional. Then I'll have the guy cut the louvers in the same pattern as the outline, which will probably cost me all of $30 bucks. Then using sheet metal nippers, I'll cut out around the outline, drill some mounting holes to mount where they fake plastic louvers go, and then paint it black. On the hood underneath the louvers, I'll open up the sheetmetal to make the new louvers fully functional.
I thought maybe others might find this tip useful. This would look pretty good on other hoods too. Or on fenders behind and above the front wheels for a little bit of a custom flare.
 07-07-2005, 09:33 AM
#2
Member


Join Date: Sep 2004
Location: Mississauga, Ontario, Canada
Posts: 106
Likes: 0
Received 0 Likes
on
0 Posts
Car: 1991 Z28
Engine: L98
Transmission: 700R4
what if it rains and water gets inside engine bay... Might be problematic. Need it designed in a way that would keep water away from getting inside eng bay. I think...
07-07-2005, 10:18 AM
#3
Member
Thread Starter
Join Date: Jan 2002
Location: Morrison, Colorado
Posts: 266
Likes: 0
Received 0 Likes
on
0 Posts
Car: 1986 IROC-Z
Engine: 355 ci TPI, 10:1 cr, Isky cam, ported heads, dual exhaust
Transmission: 700R4, ratchetting shifter, 3.23 rear
I thought of that. It is very arid here where I live, although we do get our occaisional cloud burst.
It wouldn't be very hard to come up with a water barrier, directly underneath the louvers, with a drainage off to the side of the engine instead of directly on top of it. An air space between the bottom of the hood and the rain barrier would still make it functional for venting the engine bay.
However, a little water never hurt anything. I'm not going to worry about it on mine, but someone in a very rainy environment could fabricate that "rain barrier" under the louvers easily.


 07-07-2005, 06:50 PM
#6
Supreme Member

Join Date: Aug 2003
Location: Calgary
Posts: 1,352
Likes: 0
Received 0 Likes
on
0 Posts
Car: 1987 Z28
Engine: Tree Fiddy (modded)
Transmission: 700R4
Thats friggen hottt!! But like said before rain would be a problem.....
and you say a little rain never hurt anyone? get this:
One morning after a light rain, i goto start my car.....took longer than the usual 10 minutes but I didnt think much of it. So i go onto the highway to merge and put it to the floor.....murr murr muurrrrrzzinnnnng........down the highway thats 100km/h max, to the floor i could only go 50km/h. So i managed to make it to a shop, turned the car off and went in. When they went to put the car in the bay it wouldnt even start. So thers me pushing the car in....... because of 3 drops of water on the dist cap cost me 60 bucks
and you say a little rain never hurt anyone? get this:
One morning after a light rain, i goto start my car.....took longer than the usual 10 minutes but I didnt think much of it. So i go onto the highway to merge and put it to the floor.....murr murr muurrrrrzzinnnnng........down the highway thats 100km/h max, to the floor i could only go 50km/h. So i managed to make it to a shop, turned the car off and went in. When they went to put the car in the bay it wouldnt even start. So thers me pushing the car in....... because of 3 drops of water on the dist cap
cost me 60 bucks Trending Topics
07-08-2005, 12:30 PM
#8
Member
Thread Starter
Join Date: Jan 2002
Location: Morrison, Colorado
Posts: 266
Likes: 0
Received 0 Likes
on
0 Posts
Car: 1986 IROC-Z
Engine: 355 ci TPI, 10:1 cr, Isky cam, ported heads, dual exhaust
Transmission: 700R4, ratchetting shifter, 3.23 rear
Those pics are BEAUTIFUL! Wow, that's pretty much what mine's going to look like. Much better than the fake plastic louvers that like to break all the time!
On a tuned port motor, the distributor cap is covered with an extension off the upper plenum. I really do not think rain will get under the cap. I routinely spray my engine clean anyway, and water has never gotten under my distributor cap even with a forceful stream of water.
If you paid $60, you paid too much. All it would have taken is removing the cap and drying it off completely. They probably simply pulled it off and shot it with a blast of compressed air, put it back together, and then collected the cash. Easy money.
But if you were stranded with no tools, I can understand.
I live in Colorado, which does get some rain, but it's usually short and intense. And if it's that intense, I try to drive around it or let it pass. In 10 minutes, the weather changes anyway.
We get a lot of the arid southwest weather patterns the majority of the time.
But like I said, it's a simple matter to make a rain shield, spaced an inch away from the hood, that would have drip holes off to the sides of the engine. My Shelby Charger had functional louvers in the hood right above the turbocharger, and it had that exact type of rain shield under the louvers. It worked great, and I never had a problem in the most severe of thunderstorms. Also kept the engine bay cool all the time.

 07-08-2005, 04:05 PM
#10
Supreme Member
iTrader: (3)
Join Date: May 2004
Location: Brighton, CO
Posts: 4,345
Likes: 0
Received 1 Like
on
1 Post
Car: '72 Chevy Nova
Engine: Solid roller 355
Transmission: TH350
Axle/Gears: 8.5" 10-bolt 3.73 Posi
Well you have a TPI intake so the only thing you really have to worry about in regards to water is probably the dizzy. Make a block off plate or something back behind the louvers to protect that and you should be good in case you get caught in water.
07-08-2005, 08:36 PM
#11
Supreme Member
Join Date: Nov 2003
Location: surrey b.c. canada
Posts: 3,383
Likes: 0
Received 0 Likes
on
0 Posts
Car: 89 Iroc
Engine: lb9
Transmission: wc t-5
Axle/Gears: 10 bolt 3.08 posi
this has actually be done before, the guy cut only near the front of the louvers, so water would never even get close to anything important
07-08-2005, 10:21 PM
#12
Supporter/Moderator

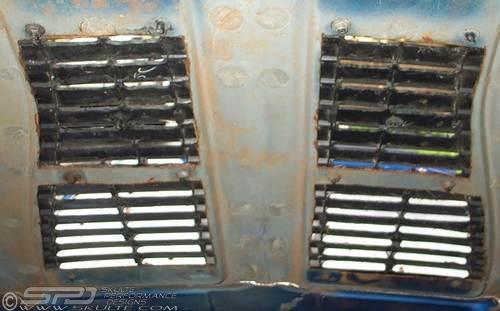
At Watkins Glen, the Z28tt was getting very floaty at higher speeds, especially from the rammed air through the sealed off intercooler/radiator duct assembly getting forced under the hood. There was no other place for the air to exit, except for out, under the car. This creates higher pressure under the hood, which results in lift at the front of the car, rather than downforce. Louvering the hood was the next step before doing a radiator extraction duct similar to the C5R.
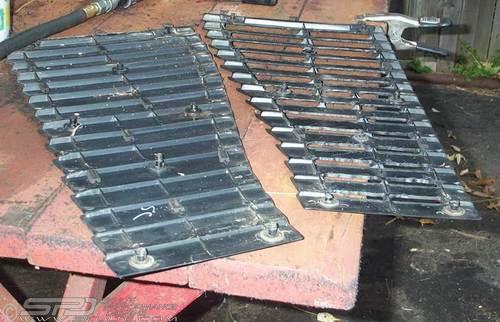
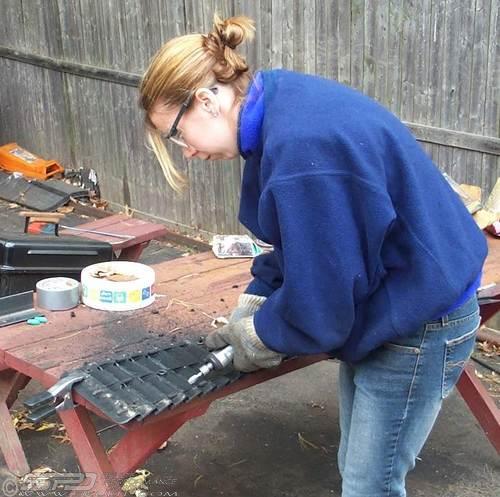
I used a hot air gun to loosen the adhesive blobs holding the very thin inner hood support to the outer hood shell, and removed that. Once the center section of the inner hood support was removed, I cut the hood skin in between the louver mounting holes. Finally, my lovely helper (thanks KW!) used a die grinder with an aluminum cutting bit to cut the base of each fin open.
Gallery pictures at:
http://www.skulte.com/gallery/view_a...C-Hood-Louvers
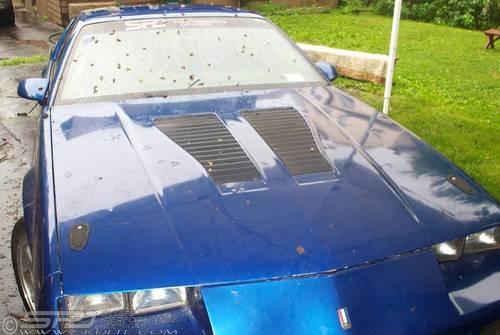
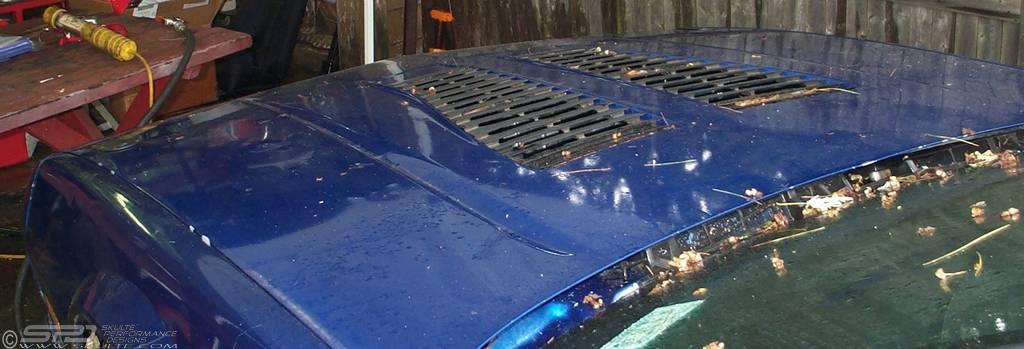
You can barely tell! (Those are new Aerocatch hood latches in the front corners, since I removed the factory hood latch to remove the hood load on the intercooler).
I used a hot air gun to loosen the adhesive blobs holding the very thin inner hood support to the outer hood shell, and removed that. Once the center section of the inner hood support was removed, I cut the hood skin in between the louver mounting holes. Finally, my lovely helper (thanks KW!) used a die grinder with an aluminum cutting bit to cut the base of each fin open.
Gallery pictures at:
http://www.skulte.com/gallery/view_a...C-Hood-Louvers
You can barely tell! (Those are new Aerocatch hood latches in the front corners, since I removed the factory hood latch to remove the hood load on the intercooler).
Last edited by askulte; 07-08-2005 at 10:29 PM.
07-10-2005, 03:56 AM
#14
Member

Join Date: Apr 2003
Location: San Diego
Posts: 369
Likes: 0
Received 1 Like
on
1 Post
Car: 88 5.7 Iroc, 2000 SS
Engine: Vortec Hot cam TPI/LS1
Transmission: Pro-Built/T-56
Just my opinion,
I second the thumbs up!
That's one of the coolest 'stock' body mods ever- when I repaint my car I'm seriously considering doing that.
I hate most body mods on thirdgen's but I think that is the best mod I've seen so far - thought about it for 15yrs - now Andris does it-
I second the thumbs up!
That's one of the coolest 'stock' body mods ever- when I repaint my car I'm seriously considering doing that.
I hate most body mods on thirdgen's but I think that is the best mod I've seen so far - thought about it for 15yrs - now Andris does it-
07-10-2005, 04:53 PM
#15
Supreme Member
Join Date: Apr 2001
Location: Changing Tires
Posts: 5,675
Likes: 0
Received 3 Likes
on
3 Posts
Car: too many ...
I cut small holes into a stock 82-83 fiberglass hood for heat extraction and I didnt think rain would be a problem. But now that I'm troubleshooting some insane idle/stall issues I'm wondering if rain might have helped causes these problems. If water did drip onto the TPI plennum and you were parked on an incline the water could run off the back of that extension onto the backside of the distributor (closest the firewall), or it could run towards the throttle body and flow over the TPS/IAC sensors. Neither sounds good to me and once I get this idle/stall problem fixed I'm gonna be making something to put over the holes on the hood when its parked to divert any rain.
07-11-2005, 08:53 AM
#16
Member
Thread Starter
Join Date: Jan 2002
Location: Morrison, Colorado
Posts: 266
Likes: 0
Received 0 Likes
on
0 Posts
Car: 1986 IROC-Z
Engine: 355 ci TPI, 10:1 cr, Isky cam, ported heads, dual exhaust
Transmission: 700R4, ratchetting shifter, 3.23 rear
I thought about cutting out the plastic louvers also, but it looked like too much work to me, compared with paying $30-ish to have the steel louvers cut out of mild steel. Besides, what do you do when the fragile plastic louvers break eventually?
I really like the modified plastic louvers, that's cool. But I wanted something a little more durable, even though it'll look slightly different.
Concerning the water dripping onto the throttlebody issue, that's easily addressed by not cutting a louver directly above the throttlebody.
You know what else would be cool, (but not easy to make), is to make louvers that you can open and close with a choke cable in the cockpit.
07-11-2005, 01:49 PM
#17
I was thinking the same thing. My bud wants to do this to his iroc and we're going over ways on how we could do this. Askulte's way is awesome. I love them! The way that 19Doug90 wants his, is to make them metal/aluminum slats instead of the plastic stock louvers. But the idea that Rockin' Iroc has with making them open and close is an idea I've had in my brain since I wanted a 3rdgen Camaro. The problem would be doing this...but making tracks for the slats to fit into and having them on a choke cable let's say isn't all that hard to fab up I don't think. Just having the tools and materials needed would be the only thing standing in the way...oh and of course having time to do all this 
07-12-2005, 05:20 AM
#18
Supreme Member
Join Date: Apr 2001
Location: Changing Tires
Posts: 5,675
Likes: 0
Received 3 Likes
on
3 Posts
Car: too many ...
Being able to open and close em would be sweet. I guess what I was trying to say earlier is that its possible that water will flow through the groves of the TPI plennum if the water drips anywhere on the plennum. If you're parked on a flat surface it will probably go over the sides, but on an incline the water might flow over the plennum and depending on what angle incline you park on, it can go either way (towards the TB or towards the Dist). My car is parked on an incline with the nose down and my holes are cut high (picture here), but I can see where the water flows when I open the hood.
Lately I've just been covering the car. No more problems.
Lately I've just been covering the car. No more problems.
Last edited by CrazyHawaiian; 07-12-2005 at 05:22 AM.
07-12-2005, 09:27 AM
#19
Member
Thread Starter
Join Date: Jan 2002
Location: Morrison, Colorado
Posts: 266
Likes: 0
Received 0 Likes
on
0 Posts
Car: 1986 IROC-Z
Engine: 355 ci TPI, 10:1 cr, Isky cam, ported heads, dual exhaust
Transmission: 700R4, ratchetting shifter, 3.23 rear
I can think of a way to make the louvers open and close. I'm an engineer, so designing one is the easy part. Making it is all the work.
1. You'd want a frame. You could probably use the hood as the frame, in the sides of the recess where the louvers sit. Then drill a series of equally spaced holes in the frame.
2. The hard part is making all the louvers. Choose a metal, any metal. I would choose something that is easiest to weld to, such as brass sheet, for example. Then brazing can be done.
I would keep the brass thin enough to bend slightly. You'll see why in a minute.
3. You'll need brass rod. One end gets threads cut in it. I would go with a fine thread, rather than coarse. The other end, either cut a slot in it, or grind half the rod flat. Then braze it to both sides of the louver slat. Do this on every slat.
Actually, a note here. You don't really need to tap the rods on the outer end of the louvers. Just tap the rods with threads on the inner end.
4. Now you have to cut an actuator "bar" out of sheetmetal. It needs to be a long rectangle with the sides bent up for rigidity. Cut equally spaced holes for each louver in the bent up sides of the actuator bar.
5. You need to make "fingers", probably also out of sheetmetal.
These will go on each louver and will be tightened down with a nut so that they are rigid on the louver side. On the actuator bar side, you probably want to either rivit them loosely so that they can move, or loosely bolt them. They need to pivot on the actuator bar. Make each finger angle the same for all louvers.
6. Hard part's done. Now just make a brace for the choke cable, install it, and when you pull the choke cable from inside the cockpit, the louvers open all at once. Push it and they close off.
Note that although it's not totally waterproof, it'll block most of the water. You might get a little drip through.
I might consider this for a very rainy area. However, just making a drip tray underneath fixed louvers would be so much easier. Less trick, but easier, as you can see.
 04-20-2006, 09:21 AM
#21
Junior Member

Join Date: Apr 2006
Location: Richfield, Ut
Posts: 22
Likes: 0
Received 0 Likes
on
0 Posts
Car: 87 IROC
Engine: 350 TPI
Transmission: 700R4
Axle/Gears: whatever stock is
Sweeet Idea
Well this is the best idea ive heard, but i think its being way over thought, keep it simple. . Askultes is a great start and keeps it looking stock, instead of making all the fins move just have a plate underneath the fins move. Thats just my idea and opinion though. But this is a really cool idea.
. Askultes is a great start and keeps it looking stock, instead of making all the fins move just have a plate underneath the fins move. Thats just my idea and opinion though. But this is a really cool idea.
05-04-2006, 05:59 PM
#22
Supreme Member
iTrader: (16)
Join Date: Dec 2001
Location: Tiffin OHIO
Posts: 2,006
Likes: 0
Received 1 Like
on
1 Post
Car: 1987 Iroc-z Convertible
I have been thinking about something like this for a while but don't really know if it will work. I was thinking about cutting the louvers out then hinging the rear and buying a couple linear actuators mount them to the sides then run a wire with the hood lamp hook it up to a switch so they would automatically raise when the key is on and hook up the actuators to a timer so they shut off when fully opened. then use a rigid gasket around the openings. not real sure on how to make them lower when power is off though. maybe good idea maybe not I might try sometime though. then if it works fab up ducting to run into my air cleaner for a ram air effect.
05-04-2006, 07:36 PM
#23
Senior Member
Join Date: Mar 2006
Location: Point Pleasant, NJ
Posts: 633
Likes: 0
Received 0 Likes
on
0 Posts
Car: 1987 Chevy Stepside
Engine: 350 TBI w/ a Cam
Transmission: 3 Speed Stick w/ granny low
With the topic of rain. Is it ever a problem with a cowl or does it all run down the firewall?
05-04-2006, 09:40 PM
#24
Supporter/Moderator
The rain down the cowl goes through drain hose, inside the fenders to the bottom. You will get water coming from the front, through the radiator. The open louvers are actually an exit for the air, not an entrance, at least while moving.
05-04-2006, 10:01 PM
#25
Junior Member

Join Date: May 2006
Location: Oakland, Ca.
Posts: 6
Likes: 0
Received 0 Likes
on
0 Posts
Car: 1986 Iroc
Engine: 305 Carbuerated
Transmission: 700R4
Yeah.... those are nice... I'm not really a fan of the Louvers, but the ventilation idea is pretty cool especially with them functional... now they don't seem as bad... I'm more of a fan of the blisters on the 91-92 Z28's
05-05-2006, 12:36 AM
#26
Supreme Member
Join Date: Aug 2005
Location: Yellowknife, NWT, Canada
Posts: 3,004
Likes: 0
Received 2 Likes
on
2 Posts
Car: 84 Z28
Engine: 357
Transmission: TH-350C
Axle/Gears: 3.43
cool idea, i cut out the very end of mine so their sort of a ram-air type thing. Just did it to get someairflow and i dropped about 40*F under the hood so it did do some good.
Ive never had a problem with water but i dont go cruising around when it pouring rain either...
Ive never had a problem with water but i dont go cruising around when it pouring rain either...
06-05-2006, 12:58 PM
#27
Supporter/Moderator
A few weeks ago I had the first track day with the louvers. Only problem was that too much heat was escaping through the louvers. They started sagging above the insulated turbos & downpipes. Just a point of data...
 06-06-2006, 03:30 PM
#31
Member

Join Date: Mar 2005
Location: Back in the states...
Posts: 122
Likes: 0
Received 0 Likes
on
0 Posts
Car: Silver 1980 Corvette (L82 w/TPI)
Engine: L82
Transmission: TH350
Originally Posted by Rockin-Iroc
I can think of a way to make the louvers open and close. I'm an engineer, so designing one is the easy part. Making it is all the work.
1. You'd want a frame. You could probably use the hood as the frame, in the sides of the recess where the louvers sit. Then drill a series of equally spaced holes in the frame.
2. The hard part is making all the louvers. Choose a metal, any metal. I would choose something that is easiest to weld to, such as brass sheet, for example. Then brazing can be done.
I would keep the brass thin enough to bend slightly. You'll see why in a minute.
3. You'll need brass rod. One end gets threads cut in it. I would go with a fine thread, rather than coarse. The other end, either cut a slot in it, or grind half the rod flat. Then braze it to both sides of the louver slat. Do this on every slat.
Actually, a note here. You don't really need to tap the rods on the outer end of the louvers. Just tap the rods with threads on the inner end.
4. Now you have to cut an actuator "bar" out of sheetmetal. It needs to be a long rectangle with the sides bent up for rigidity. Cut equally spaced holes for each louver in the bent up sides of the actuator bar.
5. You need to make "fingers", probably also out of sheetmetal.
These will go on each louver and will be tightened down with a nut so that they are rigid on the louver side. On the actuator bar side, you probably want to either rivit them loosely so that they can move, or loosely bolt them. They need to pivot on the actuator bar. Make each finger angle the same for all louvers.
6. Hard part's done. Now just make a brace for the choke cable, install it, and when you pull the choke cable from inside the cockpit, the louvers open all at once. Push it and they close off.
Note that although it's not totally waterproof, it'll block most of the water. You might get a little drip through.
I might consider this for a very rainy area. However, just making a drip tray underneath fixed louvers would be so much easier. Less trick, but easier, as you can see.
1. You'd want a frame. You could probably use the hood as the frame, in the sides of the recess where the louvers sit. Then drill a series of equally spaced holes in the frame.
2. The hard part is making all the louvers. Choose a metal, any metal. I would choose something that is easiest to weld to, such as brass sheet, for example. Then brazing can be done.
I would keep the brass thin enough to bend slightly. You'll see why in a minute.
3. You'll need brass rod. One end gets threads cut in it. I would go with a fine thread, rather than coarse. The other end, either cut a slot in it, or grind half the rod flat. Then braze it to both sides of the louver slat. Do this on every slat.
Actually, a note here. You don't really need to tap the rods on the outer end of the louvers. Just tap the rods with threads on the inner end.
4. Now you have to cut an actuator "bar" out of sheetmetal. It needs to be a long rectangle with the sides bent up for rigidity. Cut equally spaced holes for each louver in the bent up sides of the actuator bar.
5. You need to make "fingers", probably also out of sheetmetal.
These will go on each louver and will be tightened down with a nut so that they are rigid on the louver side. On the actuator bar side, you probably want to either rivit them loosely so that they can move, or loosely bolt them. They need to pivot on the actuator bar. Make each finger angle the same for all louvers.
6. Hard part's done. Now just make a brace for the choke cable, install it, and when you pull the choke cable from inside the cockpit, the louvers open all at once. Push it and they close off.
Note that although it's not totally waterproof, it'll block most of the water. You might get a little drip through.
I might consider this for a very rainy area. However, just making a drip tray underneath fixed louvers would be so much easier. Less trick, but easier, as you can see.
I once had a '71 SS El Camino that had a cowl induction hood and would open up... pretty neat.
I'd like to see the opening louvres on an IROC.
 06-12-2006, 06:23 PM
#32
Senior Member
Join Date: Jun 2003
Location: Acworth/Marietta, GA
Posts: 749
Likes: 0
Received 0 Likes
on
0 Posts
Car: 88 IROC
Engine: 350 TPI
Transmission: Pro 5.0 shifted T56
Axle/Gears: 10 bolt 3.73 posi
I really like this idea. Reminds me of my dads 1964 Jaguar Series I E-type. (if you dont know what im talking about, its the car Austin Powers drives thats painted up like a british flag in the first movie, well thats actually a series II but you get the idea)
I really like the idea of them opening and closing. Im not an engineer.....yet (still in school) but what Rockin-Iroc has described is very feasible. Id like to take it yet another step farther though, and install a small solenoid that could be wired to a toggle switch in the dash. How cool would it be to flip a switch and have your louvers crack open??? Thats it im on a mission to do this!
Oh wait, i dont have a car. Damnit!!!! Maybe i can find a way to incorporate electric louvers into my bike...
06-13-2006, 11:45 AM
#33
Member

Join Date: Jun 2001
Location: Columbus, Ohio
Posts: 461
Likes: 0
Received 0 Likes
on
0 Posts
Car: 92 Camaro RS
Engine: 350 TPI
Transmission: T5 manual
Originally Posted by vorgath
Sagging ? As in they were getting soft due to heat, almost melting ?
Last edited by Axoid; 06-13-2006 at 11:48 AM.
07-14-2006, 12:01 AM
#34
Junior Member

Join Date: Jun 2006
Posts: 86
Likes: 0
Received 0 Likes
on
0 Posts
this would be similar to blinds in a window frame, or old school adjustable shutters. Not difficult to design, but again, the fine machinery involved.
----------
----------
Originally Posted by Rockin-Iroc
I can think of a way to make the louvers open and close. I'm an engineer, so designing one is the easy part. Making it is all the work.
1. You'd want a frame. You could probably use the hood as the frame, in the sides of the recess where the louvers sit. Then drill a series of equally spaced holes in the frame.
2. The hard part is making all the louvers. Choose a metal, any metal. I would choose something that is easiest to weld to, such as brass sheet, for example. Then brazing can be done.
I would keep the brass thin enough to bend slightly. You'll see why in a minute.
3. You'll need brass rod. One end gets threads cut in it. I would go with a fine thread, rather than coarse. The other end, either cut a slot in it, or grind half the rod flat. Then braze it to both sides of the louver slat. Do this on every slat.
Actually, a note here. You don't really need to tap the rods on the outer end of the louvers. Just tap the rods with threads on the inner end.
4. Now you have to cut an actuator "bar" out of sheetmetal. It needs to be a long rectangle with the sides bent up for rigidity. Cut equally spaced holes for each louver in the bent up sides of the actuator bar.
5. You need to make "fingers", probably also out of sheetmetal.
These will go on each louver and will be tightened down with a nut so that they are rigid on the louver side. On the actuator bar side, you probably want to either rivit them loosely so that they can move, or loosely bolt them. They need to pivot on the actuator bar. Make each finger angle the same for all louvers.
6. Hard part's done. Now just make a brace for the choke cable, install it, and when you pull the choke cable from inside the cockpit, the louvers open all at once. Push it and they close off.
Note that although it's not totally waterproof, it'll block most of the water. You might get a little drip through.
I might consider this for a very rainy area. However, just making a drip tray underneath fixed louvers would be so much easier. Less trick, but easier, as you can see.
1. You'd want a frame. You could probably use the hood as the frame, in the sides of the recess where the louvers sit. Then drill a series of equally spaced holes in the frame.
2. The hard part is making all the louvers. Choose a metal, any metal. I would choose something that is easiest to weld to, such as brass sheet, for example. Then brazing can be done.
I would keep the brass thin enough to bend slightly. You'll see why in a minute.
3. You'll need brass rod. One end gets threads cut in it. I would go with a fine thread, rather than coarse. The other end, either cut a slot in it, or grind half the rod flat. Then braze it to both sides of the louver slat. Do this on every slat.
Actually, a note here. You don't really need to tap the rods on the outer end of the louvers. Just tap the rods with threads on the inner end.
4. Now you have to cut an actuator "bar" out of sheetmetal. It needs to be a long rectangle with the sides bent up for rigidity. Cut equally spaced holes for each louver in the bent up sides of the actuator bar.
5. You need to make "fingers", probably also out of sheetmetal.
These will go on each louver and will be tightened down with a nut so that they are rigid on the louver side. On the actuator bar side, you probably want to either rivit them loosely so that they can move, or loosely bolt them. They need to pivot on the actuator bar. Make each finger angle the same for all louvers.
6. Hard part's done. Now just make a brace for the choke cable, install it, and when you pull the choke cable from inside the cockpit, the louvers open all at once. Push it and they close off.
Note that although it's not totally waterproof, it'll block most of the water. You might get a little drip through.
I might consider this for a very rainy area. However, just making a drip tray underneath fixed louvers would be so much easier. Less trick, but easier, as you can see.
Last edited by Hotdogstand; 07-14-2006 at 12:07 AM. Reason: Automerged Doublepost
07-14-2006, 01:48 AM
#35
Member

Join Date: Oct 2005
Location: South Carolina
Posts: 130
Likes: 0
Received 0 Likes
on
0 Posts
Car: 89 RS
Engine: 350 5.7
Transmission: 700r4
Cool idea!!! Not something I would ever do, but those pictures of the red car changed my mind, at first I thought it was a bad idea, it looks GREAT!
05-06-2007, 08:01 AM
#36
Junior Member
Join Date: Mar 2007
Location: Nebraska
Posts: 1
Likes: 0
Received 0 Likes
on
0 Posts
Car: 1984 L69 Z28
Engine: Custom 350
Transmission: Borg Warner T-5
Axle/Gears: 3:73 Posi
Re: Ever think about making IROC hood louvers functional?
I have an 84 Z28 that has had the louvers cut out for about 8 years now. It is carbed and I just have a good rubber washer underneath a big wing nut on my air cleaner. It has worked like a charm and I have never had a "rain no-start" problem. Raining currently here today in fact!
05-07-2007, 06:55 PM
#37
Junior Member

Join Date: Apr 2007
Location: Ontario, canada
Posts: 2
Likes: 0
Received 0 Likes
on
0 Posts
Car: 1989 Firebird
Engine: 2.8 V6
Transmission: Automatic
Re: Ever think about making IROC hood louvers functional?
didnt the second gen Z28s have a vaccum actuated butterfly in the scoop? and couldnt that be used to actuate the opening and closing of the louvers?
i think(if i remember correctly) they were hooked up to the vaccum secondaries on the carberator.
i think(if i remember correctly) they were hooked up to the vaccum secondaries on the carberator.
05-08-2007, 06:45 PM
#38
Supreme Member
Join Date: May 2005
Location: San Diego, CA
Posts: 1,701
Likes: 0
Received 0 Likes
on
0 Posts
Car: 1991 Camaro RS
Engine: LO3
Transmission: 700R4
Axle/Gears: 3.42 LS1
Re: Ever think about making IROC hood louvers functional?
The cross-fire Z28's had a similar feature as well.
05-15-2007, 05:02 AM
#39
Supreme Member
iTrader: (1)
Join Date: Jul 2006
Location: Aloha, Oregon
Posts: 1,132
Likes: 0
Received 11 Likes
on
6 Posts
Car: '91 Camaro Z28, '85 Camaro Z28
Engine: LB9, LB9
Transmission: T5, 700r4
Axle/Gears: Eaton 3.73 Posi, 3.23 Posi
Re: Ever think about making IROC hood louvers functional?
I am currently in the process of making my louvers functional. Though it turns out that the previous owner super glued them to the hood so it's taking while to slowly are carefully pry them off without cracking them.
 05-21-2007, 06:58 AM
#41
Member
Re: Ever think about making IROC hood louvers functional?
I've seen open blisters on a white Camaro vert with a supercharger. If I recall correctly he opened the hood just in the radiator area for a better flow.
Probably someone finds these pics somewhere here.
Edit: found them on his website: http://www.lbsz28blown.cz28.com/photo.html
Probably someone finds these pics somewhere here.
Edit: found them on his website: http://www.lbsz28blown.cz28.com/photo.html
Last edited by swisscheese; 05-21-2007 at 07:24 AM.
05-23-2007, 06:09 PM
#42
Supreme Member

Join Date: Jul 2003
Location: Markham
Posts: 2,494
Likes: 0
Received 0 Likes
on
0 Posts
Car: 1990 Camaro
Engine: 355ci
Transmission: TKO-600 5 speed
Axle/Gears: 3.73 10 bolt
Re: Ever think about making IROC hood louvers functional?
two questions
first of all skulte what sort of a bit were you using for opening up the louvers? im also assuming that my die grinder spins at way too high of an rpm for cutting plastic and that id have to go get a dremel tool.
second at some point in the future i would like to go away from a distributor and look into switching over to a coil pack setup like the ls1's, how do these handle getting wet if you were to run open louvers like on the red car.
06-11-2007, 02:40 PM
#43
Supporter/Moderator
Re: Ever think about making IROC hood louvers functional?
two questions
first of all skulte what sort of a bit were you using for opening up the louvers? im also assuming that my die grinder spins at way too high of an rpm for cutting plastic and that id have to go get a dremel tool.
second at some point in the future i would like to go away from a distributor and look into switching over to a coil pack setup like the ls1's, how do these handle getting wet if you were to run open louvers like on the red car.
first of all skulte what sort of a bit were you using for opening up the louvers? im also assuming that my die grinder spins at way too high of an rpm for cutting plastic and that id have to go get a dremel tool.
second at some point in the future i would like to go away from a distributor and look into switching over to a coil pack setup like the ls1's, how do these handle getting wet if you were to run open louvers like on the red car.
I bet the coil packs would be just fine. You get a water through the radiator when driving in the rain anyways...
06-16-2007, 10:12 PM
#44
Supreme Member
Join Date: Mar 2005
Location: Red Lion, PA
Posts: 1,446
Likes: 0
Received 1 Like
on
1 Post
Car: 91 Camaro RS, 99 Camaro Z28
Engine: L03, LS1
Transmission: 700R4, T56
Axle/Gears: bunch of 10 bolts how scary is that
Re: Ever think about making IROC hood louvers functional?
I have a bit of experiance in computer aided drafting and engineering.
I was working on true functional iroc louvers. Not just open ones but making them open and close with the throttle.
If theres interest I could probaly step foward with the idea and maybe show the progress.
I was working on true functional iroc louvers. Not just open ones but making them open and close with the throttle.
If theres interest I could probaly step foward with the idea and maybe show the progress.
06-18-2007, 09:22 PM
#45
Senior Member
Join Date: Feb 2005
Location: Albany NY
Posts: 514
Likes: 0
Received 5 Likes
on
4 Posts
Car: 84 Trans AM (sold), 87 IROC, 09 C6
Engine: Lt1 in IROC
Transmission: 5 speeds
Axle/Gears: Moser 12 bolt tru tracker 3.42
Re: Ever think about making IROC hood louvers functional?
That Red Dale Earnhart hood appears to have the louvers opening towards the front? I would think that they'd allow more air out by turning them the other way?? ANyway I am in the process of painting my 87 and I'd loveto do something with a set of open louvers. Is it possible that somebody out there makes them already? Custom home made parts seem to take forever to build....I spent the whole weekend fabricating some baffle plates and a 3 inch hose connections for cooling ducts for my front brakes...........$10 worth of sheetmetal and 8 hours to get it right..................
06-20-2007, 09:50 AM
#46
Banned

Join Date: Sep 2003
Location: illinois, home of liberals, D'oh!
Posts: 645
Likes: 0
Received 0 Likes
on
0 Posts
Car: 89 Formula L98 power
Engine: '96 subaru, opposed 4banger
Transmission: TH700R4, subaru 4WD
Axle/Gears: 3.27, just works
Re: Ever think about making IROC hood louvers functional?
I made my '87 IROC-Z run some great times, but I needed slicks the last time at the track, when I broke the 3-4 clutch pack, then I had a bad accident, didn't hurt anyone, wasn't because of the car, I wasn't doing anything stupid, I just avoided hitting a deer, and hit a ditch, and flipped the car over twice from front to rear, and almost died, wasn't good!
I almost did this to my '87 IROC-Z, but since I put the '86 berlinetta 6-banger front nose on the car, it got way more air, and made it unneccesary, it is a great idea though. Great job everyone that has done this!
CHeck my car out on this page www.cardomain.com/ride/471099/8 she will be missed, D'OH! I always say, if your going to lose an F-body, get rid of it yourself, it just sucked that I almost died in my accident, but the IROC and GOD saved me, so they are great cars and safe, when you have a serious accident.
06-25-2007, 09:24 PM
#47
Senior Member
Join Date: Feb 2005
Location: Albany NY
Posts: 514
Likes: 0
Received 5 Likes
on
4 Posts
Car: 84 Trans AM (sold), 87 IROC, 09 C6
Engine: Lt1 in IROC
Transmission: 5 speeds
Axle/Gears: Moser 12 bolt tru tracker 3.42
Re: Ever think about making IROC hood louvers functional?
Another idea that I haven't seen yet to make the louvers functional is this: Leave the louvers FIXED, but use the choke cable idea to open a slide UNDER the louvers........this would be much easier to pull off than using the "blinds" idea..........
07-02-2007, 08:38 PM
#48
Member

Join Date: Mar 2004
Posts: 109
Likes: 0
Received 0 Likes
on
0 Posts
Car: 1985 camaro z28
Engine: 305 lg4
Transmission: 700r4
Re: Ever think about making IROC hood louvers functional?
.........I also thought about doing this myself. But what about removing the weather strip underneath the hood, or maybe just the center part of the weather strip. Would that give it a cowl effect and draw in cool air? What do you guys think?.......Zapr
07-02-2007, 09:34 PM
#49
Supreme Member
iTrader: (7)

Join Date: Jan 2006
Location: Santa Rosa, Cali
Posts: 1,160
Likes: 0
Received 1 Like
on
1 Post
Car: 1988 IROC 5.7 Money Pit
Engine: (being built; modified TPI ZZ4
Transmission: 2200 stall/ stage 3 700R4
Axle/Gears: freshened 3.27 in 9.bolt/
Re: Ever think about making IROC hood louvers functional?
Re: Ever think about making IROC hood louvers functional?
--------------------------------------------------------------------------------
* "I have a bit of experiance in computer aided drafting and engineering.
I was working on true functional iroc louvers. Not just open ones but making them open and close with the throttle.
If theres interest I could probaly step foward with the idea and maybe show the progress." *
That would be real interesting to follow an actual 'engineered' design. I also think the idea of using a bottom 'slide-plate' (Hotrodln) sounds promising.
I had an 88 Supra that traditionally had burning rocket fuel temperature's under the hood and most Supra owners would either stack washers under the windshield area latch or else remove that section of rubber gasket. There was a dramatic difference in under hood temps after that, so we know we're on the right track.
What's the formula for horsepower loss equating with engine temperature's? I remember that it has something to do with a measured increase in heat trips a change in the engine timing??????
Oh, up towards the top of this thread is the car that has black 'hood locks' set into the front of his Camaro hood??? Anybody have any close up pic's of that or better info on how it functions (compared to the traditional hood pin idea)???? Nitro