
Complete audio build up and results, with pics
 07-06-2009, 12:39 AM
#1
Supreme Member

Thread Starter
iTrader: (2)

Join Date: May 2002
Location: Everett, WA
Posts: 4,449
Likes: 0
Received 8 Likes
on
8 Posts
Car: 87' IROC
Engine: L98
Transmission: T56
Complete audio build up and results, with pics
Ok this is going to be long but worth the read.
I recently tore the car apart to redo the whole audio system and work on quieting interior rattles. For starters my previous system was:
Alpine CDM-7874 Cd player (6 year old deck)
Alpine SPS-2629P 4x6 plate speakers in the dash (6 year old model)
Alpine SPS-6939S 6x9 coaxial speakers in the sail panels (6 year old model)
Pioneer 450W IMPP 12" subwoofer in well area in a really crappy box (6 year old model)
Pioneer 100w bridged 2 channel amp in rear storage area (6 year old model)
16 gauge speaker wire
broken generic power antenna
Overall this setup sounded crappy and would not get very loud before rattles and distortion. It could not overwhelm exhaust and wind noise with windows down, not even close. I suspect much of my issues were partially due to interior rattles caused by the speakers, not the speakers fault. Although I always knew the tiny front speakers were a problem.
New setup:
JVC KD-HDR1 Cd player/HD Radio/IPOD (about 3 year old model), had this laying around from my old civic, free.
Infinity 6020cs 6.5" component speakers mounted in dash and A-pillar, $110
Infinity 6020cs 6.5" component speakers mounted in sail panel, $110
Alpine F300 4x75W RMS at 2ohm amp for 4 main speakers, $140
Alpine M500 1x500W RMS at 2ohm amp for subwoofer, $140
Image Dynamics IDQ V2 12" subwoofer, $150
new custom sub box, $50
bass **** mounted in center console, $5
Ipod cable mounted in center console, came with JVC head unit
Factory power antenna, $120
HUmount, $90
125sq ft Raammat (Dynamat), $240
8yd Ensolite foam, $90
Cables, wire, supplies, ect, ~$100
4ga power wire to distribution block, 8ga to each amp
16ga speaker wire
10ga sub wire
This system rocks. Going the extra mile really paid off (dynamat). Engine, exhaust, and wind are no match for this system. And it is very clear. Also, I have not noticed any negative effects on the charging system. It is completely stock by the way.
The sub amp is way more power than I need; I listen to Rock mostly. 500W is plenty for Rap as well. I run the sub amp at well less than 1/2 of available gain. But better to have more power than not enough. Right now I am crossing the sub over at 75hz, and I think its about right.
75W per main speaker is about right. I run the gain at about 3/4 on the main amp (would prefer not to run any higher than that) and the head unit at about 3/4 volume at the loudest. I might be a little happier with 100W per channel but I'm not complaining. I am crossing the front speakers over at about 85 hz, had a very small issue with them at 75hz. The rears are at 75hz. One observation, the rear sail panel covers really kill high frequency sound. I can hardly hear any highs from the rears. I need to run some rear bias on the amp. I may try to rebuild the covers in the future with better audio cloth.
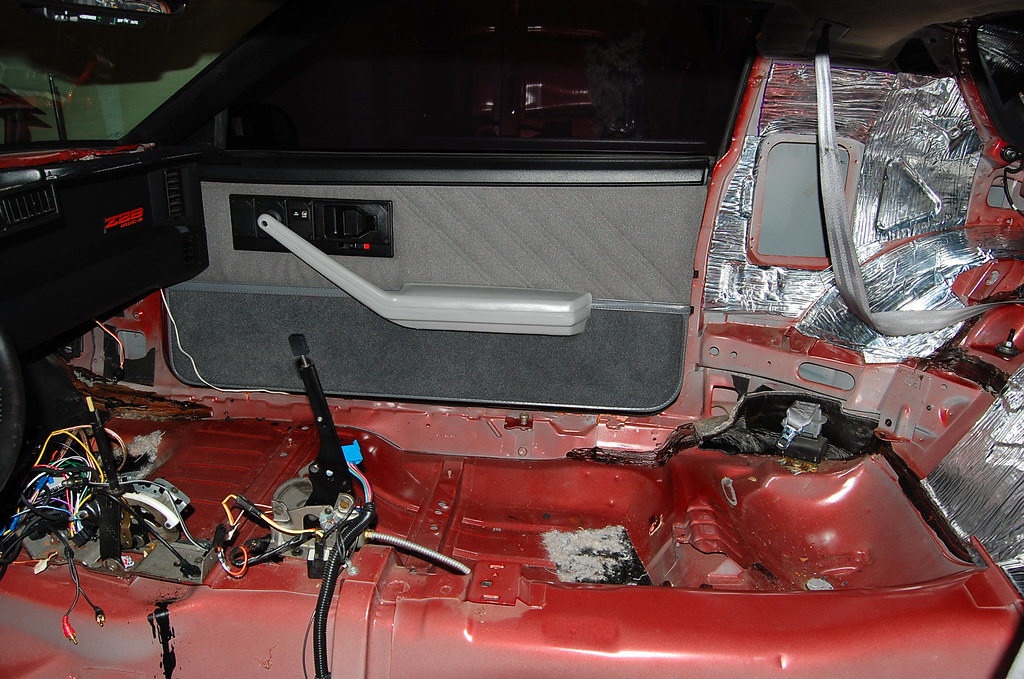
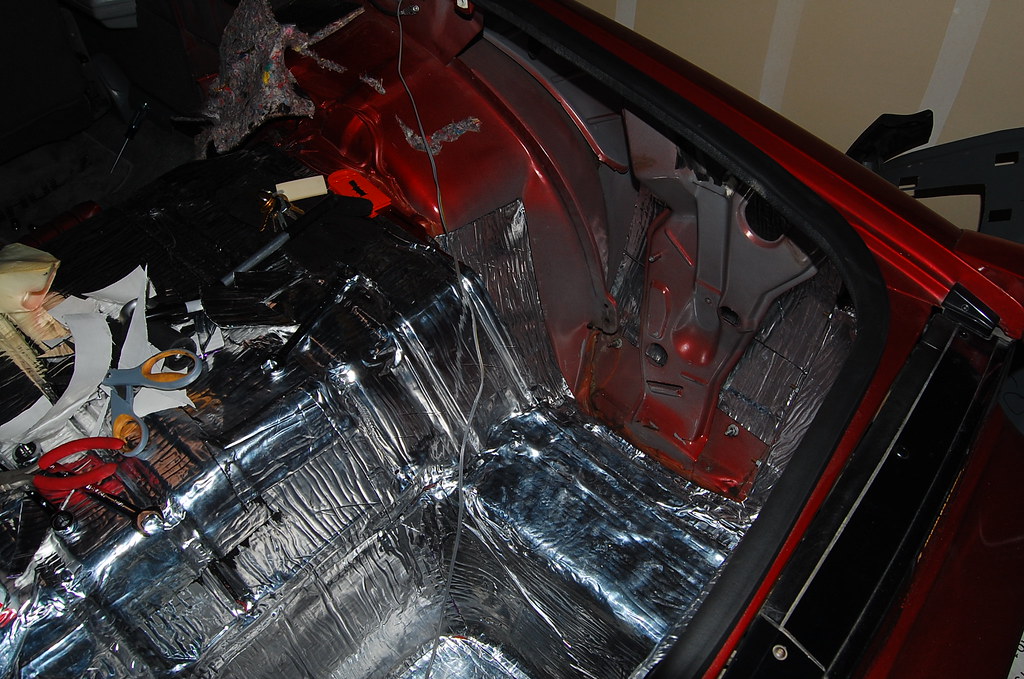
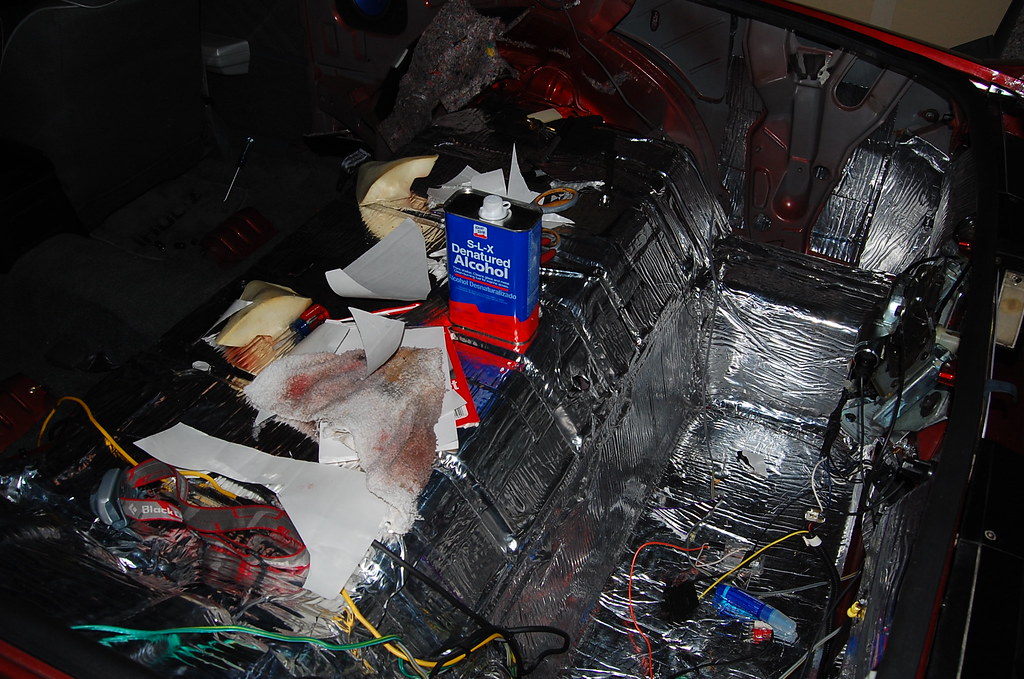
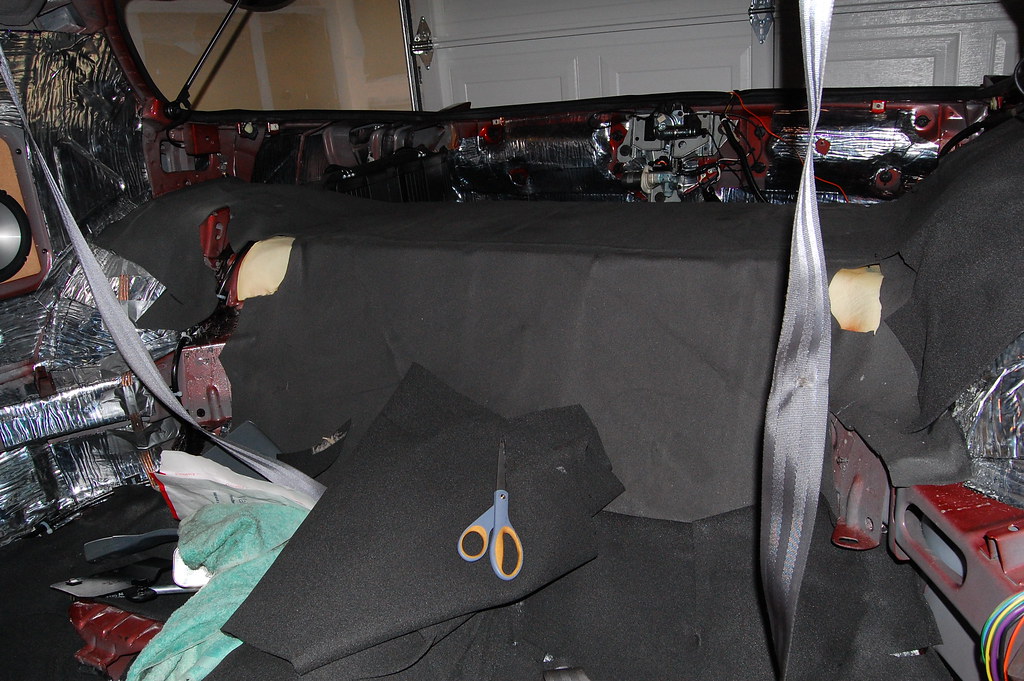
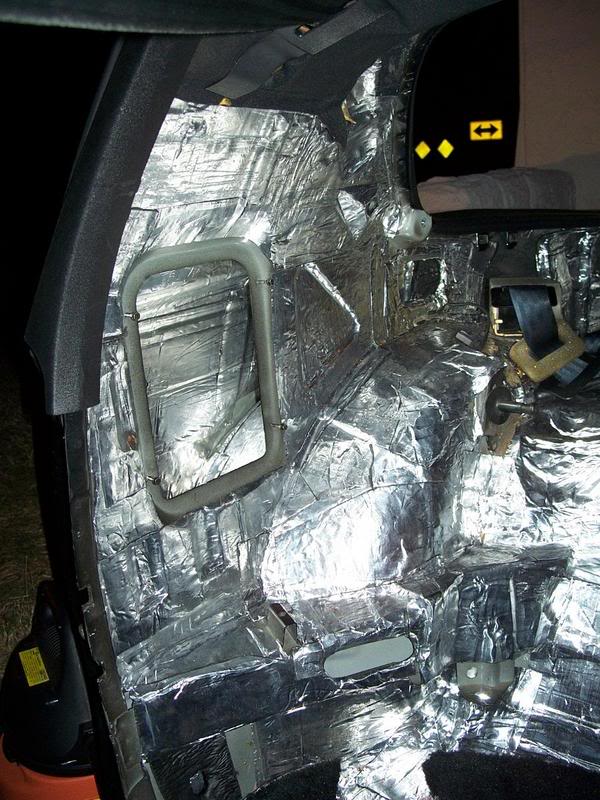
Virtually the entire car is covered in one layer of Raamat and Ensolite foam. I did not do behind the dash or the roof. The doors have two layers. While I had the interior apart I fixed a few other issues with the car. I cleaned up some funny audio wiring from the previous owner (the car was a radio delete car). I replaced the heater core. I replaced the drivers side door handle (broken spring). Did the felt pad mod on the air vents (prevents them from flapping all around). I modified the door jam vents so they don't rattle. Modified components in door so they don't rattle (explained later). Had sub frame connectors installed while the carpet was out of the car.
And now, how it was all done:
I recently tore the car apart to redo the whole audio system and work on quieting interior rattles. For starters my previous system was:
Alpine CDM-7874 Cd player (6 year old deck)
Alpine SPS-2629P 4x6 plate speakers in the dash (6 year old model)
Alpine SPS-6939S 6x9 coaxial speakers in the sail panels (6 year old model)
Pioneer 450W IMPP 12" subwoofer in well area in a really crappy box (6 year old model)
Pioneer 100w bridged 2 channel amp in rear storage area (6 year old model)
16 gauge speaker wire
broken generic power antenna
Overall this setup sounded crappy and would not get very loud before rattles and distortion. It could not overwhelm exhaust and wind noise with windows down, not even close. I suspect much of my issues were partially due to interior rattles caused by the speakers, not the speakers fault. Although I always knew the tiny front speakers were a problem.
New setup:
JVC KD-HDR1 Cd player/HD Radio/IPOD (about 3 year old model), had this laying around from my old civic, free.
Infinity 6020cs 6.5" component speakers mounted in dash and A-pillar, $110
Infinity 6020cs 6.5" component speakers mounted in sail panel, $110
Alpine F300 4x75W RMS at 2ohm amp for 4 main speakers, $140
Alpine M500 1x500W RMS at 2ohm amp for subwoofer, $140
Image Dynamics IDQ V2 12" subwoofer, $150
new custom sub box, $50
bass **** mounted in center console, $5
Ipod cable mounted in center console, came with JVC head unit
Factory power antenna, $120
HUmount, $90
125sq ft Raammat (Dynamat), $240
8yd Ensolite foam, $90
Cables, wire, supplies, ect, ~$100
4ga power wire to distribution block, 8ga to each amp
16ga speaker wire
10ga sub wire
This system rocks. Going the extra mile really paid off (dynamat). Engine, exhaust, and wind are no match for this system. And it is very clear. Also, I have not noticed any negative effects on the charging system. It is completely stock by the way.
The sub amp is way more power than I need; I listen to Rock mostly. 500W is plenty for Rap as well. I run the sub amp at well less than 1/2 of available gain. But better to have more power than not enough. Right now I am crossing the sub over at 75hz, and I think its about right.
75W per main speaker is about right. I run the gain at about 3/4 on the main amp (would prefer not to run any higher than that) and the head unit at about 3/4 volume at the loudest. I might be a little happier with 100W per channel but I'm not complaining. I am crossing the front speakers over at about 85 hz, had a very small issue with them at 75hz. The rears are at 75hz. One observation, the rear sail panel covers really kill high frequency sound. I can hardly hear any highs from the rears. I need to run some rear bias on the amp. I may try to rebuild the covers in the future with better audio cloth.
Virtually the entire car is covered in one layer of Raamat and Ensolite foam. I did not do behind the dash or the roof. The doors have two layers. While I had the interior apart I fixed a few other issues with the car. I cleaned up some funny audio wiring from the previous owner (the car was a radio delete car). I replaced the heater core. I replaced the drivers side door handle (broken spring). Did the felt pad mod on the air vents (prevents them from flapping all around). I modified the door jam vents so they don't rattle. Modified components in door so they don't rattle (explained later). Had sub frame connectors installed while the carpet was out of the car.
And now, how it was all done:
Last edited by 87350IROC; 07-06-2009 at 01:57 AM.


 07-06-2009, 01:00 AM
#3
Supreme Member
Thread Starter
iTrader: (2)
Join Date: May 2002
Location: Everett, WA
Posts: 4,449
Likes: 0
Received 8 Likes
on
8 Posts
Car: 87' IROC
Engine: L98
Transmission: T56
Re: Complete audio build up and results, with pics
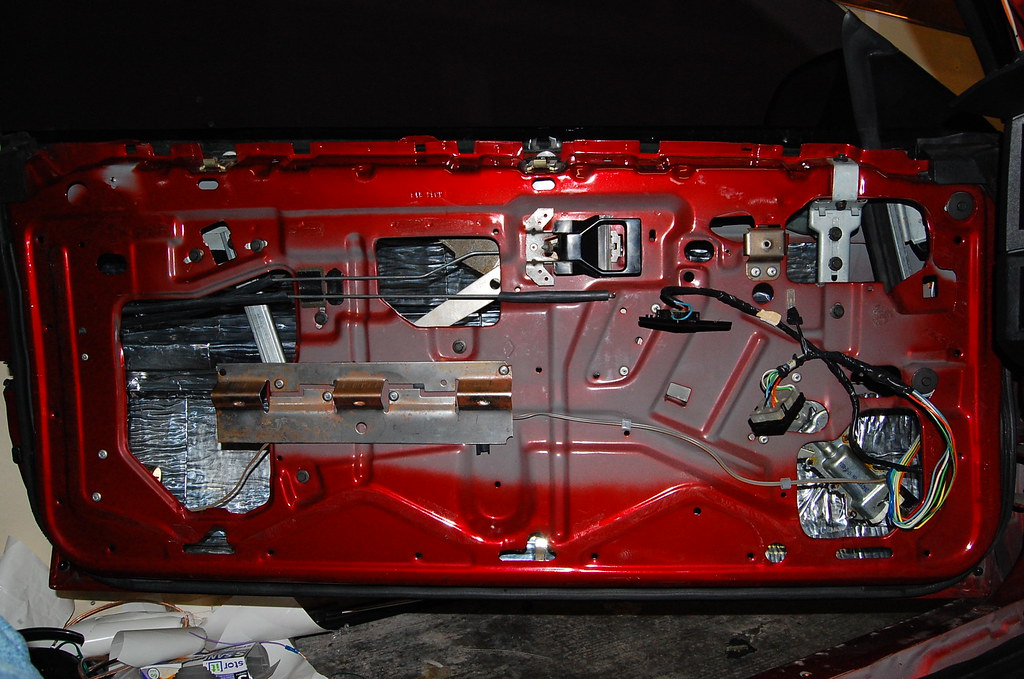
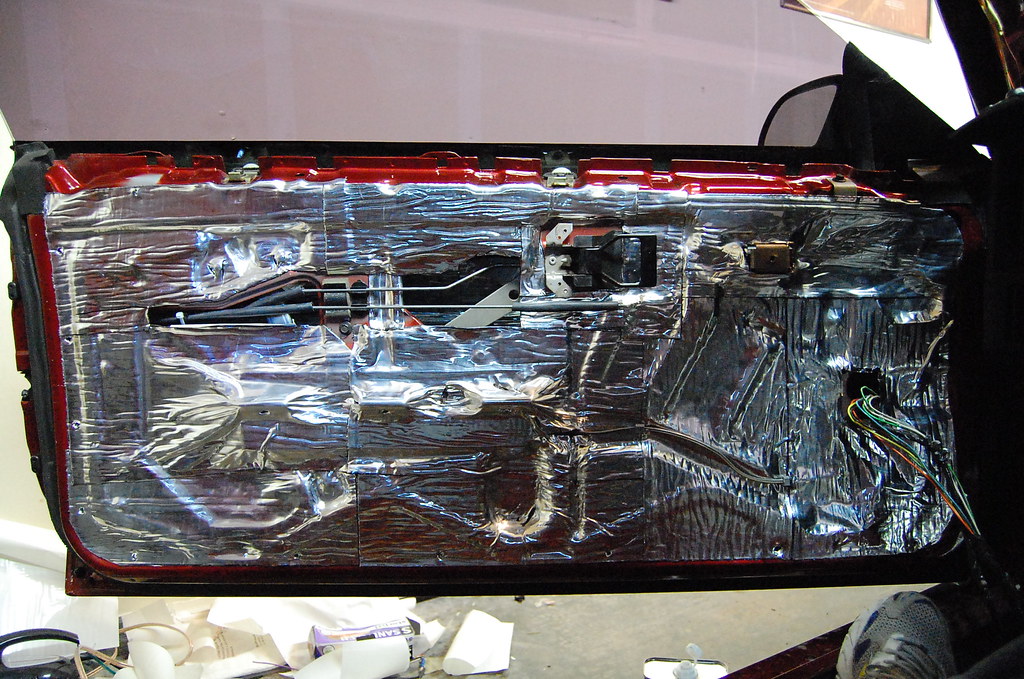
Driver side door with two layers of Raamat on outer door skin:
Single layer of Raamat on door skeleton:
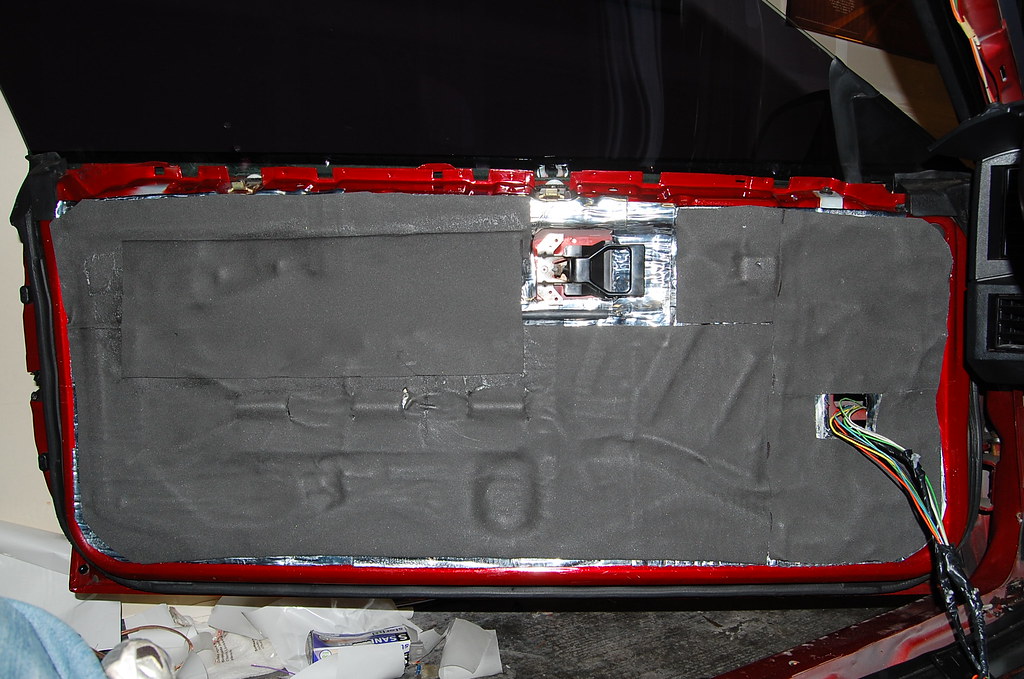
Ensolite on top of Raamat:
Power window mirror held still with wire ties. This is critical, the windows motors are a big source of door rattle when you shut the doors.

I also pre-loaded the lock rods and door handle rods with wire ties. This helps prevent them from rattling. Do not pre-load the power lock rods, the power lock actuators are not strong enough to overcome additional resistance.
Single layer of Raamat on door skeleton:
Ensolite on top of Raamat:
Power window mirror held still with wire ties. This is critical, the windows motors are a big source of door rattle when you shut the doors.
I also pre-loaded the lock rods and door handle rods with wire ties. This helps prevent them from rattling. Do not pre-load the power lock rods, the power lock actuators are not strong enough to overcome additional resistance.
 07-06-2009, 01:20 AM
#5
Supreme Member
Thread Starter
iTrader: (2)
Join Date: May 2002
Location: Everett, WA
Posts: 4,449
Likes: 0
Received 8 Likes
on
8 Posts
Car: 87' IROC
Engine: L98
Transmission: T56
Re: Complete audio build up and results, with pics
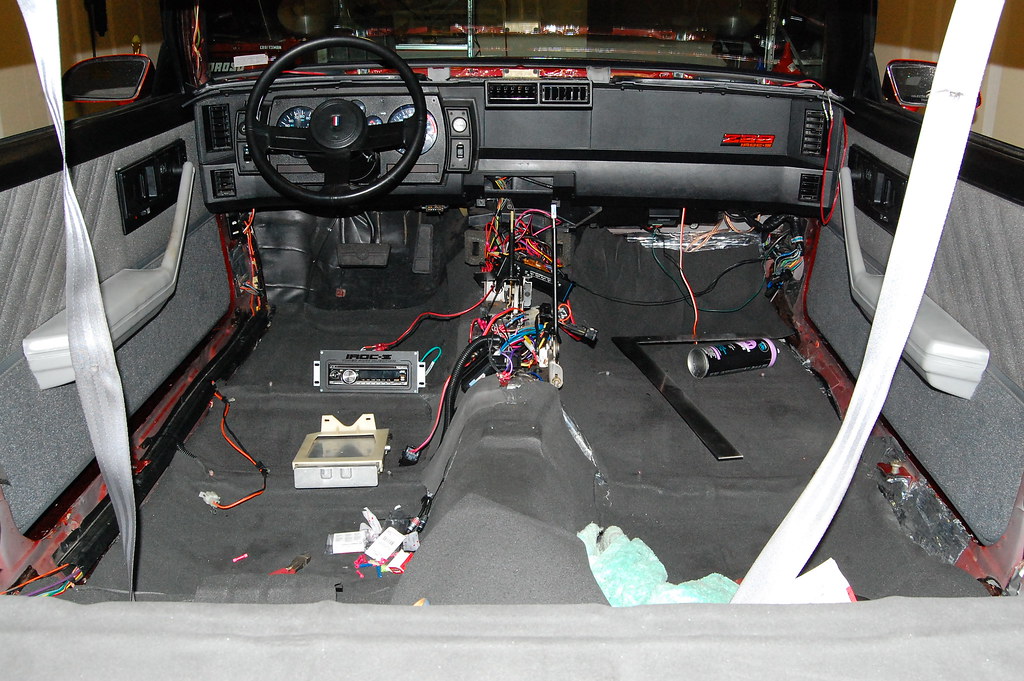
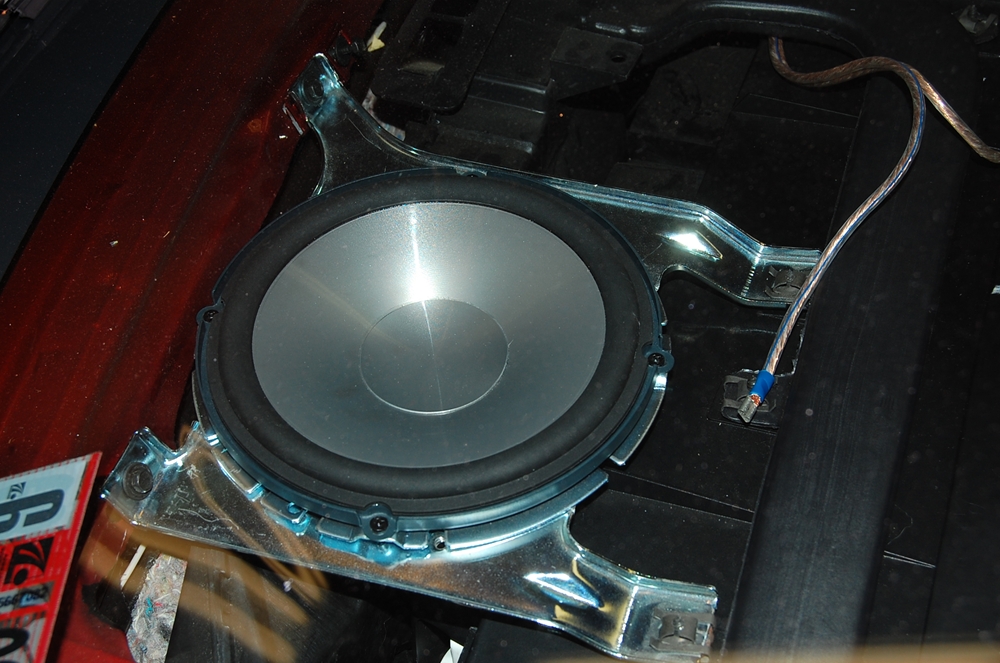
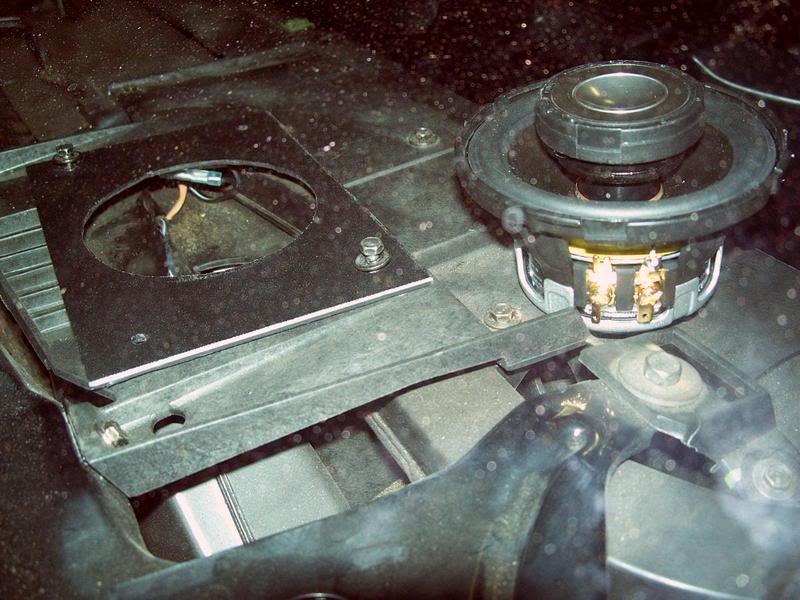
The front component woofers fit in the dash. I cut up the stock 4x6 metal bracket to accept the 6.5" woofer. I had to do some small modding of the dash of driver side to make them fit. A little bit of plastic had to be cut away. The passenger side fit fine. The speakers are really shallow, that why I got them. They are 2" deep which is about the maximum you can go. The tweeters are mounted in the A pillars. The reason why I didn't go with kickpanel speakers is because I don't like how they intrude in foot space. And I think they look silly, except for some of the custom made ones I have seen from some members.
Passenger side speaker:
Driver side speaker:
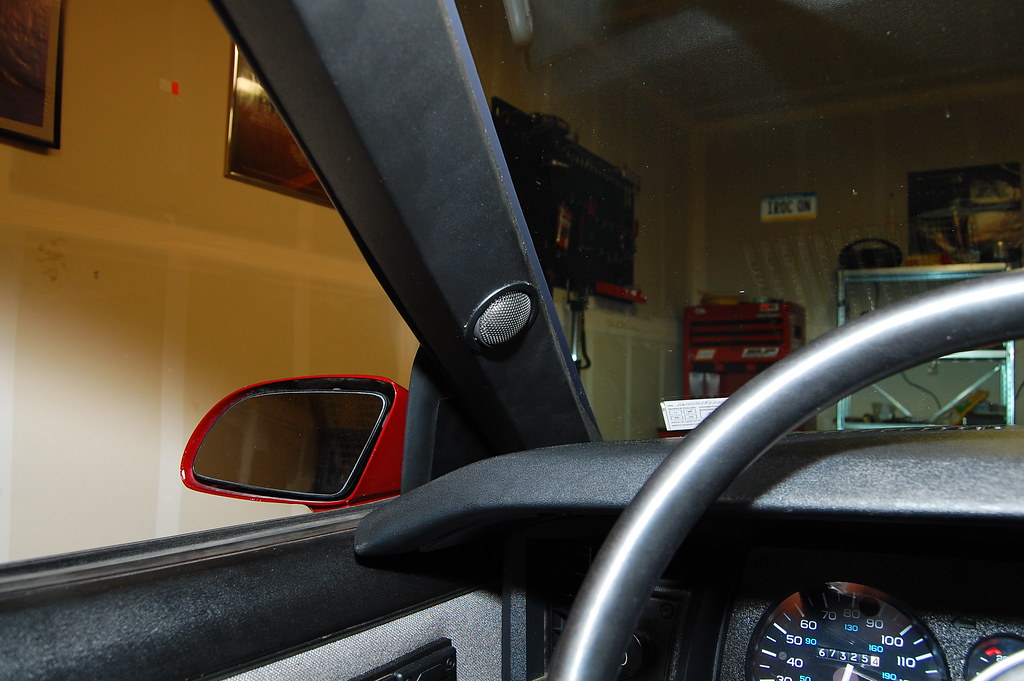
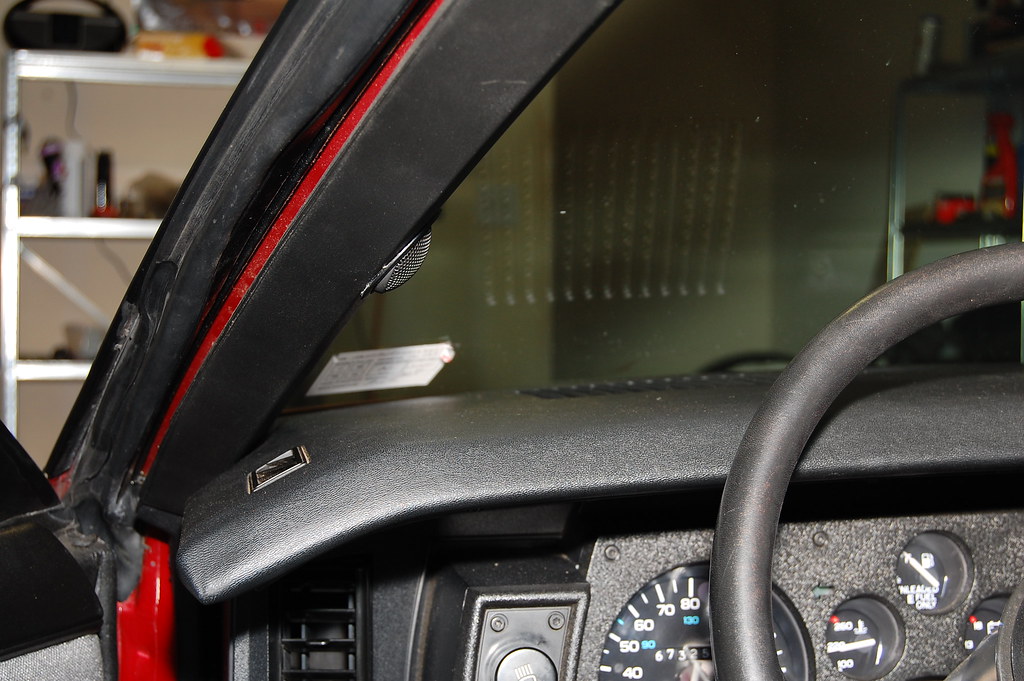
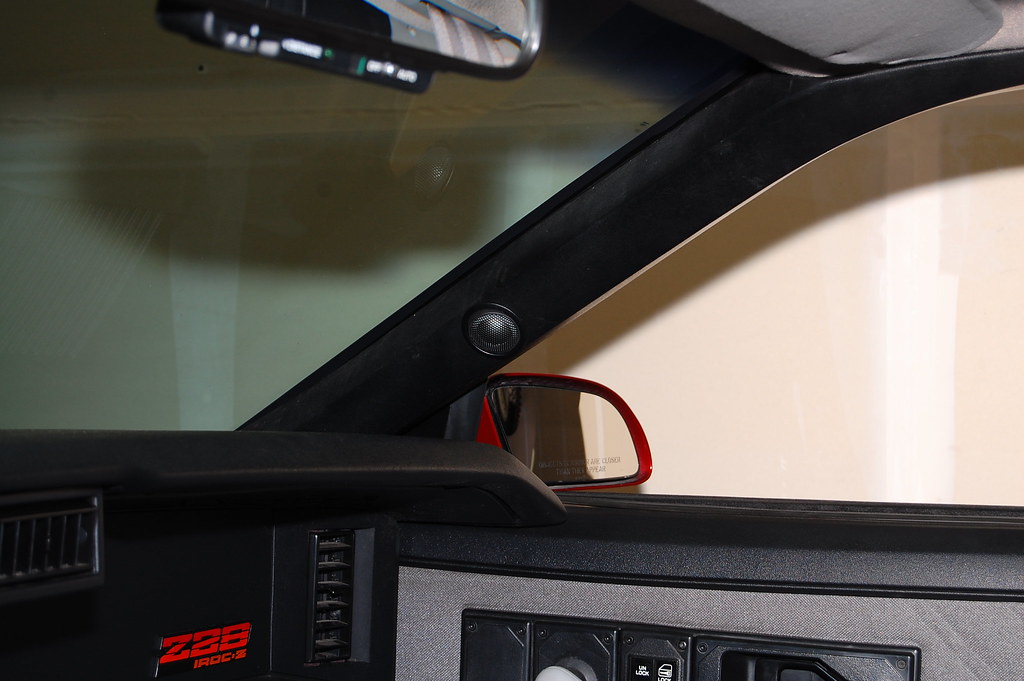
Tweeter in A pillar, disregard the hack in the A-pillar the camera flash makes it look much worse than it really is.

Passenger side speaker:
Driver side speaker:
Tweeter in A pillar, disregard the hack in the A-pillar the camera flash makes it look much worse than it really is.
07-06-2009, 01:26 AM
#6
Supreme Member
Thread Starter
iTrader: (2)
Join Date: May 2002
Location: Everett, WA
Posts: 4,449
Likes: 0
Received 8 Likes
on
8 Posts
Car: 87' IROC
Engine: L98
Transmission: T56
Re: Complete audio build up and results, with pics
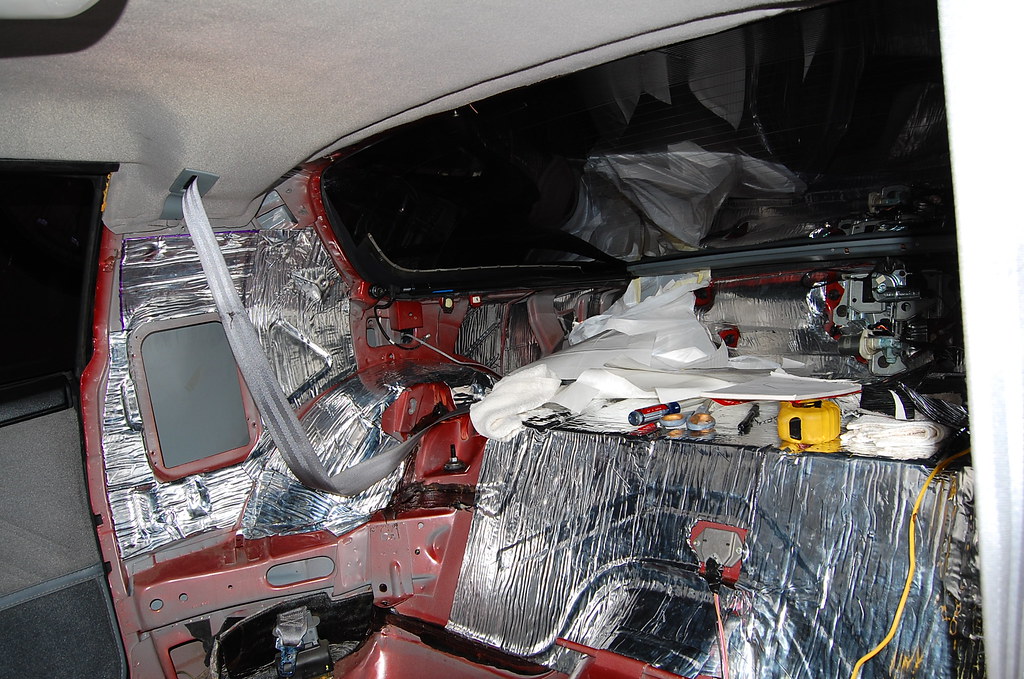
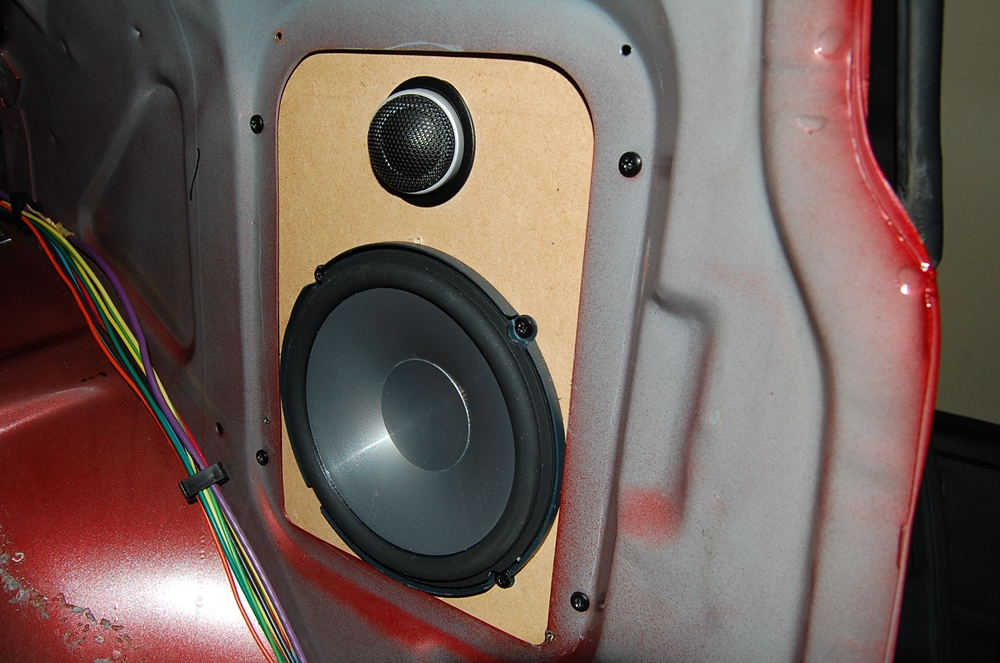
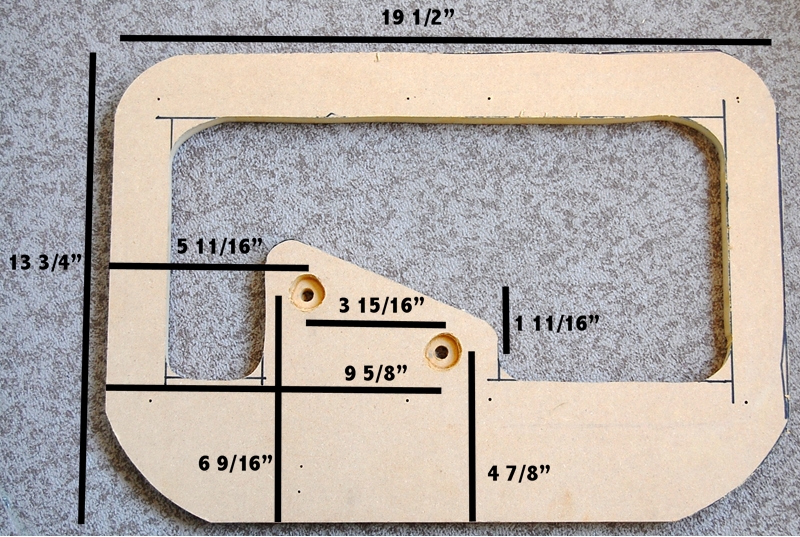
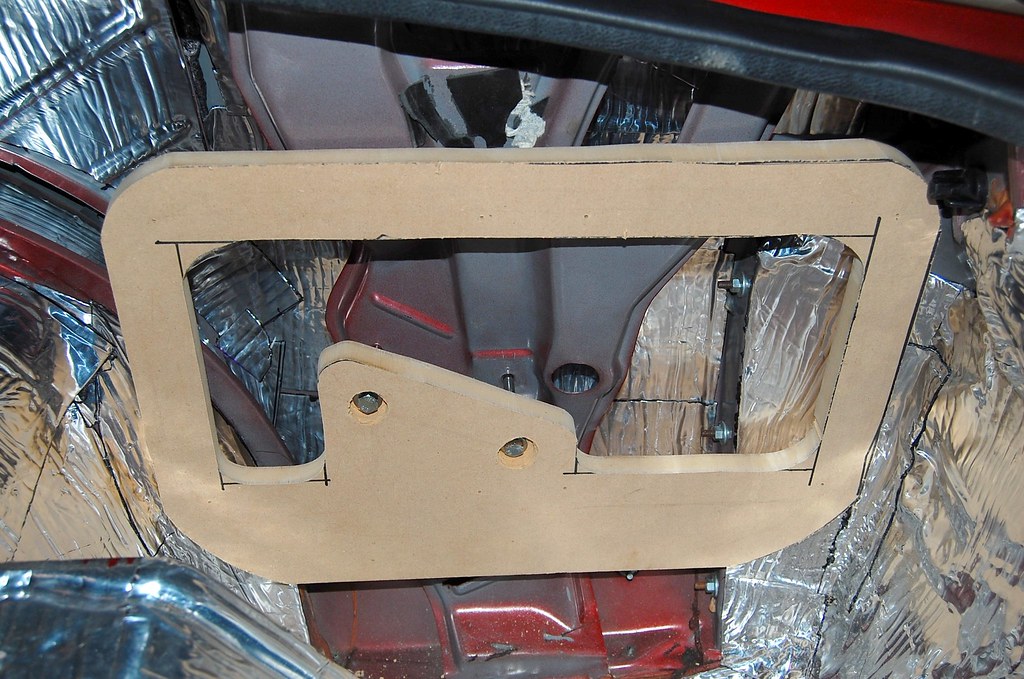
Sail panel speakers. Adapter made out of 1/4" MDF. It is mounted on the inside of the metal to reduce how far the speakers stick out. I applied Raamat and Ensolite inside the sail panels before I installed the speakers.
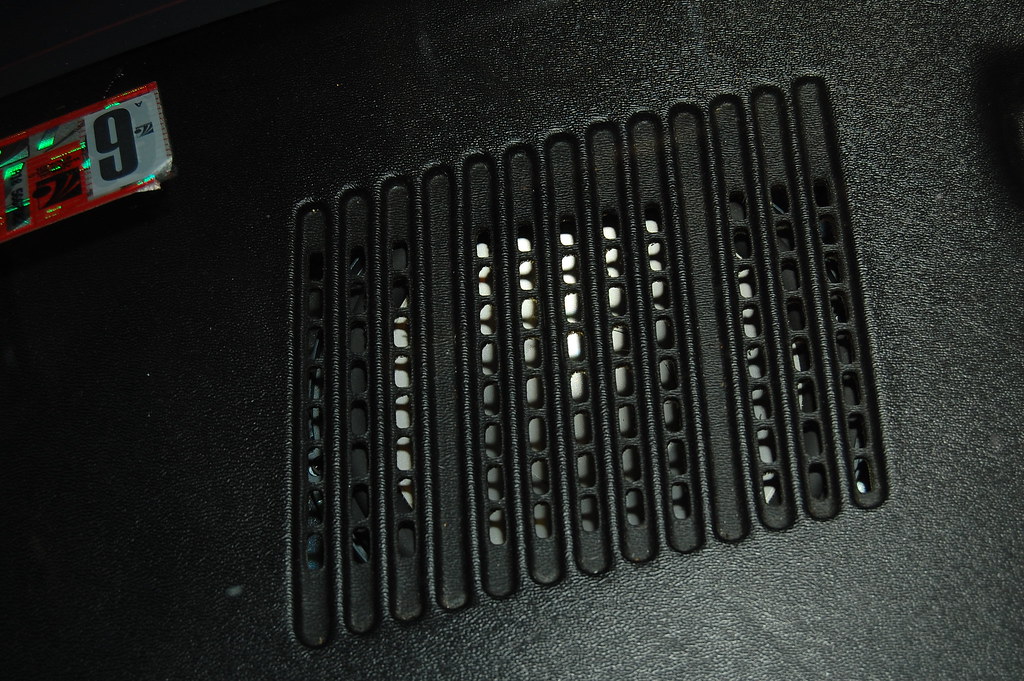
Door jam vent modified to stop rattling. I simply applied a layer of foam tape to the outside of the vent, then reinstalled. This is really important. These vents are the single biggest source of speaker rattles in thirdgens.
Door jam vent modified to stop rattling. I simply applied a layer of foam tape to the outside of the vent, then reinstalled. This is really important. These vents are the single biggest source of speaker rattles in thirdgens.
07-06-2009, 01:31 AM
#7
Supreme Member
Thread Starter
iTrader: (2)
Join Date: May 2002
Location: Everett, WA
Posts: 4,449
Likes: 0
Received 8 Likes
on
8 Posts
Car: 87' IROC
Engine: L98
Transmission: T56
Re: Complete audio build up and results, with pics
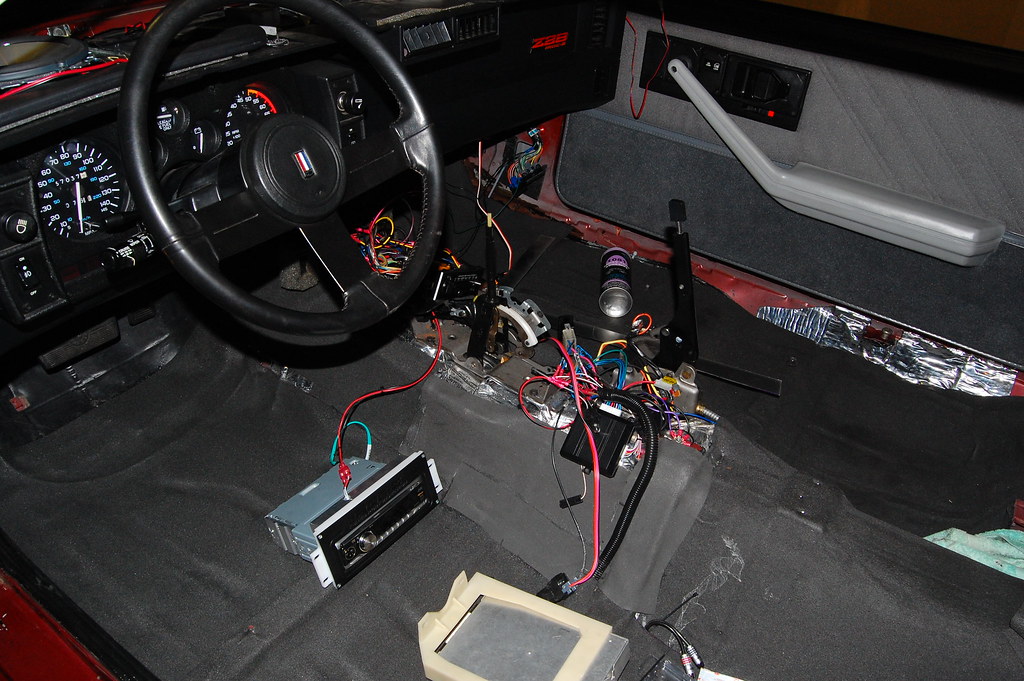
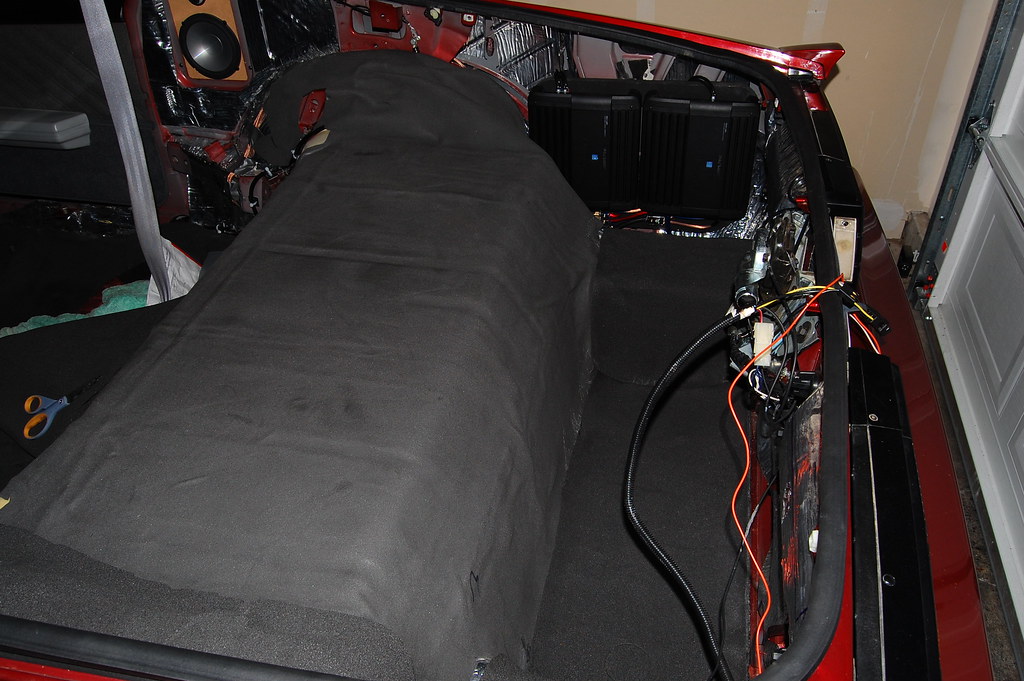
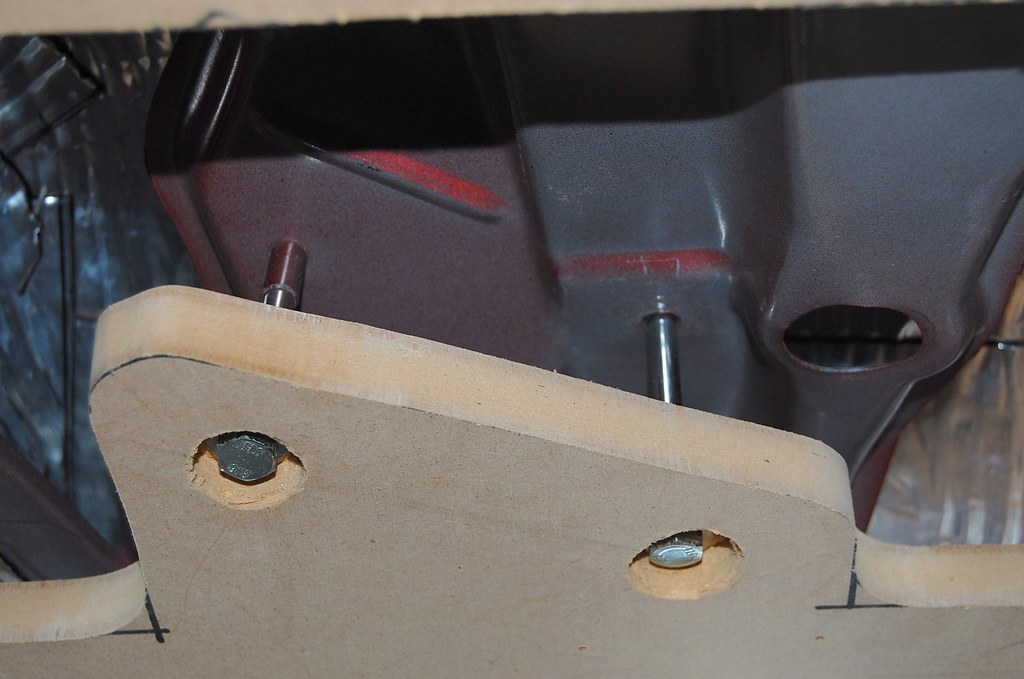
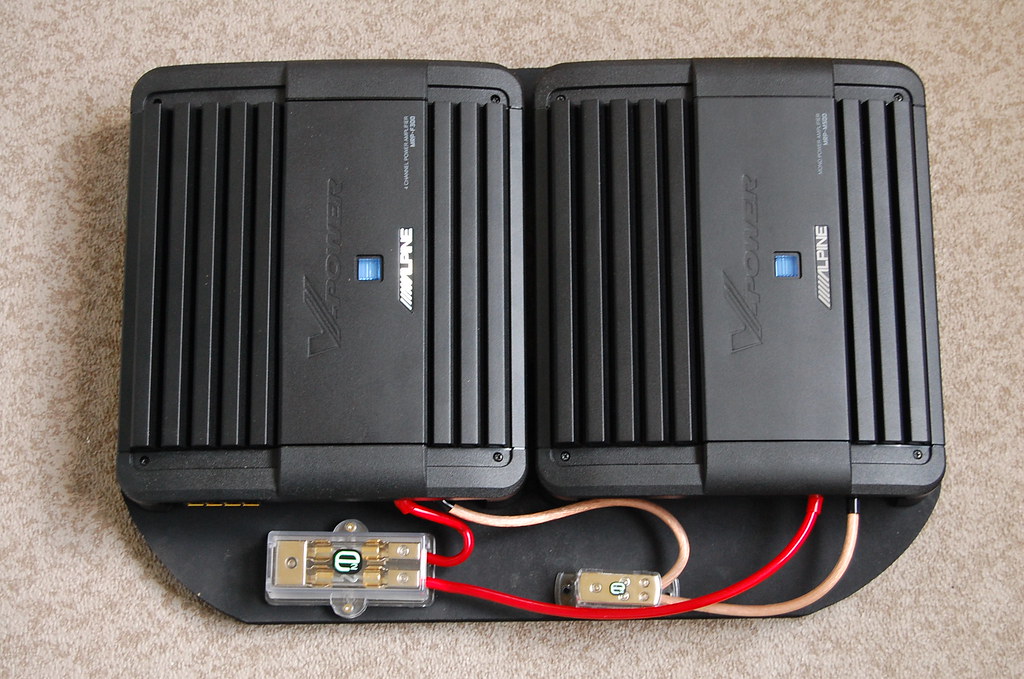
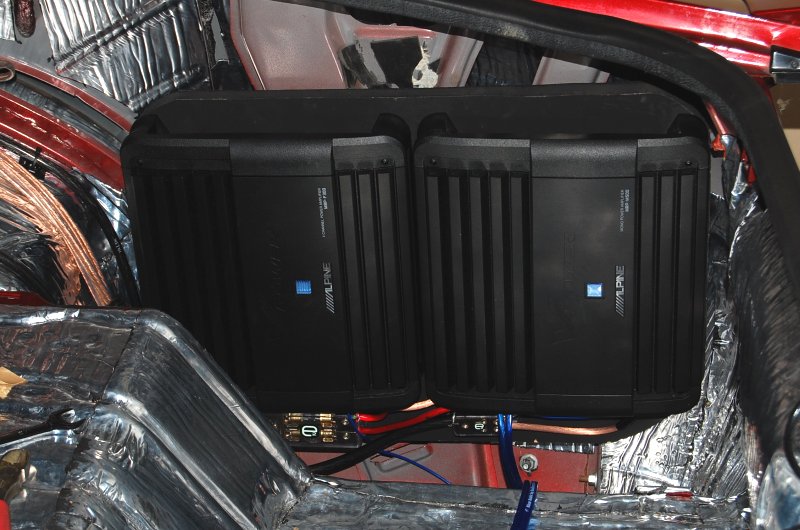
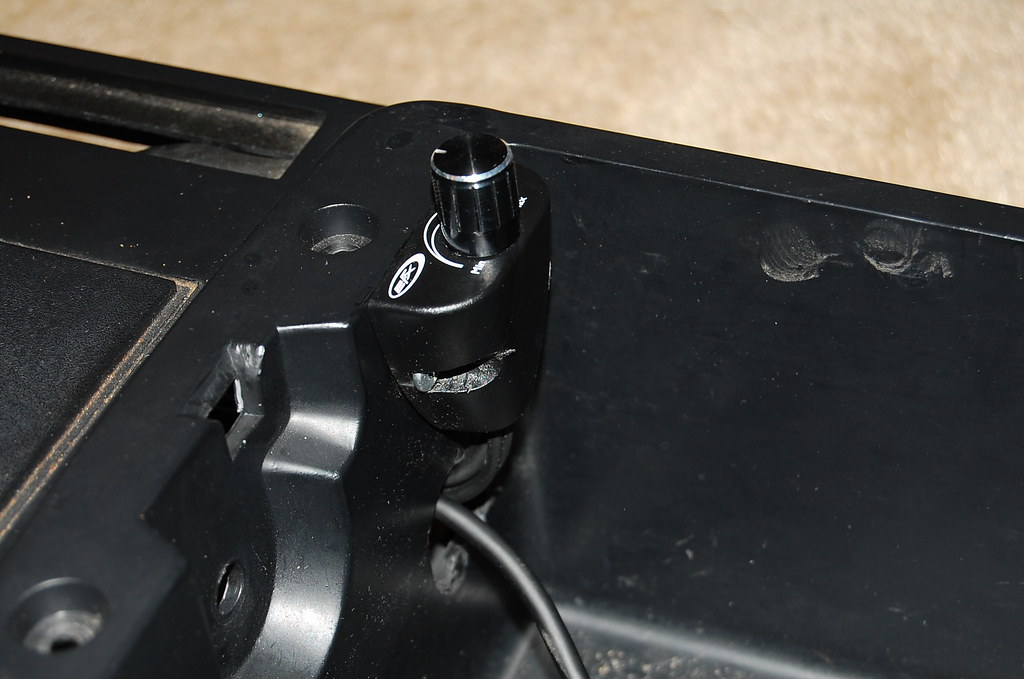
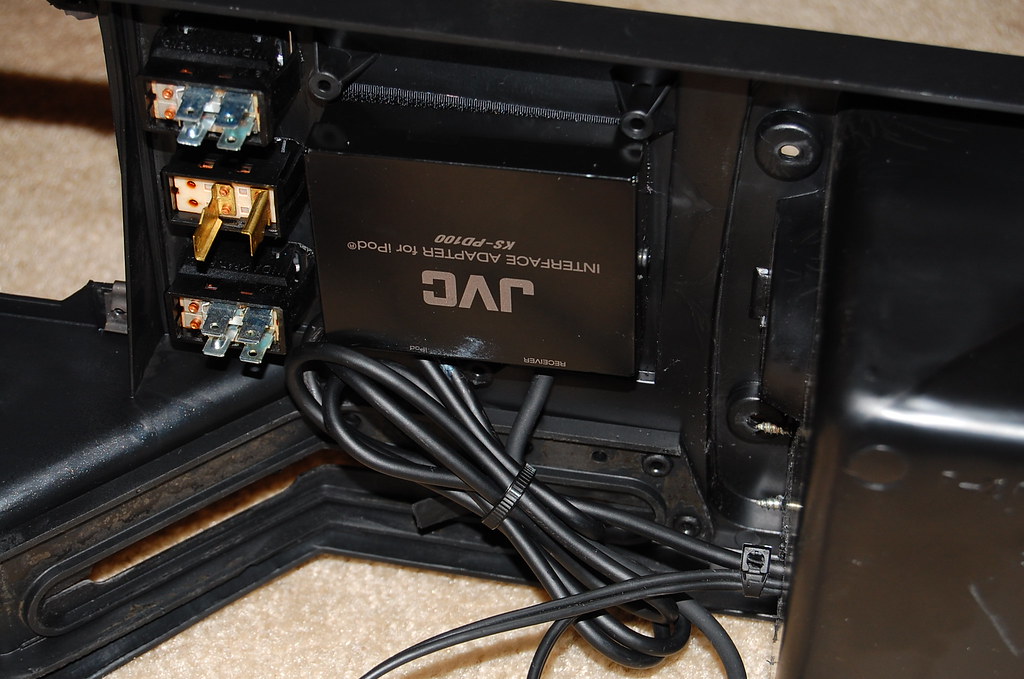
I custom built an amp rack for the spare tire area to house my two amps. It uses the two stock threaded holes for mounting the spare tire and jack. Works great. My rack is about as wide as you can go in this area. You can go higher and lower.
Trending Topics
07-06-2009, 01:42 AM
#8
Supreme Member
Thread Starter
iTrader: (2)
Join Date: May 2002
Location: Everett, WA
Posts: 4,449
Likes: 0
Received 8 Likes
on
8 Posts
Car: 87' IROC
Engine: L98
Transmission: T56
Re: Complete audio build up and results, with pics
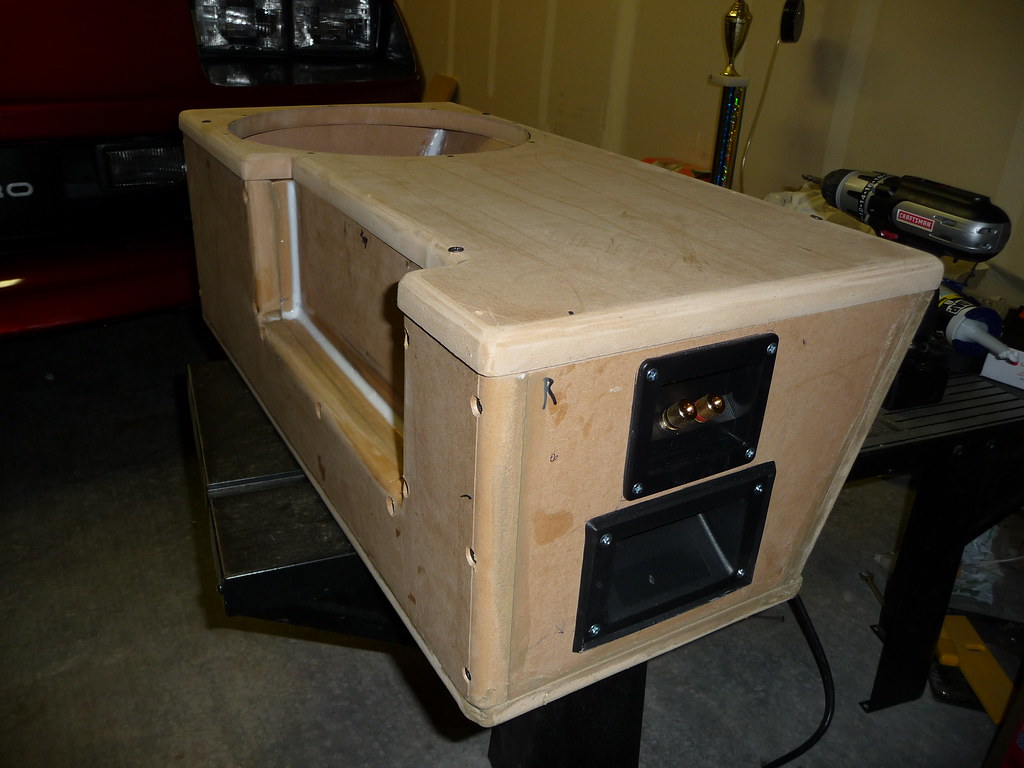
The sub box is designed to fit in the lower well area. It fits about flush with the lower humps on either side of the lower well. It is sealed and about 1 cubic foot. I rounded over the edges is a router and filled the screw holes. Then it was painted black + clear. I will soon be creating a carpeted floor out of 1/4" MDF to fit flush over the sub box and lower well humps to create a factory like look. I am not sure yet if I will do a true false floor or if I will show off the sub. This will also allow the sub box to be taken in and out of the car easily. I didn't go for a full height sub box because I only have 1 sub and I need some of the well area for golf clubs.
The box has handles and a speaker terminal for easy removal. I will post up dimensions later.


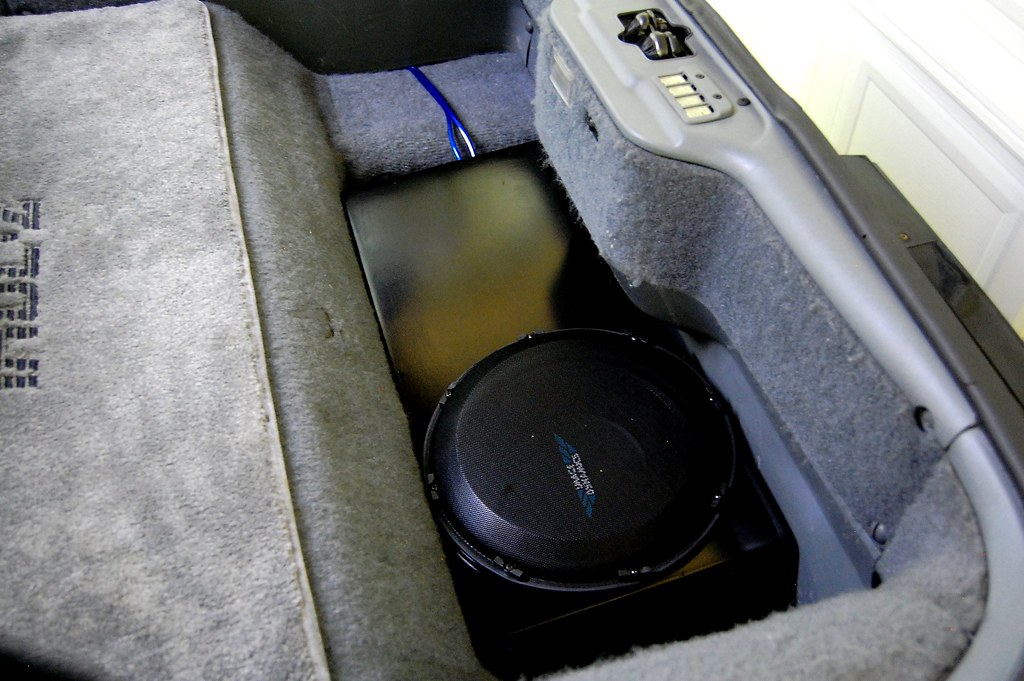
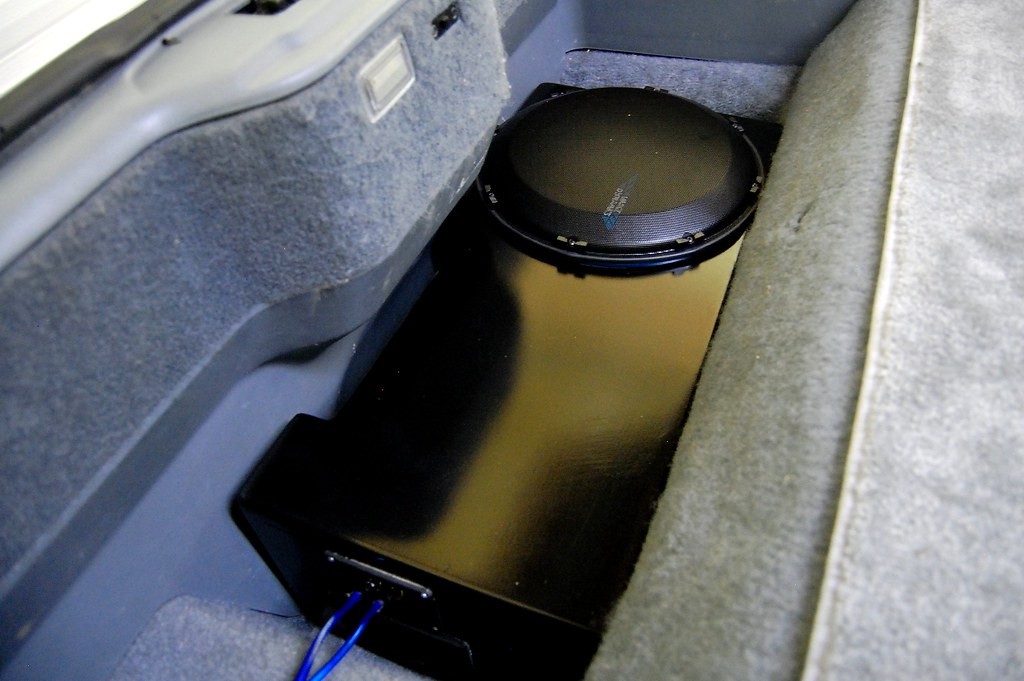
The box has handles and a speaker terminal for easy removal. I will post up dimensions later.
Last edited by 87350IROC; 07-06-2009 at 02:02 AM.
07-06-2009, 01:45 AM
#9
Supreme Member
Thread Starter
iTrader: (2)
Join Date: May 2002
Location: Everett, WA
Posts: 4,449
Likes: 0
Received 8 Likes
on
8 Posts
Car: 87' IROC
Engine: L98
Transmission: T56
Re: Complete audio build up and results, with pics
I replaced my old radio mount with one from HUmount.com It is metal faced and has light up letter. It is also flush mount. One of the coolest $90 I've spent on the car.
Off
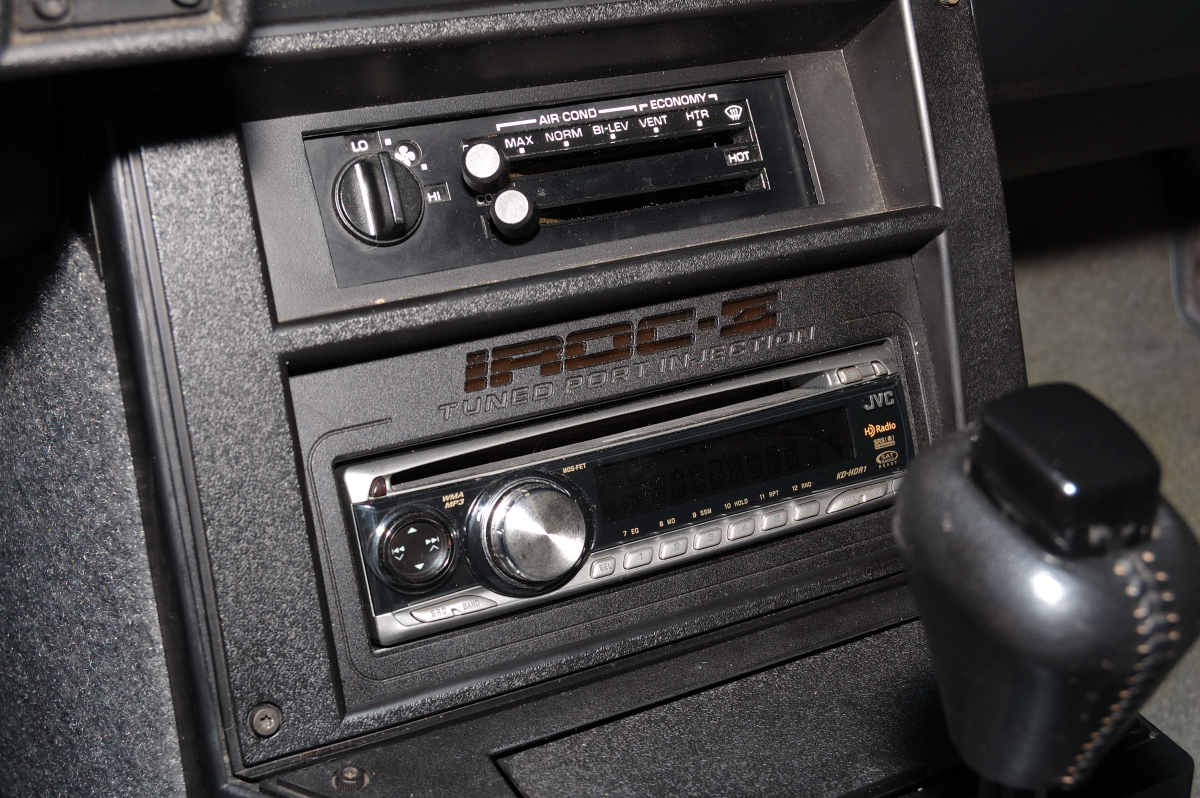
On during day
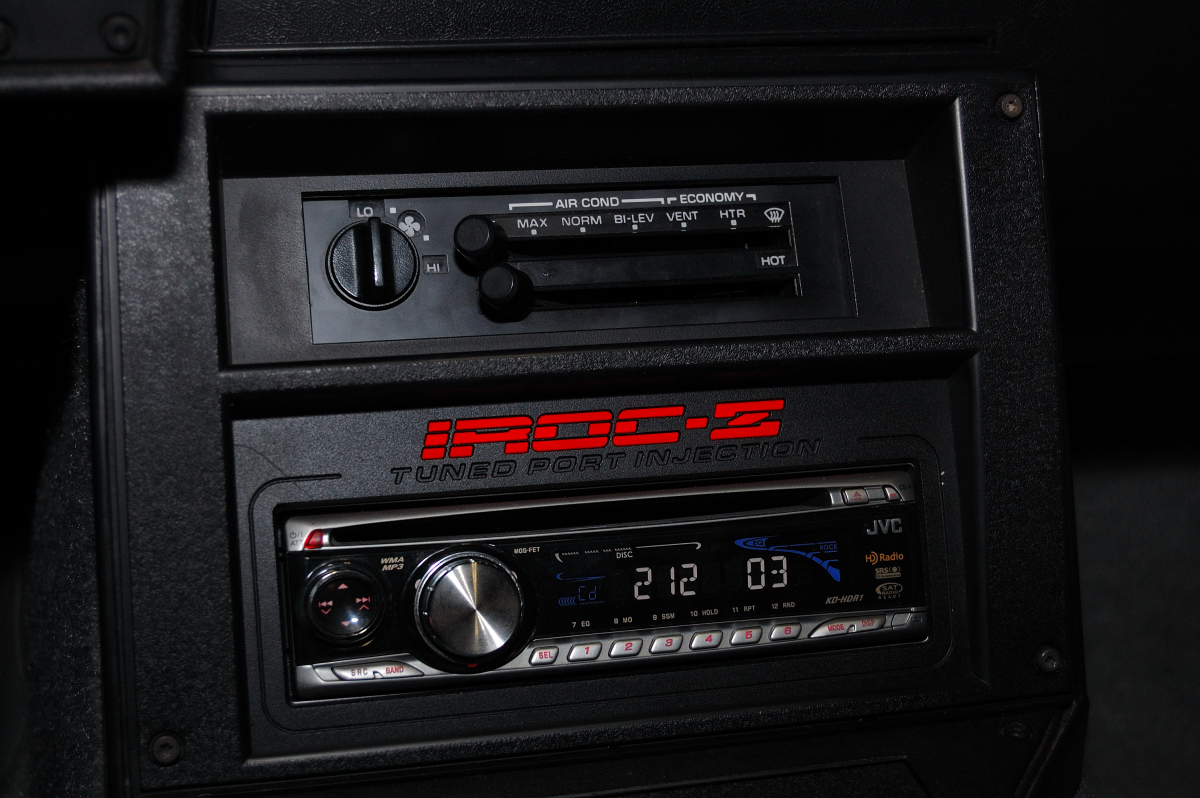
On during night
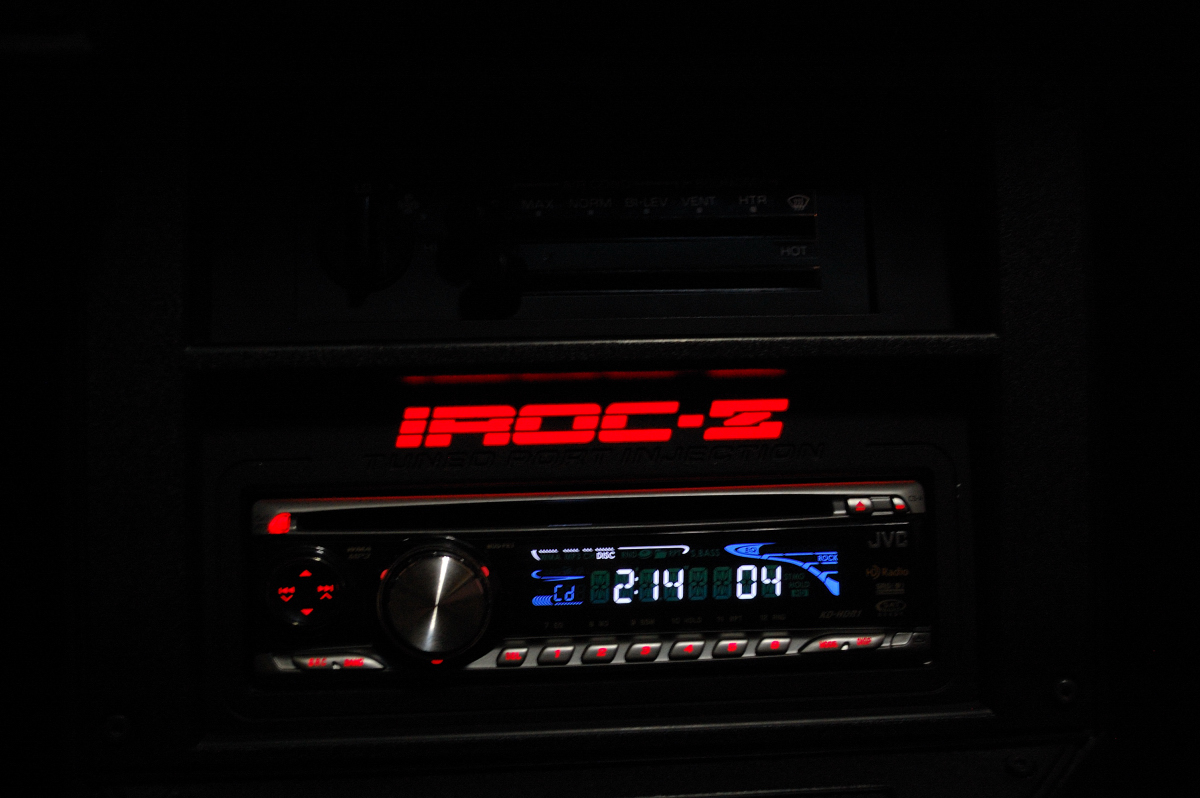
Off
On during day
On during night
The following users liked this post:
'82TA (08-16-2021)
 07-06-2009, 01:52 AM
#11
Senior Member
iTrader: (2)
Join Date: Dec 2008
Location: Peoria, IL
Posts: 990
Likes: 0
Received 1 Like
on
1 Post
Car: 1988 Camaro Sport Coupe
Engine: 5.0 305 Carb'd
Transmission: 700R4
Axle/Gears: 3.23
Re: Complete audio build up and results, with pics
man this is good stuff.. im truely jealous. lots of hard work really pays off. i see people just throw their sh*t in the back and "screw" it in place and then throw the deck in and hook it up and if it plays they leave it. wires all over the place, rattling and what not. good to see we still have people with brains left in this world. A+
oh and btw, thanks for all the ideas
oh and btw, thanks for all the ideas
07-06-2009, 01:54 AM
#12
Supreme Member
Thread Starter
iTrader: (2)
Join Date: May 2002
Location: Everett, WA
Posts: 4,449
Likes: 0
Received 8 Likes
on
8 Posts
Car: 87' IROC
Engine: L98
Transmission: T56
Re: Complete audio build up and results, with pics
I also wanted to add that I installed a DEI 530T automatic power window module. This $50 device converts your stock power windows into one touch up and down and retains the stock switches. One of neatest upgrades I've done on the camaro.
All in all this project was a lot of work but it was worth the time and money. I have not added up the total cost (i don't want to know) but you can do it from my first post, just don't tell me.
As a side benefit of the Raammat and Ensolite, the car drives quieter and has less rattles. Between this, SFCs, and the audio benefits the car is much more enjoyable to drive. Please let me know if you have any questions. I probably forgot to post some details.
07-06-2009, 02:02 AM
#13
Senior Member
iTrader: (2)
Join Date: Jan 2007
Location: jackson new jersey
Posts: 733
Likes: 0
Received 1 Like
on
1 Post
Car: 1991 camaro vert
Engine: ls1 soon
Transmission: t56 soon
Axle/Gears: moser 12bolt 4.10 soon!
Re: Complete audio build up and results, with pics
i love that radio fill in plate thats soooo hot... never saw anything like it ganna go order it right now
07-06-2009, 02:15 AM
#14
Supreme Member
Thread Starter
iTrader: (2)
Join Date: May 2002
Location: Everett, WA
Posts: 4,449
Likes: 0
Received 8 Likes
on
8 Posts
Car: 87' IROC
Engine: L98
Transmission: T56
Re: Complete audio build up and results, with pics
Oh, one thing to add about the HUmount. It stuck out about 3/16" further than stock. So I had to trim down the walls on the "radio trim plate" a bit. Its not a big deal but just keep it in mind. Took about 45mins to knock it down with a dremel and finish with a block sander.
07-06-2009, 02:38 AM
#15
Member
Join Date: Apr 2009
Location: Casper, WY
Posts: 100
Likes: 0
Received 0 Likes
on
0 Posts
Car: 1986 Irocz28
Engine: 305 tpi
Transmission: 700r4
Axle/Gears: stock
Re: Complete audio build up and results, with pics
wow i love that mount im ordering one too. ive never ever seen anything like it. thanks. and love it looks great.
07-06-2009, 04:10 PM
#16
Junior Member
iTrader: (1)

Join Date: Jan 2008
Location: Upstate SC
Posts: 50
Likes: 0
Received 0 Likes
on
0 Posts
Car: 98 Camaro, 89 Camaro RS
Engine: 3.8l & 2.8l V6
Transmission: 4l60e & T5
Axle/Gears: Open 3.08 & lsd 3.42
Re: Complete audio build up and results, with pics
Good Job. I want to put down dynamat or something in my new third gen. Is it hard? Or just glue and lay it down? Or even glue?
07-06-2009, 06:38 PM
#17
Supreme Member
Thread Starter
iTrader: (2)
Join Date: May 2002
Location: Everett, WA
Posts: 4,449
Likes: 0
Received 8 Likes
on
8 Posts
Car: 87' IROC
Engine: L98
Transmission: T56
Re: Complete audio build up and results, with pics
Dynamat and all similar products have an adhesive back. You just peel off the paper backing and slap it on. Its very easy.
07-06-2009, 08:58 PM
#20
Supreme Member
iTrader: (12)
Join Date: Aug 2005
Location: M.D
Posts: 1,923
Likes: 0
Received 2 Likes
on
1 Post
Car: 1987 Camaro
Engine: 350 hsr
Transmission: 700R4(blown)
Axle/Gears: 3:73
Re: Complete audio build up and results, with pics
wow very nice work.
dynamat is sound deadener( or how ever it is spelled) it's their to keeps noise out.
dynamat is sound deadener( or how ever it is spelled) it's their to keeps noise out.
07-06-2009, 09:36 PM
#21
Supreme Member
Thread Starter
iTrader: (2)
Join Date: May 2002
Location: Everett, WA
Posts: 4,449
Likes: 0
Received 8 Likes
on
8 Posts
Car: 87' IROC
Engine: L98
Transmission: T56
Re: Complete audio build up and results, with pics
Dynamat and similar (Raammat) are indeed sound deadeners but more importanatly they absorb vibrations. So by attaching to body panels it prevents them from vibrating. Vibration can be caused by speakers, loud exhaust, engine, trans, rear, suspension, wind. So the overall effect is to quite the car a bit. For me it decreased cabin noise caused by exhaust drone. It also prevented vibrations due to audio equipment and general rattles.
Raammat, Dynamat, and others are all fairly equal. Most suggest staying away from Dynamat because of its high cost.
Raammat, Dynamat, and others are all fairly equal. Most suggest staying away from Dynamat because of its high cost.
07-06-2009, 10:06 PM
#22
Junior Member
iTrader: (1)
Join Date: Sep 2004
Location: Tulsa, OK
Posts: 93
Likes: 0
Received 0 Likes
on
0 Posts
Car: 1986 T/A
Engine: 350 bored .040, s/r torquer heads
Transmission: 700r4, tci shift kit
Axle/Gears: stock borg warner
Re: Complete audio build up and results, with pics
Beautiful dude! I have been recently looking at several brands of sound deadener, and so far the only differences I have found were the name. And strangely enough, I have the same components in my sportage... seems like you hit the same ebay buy I did.  Good job on doing everything the right way instead of the easy way.
Good job on doing everything the right way instead of the easy way.
07-06-2009, 10:19 PM
#23
Supreme Member
Thread Starter
iTrader: (2)
Join Date: May 2002
Location: Everett, WA
Posts: 4,449
Likes: 0
Received 8 Likes
on
8 Posts
Car: 87' IROC
Engine: L98
Transmission: T56
Re: Complete audio build up and results, with pics
Update.
I was doing a little diagnosing for a bit of hissing I was hearing. After isolating each speaker I found that the passenger side rear woofer was not firing. Found that the wire connector was disconnected. Now that its fixed the system sounds even better and left/right balance is much better.
I was doing a little diagnosing for a bit of hissing I was hearing. After isolating each speaker I found that the passenger side rear woofer was not firing. Found that the wire connector was disconnected. Now that its fixed the system sounds even better and left/right balance is much better.
07-06-2009, 11:51 PM
#24
Supreme Member
iTrader: (18)
Join Date: Dec 2007
Location: Minnesota
Posts: 1,924
Likes: 0
Received 12 Likes
on
9 Posts
Car: 84 camaro, 88 trans am, 98 camaro
Engine: Modded , stock, LSX modded
Transmission: 700r4, 700r4, t-56
Axle/Gears: 327, 308, 373
Re: Complete audio build up and results, with pics
Truly some great craftsmanship and creative enginuity.
07-07-2009, 07:04 PM
#25
Senior Member
Join Date: Apr 2008
Location: O'Neill NE
Posts: 368
Likes: 0
Received 0 Likes
on
0 Posts
Car: 83 Z28 Camaro
Engine: 305
Transmission: 5 Speed manual
Axle/Gears: 3.73
Re: Complete audio build up and results, with pics
quick question how did you set up your your lights? for the humount
07-07-2009, 07:32 PM
#26
Supreme Member
Thread Starter
iTrader: (2)
Join Date: May 2002
Location: Everett, WA
Posts: 4,449
Likes: 0
Received 8 Likes
on
8 Posts
Car: 87' IROC
Engine: L98
Transmission: T56
Re: Complete audio build up and results, with pics
The HUmount comes with two wires, power and ground. I simply tapped these wires into the shift indicator light bulb in the center console. That way it comes on with the main lights and dims with the factory dimmer. You could easily wire it up to be on all the time also. Or you could wire it to a switch.
07-07-2009, 07:53 PM
#27
Senior Member
Join Date: Apr 2008
Location: O'Neill NE
Posts: 368
Likes: 0
Received 0 Likes
on
0 Posts
Car: 83 Z28 Camaro
Engine: 305
Transmission: 5 Speed manual
Axle/Gears: 3.73
Re: Complete audio build up and results, with pics
or i could wire it to my cd player to? or would that be a bad idea?
07-07-2009, 07:57 PM
#28
Member
iTrader: (4)

Join Date: Jun 2008
Location: 18326
Posts: 230
Received 0 Likes
on
0 Posts
Car: 86 Iroc
Engine: Soon to be LS 6.0
Transmission: Soon to be mn12
Axle/Gears: Strange 9in 4.10
Re: Complete audio build up and results, with pics
How is the front set up working out for you? I've been thinking about doing the same but mounting the tweeter under the dashpad on the outward side of each woofer, pointing the audio towards the center of the windsheild and installing an A-pillar or window-triangle tweeter.
Also, anything installed picks of the a-pillar would be nice also. Either way great job on the instalation. many will learn from this.
Also, anything installed picks of the a-pillar would be nice also. Either way great job on the instalation. many will learn from this.
07-07-2009, 09:33 PM
#29
Re: Complete audio build up and results, with pics
Nice work.... Took a friend and I 2 days to do from the rear pillars to the tail lights with Second Skin Damplifier....

I'm going components too, but putting a 4 and tweet in the dash and a 6.5 in the door (3 way up front) and a 6.5 and tweet in the back pillar... I got the last set of MB Quarts actually made in Germany (they are now made in China & quality has gone down hill)...
I still have more sound deadening material (like the foam mat you used) to put down.... more work
The car is SOOOO much quieter inside....
Rafael
07-07-2009, 09:46 PM
#30
Member
iTrader: (4)
Join Date: Jun 2008
Location: 18326
Posts: 230
Received 0 Likes
on
0 Posts
Car: 86 Iroc
Engine: Soon to be LS 6.0
Transmission: Soon to be mn12
Axle/Gears: Strange 9in 4.10
Re: Complete audio build up and results, with pics
I've used Second Skin in my car aswell, its good stuff.
07-07-2009, 10:19 PM
#31
Supreme Member
Thread Starter
iTrader: (2)
Join Date: May 2002
Location: Everett, WA
Posts: 4,449
Likes: 0
Received 8 Likes
on
8 Posts
Car: 87' IROC
Engine: L98
Transmission: T56
Re: Complete audio build up and results, with pics
luvofjah,
Nice setup. How are you mounting the 6.5" in the door? I wanted to do the woofer and tweeter in the door but couldn't come up with a good place for the woofer unless it sticks out. Stupid power window motor is in the way.
Harmony,
You could wire it to the cd player. I believe the gray wire is the illumination wire and would cause the HUmount to light up bright during the day and dimmer during the night. Do some research though, so you understand how that brown wire works.
Depending how much current the HUmount draws you could also wire it to the amp turn on wire, (usually the blue wire out of your cd player). That way it would light up when the stereo is on and off when the stereo is off.
DJ,
I really like the way it sounds, the tweeters are especially great. I like bright crisp treble so having the tweeters exposed and pointed at me is ideal. Firing the sound into the windshield like I have my front woofers is not ideal. But considering this and the modest cost of my components I'm really happy with how it sounds. Better than expected. If you are going to use tweeters in the window triangle, I would not mount any under the dash. Mixing tweeters can produce some goofy sounds, plus they will be really muffled under there. If you can figure out a good way to mount tweeters in the window triangle and make it look good let me know, that is what I would like to do, but couldn't make it look right.
Last edited by 87350IROC; 07-09-2009 at 09:32 PM.
07-07-2009, 10:47 PM
#32
Member
iTrader: (4)
Join Date: Jun 2008
Location: 18326
Posts: 230
Received 0 Likes
on
0 Posts
Car: 86 Iroc
Engine: Soon to be LS 6.0
Transmission: Soon to be mn12
Axle/Gears: Strange 9in 4.10
Re: Complete audio build up and results, with pics
Well that is good to know. I love my audio just as much if not more than the next guy. I'm an audiophile to put it simply.
Only reason I want to put tweeters under the dashpad is because on the outward side, they will direct the sound towards the center of the windshield and with the triangle idea it might, and I repeat might, sound good.
My idea for the triangle is to get a close match as a template and then fiberglass it to so it fits flush, custom and stockish with premium componants. I plan on using a wood backing to get the fit perfect and look I want. By no means will this be a half-assed job, if it doesn't turn out in my favor than I will destroy and re-attempt. TGO will be the first to see my findings.
07-07-2009, 10:48 PM
#33
Supreme Member
Thread Starter
iTrader: (2)
Join Date: May 2002
Location: Everett, WA
Posts: 4,449
Likes: 0
Received 8 Likes
on
8 Posts
Car: 87' IROC
Engine: L98
Transmission: T56
Re: Complete audio build up and results, with pics
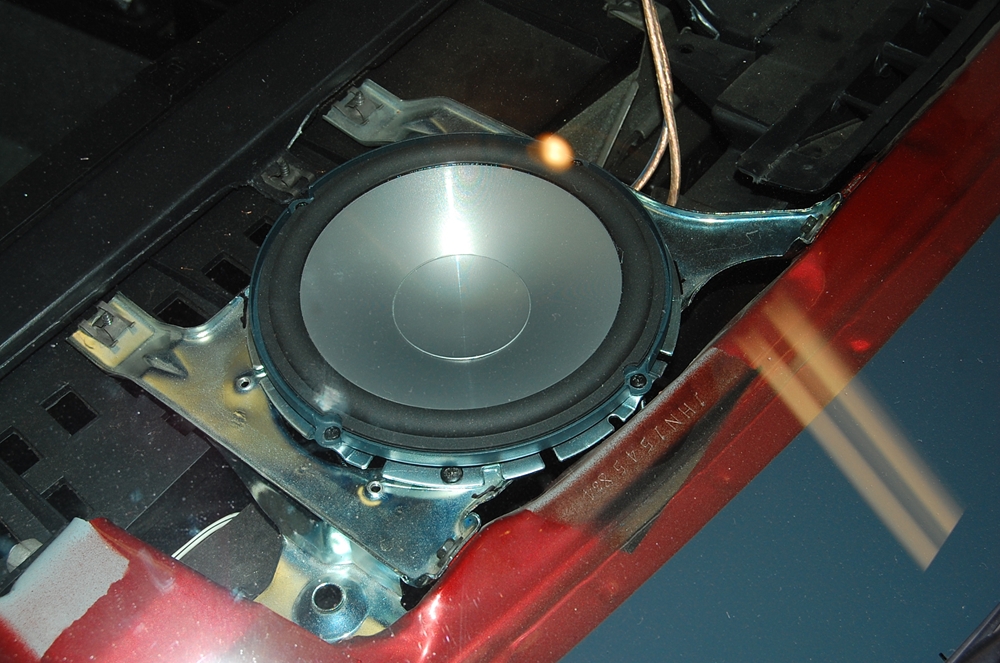
Ok here are some more finished pics.
Driver side front woofer. I would say the dash covers only about 10% of the total area of the speaker, which is better than I had expected.
Driver side tweeter:
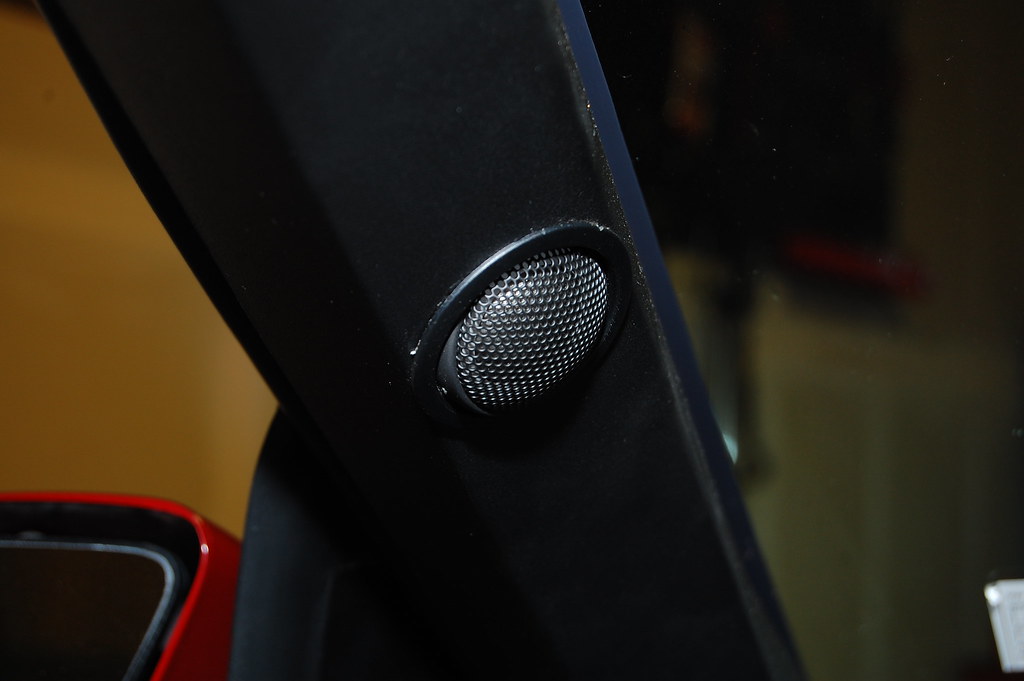
Passenger side tweeter:
Driver side front woofer. I would say the dash covers only about 10% of the total area of the speaker, which is better than I had expected.
Driver side tweeter:
Passenger side tweeter:
07-09-2009, 08:14 PM
#34
Senior Member
Join Date: Apr 2008
Location: O'Neill NE
Posts: 368
Likes: 0
Received 0 Likes
on
0 Posts
Car: 83 Z28 Camaro
Engine: 305
Transmission: 5 Speed manual
Axle/Gears: 3.73
Re: Complete audio build up and results, with pics
ok.. but if i connect it to the cd playing it wont change brightness since i have sound system and stuff?
07-09-2009, 09:09 PM
#35
Supreme Member
Thread Starter
iTrader: (2)
Join Date: May 2002
Location: Everett, WA
Posts: 4,449
Likes: 0
Received 8 Likes
on
8 Posts
Car: 87' IROC
Engine: L98
Transmission: T56
Re: Complete audio build up and results, with pics
If you connect it to the gray wire on the car side radio harness it should make the HUmount light bright during the day and dimmer when the car's lights are on.
Correction it is the gray wire on your harness. Check this out:
http://www.installdr.com/Harnesses/GM-Wiring.pdf
Correction it is the gray wire on your harness. Check this out:
http://www.installdr.com/Harnesses/GM-Wiring.pdf
Last edited by 87350IROC; 07-09-2009 at 09:17 PM.
07-10-2009, 01:22 AM
#36
Senior Member

Join Date: Jun 2008
Location: Norfolk VA
Posts: 1,298
Likes: 0
Received 2 Likes
on
2 Posts
Car: 85 Camaro IROC
Engine: 5.7 TPI
Transmission: 700-R4
Axle/Gears: open rear, 3.42 gears
Re: Complete audio build up and results, with pics
great stuff man.
thats a great looking box you got there.
thats a great looking box you got there.
07-10-2009, 01:42 AM
#37
Senior Member
iTrader: (5)
Join Date: Dec 2006
Location: Augusta, Ga
Posts: 2,212
Likes: 0
Received 0 Likes
on
0 Posts
Car: 1987 Trans Am
Engine: 355ci L98 soon to be turbo'd
Transmission: 700R4
Axle/Gears: 2.73 posi
Re: Complete audio build up and results, with pics
Nice settup bro! Quick question, why did you mount the tweeter so "low" on the A-pillar? I figured since its pointing inward, why not mount it higher, closer to the person? I decided to mount mine on the window triangle facing the person...what a night and day difference in sound!
07-10-2009, 11:06 AM
#38
Supreme Member
Thread Starter
iTrader: (2)
Join Date: May 2002
Location: Everett, WA
Posts: 4,449
Likes: 0
Received 8 Likes
on
8 Posts
Car: 87' IROC
Engine: L98
Transmission: T56
Re: Complete audio build up and results, with pics
The tweeters are in swivel cups. So even though they are mounted on the A-pillar I have them aimed where I want. I aimed the driver side tweeter at the front passenger seat and the passenger side tweeter at the driver seat. I found that this setup gave me the best left/right balance.
I mounted them fairly low in the A-pillar because I wanted them a little further from my ears and closer to the woofers. I didn't want the tweeter so close that they overpowered the woofers. Also I preferred the look of the tweeters mounted low rather than high.
I mounted them fairly low in the A-pillar because I wanted them a little further from my ears and closer to the woofers. I didn't want the tweeter so close that they overpowered the woofers. Also I preferred the look of the tweeters mounted low rather than high.
07-10-2009, 12:44 PM
#39
Senior Member
iTrader: (5)
Join Date: Dec 2006
Location: Augusta, Ga
Posts: 2,212
Likes: 0
Received 0 Likes
on
0 Posts
Car: 1987 Trans Am
Engine: 355ci L98 soon to be turbo'd
Transmission: 700R4
Axle/Gears: 2.73 posi
Re: Complete audio build up and results, with pics
ahh good idea!
07-18-2009, 11:21 PM
#40
Member
iTrader: (3)
Join Date: Apr 2009
Location: Mount Pleasant Michigan
Posts: 112
Likes: 0
Received 0 Likes
on
0 Posts
Car: 87 Camaro IROC, 85 IROC Roadste
Engine: 5.7 V8 350 TPI, 383 - Coming Soon
Transmission: 700R4, Turbo 350
Axle/Gears: 3.27
Re: Complete audio build up and results, with pics
Nice setup! Good job on the dynamat work. Looks pretty good!
07-18-2009, 11:47 PM
#41
Member
Join Date: Jul 2009
Location: Lebanon, Pennsylvania
Posts: 123
Likes: 0
Received 0 Likes
on
0 Posts
Car: 1984 Berlinetta,'82 and '86 Camaro
Engine: Rebuilt 350
Transmission: Automatic. =[
Axle/Gears: Stock
Re: Complete audio build up and results, with pics
Dang, now that I look at your job... Makes me think that the PO of my car did a half A** job... %$^&
Great Work by the way.
Great Work by the way.
 07-20-2009, 09:36 PM
#43
Senior Member
Join Date: Apr 2008
Location: O'Neill NE
Posts: 368
Likes: 0
Received 0 Likes
on
0 Posts
Car: 83 Z28 Camaro
Engine: 305
Transmission: 5 Speed manual
Axle/Gears: 3.73
Re: Complete audio build up and results, with pics
quick question again.. you wouldn't happen to show me like were you shaved off the part to make it fir would you like were exactly?
07-20-2009, 11:37 PM
#44
Junior Member

Join Date: Jul 2009
Location: MiAmi
Posts: 77
Likes: 0
Received 0 Likes
on
0 Posts
Car: 92 CaMaRo RS
Engine: CARBED 350 5.7
Re: Complete audio build up and results, with pics
i like the mount plate for the reciver. im working on mine now and ill be posting pictures soon. clarion reciver.. boston pro components.. re audio subs.. and same alpine vpower amps as your using.
nice work
nice work
07-22-2009, 01:40 AM
#45
Member
Join Date: Jul 2009
Location: Portland, OR
Posts: 180
Likes: 0
Received 0 Likes
on
0 Posts
Car: 1987 IROC-Z
Engine: 305 TPI
Transmission: 700r4
Re: Complete audio build up and results, with pics
Damn, good job, it looks great. Im new and there were a lot of posts so i didnt read em all and im curious how you got that nice little dash filler kit for your stereo with the IROc logo?
07-26-2009, 09:26 PM
#46
Supreme Member
iTrader: (33)
Join Date: Jul 2000
Location: Boosted Land
Posts: 5,945
Likes: 0
Received 1 Like
on
1 Post
Car: 92 Z28
Engine: Boosted LSX
Re: Complete audio build up and results, with pics
Stop being lazy. Go finish reading what you skipped. Some good info including the link to the website he got his mounting kit from.
07-27-2009, 11:34 AM
#47
Junior Member
Join Date: May 2009
Location: Fort Campbell, KY
Posts: 12
Likes: 0
Received 0 Likes
on
0 Posts
Car: '91 RS
Engine: 350
Transmission: 700r4
Axle/Gears: 3.23
Re: Complete audio build up and results, with pics
Looks great! How'd you get the sound deadener on the outer doorskin like that? Makes me wanna hurry and finish up some other things so I can get back on the interior to do some audio. Don't even have my head unit in as it goes right now. It's sitting in my closet wired to the factory pigtails that the PO cut out.. Bahh.
07-28-2009, 01:13 AM
#49
Supreme Member
Thread Starter
iTrader: (2)
Join Date: May 2002
Location: Everett, WA
Posts: 4,449
Likes: 0
Received 8 Likes
on
8 Posts
Car: 87' IROC
Engine: L98
Transmission: T56
Re: Complete audio build up and results, with pics
mechanic1992,
The mount is from HUmount.com
UnSouled_RS,
Its a pain to get the mat on the door skins but its not as bad as it looks. I simply cut the mat into 8"x8" squares and then just reached in from the big hole in the rear of the door. You can also squeeze some fingers in the power window motor area to help align things. It came out pretty well. It would be a lot easier if took the power window motors off. The doors sounds much more solid now.
08-01-2009, 02:47 PM
#50
Junior Member

Join Date: Jul 2009
Location: Wichita, Kansas
Posts: 68
Likes: 0
Received 0 Likes
on
0 Posts
Car: 1985 Z28
Engine: 305ci 4barrel
Transmission: 5-speed
Re: Complete audio build up and results, with pics
hey 87350IROC......great thread, great job! i am planning on ordering the same type face plate from HUmount.com for my 85' Z28. i looked at their web site, but it wasn't real clear. what exactly is included in that kit for about 90bucks? it says it comes with everything needed to add the aftermarket stereo. my unit is a JVC pretty much like yours. thanks for any info you might have........rick