
1987 Camaro "Pro-Touring" Budget Build
 04-11-2018, 09:27 AM
#101
Supreme Member

Join Date: Dec 2005
Location: Alberta (formerly Ontario)
Posts: 9,302
Received 689 Likes
on
576 Posts
Re: 1987 Camaro "Pro-Touring" Budget Build
Clearance with the Canton pan is excellent. I am running Hedman LT headers though so I can't comment on the room for the crossover pipe other than to say my understanding is that it is supposed to clear.
Speaking of headers, I have plenty of room to slip one in from the bottom (left side) and the other in from the top. Oil filter and starter (mini style from a late 90's pick up truck) are removed.
Speaking of headers, I have plenty of room to slip one in from the bottom (left side) and the other in from the top. Oil filter and starter (mini style from a late 90's pick up truck) are removed.
Last edited by skinny z; 04-11-2018 at 10:20 PM. Reason: Clarification
 04-16-2018, 08:06 PM
#102
Re: 1987 Camaro "Pro-Touring" Budget Build
Nothing too crazy for an update today, just moving forward slowly with whatever time I can find... an hour here and an hour there will add up in the end (I hope!)
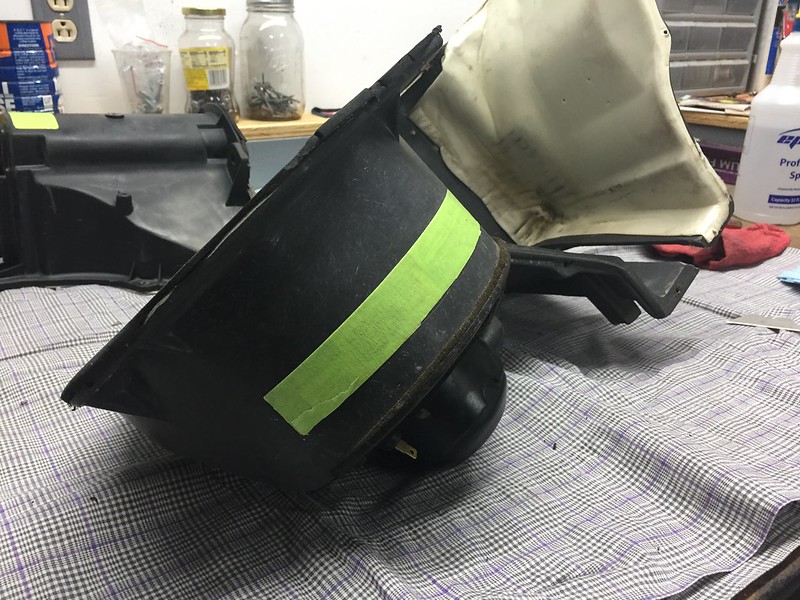
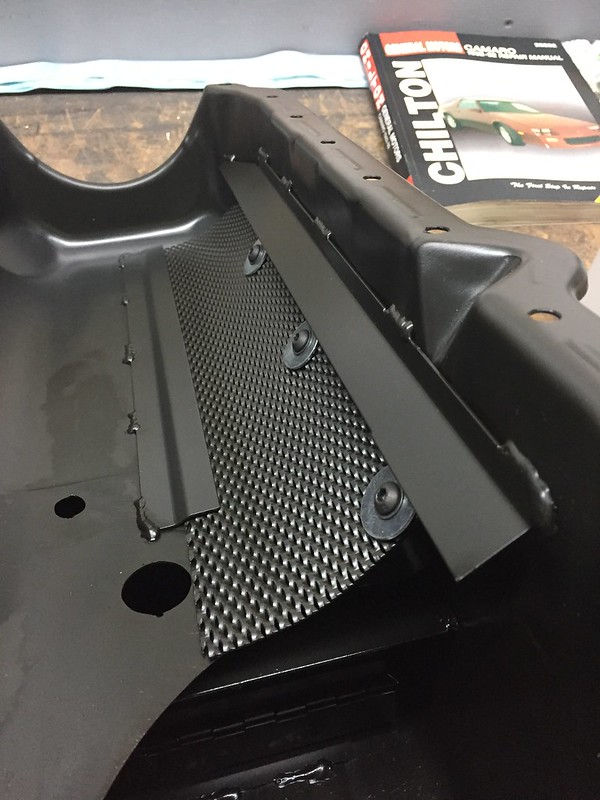
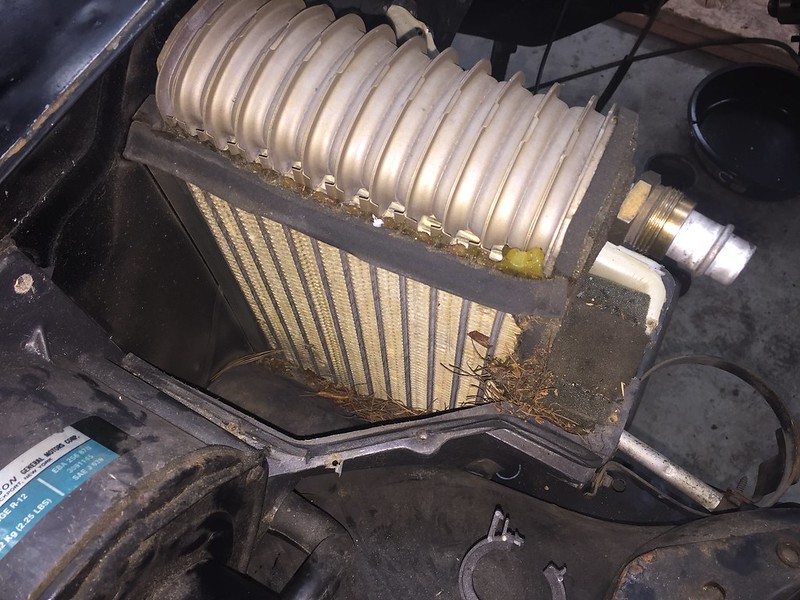
I finished up the repairs on my AC box and got a coat of paint on it. I taped off all of the factory labels to keep a close-to-stock look. The original box had a bit of a gray tint to it, but I think it's going to look sharp with the satin black.
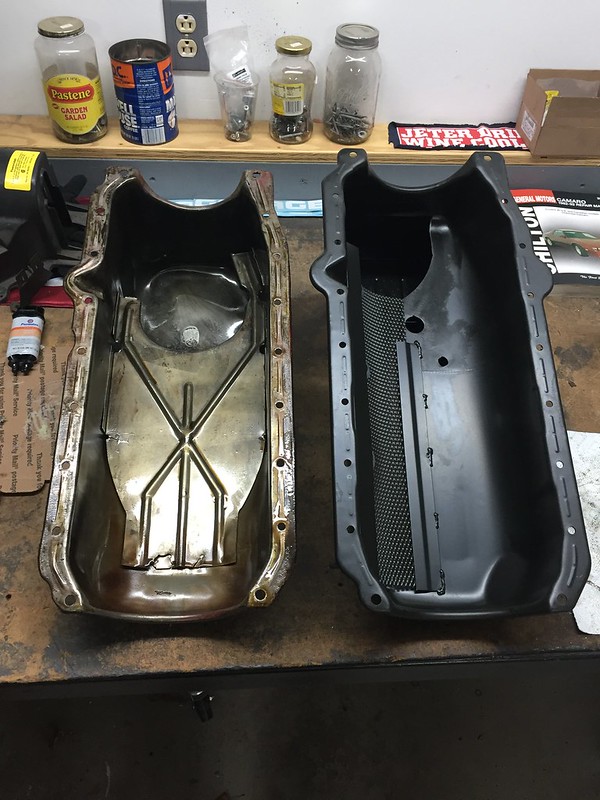
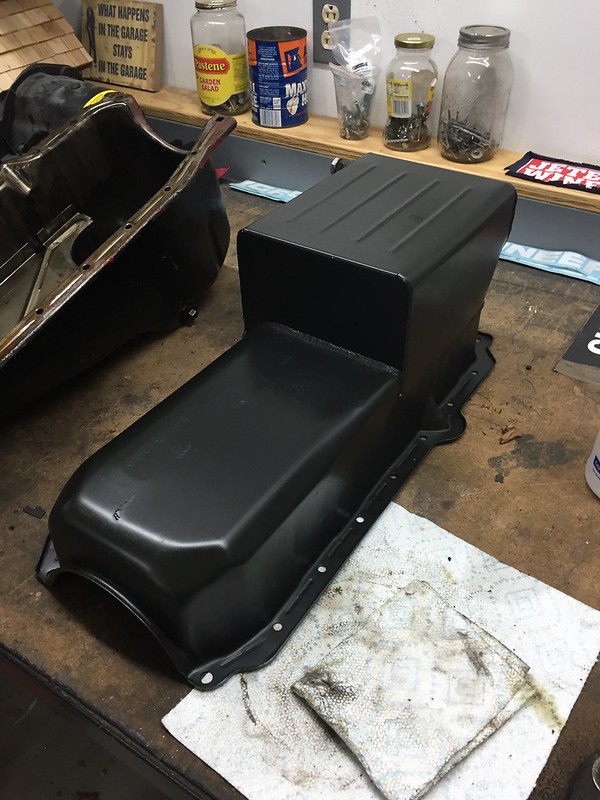
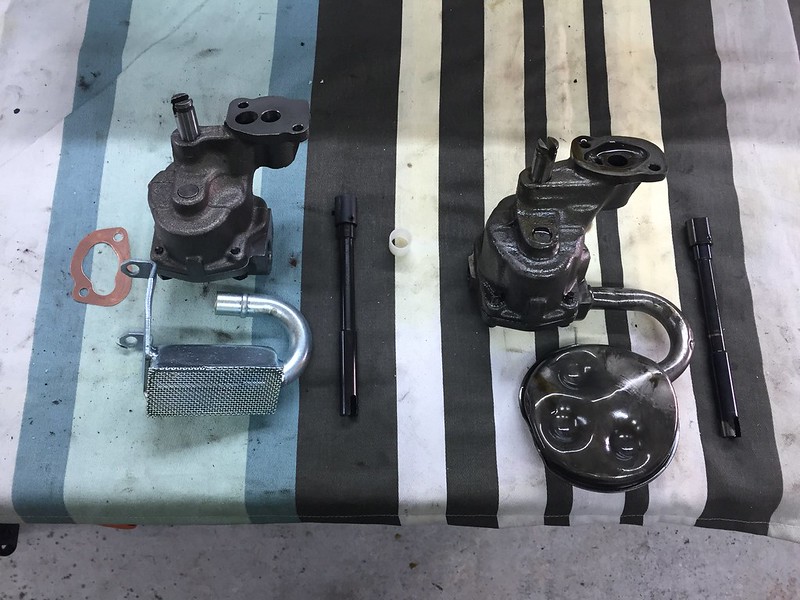
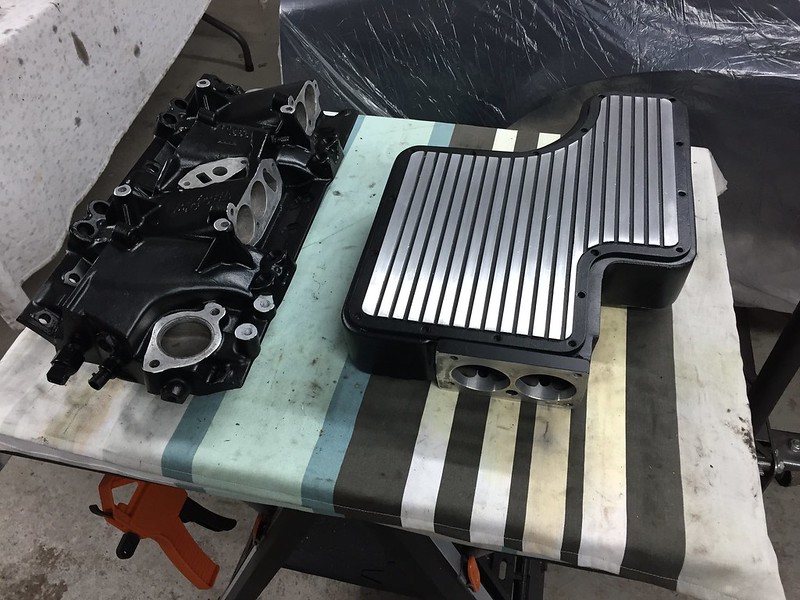
My oil pump and oil pan also came in. As I talked about in my last post, I decided to go with a standard volume pump and an upgraded oil pan with a crank scraper, windage tray and 2 qts of additional volume. I got both the pump and the pan from Summit and so far they look like nice pieces... can't wait to get them installed! I'm just a little concerned with exhaust clearance as my Y-pipe crosses underneath the pan, but I'll cross that bridge when I get there.
My current pan on the left and Summit road racing pan on the right:
In case this might help someone, I have been using a few older books to do most of my research on which parts to buy and use on my engine. There is a TON of info out there to go with a TON of different options for things like oil pumps and harmonic dampeners. These books have helped me to realize that the stock systems on these motors are actually quite stout, which means I can save some money and not have to upgrade absolutely everything. All are good reads!

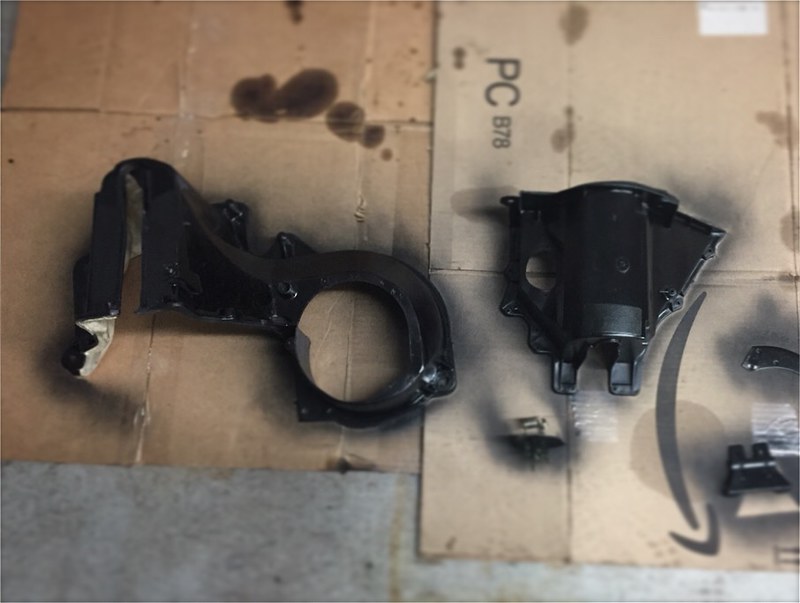
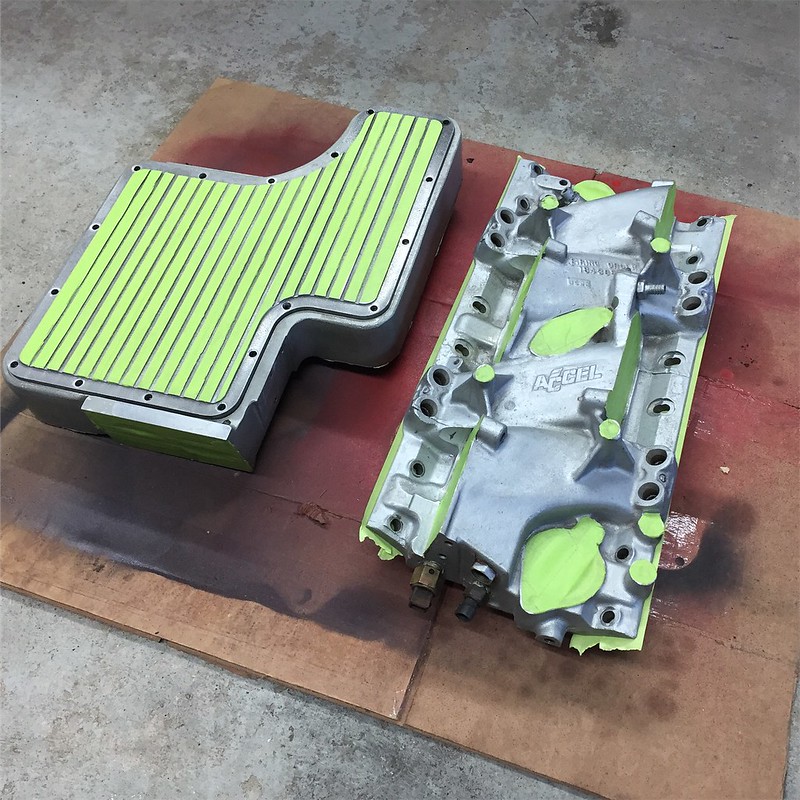
Lastly, I've started cleaning up my intake and getting it ready for paint. Nothing too exciting here, just scraping old RTV off of all the sealing surfaces:

My goal for the week is to get the engine buttoned up and ready for paint.. just need to install the new pump, pan an timing chain. I also want to check my cam specs (as best as I can) and then give it a good cleaning. Little by little I'm getting there!
PS - I'm looking to get a rendering of my car done... if anyone has any recommendations that would be appreciated. Thanks!
I finished up the repairs on my AC box and got a coat of paint on it. I taped off all of the factory labels to keep a close-to-stock look. The original box had a bit of a gray tint to it, but I think it's going to look sharp with the satin black.
My oil pump and oil pan also came in. As I talked about in my last post, I decided to go with a standard volume pump and an upgraded oil pan with a crank scraper, windage tray and 2 qts of additional volume. I got both the pump and the pan from Summit and so far they look like nice pieces... can't wait to get them installed! I'm just a little concerned with exhaust clearance as my Y-pipe crosses underneath the pan, but I'll cross that bridge when I get there.
My current pan on the left and Summit road racing pan on the right:
In case this might help someone, I have been using a few older books to do most of my research on which parts to buy and use on my engine. There is a TON of info out there to go with a TON of different options for things like oil pumps and harmonic dampeners. These books have helped me to realize that the stock systems on these motors are actually quite stout, which means I can save some money and not have to upgrade absolutely everything. All are good reads!
Lastly, I've started cleaning up my intake and getting it ready for paint. Nothing too exciting here, just scraping old RTV off of all the sealing surfaces:
My goal for the week is to get the engine buttoned up and ready for paint.. just need to install the new pump, pan an timing chain. I also want to check my cam specs (as best as I can) and then give it a good cleaning. Little by little I'm getting there!
PS - I'm looking to get a rendering of my car done... if anyone has any recommendations that would be appreciated. Thanks!
04-17-2018, 07:44 AM
#103
Supreme Member
iTrader: (11)

Join Date: Sep 1999
Location: NJ
Posts: 4,350
Received 299 Likes
on
235 Posts
Car: 92 Firebird
Engine: 4.8 LR4
Transmission: T56
Axle/Gears: 3.45 9 Bolt
Re: 1987 Camaro "Pro-Touring" Budget Build
I don't have that oil pan, but mine was kicked out on the sides, I wound up putting the Y pipe in the vice to make it oval to get it to fit with the non stock pan.
04-21-2018, 06:37 PM
#104
Re: 1987 Camaro "Pro-Touring" Budget Build
I have the same oil pan. It's a good pan for what I've been able to tell. Only thing I would say negatively about it is that the NPT threads on the plug take a considerable amount more of torque to seal unless you use a nylon washer. I have a copper washer on there currently and it is leaking past. I'll look up a torque spec and go a few ft/lbs past to see if that works.
04-22-2018, 07:32 PM
#105
Re: 1987 Camaro "Pro-Touring" Budget Build
I have the same oil pan. It's a good pan for what I've been able to tell. Only thing I would say negatively about it is that the NPT threads on the plug take a considerable amount more of torque to seal unless you use a nylon washer. I have a copper washer on there currently and it is leaking past. I'll look up a torque spec and go a few ft/lbs past to see if that works.
04-22-2018, 07:34 PM
#106
Re: 1987 Camaro "Pro-Touring" Budget Build
I was able to put in a few hours this weekend to make some progress. I feel like I'm not making must progress as all of this cleaning, prepping and stripping takes a long time with not much to show for it at the end of the day but it should be worth it when it's all said and done.
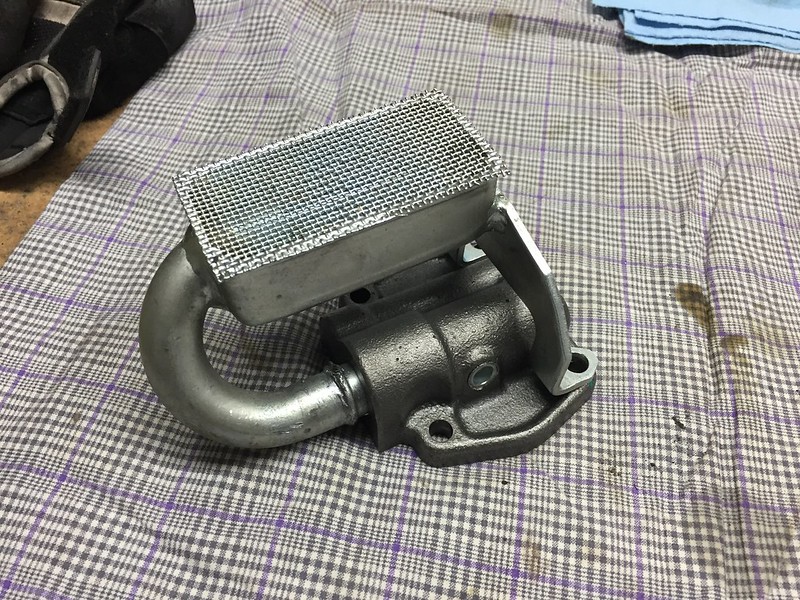
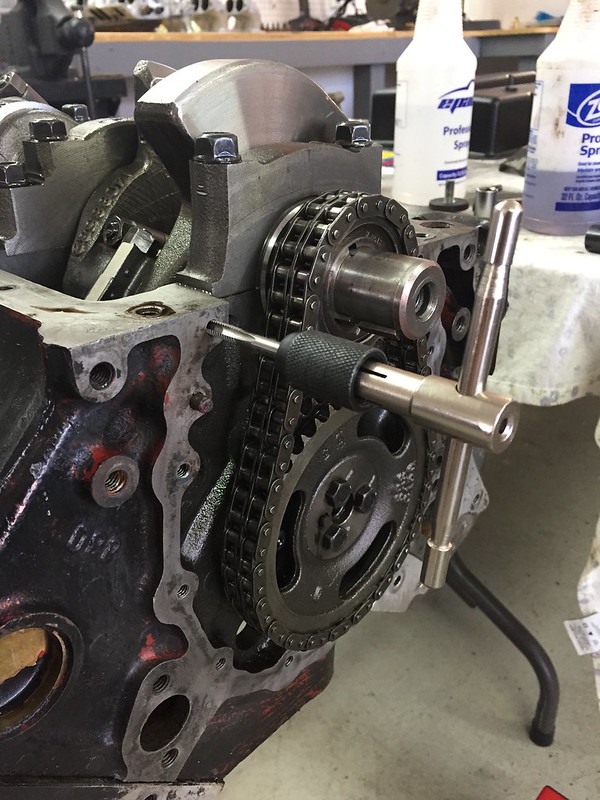
First task was getting my new oil pump installed. As I mentioned in a previous post, I am switching out the current high volume pump for a standard volume one. The one I got is from Summit and came in the kit with my new oil pan. Seems like nice piece (new one on the left):

First I worked on getting the pickup tube installed... what a battle that was! My first method was using a wrench around the neck of the pickup and hammering on the wrench (with the top half of pump braced against a piece of wood). That got it about halfway in, but I couldn't go any further. I was destroying the flange on the tube as well. I finally brought it to a local shop and they were nice enough to help get setup in press to finish the job.
Just as a note: we stopped where we did (not all the way seated) because it was just such a tight fit. I also decided it did not need to be welded because the fit was so tight and because the pickup tube is also bolted to the pump.
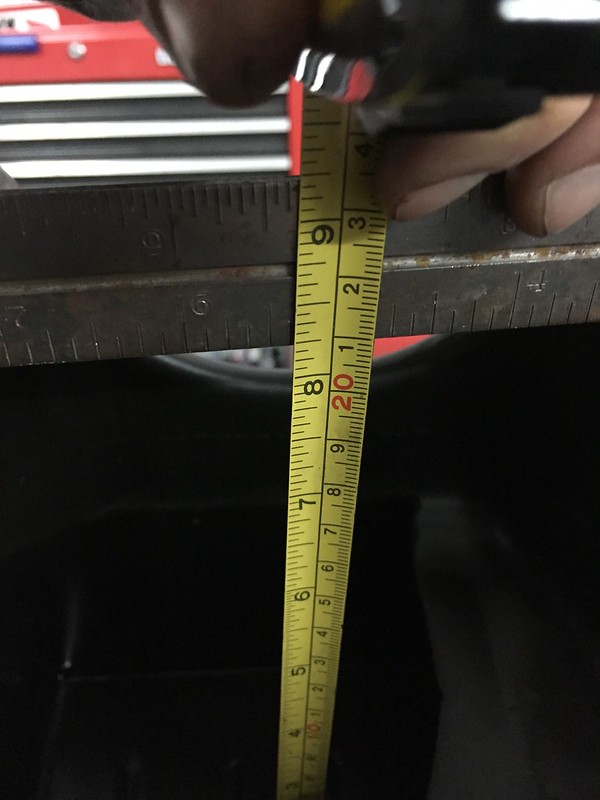
Before I took my old pump off, I verified clearance to the bottom of the pan as about 0.376". (Spec is 0.375 - 0.500"):
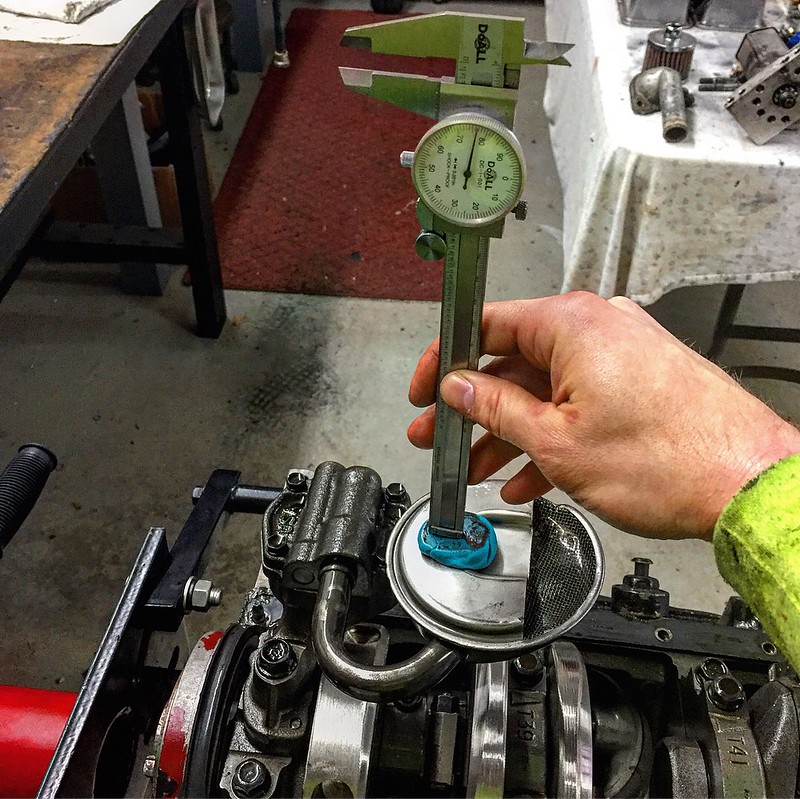
My new one came in with quite a bit larger gap... 0.650". This is on the high end, which I was a bit surprised with since the pickup was supplied with the pan. I'm going to call Summit this week to verify I got the right piece as there is no way to bend it to adjust the clearance.
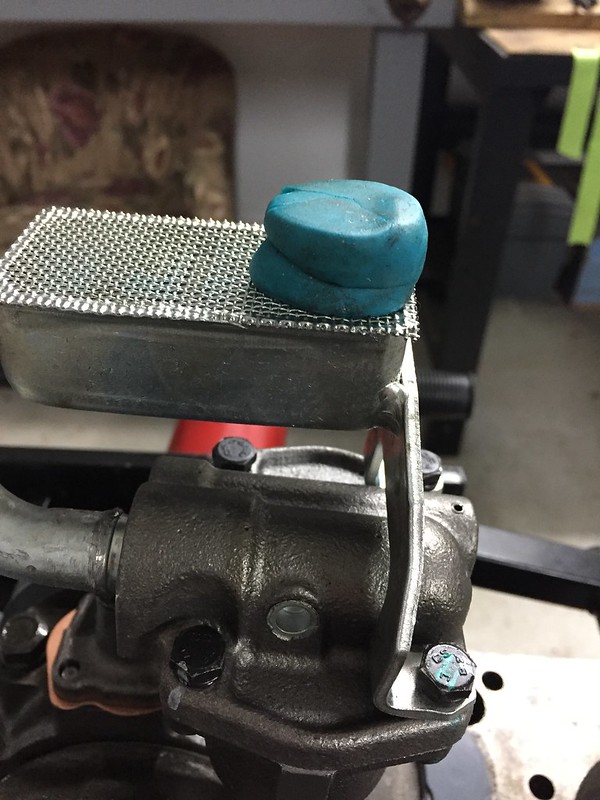
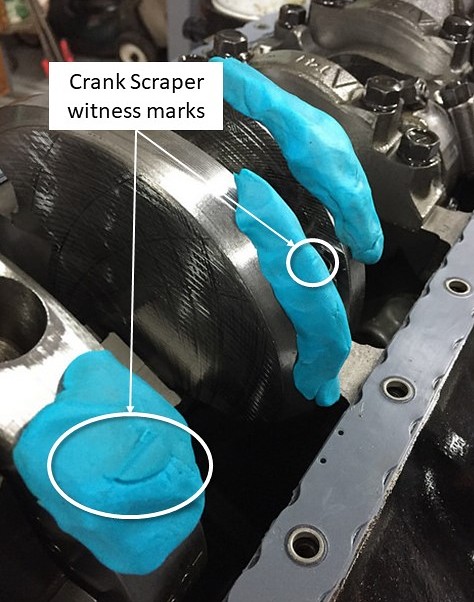
I also checked the crank scraper clearance just to make sure there was no interference. It was tough to get a good measurement, but with some creative Play-doh placement I'm pretty confident the clearance is around 0.375". It could be tighter, but again there is no real easy adjustment to make here. Having the scraper will be better than nothing and I am happy there was no interference.
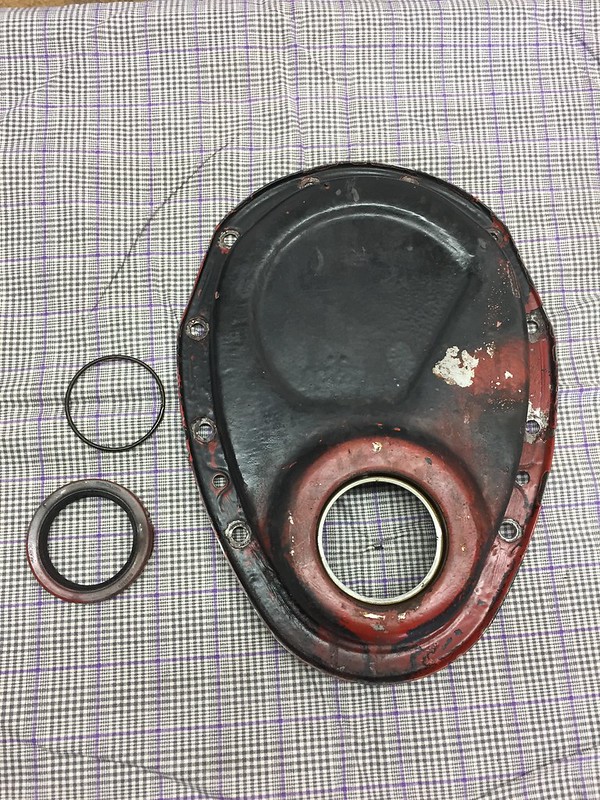
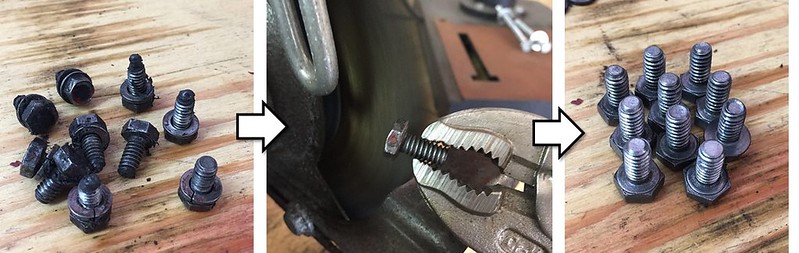
Next I pressed a new seal in my front cover and that installed it with a new gasket. My previous bolts had a ton of RTV in the threads so I chased those with a tap to clean them up a bit. I don't see why RTV in the threads would be necessary since these are blind holes, so I installed mine dry. If someone has done differently though please let me know.
Old seal coming out:
Chasing the threads to get rid of the old RTV:
Can't put old nasty bolts back on!
First task was getting my new oil pump installed. As I mentioned in a previous post, I am switching out the current high volume pump for a standard volume one. The one I got is from Summit and came in the kit with my new oil pan. Seems like nice piece (new one on the left):
First I worked on getting the pickup tube installed... what a battle that was! My first method was using a wrench around the neck of the pickup and hammering on the wrench (with the top half of pump braced against a piece of wood). That got it about halfway in, but I couldn't go any further. I was destroying the flange on the tube as well. I finally brought it to a local shop and they were nice enough to help get setup in press to finish the job.
Just as a note: we stopped where we did (not all the way seated) because it was just such a tight fit. I also decided it did not need to be welded because the fit was so tight and because the pickup tube is also bolted to the pump.
Before I took my old pump off, I verified clearance to the bottom of the pan as about 0.376". (Spec is 0.375 - 0.500"):
My new one came in with quite a bit larger gap... 0.650". This is on the high end, which I was a bit surprised with since the pickup was supplied with the pan. I'm going to call Summit this week to verify I got the right piece as there is no way to bend it to adjust the clearance.
I also checked the crank scraper clearance just to make sure there was no interference. It was tough to get a good measurement, but with some creative Play-doh placement I'm pretty confident the clearance is around 0.375". It could be tighter, but again there is no real easy adjustment to make here. Having the scraper will be better than nothing and I am happy there was no interference.
Next I pressed a new seal in my front cover and that installed it with a new gasket. My previous bolts had a ton of RTV in the threads so I chased those with a tap to clean them up a bit. I don't see why RTV in the threads would be necessary since these are blind holes, so I installed mine dry. If someone has done differently though please let me know.
Old seal coming out:
Chasing the threads to get rid of the old RTV:
Can't put old nasty bolts back on!
04-22-2018, 07:35 PM
#107
Re: 1987 Camaro "Pro-Touring" Budget Build
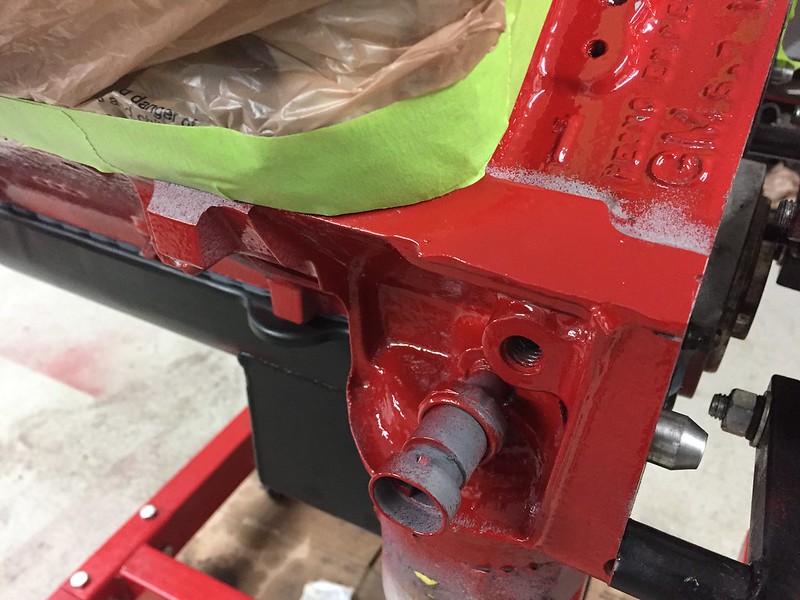
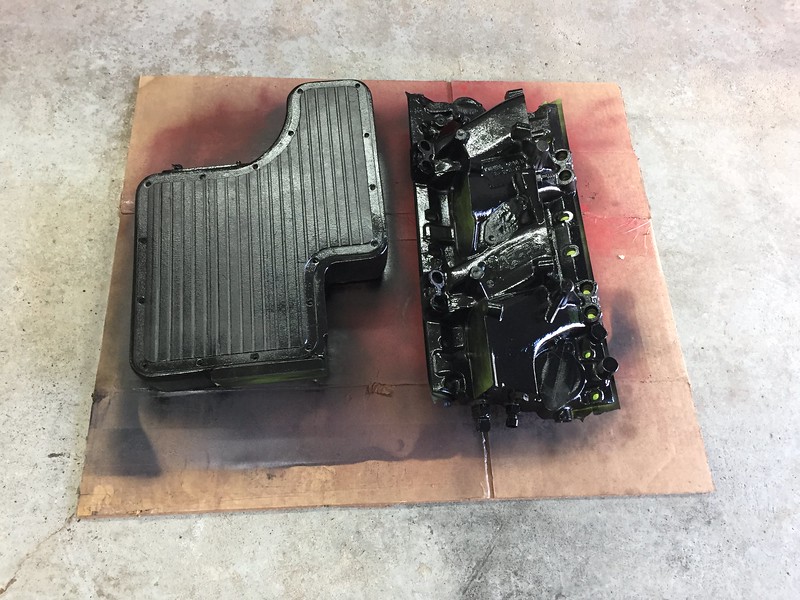
Finally, I worked on some more paint prep. My goal was to keep my AL heads bare and unpainted, but I was worried I wouldn't be able to get them looking presentable. The previous owner has painted the block black and there was quite a bit of overspray:
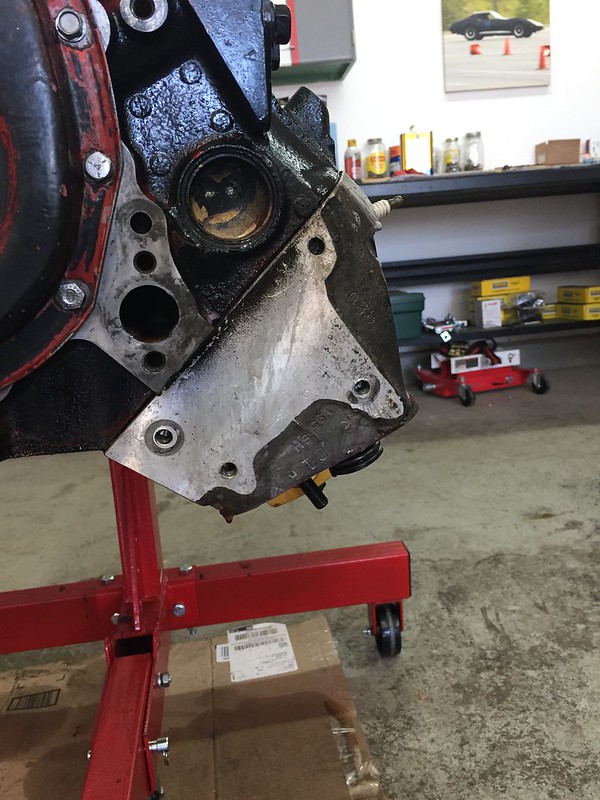
I tried a bunch of different degreasers I had lying around, along with AL wheel cleaner and mineral spirits. The combo of the degreaser and a red scuff pad worked pretty well with some elbow grease. It left a "brushed AL" surface which I think is going to look pretty good.
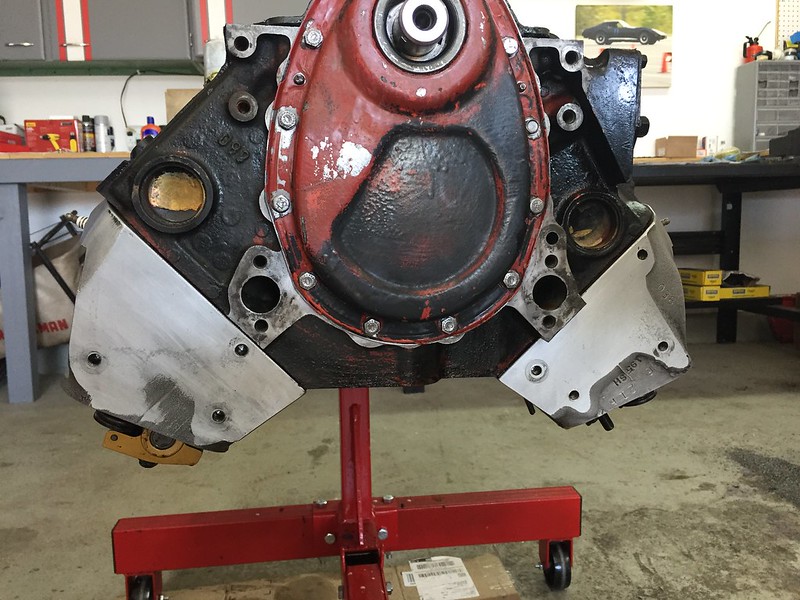
Getting the block clean enough to have the tape stick and then masking everything off took forever! Very tedious work, but again, should be worth it. Almost ready to throw some primer on it. I know it's not the prettiest looking thing, but the plastic bags should get the job done!
Lastly, I also get the intake pieces cleaned up and almost ready for paint as well.
It seems like spring is finally here in New England (60 degrees today) so I'm hoping to sling some paint this week!
Thanks for following.
I tried a bunch of different degreasers I had lying around, along with AL wheel cleaner and mineral spirits. The combo of the degreaser and a red scuff pad worked pretty well with some elbow grease. It left a "brushed AL" surface which I think is going to look pretty good.
Getting the block clean enough to have the tape stick and then masking everything off took forever! Very tedious work, but again, should be worth it. Almost ready to throw some primer on it. I know it's not the prettiest looking thing, but the plastic bags should get the job done!
Lastly, I also get the intake pieces cleaned up and almost ready for paint as well.
It seems like spring is finally here in New England (60 degrees today) so I'm hoping to sling some paint this week!
Thanks for following.
04-30-2018, 09:28 PM
#109
Re: 1987 Camaro "Pro-Touring" Budget Build
I dug a little bit deeper into why my oil pump pickup had such a large gap to the bottom of my oil pan (I measured it at 0.650") when I ordered everything as a kit. I knew my engine would run fine with that clearance, but it was bugging me that it wasn't quite right and I wanted to do the job right since I had the engine out. I don't want to be worrying about my oil pump pickup when taking a sustained high-g corner, I have enough to worry about when out on the track!
I first double checked that all the parts I received were correct and confirmed that indeed they were. I then went about checking the measurements and here is where I ran into some issues.
The pan is listed as having an 8in deep sump and the pickup in the kit is correct for a pan of that depth. However, the pan is actually 8.25in deep:
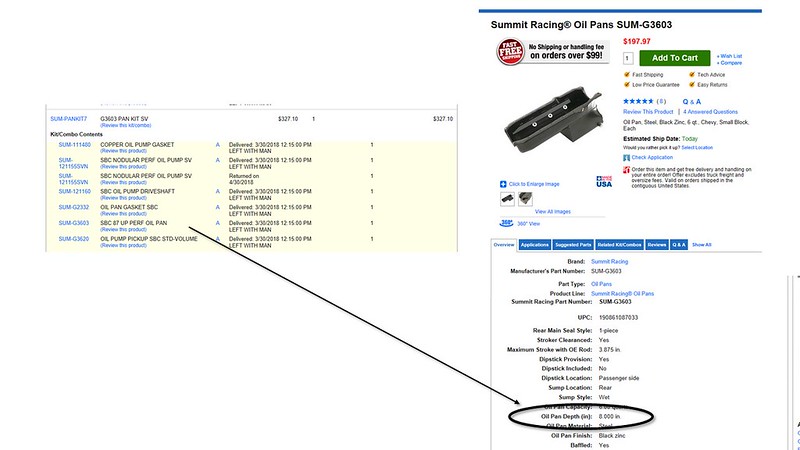
When I spoke to someone from the Summit tech line, they said that these pans are hand welded which leads to some variances in pan depths sometimes. I understand that, but I can't see a pan depth tolerance of +/-0.25" being acceptable, especially since it's a critical part of getting the oiling system dialed in.
Fortunately though, I was able to speak with someone in customer service and have them send me a pickup designed for an 8.25" deep pan (part number MOR-24170) and a new oil pump free of charge.
So, it sucks I've lost some time on my project figuring this out, but a big thanks to Summit Racing for making it right. Maybe they can update their kits in the future so someone else doesn't experience the same problem.
Now, on to some actual progress... which unfortunately there is not much to report this week.
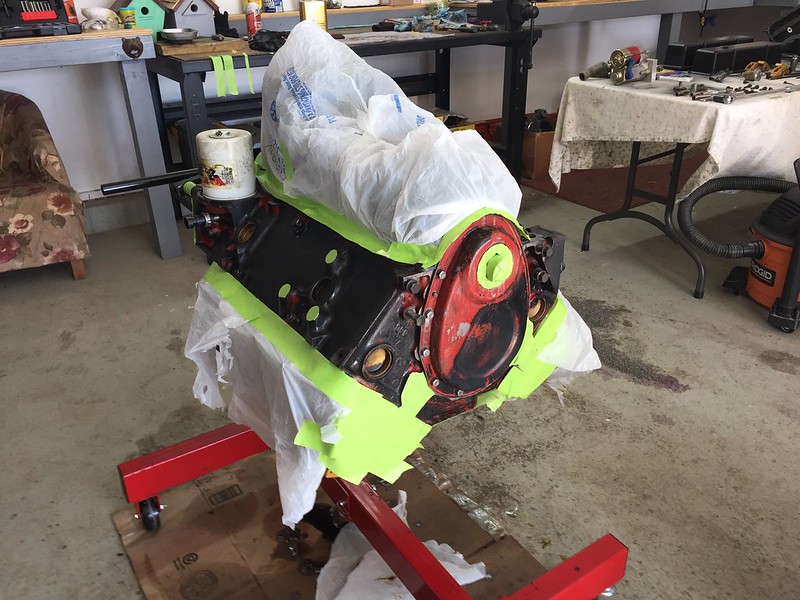
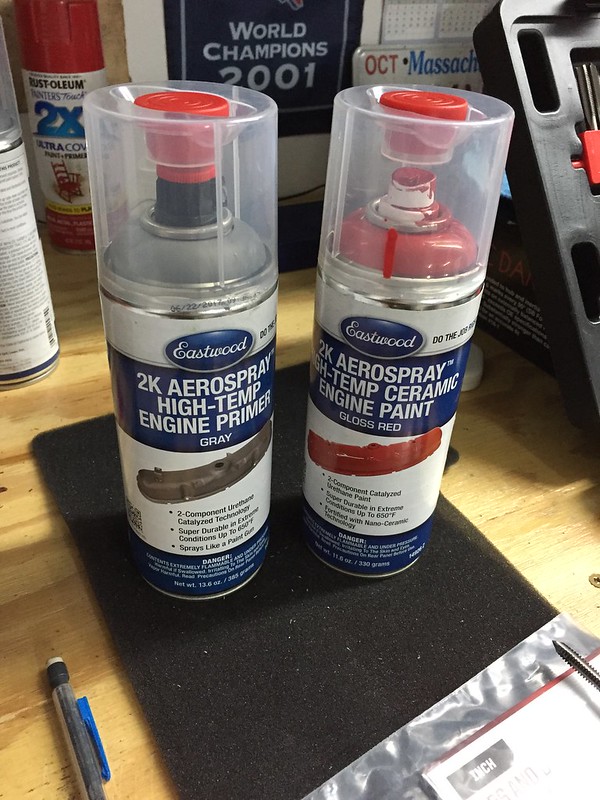
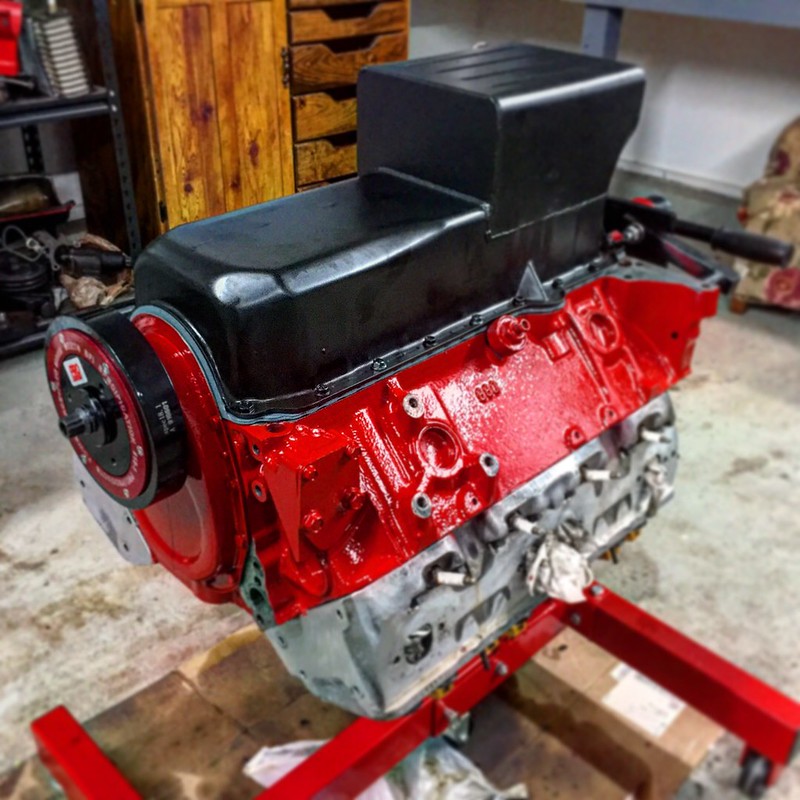
My biggest accomplishment was finally getting my engine painted. I used the Eastwood high-temp ceramic system for laying down the color. The kit was pricey (~$20/can) and seemed to leave a really nice durable finish.
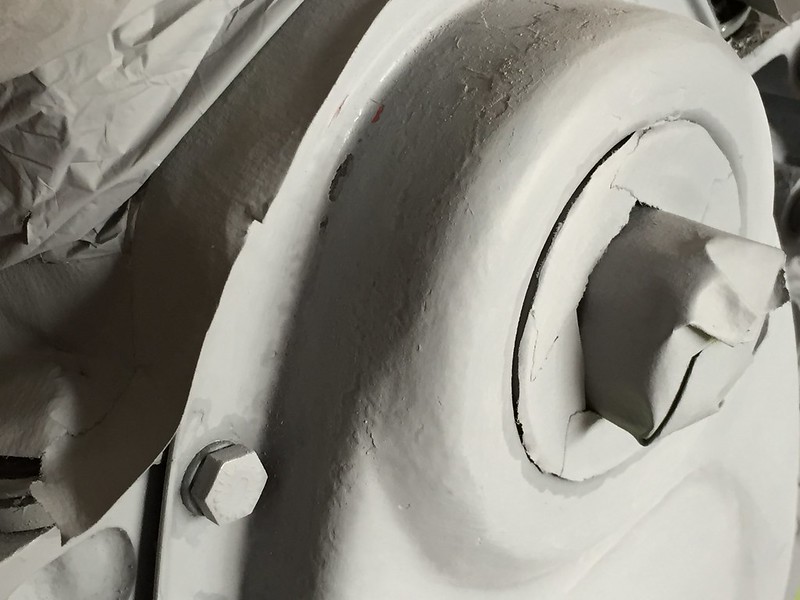
The primer laid down nicely initially, but I found some small spots flaking and discolored in some areas. I tried to clean the block as best as I could before priming but I'm guessing this is due to some contamination:
There were no instructions on the can in terms of dry time so I called Eastwood for some instructions. Here is what they suggested in case someone else wanted to use the same system:
Primer Coat
Wait 10mins
Second Primer Coat
Wait 60mins
First Color Coat
Wait 10mins
Second Color Coat
All was going well into I got to my first color coat and something went wrong with the valve on the can... it started spraying all over the place and just dumping paint on the engine. Now, I'm not an expert painter, but I do know that thin coats are the way to go as opposed to big thick ones. However, I had no choice here as I had to go over to engine a bunch of times to cover everything with the irregular spray pattern. I was a little disappointed considering I paid $20/can. It seemed to dry OK though, I just hope it doesn't start chipping off when it gets hot.
My exploding red paint can:
Finished product:
That's all for tonight. My new oil pump and pickup should be here tomorrow so I button up the bottom end and move on to the top side.
I first double checked that all the parts I received were correct and confirmed that indeed they were. I then went about checking the measurements and here is where I ran into some issues.
The pan is listed as having an 8in deep sump and the pickup in the kit is correct for a pan of that depth. However, the pan is actually 8.25in deep:
When I spoke to someone from the Summit tech line, they said that these pans are hand welded which leads to some variances in pan depths sometimes. I understand that, but I can't see a pan depth tolerance of +/-0.25" being acceptable, especially since it's a critical part of getting the oiling system dialed in.
Fortunately though, I was able to speak with someone in customer service and have them send me a pickup designed for an 8.25" deep pan (part number MOR-24170) and a new oil pump free of charge.
So, it sucks I've lost some time on my project figuring this out, but a big thanks to Summit Racing for making it right. Maybe they can update their kits in the future so someone else doesn't experience the same problem.
Now, on to some actual progress... which unfortunately there is not much to report this week.
My biggest accomplishment was finally getting my engine painted. I used the Eastwood high-temp ceramic system for laying down the color. The kit was pricey (~$20/can) and seemed to leave a really nice durable finish.
The primer laid down nicely initially, but I found some small spots flaking and discolored in some areas. I tried to clean the block as best as I could before priming but I'm guessing this is due to some contamination:
There were no instructions on the can in terms of dry time so I called Eastwood for some instructions. Here is what they suggested in case someone else wanted to use the same system:
Primer Coat
Wait 10mins
Second Primer Coat
Wait 60mins
First Color Coat
Wait 10mins
Second Color Coat
All was going well into I got to my first color coat and something went wrong with the valve on the can... it started spraying all over the place and just dumping paint on the engine. Now, I'm not an expert painter, but I do know that thin coats are the way to go as opposed to big thick ones. However, I had no choice here as I had to go over to engine a bunch of times to cover everything with the irregular spray pattern. I was a little disappointed considering I paid $20/can. It seemed to dry OK though, I just hope it doesn't start chipping off when it gets hot.
My exploding red paint can:
Finished product:
That's all for tonight. My new oil pump and pickup should be here tomorrow so I button up the bottom end and move on to the top side.
05-05-2018, 03:04 PM
#111
Re: 1987 Camaro "Pro-Touring" Budget Build
When I'm painting a metal (engine) part that may have been exposed to oil I go over it with a propane torch to burn off the residue that may be in some of the porosity. Likely that was your problem. I remember going over engine blocks with acetone or carb cleaner to no end and it appears clean but once you put a flame on it you can hear some sizzle and observe some light smoking.
05-09-2018, 11:31 AM
#112

Re: 1987 Camaro "Pro-Touring" Budget Build
I dont know know why I hadn't seen this build before. Really like the direction it's headed - looks like it will be great fun when it's done.
And this is fantastic. Great tip sir.
When I'm painting a metal (engine) part that may have been exposed to oil I go over it with a propane torch to burn off the residue that may be in some of the porosity. Likely that was your problem. I remember going over engine blocks with acetone or carb cleaner to no end and it appears clean but once you put a flame on it you can hear some sizzle and observe some light smoking.
05-15-2018, 09:29 PM
#114
Re: 1987 Camaro "Pro-Touring" Budget Build
I've been side tracked a bit lately by lots of spring projects going on around the house but nonetheless I've been able to make a bit of progress on the car.
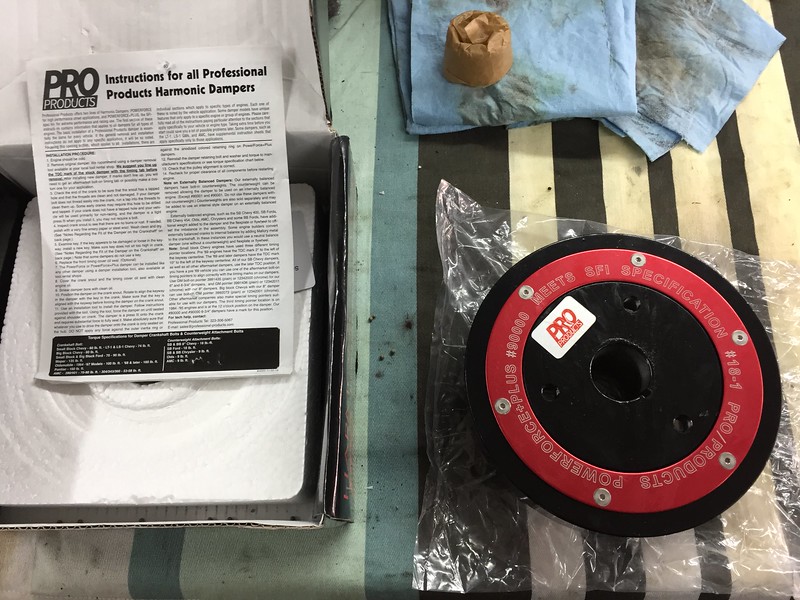
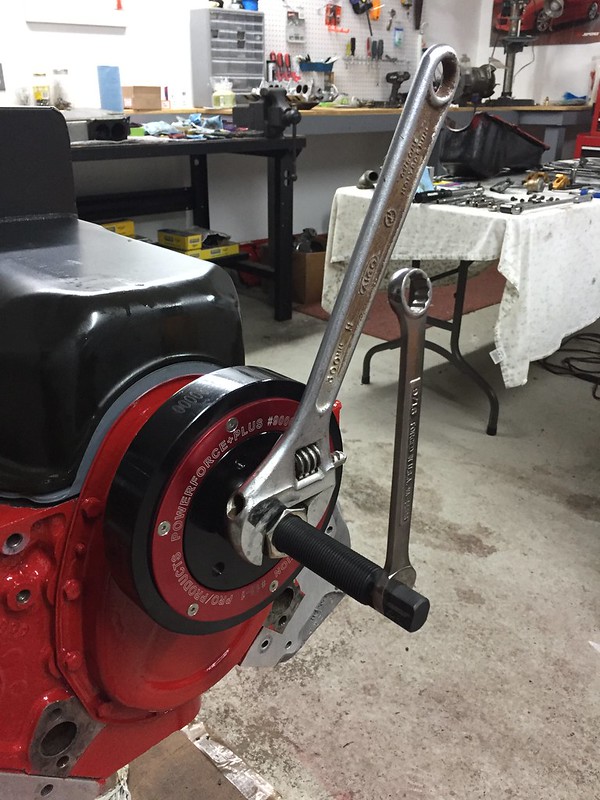
After painting the engine, I removed all of the masking and bolted up the oil pan for the last time, making sure to torque all of the bolts. Next came the harmonic balancer.There are a ton of options out there for balancers, everything from $50 stock replacements to $400 top-of-the-line ones. Again I went back to the books I've been using for reference, and ended up choosing a 6 3/4" SFI-approved balancer from Professional Products. The SFI approval means that it is tested for up to 10k RPM, which is way overkill for my engine but for the small extra price it was worth it to me for the peace of mind. This is a good, middle of the road balancer that fits in my budget and should work just fine for my needs.
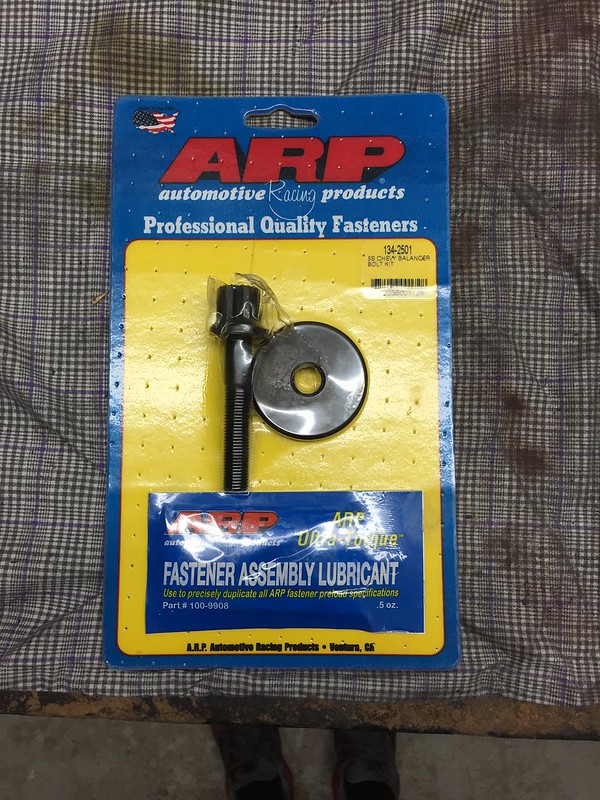
Fresh ARP crank bolt:
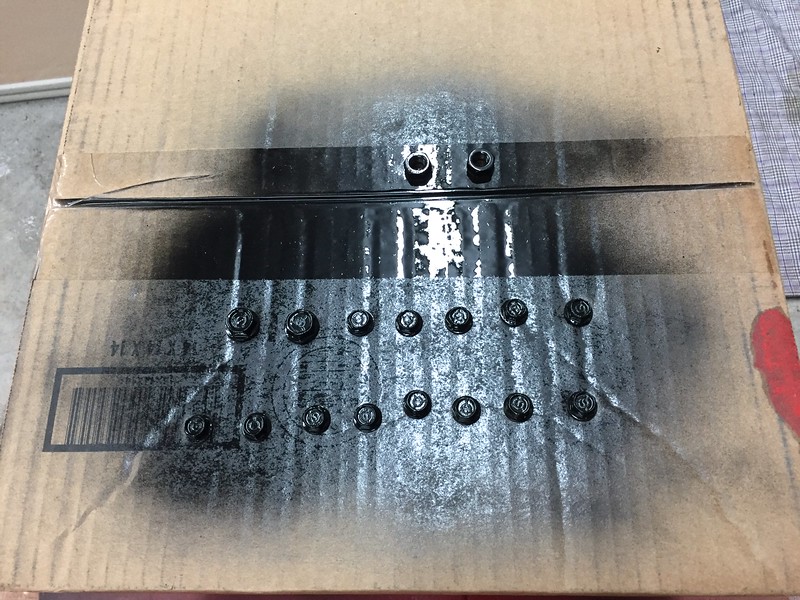
Gotta paint the oil pan bolts before installing:
Bottom end buttoned up:
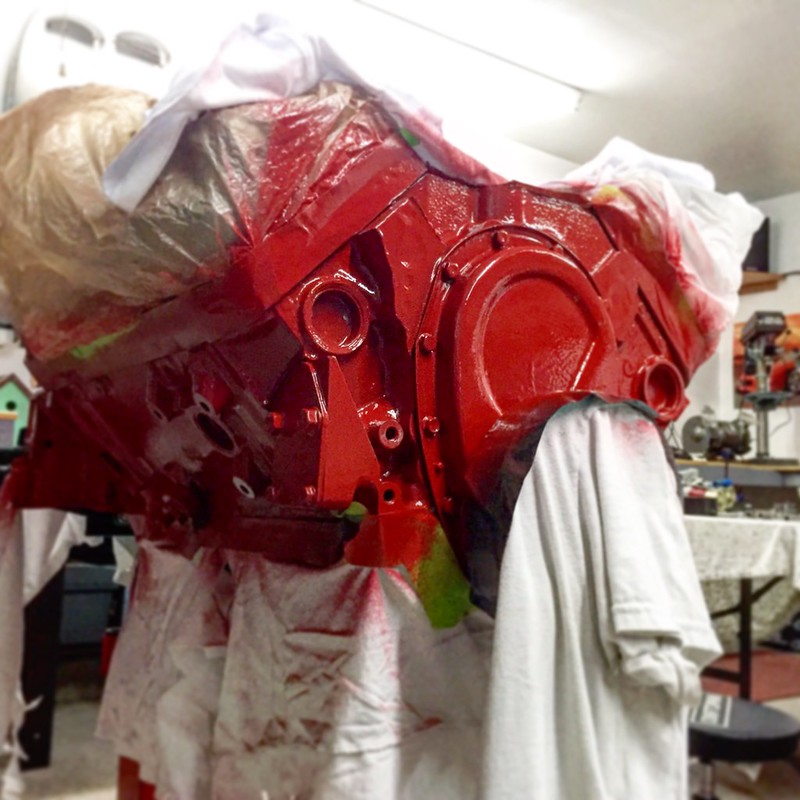
All was going along just great until I rotated the engine on my stand and noticed what a sh*tty job I had done with my paint job! Note to self, do not paint an engine upside down! I missed a ton of little spots that weren't visible when the engine was upside down but were right in your face when you turned it over:
So out comes the tape again to mask off the whole engine one more time to put on another coat of paint. Pain in the *** but you gotta do the job right!
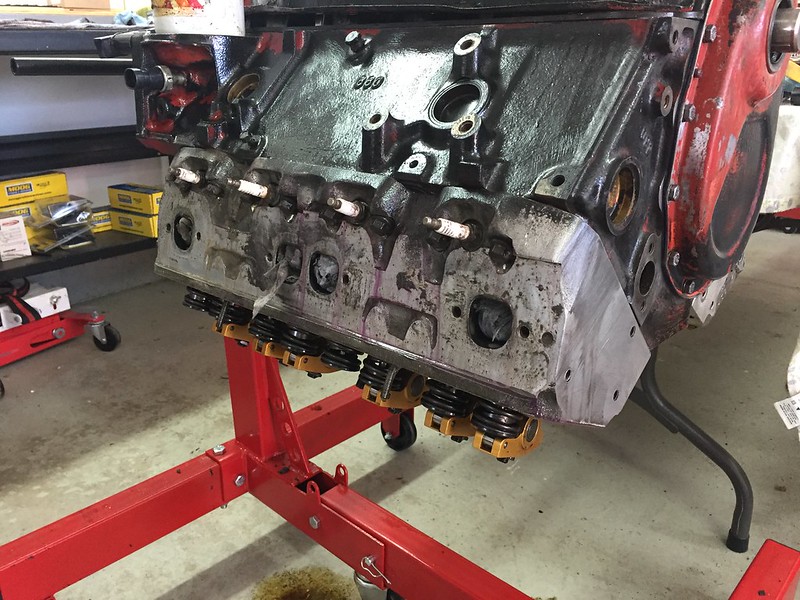
After that was settled, I wanted to measure my cam specs before buttoning up the top end of the motor. I ended up having to take off a rocker and measure the lift off of a pushrod, since having the rockers installed resulted in my lifters collapsing and getting low readings (took me a while to figure that out!)
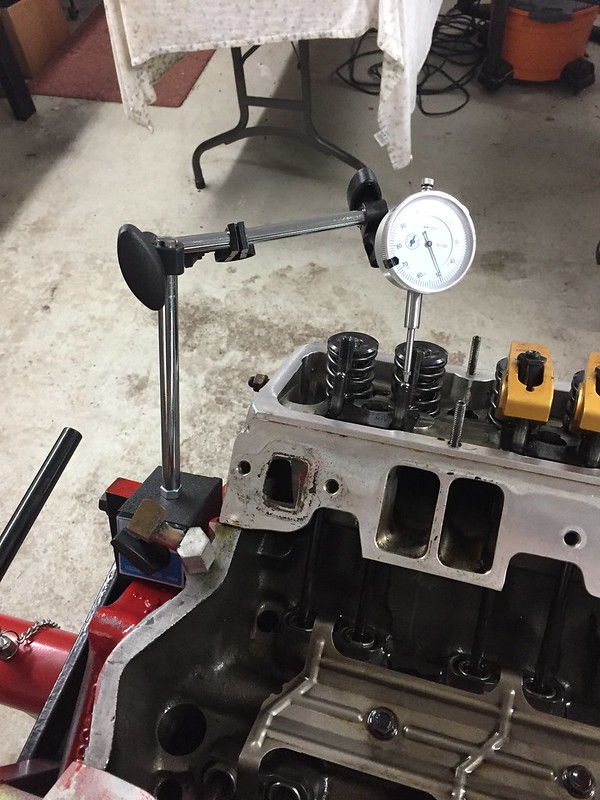
I measured duration at 0.050" by measuring the diameter of the balancer and converting that into degrees... not perfect but I thought it would at least get me in the ballpark.
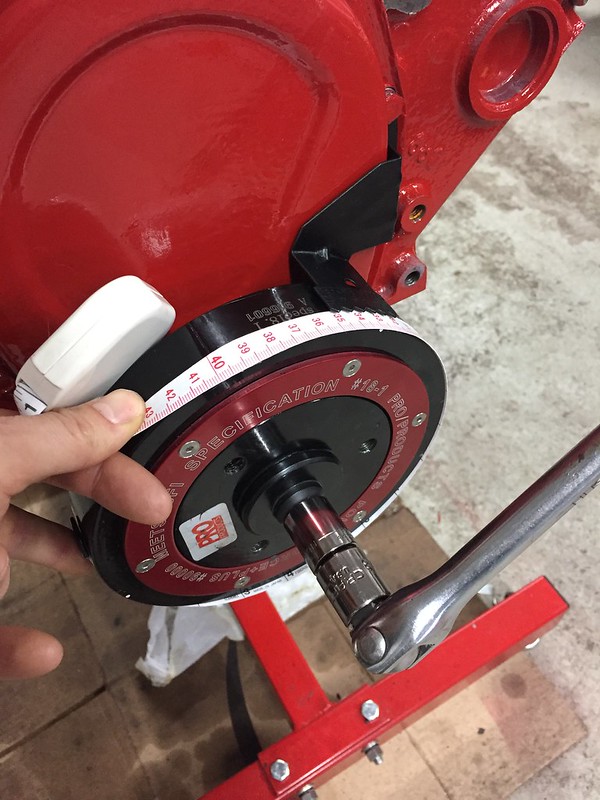
Here are the approximate specs I came up with:
Intake: 0.480" lift; 223deg duration at 0.050"
Exhaust: 0.512" lift; 233deg duration at 0.050"
Stock cam specs for a ZZ4:
Intake: 0.474" lift; 208deg duration
Exhaust: 0.510" lift; 221deg duration
Based on how close these are, and knowing that my measurements aren't perfect, I'm assuming I have a stock cam. I also couldn't find any markings on the snout of the cam to give me a clue on who made it.
A few questions here for the experienced: I've been going back and forth about putting in a new cam. If I do, would I need to put in new lifters and remeasure for new pushrods? I already have nice 1.5 roller rockers from Crane. I know I would have to take off my oil pan and timing chain cover again but that's not a big deal, it's just time! The engine ran great when I removed it from the car so I'm hesitant to mess with a good thing. Thoughts?
After painting the engine, I removed all of the masking and bolted up the oil pan for the last time, making sure to torque all of the bolts. Next came the harmonic balancer.There are a ton of options out there for balancers, everything from $50 stock replacements to $400 top-of-the-line ones. Again I went back to the books I've been using for reference, and ended up choosing a 6 3/4" SFI-approved balancer from Professional Products. The SFI approval means that it is tested for up to 10k RPM, which is way overkill for my engine but for the small extra price it was worth it to me for the peace of mind. This is a good, middle of the road balancer that fits in my budget and should work just fine for my needs.
Fresh ARP crank bolt:
Gotta paint the oil pan bolts before installing:
Bottom end buttoned up:
All was going along just great until I rotated the engine on my stand and noticed what a sh*tty job I had done with my paint job! Note to self, do not paint an engine upside down! I missed a ton of little spots that weren't visible when the engine was upside down but were right in your face when you turned it over:
So out comes the tape again to mask off the whole engine one more time to put on another coat of paint. Pain in the *** but you gotta do the job right!
After that was settled, I wanted to measure my cam specs before buttoning up the top end of the motor. I ended up having to take off a rocker and measure the lift off of a pushrod, since having the rockers installed resulted in my lifters collapsing and getting low readings (took me a while to figure that out!)
I measured duration at 0.050" by measuring the diameter of the balancer and converting that into degrees... not perfect but I thought it would at least get me in the ballpark.
Here are the approximate specs I came up with:
Intake: 0.480" lift; 223deg duration at 0.050"
Exhaust: 0.512" lift; 233deg duration at 0.050"
Stock cam specs for a ZZ4:
Intake: 0.474" lift; 208deg duration
Exhaust: 0.510" lift; 221deg duration
Based on how close these are, and knowing that my measurements aren't perfect, I'm assuming I have a stock cam. I also couldn't find any markings on the snout of the cam to give me a clue on who made it.
A few questions here for the experienced: I've been going back and forth about putting in a new cam. If I do, would I need to put in new lifters and remeasure for new pushrods? I already have nice 1.5 roller rockers from Crane. I know I would have to take off my oil pan and timing chain cover again but that's not a big deal, it's just time! The engine ran great when I removed it from the car so I'm hesitant to mess with a good thing. Thoughts?
05-29-2018, 09:49 PM
#115
Re: 1987 Camaro "Pro-Touring" Budget Build
Not a ton of progress in the past few weeks. Had to catch up on a lot of spring projects around the house and had some weekend plans thrown in. I was able to get a couple small things done though.
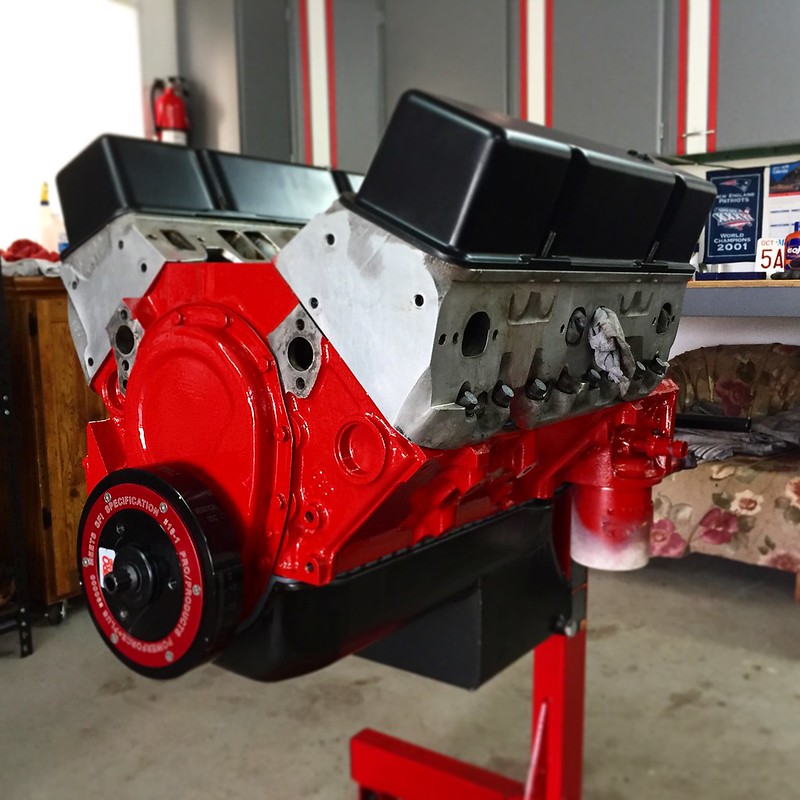
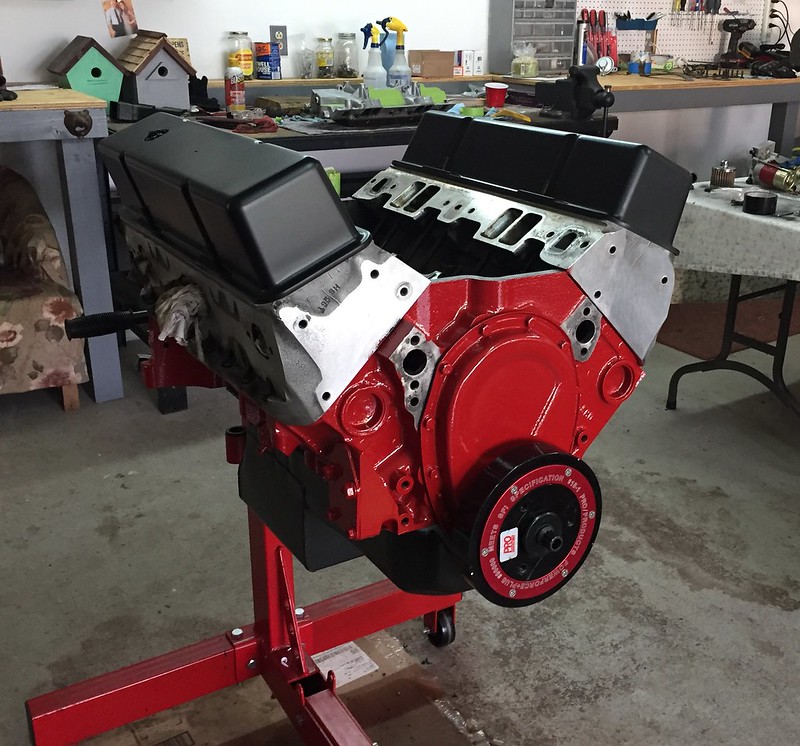
Valve covers are all painted and I threw them on for a quick mockup... I think I'm going to like the red and satin black look!
I'm still working on cleaning and masking off parts of the intake manifold... lots of small cracks and crevices to get clean!
The good thing is my pile of engine parts that need to be cleaned, painted or reinstalled is getting smaller and smaller:
I'm hoping to get back to weekly updates so stay tuned!
06-05-2018, 12:47 PM
#116
Member
Re: 1987 Camaro "Pro-Touring" Budget Build

Matt there have been a lot of horror stories about those balancers on other forums.
I know you are not planning on spinning it that high but I would hate to see you go through all this to have a failure.
might be something to look into.
06-05-2018, 12:49 PM
#117
06-05-2018, 07:10 PM
#119
Member
Re: 1987 Camaro "Pro-Touring" Budget Build
Matt, first off you are doing a fantastic job with your build and saved thousands of dollars doing all that work yourself. congrats
I know it is hard spending extra money when you already have a budget in mind and you are trying to stick with it.
But this is one of those places you should spend the money now to prevent yourself from spending more later. A bad balancer can do lots of damage to your rotating assembly and cause premature bearing wear at a minimal.
It could cause complete failure at its maximum.
Not to mention the damage it could cause coming apart like that. Picture that coming through your hood or fender.
Its just not worth taking the chance.
Stick to a well known brand name.
I use ATI, but that is just my preference.
Check with some of your local engine builders and see what they recommend for your build.
keep up the great work , cant wait to see it done .
Chuck
Last edited by Wolfster14; 06-05-2018 at 07:18 PM.
06-05-2018, 10:24 PM
#120
Supreme Member
Join Date: Dec 2005
Location: Alberta (formerly Ontario)
Posts: 9,302
Received 689 Likes
on
576 Posts
Re: 1987 Camaro "Pro-Touring" Budget Build
For what it's worth, the damper spec is totally tied into the HP output and expected RPM.
Up to 6000 RPM, it seems the heaviest OEM damper is the most economical choice.
ATI and BHJ rate at the top of the list for a purpose built race engine. BHJ dampers are custom built to the engine profile.
As for Professional Products (PP), they appear last on the list but are approved by Scat for use with their cranks up to 500 HP.
You can do the math here. A 350 making 500 HP is spinning beyond 6000 RPM.
As for the horror stories, while I'm not advocating a PP damper, it would seem that if you keep the RPM in check, then you should be OK. My bet is that the illustrated destroyed balancer was used beyond it's capacity. As for PP's SFI rating, personally I don't believe anything that's spec'd with an off-shore product. But maybe that's just me...
My NA 355 regularly sees 7000 RPM (while most certainly making less than 450 HP). I've been using a Fluidampr for about the last 250,000 miles and I can't say I've experienced any issues.
Last edited by skinny z; 06-05-2018 at 10:30 PM.
06-05-2018, 10:33 PM
#121
Supreme Member
Join Date: Dec 2005
Location: Alberta (formerly Ontario)
Posts: 9,302
Received 689 Likes
on
576 Posts
Re: 1987 Camaro "Pro-Touring" Budget Build
On a different note, what have you got for a cam and related valvetrain components? Is it stock stuff or have you made any changes? I ask as I haven't seen any post addressing the valvetrain geometry. Sort of a pet project of mine as I've had to deal with several different iterations on a SBC.
06-06-2018, 09:40 PM
#122
Re: 1987 Camaro "Pro-Touring" Budget Build
On a different note, what have you got for a cam and related valvetrain components? Is it stock stuff or have you made any changes? I ask as I haven't seen any post addressing the valvetrain geometry. Sort of a pet project of mine as I've had to deal with several different iterations on a SBC.
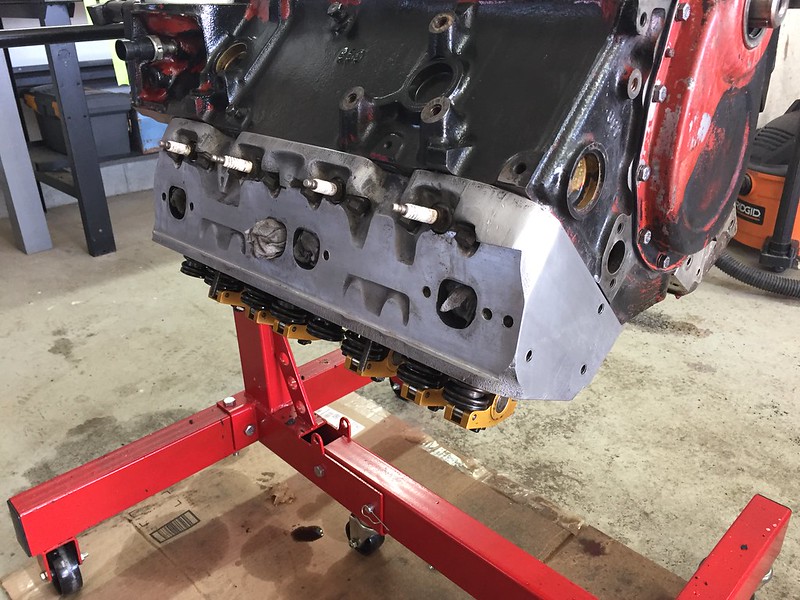
The rest of the valvetrain are hydraulic roller lifters (not sure on brand) and Crane gold roller rockers with a 1.5 ratio. Heads are early AFR 195s.
As far springs go, I am not sure on the seat pressure or anything like that. I do know that they are double springs with a dampener in between the coils. I'll have to get a better picture of that for you.
06-06-2018, 09:41 PM
#123
Re: 1987 Camaro "Pro-Touring" Budget Build
Moving right along now and gaining some momentum on the car.
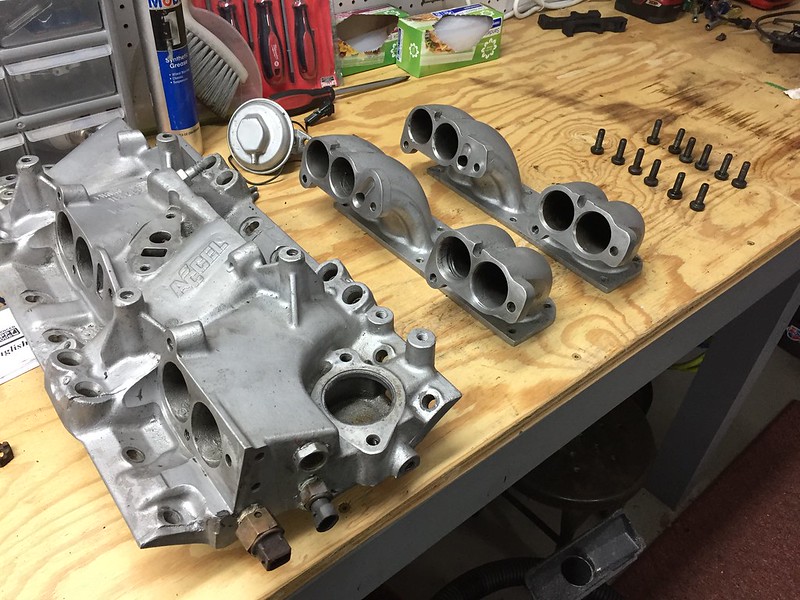
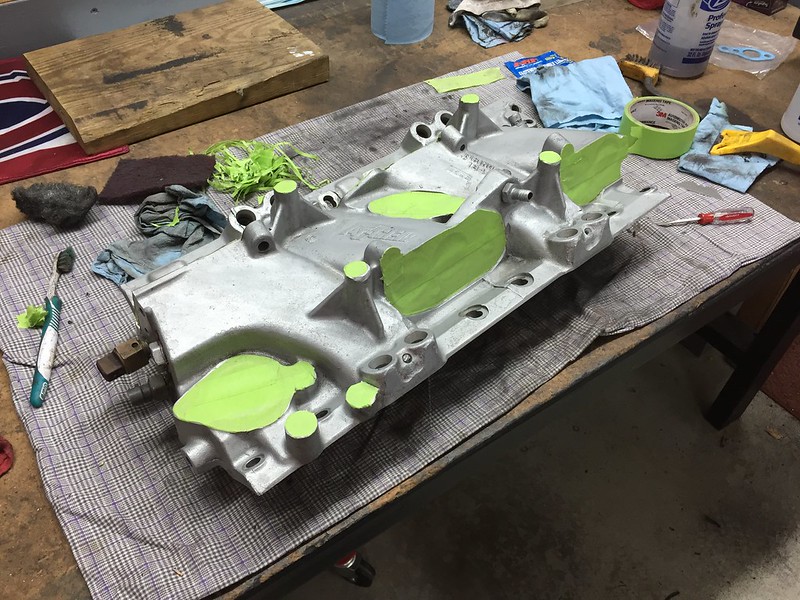
My intake is pretty much painted now. Took a long time to scrape off some old paint, clean in all the nooks and crannies and then tape all the sealing surfaces off. I think it turned out pretty good though:
I am now working on getting the intake installed along with some new sensors and I have a few questions I was hoping to get some help on:
1. I need some help selecting the correct intake manifold gaskets.
My heads have exhaust crossover holes:

But my intake only has an exhaust crossover on one side (the other is blocked as part of the casting):

Finally, my old gaskets have exhaust block off plates but one is missing (perhaps on the same side as the casted-in block off on the intake):
I don't really need the exhaust crossover... so is there a better way to block this off?
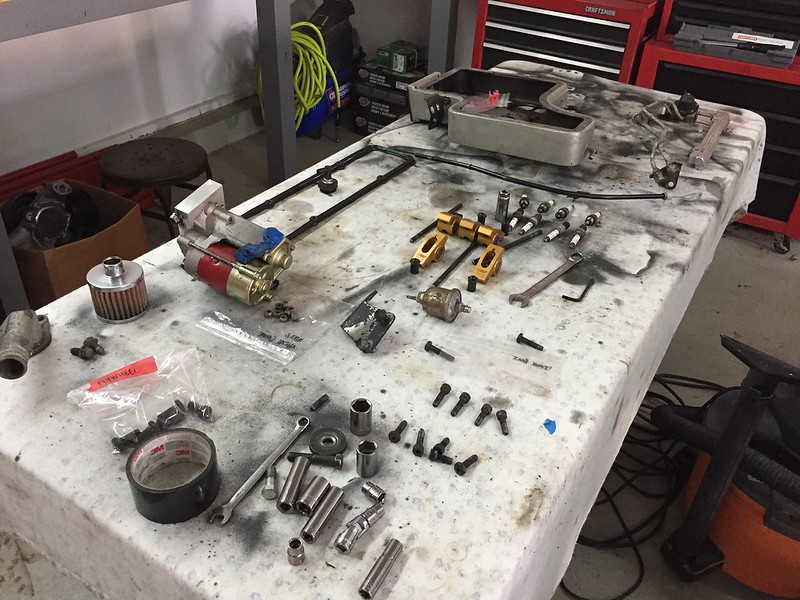
2. My fuel rails are all cleaned up, and I want to put new O-rings in before reassembling them. Any idea where the get the correct ones? I'm thinking I can maybe call Accel and see what they recommend.
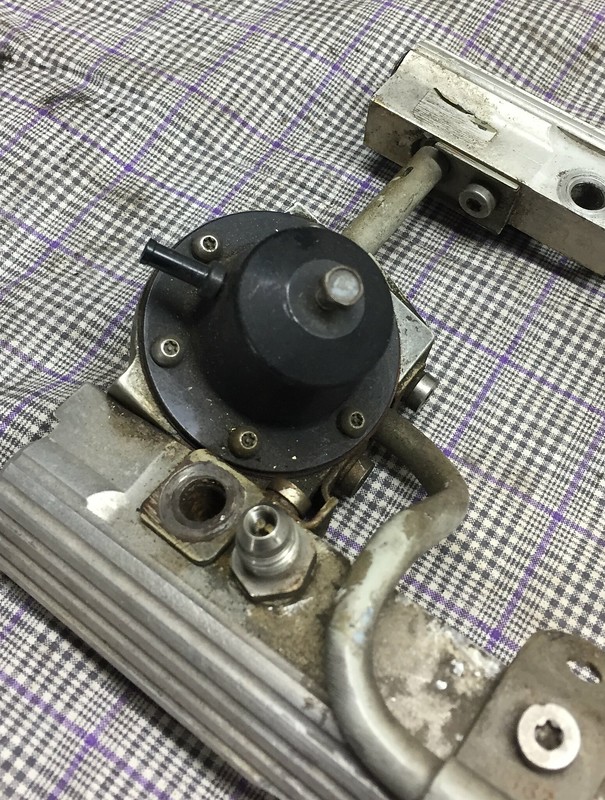
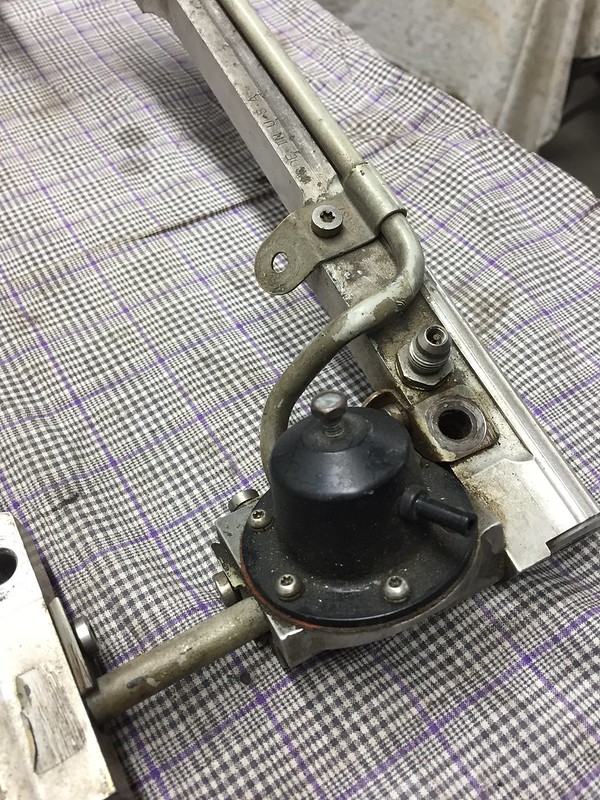
3. This sensor was mounted under the plenum on the top of the intake manifold. I'm assuming it has to do with measuring the intake manifold pressure, but any idea of it's official name? I can't find it on RockAuto.
4. Lastly, I would like to order a new fuel pressure regulator. Any idea what model this is? It doesn't have any markings on it, but it is adjustable based on the screw on top.
Thanks for all the help!
My intake is pretty much painted now. Took a long time to scrape off some old paint, clean in all the nooks and crannies and then tape all the sealing surfaces off. I think it turned out pretty good though:
I am now working on getting the intake installed along with some new sensors and I have a few questions I was hoping to get some help on:
1. I need some help selecting the correct intake manifold gaskets.
My heads have exhaust crossover holes:
But my intake only has an exhaust crossover on one side (the other is blocked as part of the casting):
Finally, my old gaskets have exhaust block off plates but one is missing (perhaps on the same side as the casted-in block off on the intake):
I don't really need the exhaust crossover... so is there a better way to block this off?
2. My fuel rails are all cleaned up, and I want to put new O-rings in before reassembling them. Any idea where the get the correct ones? I'm thinking I can maybe call Accel and see what they recommend.
3. This sensor was mounted under the plenum on the top of the intake manifold. I'm assuming it has to do with measuring the intake manifold pressure, but any idea of it's official name? I can't find it on RockAuto.
4. Lastly, I would like to order a new fuel pressure regulator. Any idea what model this is? It doesn't have any markings on it, but it is adjustable based on the screw on top.
Thanks for all the help!
06-06-2018, 10:32 PM
#125
Supreme Member
Join Date: Dec 2005
Location: Alberta (formerly Ontario)
Posts: 9,302
Received 689 Likes
on
576 Posts
Re: 1987 Camaro "Pro-Touring" Budget Build
Here's what I've found with a mix of parts and not addressing critical bits like the valve train geometry (VGT). It seemed in my old school days, with iron heads and iron valve guides, if the geometry was messed up, the durability of the guides kept the engine serviceable. A change to aftermarket heads with softer bronze guides and not considering the VGT meant new guides and a valve job in short order. Like less than 5000 miles and done. Given the detail you've applied to this point, this isn't much other than some research and measurements.
06-06-2018, 10:43 PM
#126
Re: 1987 Camaro "Pro-Touring" Budget Build
The silver piece is your EGR valve. The sensor+wire bit is a temperature sensor I believe. Take that with a grain of salt - the only TPI engine I've dug into was in a '91, and they are slightly different. It had a similar EGR valve, but I don't recall seeing that additional sensor.
Hope that helps!
06-06-2018, 10:49 PM
#127
Re: 1987 Camaro "Pro-Touring" Budget Build
A little hunting did find this: https://www.gmpartsgiant.com/parts/g...-14087416.html
Looks like a PN of 14087416. Maybe that's enough to get started with?
Looks like a PN of 14087416. Maybe that's enough to get started with?
06-07-2018, 06:54 AM
#128
Supreme Member
iTrader: (11)
Join Date: Sep 1999
Location: NJ
Posts: 4,350
Received 299 Likes
on
235 Posts
Car: 92 Firebird
Engine: 4.8 LR4
Transmission: T56
Axle/Gears: 3.45 9 Bolt
Re: 1987 Camaro "Pro-Touring" Budget Build
I am now working on getting the intake installed along with some new sensors and I have a few questions I was hoping to get some help on:
1. I need some help selecting the correct intake manifold gaskets.
My heads have exhaust crossover holes:
But my intake only has an exhaust crossover on one side (the other is blocked as part of the casting):
Finally, my old gaskets have exhaust block off plates but one is missing (perhaps on the same side as the casted-in block off on the intake):
I don't really need the exhaust crossover... so is there a better way to block this off?
06-10-2018, 05:47 AM
#129
Re: 1987 Camaro "Pro-Touring" Budget Build
I need some help on something here... my car has trouble starting when it sits for a day or 2. It cranks over fine, but takes quite a while to catch. Once it starts it runs fine, and it'll start right up if I ask it to again on that same day. I think what may be happening is my fuel pressure regulator is slowly bleeding off fuel pressure when the car is off... so when I hit the key the next day, it needs to build up that pressure again before it starts. Does this sounds correct? If so, is there a way I can test my fuel pressure regulator?

The regular mechanic test is that it should maintain pressure overnight.
Aftermarket... well I've seen a bunch of aftermarket regulators that won't come even close. Aeromotive drops pressure right away, and if you call them they will tell you that it's OK (and I've seen multiple ones do the same thing, it really pisses me off because it makes it difficult/next to impossible without much more work or throwing parts at it to test/find other problems).
At that point if you have leak down (and if you have an aftermarket regulator I don't see how you can get an accurate idea, since if they leak down some right away, what's too much?) you need to try to figure out if it's the regulator, a dirty injector dripping or a leaking o-ring.
That one looks like an Accel. If it's still available and clears that intake I like the Holley one, it's machined aluminum with a big knurled aluminum **** on top of it so you can adjust pressure with your fingers (FWIW, I don't know what clears the SR). FWIW, the TPI aftermarket AFPRs are typically just the cap, adjustment screw/****, spring assembly and a diaphram. They re-use the factory base that is part of the fuel rail assembly. It's not hard to make one out of a stock one either, I believe that I posted pictures and instructions A LONG TIME AGO here.
The injector o-rings are available as a Fel-Pro gasket PN (should be able to get it from any parts store). There are 2 numbers, GM style, and ford style, the ford ones are thicker but both will work in a GM rail/intake.
I would say the smog laws in my area (Mass) or somewhere in the middle of the range, but there are rumors that they are going to get more stringent. I think I am going to keep the charcoal canister and rebuild the system so it functions properly. One more thing to do but I think it will be worth it.
In my case I got rid of the canister but then I swapped in an LS1 4th gen style plastic tank that has one mounted on the top of the tank.
I don't believe I've ever opened one of those without finding a mouse nest in it. With mice.

Check out this thread.
https://www.thirdgen.org/forums/susp...ll-joints.html
For the short story, the extended ball joint from QA1 is PN 1210-209P. Some interesting reading in that thread.
https://www.thirdgen.org/forums/susp...ll-joints.html
For the short story, the extended ball joint from QA1 is PN 1210-209P. Some interesting reading in that thread.
FWIW. I've gone with the Del-A-Lum control arm bushings. That may or may not be the Delrin bushing you've mentioned as this one is a Delrin/aluminium composite.
http://www.globalwest.net/camaro-del...2-global-.html
http://www.globalwest.net/camaro-del...2-global-.html
 (of course if you have to pay someone for their labor...)
That looks to be the sensor that is normally mounted in the driver's side head between the 1 and 3 cylinders.
Last edited by 83 Crossfire TA; 06-10-2018 at 05:52 AM.
06-24-2018, 09:06 PM
#130
Re: 1987 Camaro "Pro-Touring" Budget Build
Thanks for all the tips Mark!
For the fuel pressure regulator, I ordered a Holley one and hopefully that will fit under the plenum. I will run the pressure test when I get the engine back in the car.
I ended up ordering my fuel rail O-rings from South Bay fuel injectors. They look like they should work just fine.
For the fuel pressure regulator, I ordered a Holley one and hopefully that will fit under the plenum. I will run the pressure test when I get the engine back in the car.
I ended up ordering my fuel rail O-rings from South Bay fuel injectors. They look like they should work just fine.
06-27-2018, 09:25 PM
#131
Re: 1987 Camaro "Pro-Touring" Budget Build
Quick update for tonight. Progress is a tad slow but its progress none-the-less!
I figured out my intake situation and decided to buy some new intake gaskets with the same part number is the ones I removed.
I started with tapping the holes in the head to get rid of the old RTV and make sure I was going to get accurate torque readings:
Here is everything I used for the install:
I used some gray high-strength RTV around the exhaust ports on both sides of the gasket and just a bad of black RTV on the bolts:

The gasket kit came with some rubber seals to go on the ends, and I started off using them but they did not seal after I torqued everything down. So, I needed to take everything back apart and used a thick bead of black RTV instead.
Installed! (The base anyway...)
Next I was on to getting the transmission cleaned up. I have decided to paint it, so I needed to get it nice and clean for good adhesion.
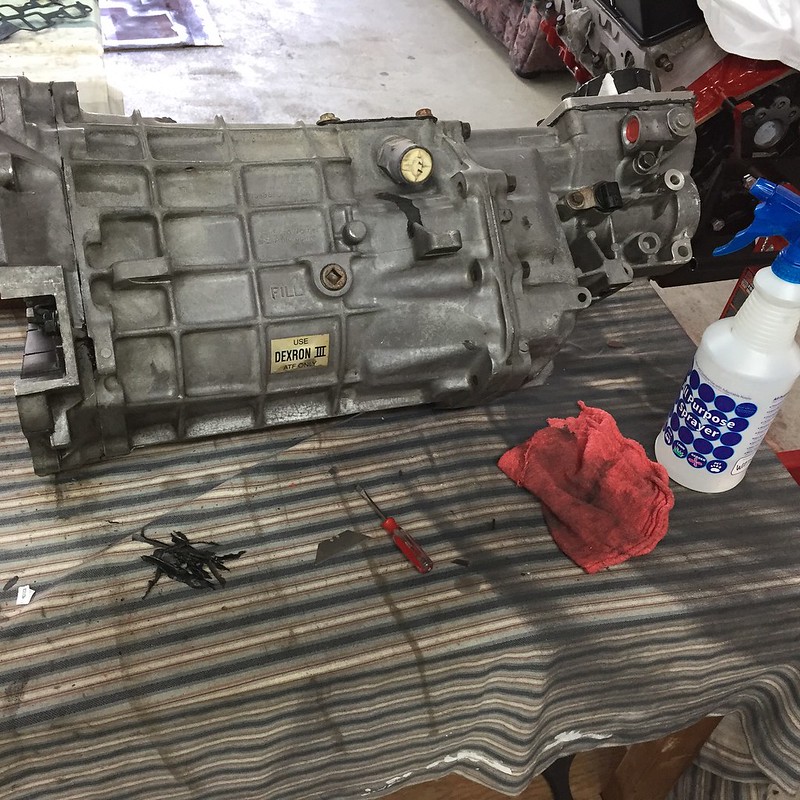
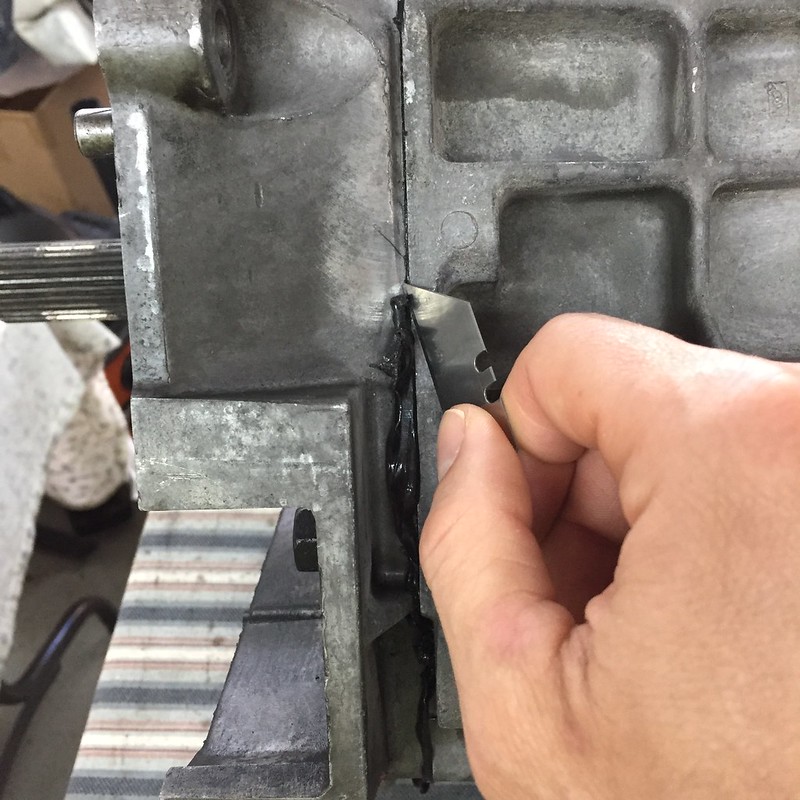
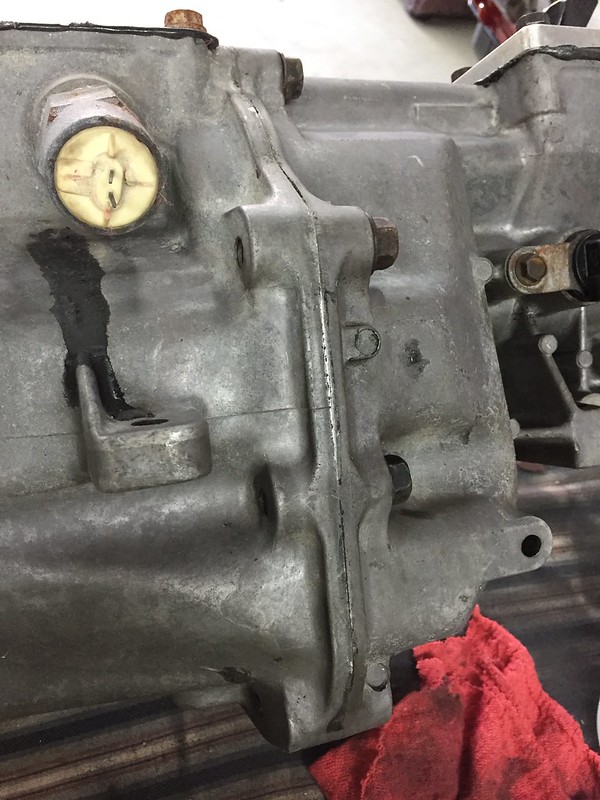
I also took the time to clean off a lot of the excess RTV for a cleaner look:
That's all for now, hoping some more progress this weekend!
I figured out my intake situation and decided to buy some new intake gaskets with the same part number is the ones I removed.
I started with tapping the holes in the head to get rid of the old RTV and make sure I was going to get accurate torque readings:
Here is everything I used for the install:
I used some gray high-strength RTV around the exhaust ports on both sides of the gasket and just a bad of black RTV on the bolts:
The gasket kit came with some rubber seals to go on the ends, and I started off using them but they did not seal after I torqued everything down. So, I needed to take everything back apart and used a thick bead of black RTV instead.
Installed! (The base anyway...)
Next I was on to getting the transmission cleaned up. I have decided to paint it, so I needed to get it nice and clean for good adhesion.
I also took the time to clean off a lot of the excess RTV for a cleaner look:
That's all for now, hoping some more progress this weekend!
 07-08-2018, 07:50 PM
#135
Re: 1987 Camaro "Pro-Touring" Budget Build
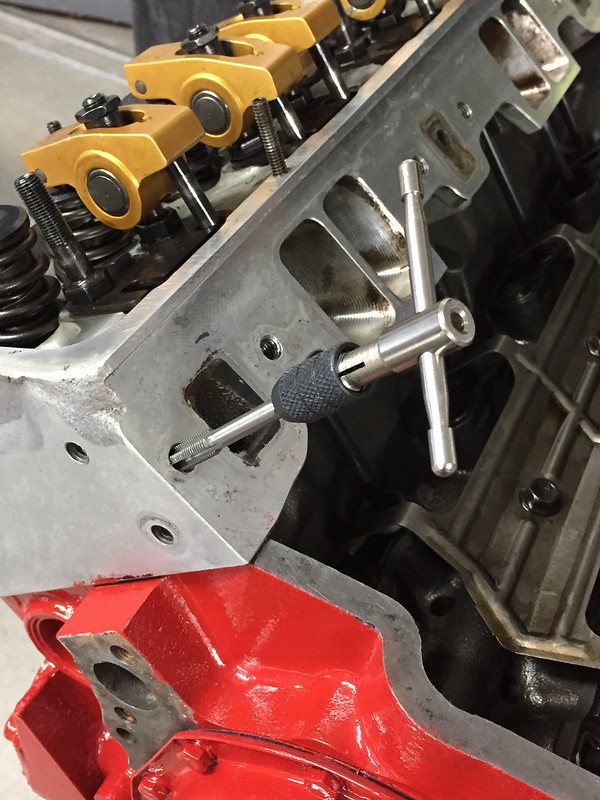
The heads, cam, pushrods and rockers were all already on the engine when I bought the car. The wear marks on the top of the valves from the rockers are dead in the center and the engine was running well so I feel my valve train geometry is OK. If there is something from my pics you think needs addressed however please let me know.
07-08-2018, 07:51 PM
#136
Re: 1987 Camaro "Pro-Touring" Budget Build
Hit a big milestone this week! My engine bay is finally painted and I'm ready to start putting some parts back on the car! What a long process that was... I spent a ton of hours cleaning, prepping, cleaning again, masking off all the areas that I didn't want to paint, cleaning again, getting my new HVLP gun set up, cleaning up one last time and finally laying down the primer, color and clear coats. I think it came out great and I'm pumped with the results!
For the prep, I first degreased the whole engine bay and then scuffed it with a red ScothBrite pad. I then used Prep-All solvent and some blue shop rags and I kept cleaning and cleaning until the wipes did not show any more dirt. I followed that up with some isopropyl alcohol as a final prep step.
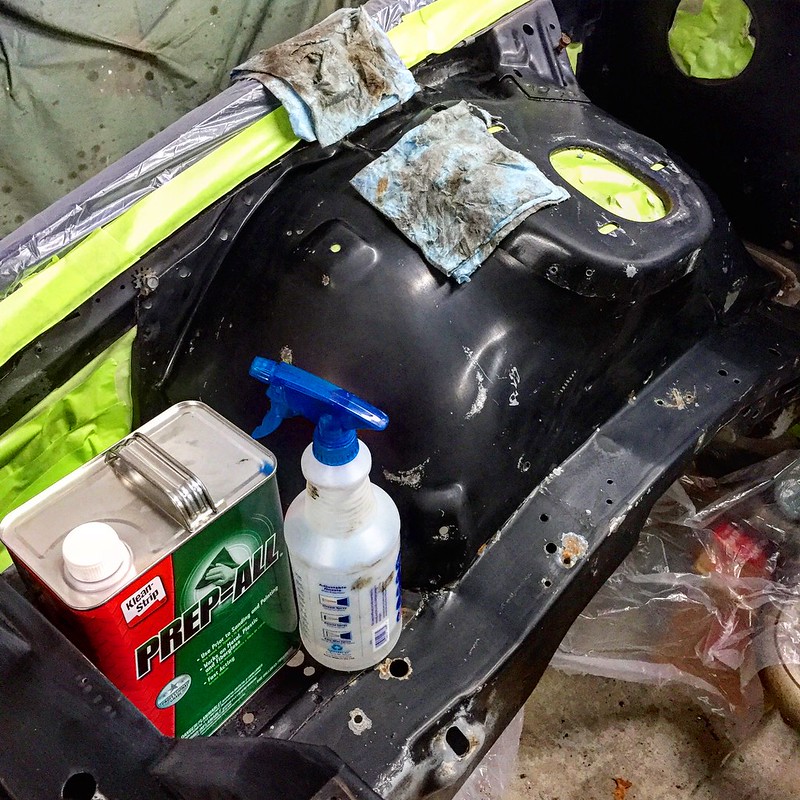
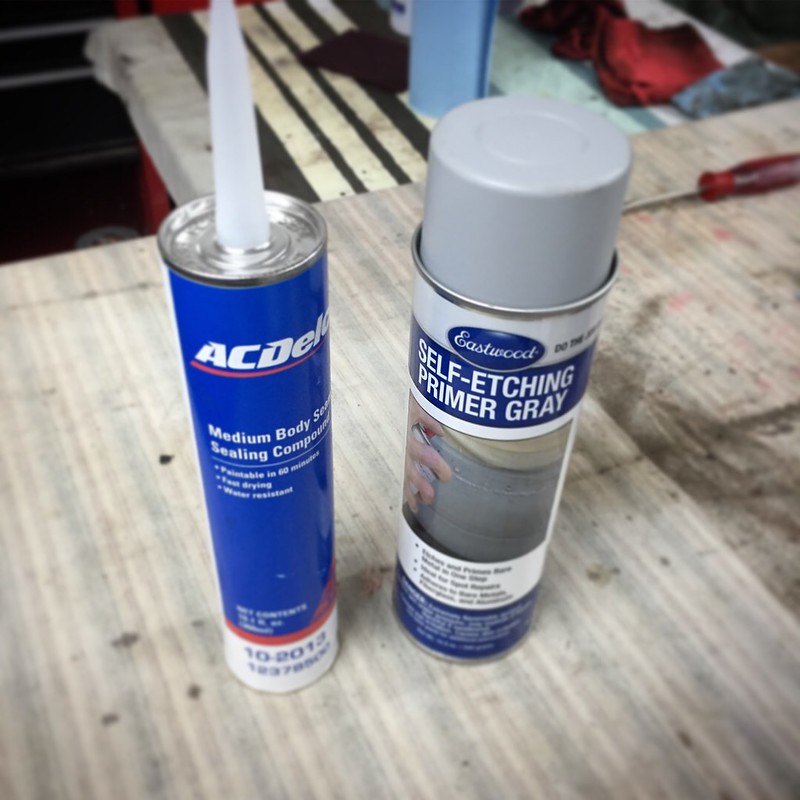
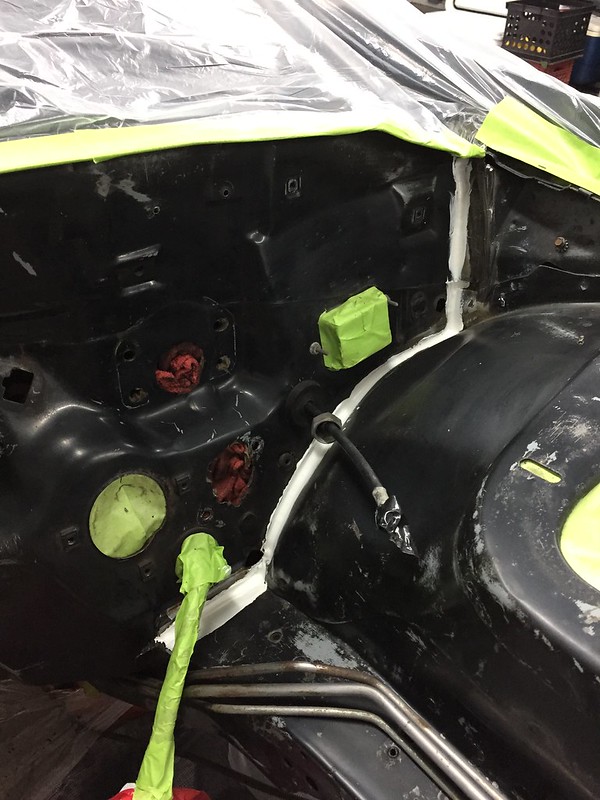
I applied some new seam sealer around the edges of the engine bay where the factory stuff had gotten dried out. This stuff is super tacky and I made the mistake of not using gloves... won't do that again! Then I hit any bare metal areas with some self-etching primer:
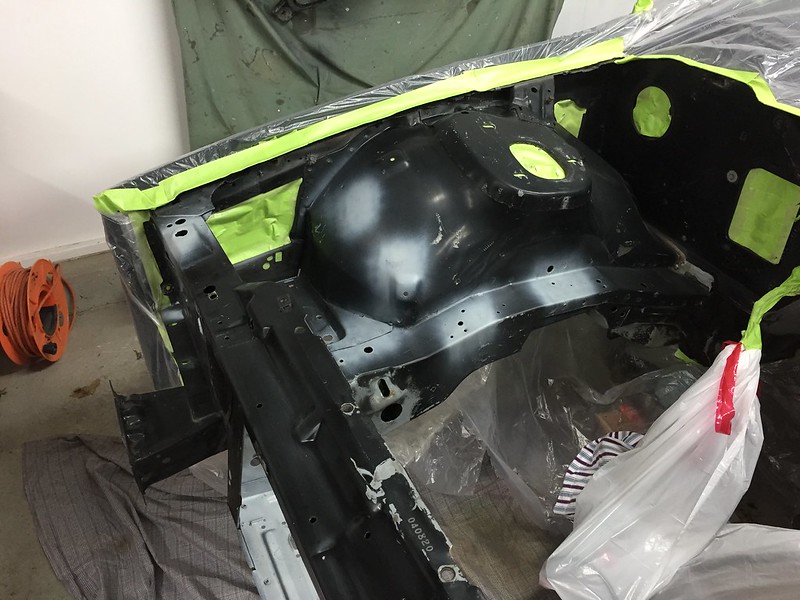
Then came the fun part. I had never used an HVLP gun before so this was all new to me. Luckily I had some good guidance from a friend at a local body shop who helped make sure I had all the right equipment and supplies I needed. I used Eastwood Urethane primer and laid on 2 coats and let it dry overnight:

2 days later, I sanded to surface with 600 grit and began the cleaning process again. The color was MUCH thinner than the primer and was way easier to work with in terms of mixing it and cleaning my gun afterwards. I put on one coat of color as it covered really well:

The color I chose for the engine bay was Audi Nardo Grey. I was inspired to choose a pretty basic, contrasting color for the engine bay based on some inspiration from the Big Red Camaro. The lighter engine color is used in race cars to easier spot leaks, and I think it just looks plain cool and really "purposeful", which is the theme I am going with for this car. I think the grey will look good against the grey and silver stripes down the side of the car as well. Here is the Big Red Camaro engine bay:
After the color, I quickly cleaned out my gun and got the clear ready. Again I went with Eastwood and one of their less-expensive clearcoats. I put on 2 light coats followed by one medium coat with 10mins in between each coat. It turned pretty good...not perfect, but OK for an engine bay and pretty good for my first time:
I haven't decided if I am going to wet sand the paint yet and seal it with some sort of ceramic coating, but either way I'm very excited as I feel like I have hit a major milestone in the project! Parts can start going back on now! ::gitrdun:: ::headspin:: ::cheers:: ::cheers::
For the prep, I first degreased the whole engine bay and then scuffed it with a red ScothBrite pad. I then used Prep-All solvent and some blue shop rags and I kept cleaning and cleaning until the wipes did not show any more dirt. I followed that up with some isopropyl alcohol as a final prep step.
I applied some new seam sealer around the edges of the engine bay where the factory stuff had gotten dried out. This stuff is super tacky and I made the mistake of not using gloves... won't do that again! Then I hit any bare metal areas with some self-etching primer:
Then came the fun part. I had never used an HVLP gun before so this was all new to me. Luckily I had some good guidance from a friend at a local body shop who helped make sure I had all the right equipment and supplies I needed. I used Eastwood Urethane primer and laid on 2 coats and let it dry overnight:
2 days later, I sanded to surface with 600 grit and began the cleaning process again. The color was MUCH thinner than the primer and was way easier to work with in terms of mixing it and cleaning my gun afterwards. I put on one coat of color as it covered really well:
The color I chose for the engine bay was Audi Nardo Grey. I was inspired to choose a pretty basic, contrasting color for the engine bay based on some inspiration from the Big Red Camaro. The lighter engine color is used in race cars to easier spot leaks, and I think it just looks plain cool and really "purposeful", which is the theme I am going with for this car. I think the grey will look good against the grey and silver stripes down the side of the car as well. Here is the Big Red Camaro engine bay:
After the color, I quickly cleaned out my gun and got the clear ready. Again I went with Eastwood and one of their less-expensive clearcoats. I put on 2 light coats followed by one medium coat with 10mins in between each coat. It turned pretty good...not perfect, but OK for an engine bay and pretty good for my first time:
I haven't decided if I am going to wet sand the paint yet and seal it with some sort of ceramic coating, but either way I'm very excited as I feel like I have hit a major milestone in the project! Parts can start going back on now! ::gitrdun:: ::headspin:: ::cheers:: ::cheers::
Last edited by garage_engineer; 08-15-2018 at 08:39 AM.
07-11-2018, 08:33 PM
#137
07-15-2018, 10:56 AM
#139
Senior Member
iTrader: (1)

Join Date: Sep 2005
Location: Windsor, Ontario
Posts: 654
Likes: 0
Received 10 Likes
on
10 Posts
Car: 1987 Trans Am
Re: 1987 Camaro "Pro-Touring" Budget Build
I'm highly debating going with a battleship gray under the hood of my black T/A. Supposed to make finding leaks easier.
08-12-2018, 08:43 PM
#141
Re: 1987 Camaro "Pro-Touring" Budget Build
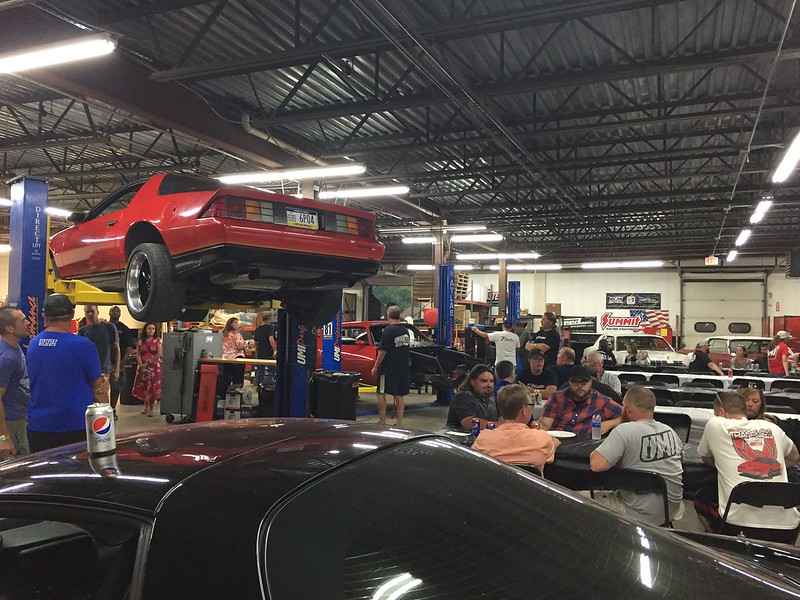
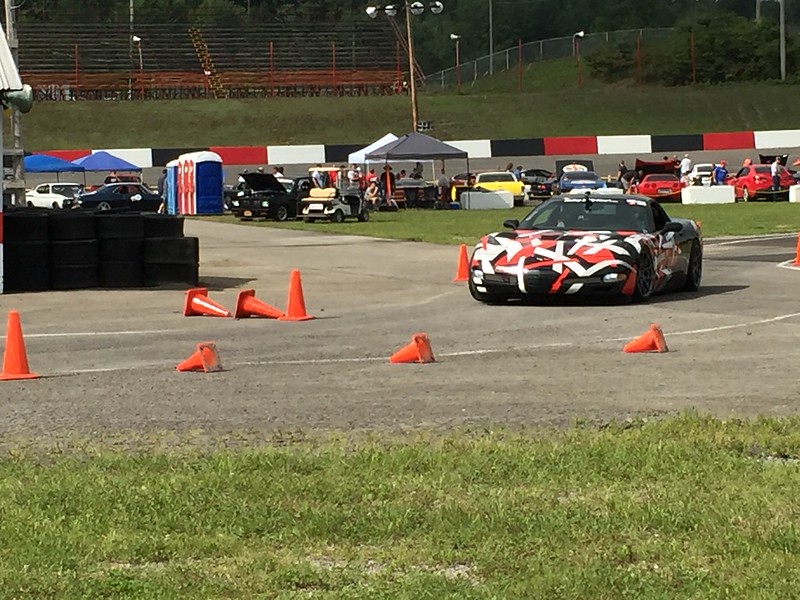
No real progress on the car unfortunately in the last few weeks. I've been swamped with some busy summer weekends and lots of projects around the house. However, I was able to attend the UMI Performance autocross event this weekend. The event was hosted at the new UMI Motorsports Park in Clearfield, PA. UMI purchased an abandoned 1/2 mile oval and are in the process of turning it into an awesome facility for autocross, road racing and testing their products. The place looks awesome and the whole crew at UMI did a great job reviving the old track. Since my car is in pieces, I volunteered to help out and **** cones for the weekend. I was happy to be a part of the event, and very motivated to attend next year with my own car!

One of the highlights of the weekend for me was meeting was meeting Valerie and Tom aka owners of the "Dragonlady GTA". I've been a big fan of this car since I bought my 3rd gen, and seeing it in person for the first time was awesome. Valerie and Tom are even more awesome and I talked to them for quite a while about the car and how they travel around going to so many events each year. Valerie even took me for a ride around the autocross course while Tom covered my cones for me, what a guy!
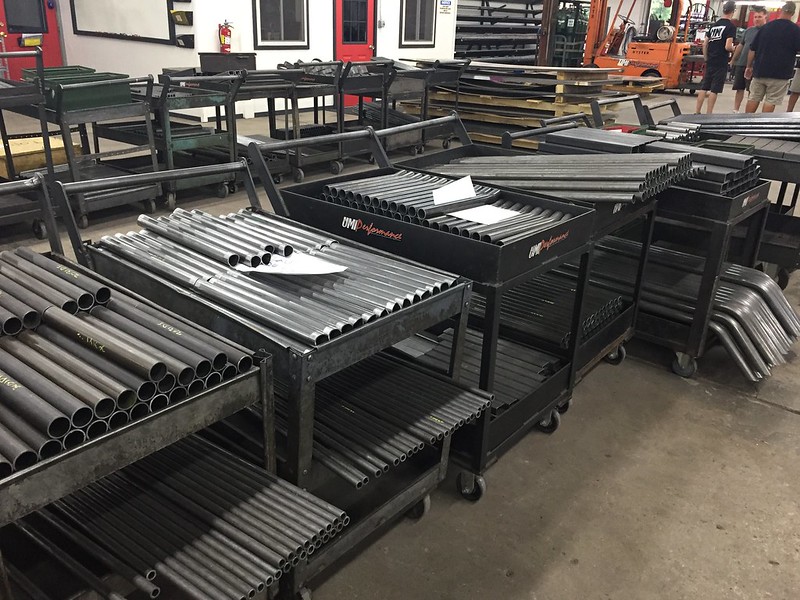
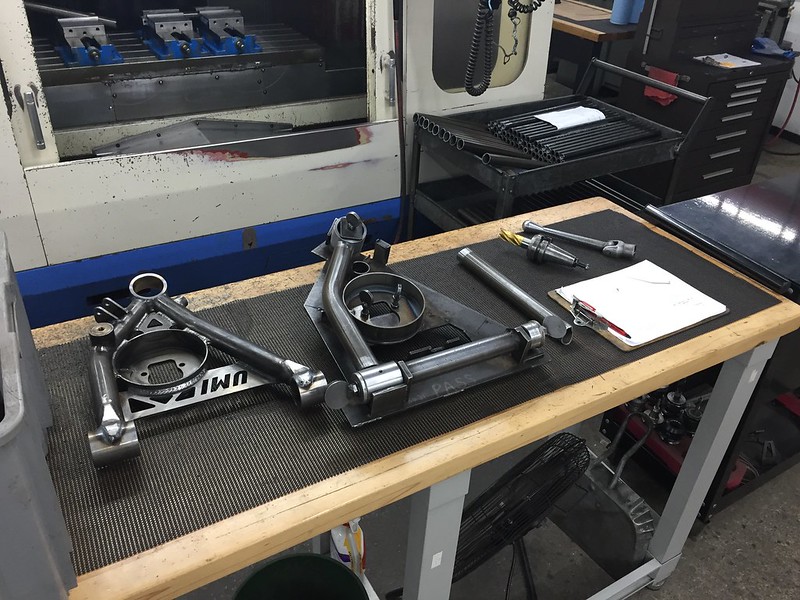
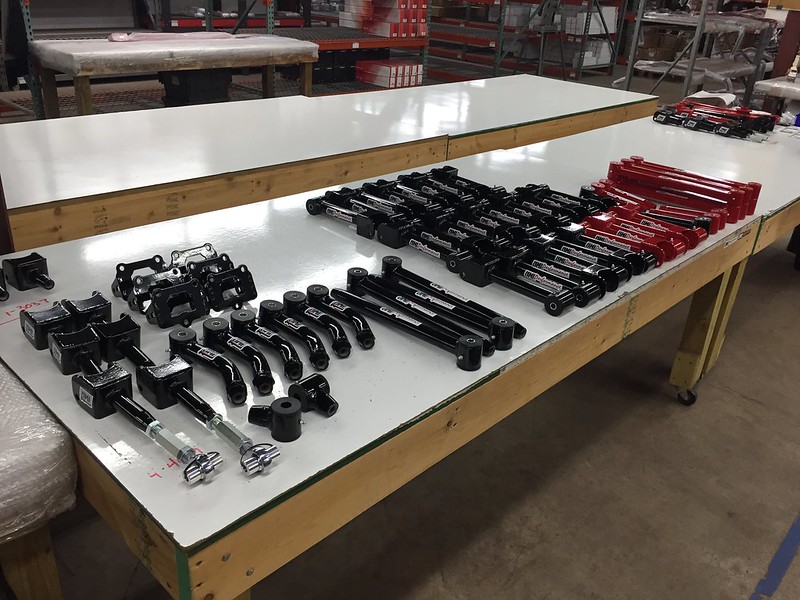
On Friday night, we got to tour the UMI facility. Another awesome experience... being an engineer myself it was cool to get to see all the tooling, jigs and drawings they use for each individual component to ensure quality and repeatability.
Some more third gen pics I grabbed:
I'm fired up now to get back to working on my car! I have a couple of free weekends coming up so my next post will hopefully be lots of updates!
One of the highlights of the weekend for me was meeting was meeting Valerie and Tom aka owners of the "Dragonlady GTA". I've been a big fan of this car since I bought my 3rd gen, and seeing it in person for the first time was awesome. Valerie and Tom are even more awesome and I talked to them for quite a while about the car and how they travel around going to so many events each year. Valerie even took me for a ride around the autocross course while Tom covered my cones for me, what a guy!
On Friday night, we got to tour the UMI facility. Another awesome experience... being an engineer myself it was cool to get to see all the tooling, jigs and drawings they use for each individual component to ensure quality and repeatability.
Some more third gen pics I grabbed:
I'm fired up now to get back to working on my car! I have a couple of free weekends coming up so my next post will hopefully be lots of updates!
08-12-2018, 08:53 PM
#142
Senior Member

Re: 1987 Camaro "Pro-Touring" Budget Build
Next time you see us, the Dragon will be back on 200 TW Rivals and will be a few seconds faster than the Comp 2 All Seasons. You know how to find me if you have questions. It was kind of a shock to have you and so many other 3rd and 4th gen owners at the event come up to tell us they follow the car on social media and wanted to talk.
08-12-2018, 08:53 PM
#143
Re: 1987 Camaro "Pro-Touring" Budget Build
Some more pics:
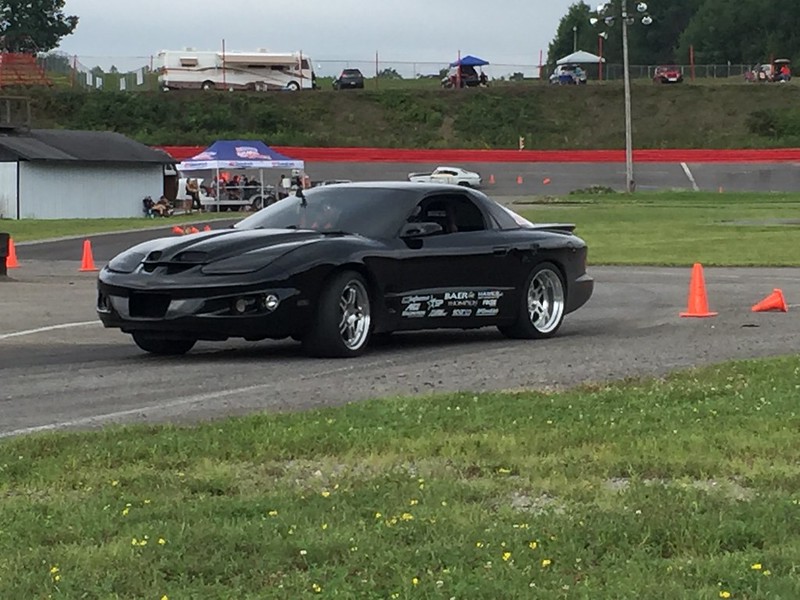
Brian Finch was there with his Camaro and it was amazing watching him throw it around the course. Him and Sam Strano were battling it out for top time of the day... man these guys can fly! They're on the gas the whole time!
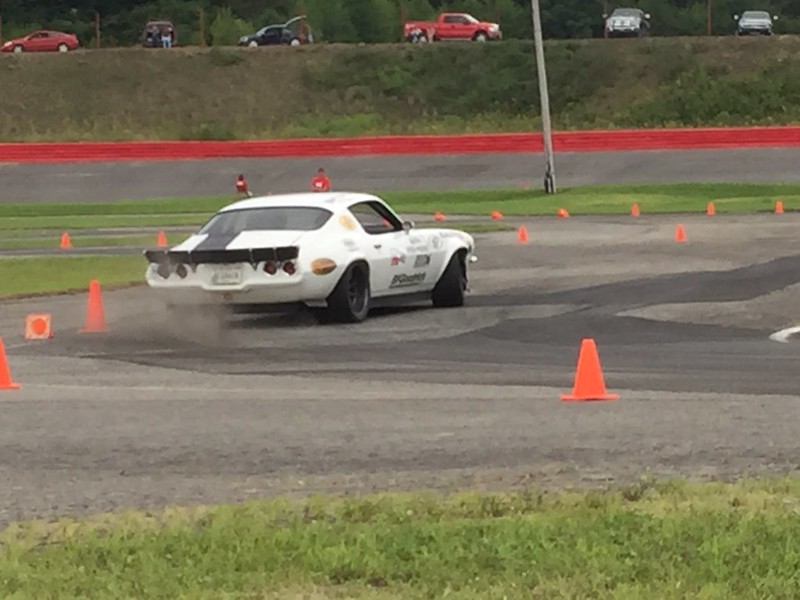
Brian Finch was there with his Camaro and it was amazing watching him throw it around the course. Him and Sam Strano were battling it out for top time of the day... man these guys can fly! They're on the gas the whole time!
The following users liked this post:
Tidan (02-20-2020)
08-12-2018, 08:54 PM
#144
Supreme Member
iTrader: (25)
Join Date: Sep 2005
Location: NJ
Posts: 1,839
Received 291 Likes
on
227 Posts
Car: 1987 IROC-Z
Engine: 406 on N20 w/ EFI
Transmission: P.B. 700R4
Axle/Gears: 12 bolt w/ 3.91
Re: 1987 Camaro "Pro-Touring" Budget Build
ah! very cool! I was really hoping to get to this event but was unable to rearrange my schedule for the full 3 days I would need to attend and compete. glad you went. I had some buddies from NJ that went and had a good time. Red 2nd gen camaro with black wheels, and a silver 4th gen camaro.
08-12-2018, 08:57 PM
#145
Senior Member
Re: 1987 Camaro "Pro-Touring" Budget Build
08-13-2018, 08:13 AM
#146
Supreme Member
iTrader: (2)
Join Date: Feb 2005
Location: West Warwick RI, postal code: 02893
Posts: 4,355
Received 61 Likes
on
46 Posts
Car: Building LS3, T56 Z28
Engine: LS3
Transmission: T-56
Axle/Gears: Moser/ 4.11
Re: 1987 Camaro "Pro-Touring" Budget Build
This looks AMAZING. I would love to attend this next year.
Is it a yearly thing?
7hr drive from my house. I will mark it on my calendar if it is. Not close, but not too far either and from the images, totally worth the drive and maybe grab a cheap hotel room or something.
How did you learn about this event?
Is it a yearly thing?
7hr drive from my house. I will mark it on my calendar if it is. Not close, but not too far either and from the images, totally worth the drive and maybe grab a cheap hotel room or something.
How did you learn about this event?
08-13-2018, 09:14 AM
#147
Supreme Member
iTrader: (11)
Join Date: Sep 1999
Location: NJ
Posts: 4,350
Received 299 Likes
on
235 Posts
Car: 92 Firebird
Engine: 4.8 LR4
Transmission: T56
Axle/Gears: 3.45 9 Bolt
Re: 1987 Camaro "Pro-Touring" Budget Build
You get any info on that Flame Red 91/92 TA? I saw that in someone else's pictures, but he din't even spot light it since he isn't into 3rd gens, lol
08-13-2018, 12:54 PM
#148
Senior Member
Re: 1987 Camaro "Pro-Touring" Budget Build
This looks AMAZING. I would love to attend this next year.
Is it a yearly thing?
7hr drive from my house. I will mark it on my calendar if it is. Not close, but not too far either and from the images, totally worth the drive and maybe grab a cheap hotel room or something.
How did you learn about this event?
Is it a yearly thing?
7hr drive from my house. I will mark it on my calendar if it is. Not close, but not too far either and from the images, totally worth the drive and maybe grab a cheap hotel room or something.
How did you learn about this event?
08-13-2018, 06:51 PM
#149
Supreme Member
iTrader: (11)
Join Date: Aug 2013
Location: MICHIGAN
Posts: 4,669
Received 810 Likes
on
615 Posts
Car: 1988 Trans Am
Engine: L03
Transmission: 700R4
Axle/Gears: 10 Bolt 2.73 Open
Re: 1987 Camaro "Pro-Touring" Budget Build
That looks like a lot of fun.
Kudos to UMI for the track purchase and rehab.
Kudos to UMI for the track purchase and rehab.
The following users liked this post:
Tidan (02-20-2020)
08-15-2018, 08:47 AM
#150
Re: 1987 Camaro "Pro-Touring" Budget Build
This looks AMAZING. I would love to attend this next year.
Is it a yearly thing?
7hr drive from my house. I will mark it on my calendar if it is. Not close, but not too far either and from the images, totally worth the drive and maybe grab a cheap hotel room or something.
How did you learn about this event?
Is it a yearly thing?
7hr drive from my house. I will mark it on my calendar if it is. Not close, but not too far either and from the images, totally worth the drive and maybe grab a cheap hotel room or something.
How did you learn about this event?
Follow UMI Performance on Instagram and Facebook for updates.