When you click on links to various merchants on this site and make a purchase, this can result in this site earning a commission. Affiliate programs and affiliations include, but are not limited to, the eBay Partner Network.
LTX and LSXPutting LT1s, LS1s, and their variants into Third Gens is becoming more popular. This board is for those who are doing and have done the swaps so they can discuss all of their technical aspects including repairs, swap info, and performance upgrades.
Im confused. Why do you need 292837 sending units out of one manifold. Some is good, more is better.
LOL!
You never know...
With the affordability of EFI today (such as Halltech or Holley)...
More and more people are becoming Junkies for Data/ Sensor-Inputs!
A few years back (for example); I had a group of guys who were getting heavy into Rally/ Dirt-Track Racing.
They all were required to use the same Aftermarket ABS/ Traction-Control Module and System.
It would use 8 Pressure-Transducers... One for the Increase Solenoid, and One for the Decrease Solenoid for each of the Four ABS channels.
I installed them all in One Manifold, similar to that Image that I Posted.
Also, most Temperature Sensors tend to hold-up just fine, when directly mounted on the Power-Train...
I do often still remote-mount them, but really is not necessary in most situations.
Something that I much more commonly do with Holley EFI Dominator installations (Inputs and Outputs GALORE) for an LSx Build; could use any Inputs that follow:
-Engine Oil Psi (Valve-Train).
-Engine Oil Psi (Mains).
-Engine Oil Psi (Pre-Filter Remote).
-Engine Oil Psi (Post-Filter Remote).
-Engine Coolant Psi (Boost/ Cylinder Head Gasket FAILURE).
-Turbocharger Coolant Psi (Pump).
-Turbocharger Coolant Psi (Bank One).
-Turbocharger Coolant Psi (Bank Two).
-Intercooler Refrigerant Psi (Compressor).
-Intercooler Refrigerant Psi (Exchanger).
-MAP
-Crankcase/ Vacuum Psi (Cylinder Block).
-Crankcase/ Vacuum Psi (Vacuum Pump).
-Boost Psi (Aggregate).
-Boost Psi (Blow-Off).
-Boost Psi (Top of Wastegate Bank One).
-Boost Psi (Top of Wastegate Bank Two).
-Boost Psi (Bottom of Wastegate Bank One).
-Boost Psi (Bottom of Wastegate Bank Two).
-Hydraulic Power S&B Psi (Pump).
-Hydraulic Power S&B Psi (Hydro-Booster).
-Hydraulic Power S&B Psi (Steering-Gear).
-Automatic Transmission Psi (Torque-Converter Charge).
-Automatic Transmission Psi (Cooler Charge).
-Automatic Transmission Psi (Line).
-Automatic Transmission Psi (Brake).
-Automatic Transmission Psi (Dump).
-Fuel Psi (Feed).
-Fuel Psi (Return).
-Aux. Fuel Psi (Feed).
-Aux. Fuel Psi (Return).
Blah Blah Blah... of course there is more, with Nitrous-Oxide use, Manual Transmission Cooler, Differential Cooler, Brake Hydraulics, ABS and TC, and much more...
So depending on the Project/ Vehicle/ Systems implimented; I use many Pressure Transducers (as well as Hobbs/ Pressure-Safety Switches, and don't forget Temperature Sensors) and Remote Mount Sensor Blocks/ Manifolds.
Last edited by vorteciroc; 06-23-2022 at 01:23 AM.
Drove the car this weekend for the first time since my death drip. Exhaust has to change. I may try to design up a dual inlet/outlet muffler and place it in the stock location. Or try a longer race muffler but with a larger jacket (5" vs 4"). Trans fluid is still leaking. I might have to replace this seal a 3rd time. I am not sure if the seal failed when I had it accidently over filled, or if my driveshaft is somehow too short. The vent tube is free and clear and not pinched either. Under the car is COATED with fluid. Like, Exon Valdez bad. I will have to soap her down and get that off. Exhaust tubing is black from all the burnt fluid.
Was the Coil-Spring damaged or did it fall out when you removed the last Seal?
A small amount of Permatex ATF RTV over the Spring can help retain it with problematic installs.
Do not put so much that the Seal will not flex... Do not use another type of RTV.
Check the surface of the Yoke for imperfections or rust.
Clean/ Polish as needed.
Inspect the Tail-Housing for Core-Shift.
Replace as needed.
Indeed the tailhousing is leaking. After a drive it leaves a nice puddle. I assume the seal is the culprit. Perhaps it was damaged on install (i actually had a shop do it while it was in the air on their lift). I'll buy a new one, the robust ones we mentioned before, and try again.
In my new quest to reduce oil temps I put a ton of DEI heat shielding on the header primaries closest to the oil thermostat as well as placed one of their adhesive backed shields to the side of the thermostat. I also put a jacket around one of the oil lines nearest to a primary. I "think" this helped but temps still got warmer than I'd like. Whereas I would previously be at 240 deg, I was able to keep it down 5 to 10 degrees or so. It did hit 240 again, but for the most part stayed between 225 and 230. However, the longer I drive I bet it would eventually get to 240 and level off. So, Either the shielding does nothing and allows heat soak, or my oil cooler isn't large enough. I am using an Earl's 25 row 225ERL unit. I am thinking I may need to go to a 35 or 40 row unit. I also may try 10W40 instead of the 5W30 I am running now. Hopefully it won't make my oil pressure too high. I am exploring a remote filter and T-stat but I just don't know where I would place it. I have some room in the nose of the car but that is pretty far from the motor and at risk of getting hit by something (curbs, road debris, etc).
Last edited by ShiftyCapone; 07-21-2022 at 03:19 PM.
In my new quest to reduce oil temps I put a ton of DEI heat shielding on the header primaries closest to the oil thermostat as well as placed one of their adhesive backed shields to the side of the thermostat. I also put a jacket around one of the oil lines nearest to a primary. I "think" this helped but temps still got warmer than I'd like. Whereas I would previously be at 240 deg, I was able to keep it down 5 to 10 degrees or so. It did hit 240 again, but for the most part stayed between 225 and 230. However, the longer I drive I bet it would eventually get to 240 and level off. So, Either the shielding does nothing and allows heat soak, or my oil cooler isn't large enough. I am using an Earl's 25 row 225ERL unit. I am thinking I may need to go to a 35 or 40 row unit. I also may try 10W40 instead of the 5W30 I am running now. Hopefully it won't make my oil pressure too high. I am exploring a remote filter and T-stat but I just don't know where I would place it. I have some room in the nose of the car but that is pretty far from the motor and at risk of getting hit by something (curbs, road debris, etc).
I believe that you are overly concerned about your oil temperature for the following reasons. I�ll assume that you are using a synthetic oil over a standard petroleum oil which has a much higher resistance to thermal breakdown, by hundreds of degrees and is used in turbine engines for this reason. Your oil temperature will not be the same as your coolant temperature because your oil sump is an integral part of the engine, making it more susceptible to heat soak, therefore assisting in cooling the engine by drawing the heat in and carrying it away from the bearings and cylinder walls. Typically you want the oil temperature to be above 200 degrees, hence the 180 degree thermostat, so 230 - 240 is not unreasonable for normal cruising temperatures. Considering that header temperatures are nearly 500 degrees and with the proximity of the oil cooler adapter on an LS engine, I would say that your heat mitigation efforts are working if your oil temperature is stable at 240 degrees. Lastly, the Camaros, GTOs, and most trucks running LS power plants do not have oil coolers and survive 100,000s of daily driving miles, think about what those oil temperatures are? Remember, all of this is my humble opinion and subject to debate, but I think you should relax and enjoy your incredible build. You have done an amazing job building your car, I have really enjoyed following along.
I believe that you are overly concerned about your oil temperature for the following reasons. I�ll assume that you are using a synthetic oil over a standard petroleum oil which has a much higher resistance to thermal breakdown, by hundreds of degrees and is used in turbine engines for this reason. Your oil temperature will not be the same as your coolant temperature because your oil sump is an integral part of the engine, making it more susceptible to heat soak, therefore assisting in cooling the engine by drawing the heat in and carrying it away from the bearings and cylinder walls. Typically you want the oil temperature to be above 200 degrees, hence the 180 degree thermostat, so 230 - 240 is not unreasonable for normal cruising temperatures. Considering that header temperatures are nearly 500 degrees and with the proximity of the oil cooler adapter on an LS engine, I would say that your heat mitigation efforts are working if your oil temperature is stable at 240 degrees. Lastly, the Camaros, GTOs, and most trucks running LS power plants do not have oil coolers and survive 100,000s of daily driving miles, think about what those oil temperatures are? Remember, all of this is my humble opinion and subject to debate, but I think you should relax and enjoy your incredible build. You have done an amazing job building your car, I have really enjoyed following along.
I was thinking along the same lines and I really appreciate the reassurance. I beleive you are correct on all of this. Same race teams want oil temps in the 300's! I am indeed running quality synthetic (mobil 1) and overall the car runs like a monster. It's the devil of doubt that sits on my shoulder and second guesses everything. Paralysis through analysis. Headers, do make things hotter for sure but I agree that I'm probably ok. My buddies stockish LSA ZL1 was running oil temps around 225 to 230 so it makes sense that im in that ballpark. If he goes with longtube, I bet those temps jump a bit. All relative..... On to transmission leak!!
Car just got back from the Dyno. We had few hiccups at the beginning (PS pully wasn't fully seated and I had a loose fuel line, but once those were fixed everything went smoothly. My tail housing is leaking fluid and I suspect the stock tremec seal was damaged during driveshaft install. All in all I am pretty satisfied with the results and I will try to post a video. I do need to put a larger air filter on, as my current one is too small and I was at 93 kpa at WOT (you want 98+). Tuner says I have 10 to 15 more rwhp with a larger filter, I will go back later to test that out. I also am running the break in oil and the engine has barely any break in time. Car made 503 rwhp and 443TQ on a Mustang Dyno. She's loud and she is a Monster.
Weapon X motorsports. The tuners name is Blake. He works through cincy speed. They are really good.
Didn't realize Cincy Speed was still around, Craig Newport still own it? The World Product heads I�ve got on the car came from them when they were just a parts supplier about 25 years ago, had them in lay-a-way there for about 6 months cause I was super broke wanted to go fast(er) 😂
Approx 620.00 HP is PERFECT at 6.20-Liters.
100.00 Per 1.00 Liter (Normally Aspired) is the sweet-spot before Engine Life really starts to be shortened.
And is the PERFECT starting point to add Forced induction...
Double or Triple the Power Output!
Approx 620.00 HP is PERFECT at 6.20-Liters.
100.00 Per 1.00 Liter (Normally Aspired) is the sweet-spot before Engine Life really starts to be shortened.
And is the PERFECT starting point to add Forced induction...
Double or Triple the Power Output!
They say once you get used to the power you'll want more. I'll wait until I do my tweaking dyno session (should be soon) to see where my final numbers land. I should end up around 520rwhp on a mustang dyno. I built this to be an N/A monster with good idle manors, small cam, and I have achieved that. I'd have to swap heads to lower the compression before I consider boost. 600+ hp in a 3200 lb car gets you in trouble quickly. Why are roads so short?....
I'd rather do an all out Mamo LS7 (Chuck!). Or a boosted 416 LS3. I didn't win the mega millions soooo, ill keep what I have.
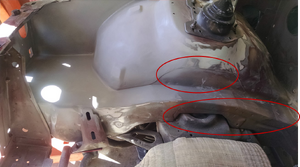
After that picture was taken i stitched welded along those seams, ground down and then thin bondo. I only added metal to the reservoir mount pads and around the lip of the strut cap.
They key is to stitch weld any OEM seem. They flex more than you think which will destroy your hard work. Im a few thousand miles into my journey with a back breaking stiff suspension and haven't noticed a single crack.
I am curious, did you weld the filler plate to the inner wheel well or just spot weld it down and use body filler to make it a smooth transition? I have a similar situation where I spot welded my filler plate but do not know if I should weld the seam in addition to using filler. It is structurally sound, just looking for the correct approach to get that visual look.
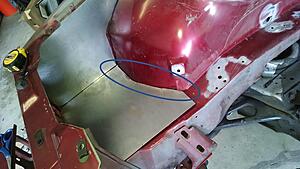
I actually cut out the OEM trays and then welded in those panels. I didn't want a hidden void in between the two panels especially since the OEM trays have holes in them. I don't have many pictures of cutting those areas out for some reason. What you see are just the panels laying on top prior to the cuts.
I actually cut out the OEM trays and then welded in those panels. I didn't want a hidden void in between the two panels especially since the OEM trays have holes in them. I don't have many pictures of cutting those areas out for some reason. What you see are just the panels laying on top prior to the cuts.
I figured you removed the old panels I guess my question is more in regards to supplies used to make the panels so seamless where they join together. Was it just body filler applied at all the seams and sanded down? The yellowish color almost looks like a polyester primer/surfaces like Featherfill G2. I am assuming it�s not from seam sealer that was painted because it looks so smooth. I love the seamless look of both front areas in your engine bay and I am just not sure how to finish the body work now that I have my patch panels welded in.
I figured you removed the old panels I guess my question is more in regards to supplies used to make the panels so seamless where they join together. Was it just body filler applied at all the seams and sanded down? The yellowish color almost looks like a polyester primer/surfaces like Featherfill G2. I am assuming it�s not from seam sealer that was painted because it looks so smooth. I love the seamless look of both front areas in your engine bay and I am just not sure how to finish the body work now that I have my patch panels welded in.
Yeah the yellowing stuff is filler, I had the shop do it so I dont know the exact brand. I know they specifically prepped it for satin paint as the body work to do gloss would have been another $4 grand or more. There is very little filler and all panels were stitched in and ground down. That took forever honestly. Once I had the panels in place, the custom fab shop took over. I'll see if I can find more pics.
Yeah the yellowing stuff is filler, I had the shop do it so I dont know the exact brand. I know they specifically prepped it for satin paint as the body work to do gloss would have been another $4 grand or more. There is very little filler and all panels were stitched in and ground down. That took forever honestly. Once I had the panels in place, the custom fab shop took over. I'll see if I can find more pics.
Appreciate the info. I just epoxied my engine bay and was just going to smooth all the spot welds but now I am having second thoughts and want to smooth everything. I wish I would of decided this before I started applying the filler . I know its a ton of work but its the middle of winter and shouldn't break the bank, it will just be a lot of my time.
Appreciate the info. I just epoxied my engine bay and was just going to smooth all the spot welds but now I am having second thoughts and want to smooth everything. I wish I would of decided this before I started applying the filler . I know its a ton of work but its the middle of winter and shouldn't break the bank, it will just be a lot of my time.
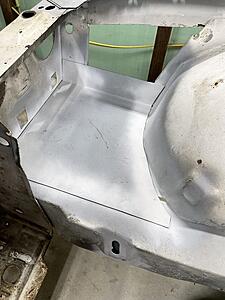
Well, if it nakes you feel better I waited till everything was ready for paint before I decided to remove the wheel well humps for coolant and washer fluid. Required a lot of rework to the prepped surfaces. This whole process took months. The rest of the car is still not painted....
Back with another question, on the sides of the frame rails did you just weld the seam and skim with filler or did you weld a piece of metal in on both sides to fill the space? I am going to try and tackle that as well as the seam on the firewall this weekend.
Back with another question, on the sides of the frame rails did you just weld the seam and skim with filler or did you weld a piece of metal in on both sides to fill the space? I am going to try and tackle that as well as the seam on the firewall this weekend.
It was stich welded and then ground down before filler. No metal was added.
I was pretty reluctant to work on the car over the winter, project fatigue, but we've had a few odd ball warm days here to motivate me. I plan on taking the car on the power tour again this year but I need to fix a few things. Still waiting on my money tree to grow so I can get this thing properly painted. For now, the red-primer combo has a joe dirt appeal that is fitting given how visceral this car is.
I started with the dreaded steering gage cluster and steering column removal. The hub on my aftermarket steering wheel rubbed against these two plastic ridges that are part of the stock unit. When I would turn, they would act as a detent and retard my steering until I pushed the wheel across these bumps. Very unnerving when driving in traffic with this. You can see in the image where the aftermarket wheel has started to abrade the column ridges.
I also had a few gages that where the illumination would go away when the car was in key on run. They would work fine with the key off but would turn off when you put the key on run. I changes the grounds around and now everything works as planned. My headlight buzzer goes off non stop so I will have to unplug that. My guess is that since I don't have the dome light circuits in place it is wanting to see a signal there. I'll just unplug the buzzer, you know, the doing the right thing.
I was never able to get the vintage air unit to work and although the system held vacuum, I couldn't get the compressor to kick on and suck in the refrigerant. That is a top priority given how hot the car gets. I don't have it figured out yet but I think I tried to get to cute with the NOS RPM cutoff switch. My intent was to cut power to the compressor at 4k RPM just like an OEM system would. However, I am not sure if I have it configured correctly. I am going to remove that, and just wire the compressor to the trinary switch as instructed. If it blows, it blows.
I am still fighting the trans leak and haven't figured it out. I replaced the stock tremec tailhousing seal with a much better OEM unit. However, it still leaks. I verified that my vent tube was intact and not kinked or bent. I was able to follow its path using a optical camera. Super handy. You can see the vent tube is fine.
I am starting to wonder if my driveshaft is too short. I suppose I should call Tremec and get their recommended input shaft dimensions. Originally, my driveshaft was too long, which is what damaged the original seal. I am wondering if I do not have enough driveshaft engagement. I have another new seal I will pop in, but this is still concerning. Especially how expensive Mobile 1 ATF is.
Lastly, in an attempt to dampen the exhaust drone, I will be putting carpet back in the car. I have been exploring new mufflers and such but it will be a major tear up of the current system. I don't want to just replace the speed engineering bullet mufflers with a fancier one only to end up with the same drone. I am very space limited with the true duals. Those Vorex mufflers with the built in cut out are also an option.
Not sure how much this will help. As far as the Vintage Air, I simple pinned the compressor clutch wire (green) to the 30 terminal on the supplied relay with the trinary switch wired between the relay and the compressor and it works great. The SD7 compressor is rated for 9000 RPM and I've taken my engine up to 6500 with the A/C on and have not experienced any problems (yet). As for the exhaust, I have 18" MagnaFlow bullets on 3" duals and it is Cup Car load, I also need to do something about this. I saw that the DSE Camaro has Stainless Works, 3" dual chambered mufflers, which come in up to 31" long, but I don't know if they are any better. I would like to hear from someone that has some real world experience with both systems. I've got nothing for you about the trans seal, I just installed my Magnum and have only moved it about 50 ft, no leaks net, but my driveshaft doesn't move once it is installed. I'm at the same stage as your project, preparing to paint and I have no interior. Good luck with your car and have a great time on the Power Tour.
Not sure how much this will help. As far as the Vintage Air, I simple pinned the compressor clutch wire (green) to the 30 terminal on the supplied relay with the trinary switch wired between the relay and the compressor and it works great. The SD7 compressor is rated for 9000 RPM and I've taken my engine up to 6500 with the A/C on and have not experienced any problems (yet). As for the exhaust, I have 18" MagnaFlow bullets on 3" duals and it is Cup Car load, I also need to do something about this. I saw that the DSE Camaro has Stainless Works, 3" dual chambered mufflers, which come in up to 31" long, but I don't know if they are any better. I would like to hear from someone that has some real world experience with both systems. I've got nothing for you about the trans seal, I just installed my Magnum and have only moved it about 50 ft, no leaks net, but my driveshaft doesn't move once it is installed. I'm at the same stage as your project, preparing to paint and I have no interior. Good luck with your car and have a great time on the Power Tour.
It does help and I've already started to reexamine how I wired the system (using the VA diagrams). My vent fan works but only comes out the derost vents and not the front vents. May have something goofed with the control panel wiring.
As for exhaust, the DSE car has their 4 link which yields more room for mufflers. I've also considered a magnaflow dual in dual out muffler and route both paths from over the axle to the OEM muffler location. Do you have a lot of drone with your magnaflow bullets?
Dual 3" exhaust is so large that you could use quiet turbo mufflers and it would still flow decent, but I don't know how you would package 2 mufflers that large. Catalytic converters are a good muffler too.
There's always the single exhaust path.... no more drone.
I've been looking into maybe muffling the living crap out of my exhaust for pleasant driving and then using two junkyard Mustang PWM controlled active exhaust valves for cutouts. Lightning fast valves compared to aftermarket electric valves and could use the Holley EFI to dial in my own active exhaust map. I think the Holley exhaust valves might be the same source as Mustang, they look the same anyway. I've got all kinds of ideas I'll never do.
Dual 3" is so large that you could use quiet turbo mufflers and it would still flow decent, but I don't know how you would package 2 mufflers that large. Catalytic converters are a good muffler too.
There's always the single exhaust path.... no more drone.
I wish I had room for a small turbo muffler but I do have cats. I can't go single yet, I paid way too much for this exhaust to give up on it yet. Again, I went sexy overboard instead of doing a single 4". The varex mufflers are intriguing to me. They have an electronic cutout built right into them. They are popular down under. Whats another $700 thrown at my exhaust....kill me.
Mustang active exhaust valves in action. Valves even have V-bands from the factory, just unbolt in junkyard and mount where you want. Could easily control this with Holley EFI if I could figure out what are the PWM settings. I figured out who is the supplier for the valve actuator but can't get any application tech help yet.
It does help and I've already started to reexamine how I wired the system (using the VA diagrams). My vent fan works but only comes out the derost vents and not the front vents. May have something goofed with the control panel wiring.
As for exhaust, the DSE car has their 4 link which yields more room for mufflers. I've also considered a magnaflow dual in dual out muffler and route both paths from over the axle to the OEM muffler location. Do you have a lot of drone with your magnaflow bullets?
The VA system is odd like that, defrost is great, but the center and lower vents not so much. My theory on this is that the defrost side is more isolated, therefore less volume and more air pressure, whereas the lower vents share a larger plenum and experience less pressure and more volume. As far as cooling the entire car, the volume helps more, even if you can�t �feel� the air moving. Again, this is my humble opinion.
�Do I have a lot of drone?� I started mine up in the garage for some friends and one pointed out that the floor was shaking and a couple of other guys jumped back, and these are car guys. The DSE mufflers are basically straight through, 5� OD, just longer, which is why I question whether they would make a difference. Since I have deleted the rear seat, I actually thought about cutting the tubs out and putting flat floors in place like a 2nd gen and put a couple of turbo mufflers in, until I was told to �Stop going down the rabbit holes and get the car done!���BajaDaze. I figured he�s right, I will never get this car done if I don�t stop modifying it, so I�ll live with the drone for the few times a year that I will drive it. It sure does attract a lot of attention though.
�Do I have a lot of drone?� I started mine up in the garage for some friends and one pointed out that the floor was shaking and a couple of other guys jumped back, and these are car guys. The DSE mufflers are basically straight through, 5� OD, just longer, which is why I question whether they would make a difference. Since I have deleted the rear seat, I actually thought about cutting the tubs out and putting flat floors in place like a 2nd gen and put a couple of turbo mufflers in, until I was told to �Stop going down the rabbit holes and get the car done!���BajaDaze. I figured he�s right, I will never get this car done if I don�t stop modifying it, so I�ll live with the drone for the few times a year that I will drive it. It sure does attract a lot of attention though.
Just wait, the loudness is bearable, but the 2k rpm steady state drone while going down the highway will make you reconsider your entire lifes decision making process. ha.
I replaced the steering shaft bearing today and the one I put in a year ago was completely trashed. The bearing races were warped and the plastic bushing was all sloppy. I must have ruined it while turning the wheel before I fired the car (no PS pump). It had 2200 miles on it but I think I destroyed it before mile #1. I won't do that again.
Me too, and thats the one that failed. I don't blame the bearing. I blame me yanking on the wheel to get the car turned to get on the flatbed for allignment and tune. 265 fronts on dry concrete without the motor running = massive steering shaft loads. Shout out to screaming chicken for the new bearing.
What does the Steering Column to Intermediate Steering-Shaft Bearing from Hawks cost?
When I would do upgrades here, I would Grab a 1995-2005 M-Body Van (Safari/ Astro) Intermediate Steering-Shaft..
and a 1993-2002 F-Body Car Intermediate Steering-Shaft, to combine and restore.
Then grab a new 1995 M-Body Van Steering Column to Intermediate Steering-Shaft Bearing...
to replace the Plastic Bushing used in our Cars.
They were about $25.00...
I would guess that they might be $35.00 now post COVID.
When I would do upgrades here, I would Grab a 1995-2005 M-Body Van (Safari/ Astro) Intermediate Steering-Shaft..
and a 1993-2002 F-Body Car Intermediate Steering-Shaft, to combine and restore.
Ha! That's exactly what I had custom built for myself. I've never seen anybody else do it until you.
Hawks is expensive, I think I paid $50 for the bearing but had no idea where else to go. Got a part number for that metal bearing?
What does the Steering Column to Intermediate Steering-Shaft Bearing from Hawks cost?
When I would do upgrades here, I would Grab a 1995-2005 M-Body Van (Safari/ Astro) Intermediate Steering-Shaft..
and a 1993-2002 F-Body Car Intermediate Steering-Shaft, to combine and restore.
Then grab a new 1995 M-Body Van Steering Column to Intermediate Steering-Shaft Bearing...
to replace the Plastic Bushing used in our Cars.
They were about $25.00...
I would guess that they might be $35.00 now post COVID.
I paid $50 I think from Screaming Chicken which is the same as the hawks price. I've seen them as low as $12 on ebay that supposedly come with the bearing. I am running the DSE steering shaft and am intrigued by your van bearing tip. Do you just use the bearing or do you use the whole column? After blowing up two of these now, the plastic portion of the assembly is the weak link. It distorts under load and eventually wallows out.
I paid $50 I think from Screaming Chicken which is the same as the hawks price. I've seen them as low as $12 on ebay that supposedly come with the bearing. I am running the DSE steering shaft and am intrigued by your van bearing tip. Do you just use the bearing or do you use the whole column? After blowing up two of these now, the plastic portion of the assembly is the weak link. It distorts under load and eventually wallows out.
Just the Bearing with the Metal Outer Collar and Lock/ E-Clip:
Last edited by vorteciroc; 02-23-2023 at 04:05 PM.
Does anyone know the definitive answer if the GM E38 ECM sends ground or 12 volts to fan command? Both my fans are running non stop regardless of water temp. We are speculating that the ECM, which has an operating system on it that only controls one fan, may be configured for a single variable speed fan. I have reached out to my tuner but the interwebs are all over the place on how the GM ECM commands fans (and if that is a configurable feature to change the switch type in the ECM itself). My fans are wired per the SPAL diagram but something is commanding the relays to kick on. There is no voltage coming out of the ECM signal (so thinking it is ground signal) but when I disconnect the ignition on signal to the relays, the fans still run. Ha.

 06-23-2022, 12:24 AM


 . I know its a ton of work but its the middle of winter and shouldn't break the bank, it will just be a lot of my time.