
What ever happened to QwkTrip's car anyway?

 09-14-2015, 07:37 AM
#302
COTM Editor

Thread Starter
iTrader: (22)
Join Date: Mar 2001
Posts: 10,077
Likes: 0
Received 1,941 Likes
on
1,325 Posts
Car: '89 Firebird
Engine: 7.0L
Transmission: T56
Re: What ever happened to QwkTrip's car anyway?
Yep, there are lots of pictures.  Must be your work blocking it.
Must be your work blocking it.
09-19-2015, 07:07 PM
#304
COTM Editor
Thread Starter
iTrader: (22)
Join Date: Mar 2001
Posts: 10,077
Likes: 0
Received 1,941 Likes
on
1,325 Posts
Car: '89 Firebird
Engine: 7.0L
Transmission: T56
Re: What ever happened to QwkTrip's car anyway?
I had to reinvent the wheel because I couldn't find the info I needed in order to eliminate the PASSkey security system (what most people call VATS, Vehicle Anti-Theft System). All the info I found had the wrong pinouts or wiring. And I don't know any teenage delinquents that could quickly show me so I had to reverse engineer the system for myself.
I found plenty of info how to defeat the PASSkey by using a resistor in the key test-circuit, but I need to eliminate PASSkey entirely so using a resistor is pointless for me. Here is the diagram I made of my 1989 Firebird.

And all I need to do is jump terminals A3 and B1 at the PASSkey module. This keeps the Start Enable Relay in tact, with no modifications at the kick panel. It also gives opportunity to operate the relay by another means if I choose to do so.

I found plenty of info how to defeat the PASSkey by using a resistor in the key test-circuit, but I need to eliminate PASSkey entirely so using a resistor is pointless for me. Here is the diagram I made of my 1989 Firebird.
And all I need to do is jump terminals A3 and B1 at the PASSkey module. This keeps the Start Enable Relay in tact, with no modifications at the kick panel. It also gives opportunity to operate the relay by another means if I choose to do so.
Last edited by QwkTrip; 03-13-2018 at 01:01 AM.
09-20-2015, 02:09 AM
#305
COTM Editor
Thread Starter
iTrader: (22)
Join Date: Mar 2001
Posts: 10,077
Likes: 0
Received 1,941 Likes
on
1,325 Posts
Car: '89 Firebird
Engine: 7.0L
Transmission: T56
Re: What ever happened to QwkTrip's car anyway?
Well, I don't think my plan is going to work. I found the BLK/WHT wire (B1) and it goes to the datalink connector. Kind of strange. Must be sharing a ground with some other circuits. Problem is that set of wires is not grounded to chassis any more. I have a feeling it was removed when I pulled the wires out of the passenger side kick panel, but I can't find it at the connector that is still there. Little confused right now.
If anybody has schematics showing all the electrical grounds that would be awesome to have.
If anybody has schematics showing all the electrical grounds that would be awesome to have.
09-22-2015, 12:19 AM
#306
COTM Editor
Thread Starter
iTrader: (22)
Join Date: Mar 2001
Posts: 10,077
Likes: 0
Received 1,941 Likes
on
1,325 Posts
Car: '89 Firebird
Engine: 7.0L
Transmission: T56
Re: What ever happened to QwkTrip's car anyway?
I found the ground location for the PASSkey. Having to find this ground location ended up being a blessing in disguise. It was the common ground for the VSS buffer box too, and I needed that for the Dakota Digital speedo conditioner.
09-22-2015, 11:23 PM
#307
COTM Editor
Thread Starter
iTrader: (22)
Join Date: Mar 2001
Posts: 10,077
Likes: 0
Received 1,941 Likes
on
1,325 Posts
Car: '89 Firebird
Engine: 7.0L
Transmission: T56
Re: What ever happened to QwkTrip's car anyway?
Here's a good mystery that needs solving.
I used to connect battery to run the rear hatch motor before I cut up the car harness. The last time I connected battery I had an electrical short, complete with a smoke show, that burned open a ground wire near the battery (this was with the original harness still in tact). I've been trying to track down the cause of that short as I work on all the wiring for the engine swap.
The AC relay connector at firewall pass-thru is fine. The connector at the AC compressor clutch is burned. I also found heat damage on the selector switch inside the HVAC head unit in the dash. And the 25 Amp HTR FAN fuse is not blown, and there is no heat damage to any other wires or connectors in the blower motor circuit. What the.... ????
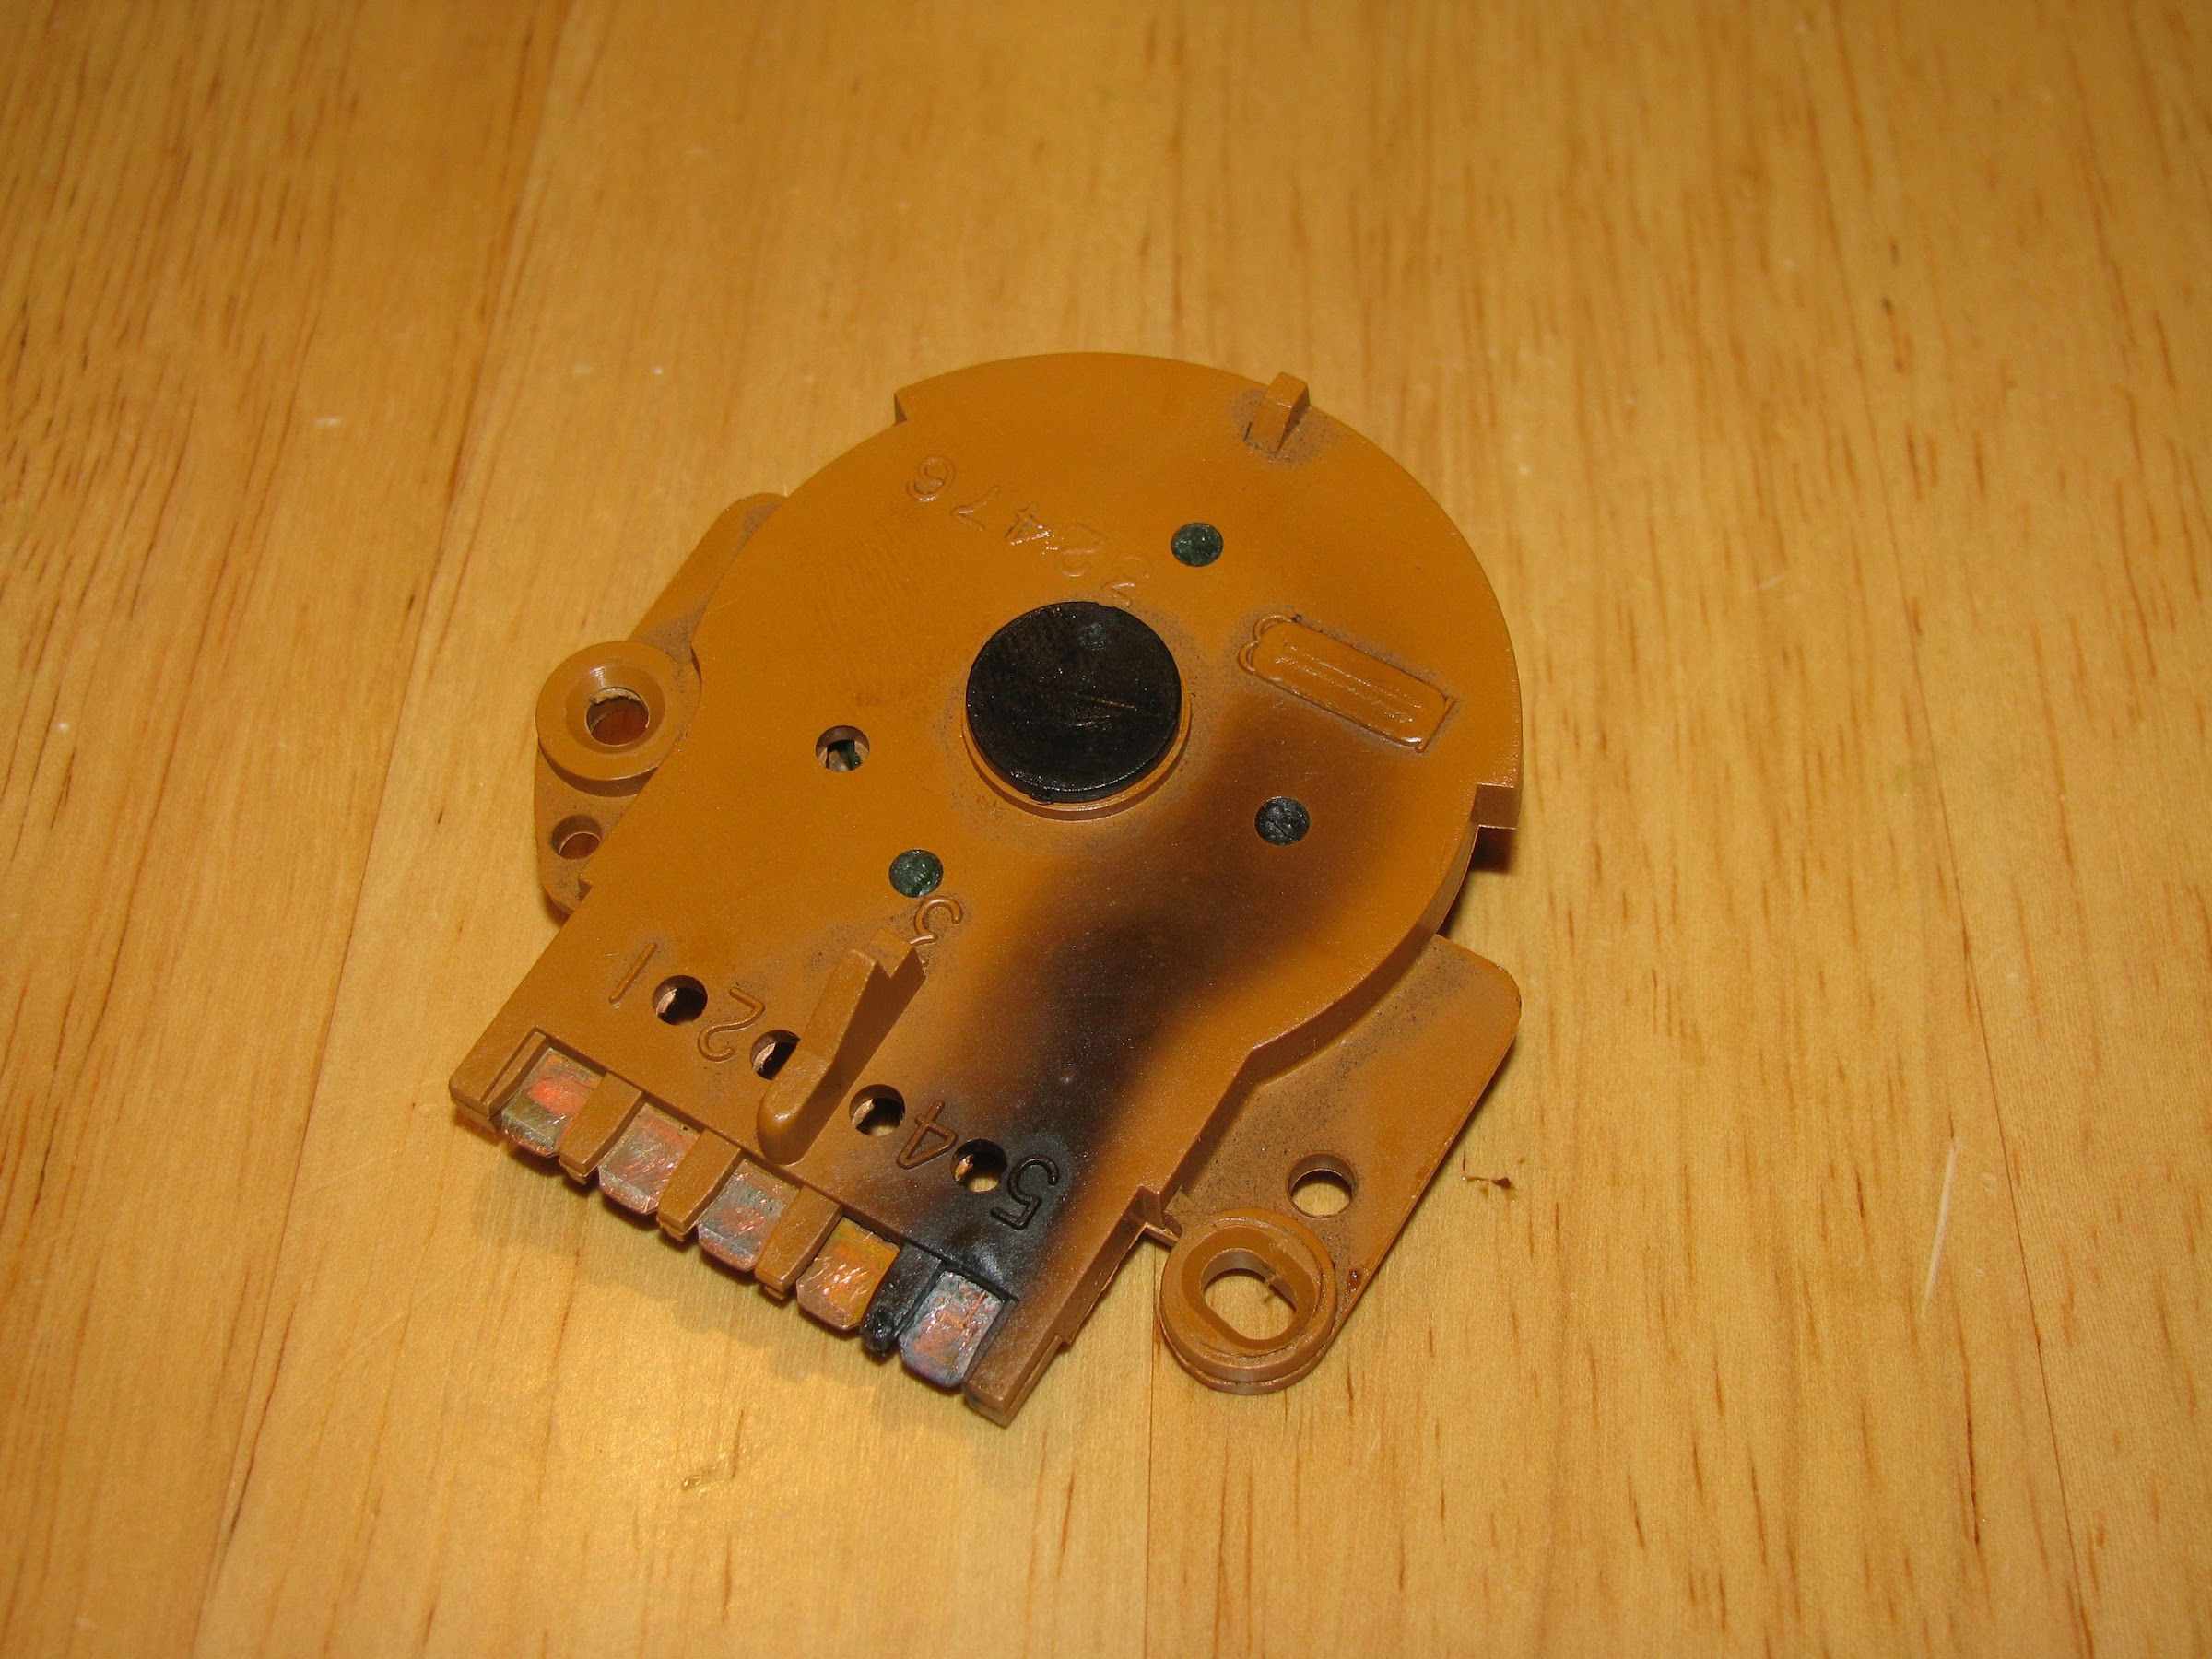
5 is the BRN wire from HTR FAN fuse.
4 is the BRN/WHT wire for fan speed.
3 is LT GRN wire for AC pressure switch
2 is DK GRN wire for ???
1 is BLK wire is grounded
A lot of the black stuff is grease, but it got smoking hot on the #5 strap and the contacts between #5 and #4. Hot enough to varnish some of the grease.

Update: The burn marks are common with these GM modules because the circuit is undersized for higher fan speed. I had a terrible time finding a correct new replacement (I never did). All the aftermarket pieces had the wrong internal circuitry. I ended up cleaning the contacts and putting this stock module back together and re-using it.
I used to connect battery to run the rear hatch motor before I cut up the car harness. The last time I connected battery I had an electrical short, complete with a smoke show, that burned open a ground wire near the battery (this was with the original harness still in tact). I've been trying to track down the cause of that short as I work on all the wiring for the engine swap.
The AC relay connector at firewall pass-thru is fine. The connector at the AC compressor clutch is burned. I also found heat damage on the selector switch inside the HVAC head unit in the dash. And the 25 Amp HTR FAN fuse is not blown, and there is no heat damage to any other wires or connectors in the blower motor circuit. What the.... ????
5 is the BRN wire from HTR FAN fuse.
4 is the BRN/WHT wire for fan speed.
3 is LT GRN wire for AC pressure switch
2 is DK GRN wire for ???
1 is BLK wire is grounded
A lot of the black stuff is grease, but it got smoking hot on the #5 strap and the contacts between #5 and #4. Hot enough to varnish some of the grease.
Update: The burn marks are common with these GM modules because the circuit is undersized for higher fan speed. I had a terrible time finding a correct new replacement (I never did). All the aftermarket pieces had the wrong internal circuitry. I ended up cleaning the contacts and putting this stock module back together and re-using it.
Last edited by QwkTrip; 03-13-2018 at 01:01 AM.
09-23-2015, 12:32 AM
#308
COTM Editor
Thread Starter
iTrader: (22)
Join Date: Mar 2001
Posts: 10,077
Likes: 0
Received 1,941 Likes
on
1,325 Posts
Car: '89 Firebird
Engine: 7.0L
Transmission: T56
Re: What ever happened to QwkTrip's car anyway?
double post
09-23-2015, 11:04 PM
#309
COTM Editor
Thread Starter
iTrader: (22)
Join Date: Mar 2001
Posts: 10,077
Likes: 0
Received 1,941 Likes
on
1,325 Posts
Car: '89 Firebird
Engine: 7.0L
Transmission: T56
Re: What ever happened to QwkTrip's car anyway?
Coming to the conclusion that the switch just got hot from normal operation. It is a common GM design flaw that a mechanic friend sees routinely. I also took the switch in to work where engineers could examine it and they found no signs of a short in the switch. Not a single fuse or fusible link was blown on the car. I am thinking that I must have accidentally created my own short from battery cable to ground. That would have bypassed all the fuses and caused the ground lead to burn open in a hurry.
All the damaged components have been removed and I'm just going to chalk this one up to operator malfunction. Let's hope I am right or we're going to have fireworks when I connect battery again!
All the damaged components have been removed and I'm just going to chalk this one up to operator malfunction. Let's hope I am right or we're going to have fireworks when I connect battery again!
09-23-2015, 11:13 PM
#310
COTM Editor
Thread Starter
iTrader: (22)
Join Date: Mar 2001
Posts: 10,077
Likes: 0
Received 1,941 Likes
on
1,325 Posts
Car: '89 Firebird
Engine: 7.0L
Transmission: T56
Re: What ever happened to QwkTrip's car anyway?
I am adding 4th gen power seats so I need to create a power source for it. My car was pretty basic with only options being AC and defrost so the power seat wiring doesn't exist at all. There aren't even pins or wiring at the fuse box.
So I went on a hunt for the power source and I found an easy solution. The fuse box is pre-wired for some power accessories and power windows, but the wires dead end at a connector on the driver side kick panel. How convenient. The wires are pretty good size and can carry the current of the power seat motors and air pump. I will tap in to the PWR ACC fuse simply because the name makes a little more sense than the power window fuse. I'm please how simple this will be!

So I went on a hunt for the power source and I found an easy solution. The fuse box is pre-wired for some power accessories and power windows, but the wires dead end at a connector on the driver side kick panel. How convenient.
The wires are pretty good size and can carry the current of the power seat motors and air pump. I will tap in to the PWR ACC fuse simply because the name makes a little more sense than the power window fuse. I'm please how simple this will be! Last edited by QwkTrip; 03-13-2018 at 01:00 AM.
09-26-2015, 04:51 PM
#311
COTM Editor
Thread Starter
iTrader: (22)
Join Date: Mar 2001
Posts: 10,077
Likes: 0
Received 1,941 Likes
on
1,325 Posts
Car: '89 Firebird
Engine: 7.0L
Transmission: T56
Re: What ever happened to QwkTrip's car anyway?
I'm getting pretty frustrated trying to find a replacement AC selector switch. Everything I find has 4 terminals, not 5 terminals, and the omitted terminal is always Pin 1 which is a ground wire connected to chassis (confirmed by testing on my car).
After studying the switch and examining the wiring in my car (x-ray vision would help), I think the replacement part will work. It appears that the original switch is capable of supporting different schemas of AC relay control. My car doesn't even seem to use Pin 1 and 2. I think those pins are used on different kinds of cars to ground a relay. So I'm just going to buy the new switch and I think it will work.
Update: The fan will never shut off when switch is installed in my '89. As far as I can tell, these switches are for early 3rd gens, not the later 3rd gens.
Last edited by QwkTrip; 10-18-2021 at 12:49 AM.
09-26-2015, 06:58 PM
#312
COTM Editor
Thread Starter
iTrader: (22)
Join Date: Mar 2001
Posts: 10,077
Likes: 0
Received 1,941 Likes
on
1,325 Posts
Car: '89 Firebird
Engine: 7.0L
Transmission: T56
Re: What ever happened to QwkTrip's car anyway?
Figured out alternator excitation circuit. I don't have an ECM that can use the SERVICE ENGINE SOON light so I am recycling it as a charging indicator lamp. 
By doing some circuit checks, I believe the SERVICE ENGINE SOON light bulb has +12V on it at all times when key switch is in the RUN and CRANK positions. The light turns on when a ground path is provided at Terminal 13 of the large Grey connector. The wire is routed in the factory harness to the C207 connector, Pin C. All I need to do is make a connection to C207 Pin C with the alternator excitation wire. If the alternator is not charging then the ground path is made and the light goes on. When the alternator is charging then both sides of the bulb are at the same voltage and current does not flow, and the light is off. And the light bulb has enough resistance to meet spec for the excitation circuit.
Update: This method ended up having issues with alternator turning off intermittently due to the inherently poor design of the connectors at the dash gage pod. An improved method is shown here, Post #884, https://www.thirdgen.org/forums/ltx-...ml#post6172816
Last edited by QwkTrip; 05-22-2021 at 07:23 PM.
09-27-2015, 06:30 AM
#313
Senior Member
iTrader: (5)

Join Date: Jan 2009
Location: Golden, CO
Posts: 887
Likes: 0
Received 11 Likes
on
9 Posts
Car: 87 IROC
Engine: L31 350
Transmission: T56
Axle/Gears: 4.10 D44
Re: What ever happened to QwkTrip's car anyway?

Bonus points for re-using an existing circuit!
09-27-2015, 02:32 PM
#314
COTM Editor
Thread Starter
iTrader: (22)
Join Date: Mar 2001
Posts: 10,077
Likes: 0
Received 1,941 Likes
on
1,325 Posts
Car: '89 Firebird
Engine: 7.0L
Transmission: T56
09-27-2015, 04:14 PM
#315
COTM Editor
Thread Starter
iTrader: (22)
Join Date: Mar 2001
Posts: 10,077
Likes: 0
Received 1,941 Likes
on
1,325 Posts
Car: '89 Firebird
Engine: 7.0L
Transmission: T56
Re: What ever happened to QwkTrip's car anyway?
Using the fuel pump relay in my new underhood electrical center has freed up the original fuel pump power wire (TAN/WHT wire at C100 G4). That's pretty convenient for me because I had run out of connections at C100 and now I can repurpose that wire for my "roll stop" brake control.
The fuel pump wire already runs across the tray by the driver seat, so I simply cut the wire and ran it across to the center console in the existing wire bundle. I will mount the micro switch in the center console and pull power from the cigarette lighter (or maybe some other unused circuit).

The fuel pump wire already runs across the tray by the driver seat, so I simply cut the wire and ran it across to the center console in the existing wire bundle. I will mount the micro switch in the center console and pull power from the cigarette lighter (or maybe some other unused circuit).
Last edited by QwkTrip; 03-13-2018 at 01:00 AM.
09-27-2015, 04:20 PM
#316
COTM Editor
Thread Starter
iTrader: (22)
Join Date: Mar 2001
Posts: 10,077
Likes: 0
Received 1,941 Likes
on
1,325 Posts
Car: '89 Firebird
Engine: 7.0L
Transmission: T56
Re: What ever happened to QwkTrip's car anyway?
I also had to reconnect the vacuum lines to my HVAC box. It has been many years since I pulled those lines off and I didn't think to document what colors went where. 
But.... I finally found a nice vacuum schematic that helped me a lot. I am sharing it in case it is useful for somebody else.


But.... I finally found a nice vacuum schematic that helped me a lot. I am sharing it in case it is useful for somebody else.
Last edited by QwkTrip; 03-13-2018 at 01:00 AM.
10-03-2015, 09:33 PM
#317
COTM Editor
Thread Starter
iTrader: (22)
Join Date: Mar 2001
Posts: 10,077
Likes: 0
Received 1,941 Likes
on
1,325 Posts
Car: '89 Firebird
Engine: 7.0L
Transmission: T56
Re: What ever happened to QwkTrip's car anyway?
I hit another milestone today.... I filled and bled the clutch hydraulics. I used a Mityvac type tool on the top end to pull air out of the system. This was a complete fill up with dry parts so I still had to pump the clutch and use the bleed valve a couple times. But that little Mityvac still made the job easier.
One downside to the scatter shield bellhousing is it collects all the brake fluid that comes out of the bleed valve. There was a large puddle of fluid inside the bellhousing that had to get out or the clutch would be ruined. I tried taking out the four bottom bolts to bellhousing but the joint didn't loosen at all. I finally got it out by stuffing shop towels through a hole in the bottom of the flywheel housing to soak up the fluid.
I am pretty much ready to put interior back together. I finished up the wire pass-thru at the rear bulkhead and sealed it up. This is passing a 10 ga. wire for fuel pump and the return ground that I grounded inside the car. I also tied into the stock fuel gauge sender wires.

And a view from the outside. Wires are inside a rubber boot that also passes through the plate and sealed inside and outside the car. The boot itself makes the drip loop. I bored out the holes where the old rivets were to fit 1/4" bolts. I didn't want to tighten the bolts too much for fear of bending the cover inside the car, so the bolts are set pretty snug and finished with Loctite.

I filled the transmission with Royal Purple Synchromax. I also made and installed a floor patch to cover the gap in front of the shifter boot. I re-used the stock screw locations for the patch panel but had to make new screw locations for the floor boot. Metal work is not my area of strength but this will do for now. The patch and the shifter boot are screwed down and sealed to the floor with gasket maker. That is an MGW shifter for those who are wondering.

I used a Mityvac type tool on the top end to pull air out of the system. This was a complete fill up with dry parts so I still had to pump the clutch and use the bleed valve a couple times. But that little Mityvac still made the job easier.One downside to the scatter shield bellhousing is it collects all the brake fluid that comes out of the bleed valve. There was a large puddle of fluid inside the bellhousing that had to get out or the clutch would be ruined. I tried taking out the four bottom bolts to bellhousing but the joint didn't loosen at all. I finally got it out by stuffing shop towels through a hole in the bottom of the flywheel housing to soak up the fluid.
I am pretty much ready to put interior back together. I finished up the wire pass-thru at the rear bulkhead and sealed it up. This is passing a 10 ga. wire for fuel pump and the return ground that I grounded inside the car. I also tied into the stock fuel gauge sender wires.
And a view from the outside. Wires are inside a rubber boot that also passes through the plate and sealed inside and outside the car. The boot itself makes the drip loop. I bored out the holes where the old rivets were to fit 1/4" bolts. I didn't want to tighten the bolts too much for fear of bending the cover inside the car, so the bolts are set pretty snug and finished with Loctite.
I filled the transmission with Royal Purple Synchromax. I also made and installed a floor patch to cover the gap in front of the shifter boot. I re-used the stock screw locations for the patch panel but had to make new screw locations for the floor boot. Metal work is not my area of strength but this will do for now. The patch and the shifter boot are screwed down and sealed to the floor with gasket maker. That is an MGW shifter for those who are wondering.
Last edited by QwkTrip; 03-13-2018 at 12:59 AM.
10-04-2015, 09:30 AM
#318
Re: What ever happened to QwkTrip's car anyway?
i'm surprised you don't have a remote bleeder. is the t56 magnum OK to use something thicker than ATF? i know that on a regular t56, the roller bearing tolerances are too small for the thicker fluids to provide proper lubrication, which is why they recommend ATF. i use amsoil atf in mine.
Last edited by mw66nova; 01-27-2016 at 05:35 AM.
10-04-2015, 11:23 AM
#319
COTM Editor
Thread Starter
iTrader: (22)
Join Date: Mar 2001
Posts: 10,077
Likes: 0
Received 1,941 Likes
on
1,325 Posts
Car: '89 Firebird
Engine: 7.0L
Transmission: T56
Re: What ever happened to QwkTrip's car anyway?
I have a well built T56 but it is not a Magnum. RPM Transmissions did the work on my tranny and told me to use Royal Purple Synchromax so I do what they say.
They also threw my remote bleeder in the garbage and told me to leave it there. Don't know why but they have some kind of dislike for it. I didn't care one way or the other but that was before I knew that not all the fluid can drain from the flywheel housing. There is a vent hole but it leaves a large puddle inside. I might drill a weep hole the next time I change hydraulic fluid. This is just a street car so it may be many years before that needs to happen.
They also threw my remote bleeder in the garbage and told me to leave it there. Don't know why but they have some kind of dislike for it. I didn't care one way or the other but that was before I knew that not all the fluid can drain from the flywheel housing. There is a vent hole but it leaves a large puddle inside. I might drill a weep hole the next time I change hydraulic fluid. This is just a street car so it may be many years before that needs to happen.
Last edited by QwkTrip; 10-04-2015 at 11:37 AM.
10-04-2015, 11:49 AM
#320
COTM Editor
Thread Starter
iTrader: (22)
Join Date: Mar 2001
Posts: 10,077
Likes: 0
Received 1,941 Likes
on
1,325 Posts
Car: '89 Firebird
Engine: 7.0L
Transmission: T56
Re: What ever happened to QwkTrip's car anyway?
Looks like the viscosity is very similar.
Dextron III
https://www.motul.com/system/product...pdf?1335541694
Synchromax
http://www.royalpurpleconsumer.com/w...Synchromax.pdf
Dextron III
https://www.motul.com/system/product...pdf?1335541694
Synchromax
http://www.royalpurpleconsumer.com/w...Synchromax.pdf
10-05-2015, 05:49 AM
#321
Re: What ever happened to QwkTrip's car anyway?
interesting...my contact at RPM said to use Amsoil ATF....and is what they have in the RPM built t56 that is in Ray Bulach's car (current GM t56 record holder with an 8.33 ET). My trans is built by Tick Performance, but I keep contacts everywhere...
10-05-2015, 08:00 AM
#322
COTM Editor
Thread Starter
iTrader: (22)
Join Date: Mar 2001
Posts: 10,077
Likes: 0
Received 1,941 Likes
on
1,325 Posts
Car: '89 Firebird
Engine: 7.0L
Transmission: T56
Re: What ever happened to QwkTrip's car anyway?
They wrote it on a tag with the tranny.
One thing to keep in mind is that Race vs Street can lead to different recommendations. The wear out mode is different. One is highly stressed for a few seconds at a time, with goal of lower parasitic losses. And the other favors long term durability over hours of continuous driving at different operating temp. I wouldn't use the engine oil that guy uses either. And I have no doubt that 8 second tranny doesn't use the same parts I have.
One thing to keep in mind is that Race vs Street can lead to different recommendations. The wear out mode is different. One is highly stressed for a few seconds at a time, with goal of lower parasitic losses. And the other favors long term durability over hours of continuous driving at different operating temp. I wouldn't use the engine oil that guy uses either. And I have no doubt that 8 second tranny doesn't use the same parts I have.
10-05-2015, 09:03 AM
#323
Re: What ever happened to QwkTrip's car anyway?
without knowing your transmission build by heart, i'm sure you're right. neither of us have synchro'd boxes, and i'm sure you do still have synchronizers, but all of the parts that the fluid really has an effect on, blocker rings, roller bearings, sliders, etc, are all GM parts on even the top tier builds by all the companies, so i don't really see why they would have you deviate from the factory recommendations of ATF anyway. i'm interested to see how it goes though
10-05-2015, 06:17 PM
#324
COTM Editor
Thread Starter
iTrader: (22)
Join Date: Mar 2001
Posts: 10,077
Likes: 0
Received 1,941 Likes
on
1,325 Posts
Car: '89 Firebird
Engine: 7.0L
Transmission: T56
10-05-2015, 09:28 PM
#325
COTM Editor
Thread Starter
iTrader: (22)
Join Date: Mar 2001
Posts: 10,077
Likes: 0
Received 1,941 Likes
on
1,325 Posts
Car: '89 Firebird
Engine: 7.0L
Transmission: T56
Re: What ever happened to QwkTrip's car anyway?
Tonight was air intake night.
I used a 4" Airaid U-Build-It kit (with air filter) as the building blocks for my air intake. There was more than enough tube to make 2 intakes so plenty of tube to work with. I used a compound miter saw to make clean, straight cuts. And a friend pointed me to http://intakehoses.com/ where I found inexpensive silicone couplers.
A PCV grommet was a perfect match to the wall thickness of the tube, and the IAT sensor fit nice and snug inside the grommet with the help of a little soap. I used a #3 unibit to make the hole in the tube for the grommet. It just so happens that the bit is the right size to drill all the way thru so I ended up with a uniform hole (no taper).

I chose to go to the passenger side. Seemed to be more room for the intake tube. A 4" tube takes up quite a bit of room! And the filter that came with the Airade kit is pretty darn big, but it did fit. I'm a little uncertain if the hood will close as-is but I can tilt the intake down if I shorten the tube a bit. No MAF sensor on my car because the Holley HP is speed density. The middle joint is just a straight coupler, and I have a bellows coupler at the throttle body. No reducers needed, everything is the same diameter all throughout. The tubes are butted up against each other inside the straight coupler and I could have a 1-piece intake if I just had some "plastic welding" skills.

I used a 4" Airaid U-Build-It kit (with air filter) as the building blocks for my air intake. There was more than enough tube to make 2 intakes so plenty of tube to work with. I used a compound miter saw to make clean, straight cuts. And a friend pointed me to http://intakehoses.com/ where I found inexpensive silicone couplers.
A PCV grommet was a perfect match to the wall thickness of the tube, and the IAT sensor fit nice and snug inside the grommet with the help of a little soap. I used a #3 unibit to make the hole in the tube for the grommet. It just so happens that the bit is the right size to drill all the way thru so I ended up with a uniform hole (no taper).
I chose to go to the passenger side. Seemed to be more room for the intake tube. A 4" tube takes up quite a bit of room! And the filter that came with the Airade kit is pretty darn big, but it did fit. I'm a little uncertain if the hood will close as-is but I can tilt the intake down if I shorten the tube a bit. No MAF sensor on my car because the Holley HP is speed density. The middle joint is just a straight coupler, and I have a bellows coupler at the throttle body. No reducers needed, everything is the same diameter all throughout. The tubes are butted up against each other inside the straight coupler and I could have a 1-piece intake if I just had some "plastic welding" skills.
Last edited by QwkTrip; 03-13-2018 at 12:59 AM.
10-06-2015, 11:21 PM
#326
COTM Editor
Thread Starter
iTrader: (22)
Join Date: Mar 2001
Posts: 10,077
Likes: 0
Received 1,941 Likes
on
1,325 Posts
Car: '89 Firebird
Engine: 7.0L
Transmission: T56
Re: What ever happened to QwkTrip's car anyway?
Props to "$750 L98" for making the thread about modifying the stock gauge for LS1 fuel sender.
https://www.thirdgen.org/forums/ltx-...auge-40-a.html
I am copying that method by swapping resistors in the back of the fuel gauge. This way I can use standard off the shelf service parts in the fuel tank without hacking anything. And frankly, resistors are much cheaper and easier than a Grand Prix fuel sender.
I saw that the stock resistors on fuel gauge have a 2W rating, while some people use 0.5W resistors for this modification with the LS1 fuel sender. Just had to check for myself you know... I calculated the power losses across each resistor with stock fuel sender and then again with the LS1 fuel sender. It seems to make sense that the stock resistors are 2W. It also seems to make sense that you can get away with 0.5W with the LS1 fuel sender because of the greater circuit resistance. 1W would be totally safe and I found a good selection at Allied Electronics.
The next thing I did was measure actual resistance through the range of motion for my fuel sender. It was 40 to 250 Ohm. Literally spot on with spec. With that in mind, if I change out the low side resistor to 43 Ohm then I should have a little reserve fuel when the fuel gauge reaches empty. And if I change out the high side to 250 Ohm then the tank should pretty much read full when full. So the plan is that I am changing resistors from stock values of 82 Ohm and 22 Ohm, to 250 Ohm and 43 Ohm.
Update: This method does not work. Fuel gage reads correct when FULL but is at 1/4 tank when EMPTY. Bottom line is the stock gage will not read empty unless it sees 0 Ohm from the fuel tank sender. See this thread for more information, https://www.thirdgen.org/forums/elec...ou-useful.html
And see Post #1475 and #1479 for easy install of 0-90 Ohm resistor card in a 4th gen fuel module, https://www.thirdgen.org/forums/ltx-...ml#post6390566

https://www.thirdgen.org/forums/ltx-...auge-40-a.html
I am copying that method by swapping resistors in the back of the fuel gauge. This way I can use standard off the shelf service parts in the fuel tank without hacking anything. And frankly, resistors are much cheaper and easier than a Grand Prix fuel sender.
I saw that the stock resistors on fuel gauge have a 2W rating, while some people use 0.5W resistors for this modification with the LS1 fuel sender. Just had to check for myself you know...
I calculated the power losses across each resistor with stock fuel sender and then again with the LS1 fuel sender. It seems to make sense that the stock resistors are 2W. It also seems to make sense that you can get away with 0.5W with the LS1 fuel sender because of the greater circuit resistance. 1W would be totally safe and I found a good selection at Allied Electronics.The next thing I did was measure actual resistance through the range of motion for my fuel sender. It was 40 to 250 Ohm. Literally spot on with spec. With that in mind, if I change out the low side resistor to 43 Ohm then I should have a little reserve fuel when the fuel gauge reaches empty. And if I change out the high side to 250 Ohm then the tank should pretty much read full when full. So the plan is that I am changing resistors from stock values of 82 Ohm and 22 Ohm, to 250 Ohm and 43 Ohm.
Update: This method does not work. Fuel gage reads correct when FULL but is at 1/4 tank when EMPTY. Bottom line is the stock gage will not read empty unless it sees 0 Ohm from the fuel tank sender. See this thread for more information, https://www.thirdgen.org/forums/elec...ou-useful.html
And see Post #1475 and #1479 for easy install of 0-90 Ohm resistor card in a 4th gen fuel module, https://www.thirdgen.org/forums/ltx-...ml#post6390566
Last edited by QwkTrip; 08-14-2021 at 08:00 PM.
10-07-2015, 12:08 AM
#327
COTM Editor
Thread Starter
iTrader: (22)
Join Date: Mar 2001
Posts: 10,077
Likes: 0
Received 1,941 Likes
on
1,325 Posts
Car: '89 Firebird
Engine: 7.0L
Transmission: T56
Re: What ever happened to QwkTrip's car anyway?
I guess I will share what I did with my stock V6 tachometer as well. Unlike Camaro gauges, the Firebird gauges look cool and are worth keeping.  Especially the V6 tach because it has a 6K redline and sweeps up to 8K rpm. I had a friend with a waveform generator. Everybody has one of those, you know.
  Anyway, he reverse engineered how the tach works and found that there are two resistors in the back of the tach that effects calibration. He used the waveform generator to simulate a V8 engine signal and played with resistors until the tach worked the way we want. So I guess what this boils down to is the way I fixed my tach is I handed it to somebody smarter than me.
Update: Tachometer works very well during normal driving but is inaccurate when racing. The tach is reading about 6400 rpm when the engine is at 7000 rpm. Not sure what is the issue, but I suspect it has to do with the RC constant of the circuit and there is no way the tach can run accurately at that high of rpm. I have since purchased Speedhut gages.
Especially the V6 tach because it has a 6K redline and sweeps up to 8K rpm. I had a friend with a waveform generator. Everybody has one of those, you know. Anyway, he reverse engineered how the tach works and found that there are two resistors in the back of the tach that effects calibration. He used the waveform generator to simulate a V8 engine signal and played with resistors until the tach worked the way we want. So I guess what this boils down to is the way I fixed my tach is I handed it to somebody smarter than me. Update: Tachometer works very well during normal driving but is inaccurate when racing. The tach is reading about 6400 rpm when the engine is at 7000 rpm. Not sure what is the issue, but I suspect it has to do with the RC constant of the circuit and there is no way the tach can run accurately at that high of rpm. I have since purchased Speedhut gages.
Last edited by QwkTrip; 05-22-2021 at 07:23 PM.
10-07-2015, 12:48 AM
#328
Member

Join Date: Sep 2004
Location: Bay Area California
Posts: 127
Likes: 0
Received 0 Likes
on
0 Posts
Car: '88 trans am GTA
Engine: 5.7L 355 TPI L98
Transmission: T5
Axle/Gears: eaton posi 3.73 gears
Re: What ever happened to QwkTrip's car anyway?
Do you need to mod the tach for a V8 tach?
Last edited by JayBoCC2; 10-07-2015 at 01:07 AM.
10-07-2015, 08:10 AM
#329
COTM Editor
Thread Starter
iTrader: (22)
Join Date: Mar 2001
Posts: 10,077
Likes: 0
Received 1,941 Likes
on
1,325 Posts
Car: '89 Firebird
Engine: 7.0L
Transmission: T56
Re: What ever happened to QwkTrip's car anyway?
Yes, the tachs are different. If I recall correctly, the LS1 ECM can drive either tach with a setting in software. Other type of engine controllers may not have such a feature. I did this mod years ago when I had an HEI distributor with a small block so it carried forward to today. But my mod was more than just conditioning it for a V8, it also improved accuracy.
10-10-2015, 03:55 PM
#330
COTM Editor
Thread Starter
iTrader: (22)
Join Date: Mar 2001
Posts: 10,077
Likes: 0
Received 1,941 Likes
on
1,325 Posts
Car: '89 Firebird
Engine: 7.0L
Transmission: T56
Re: What ever happened to QwkTrip's car anyway?
The reverse gear lockout solenoid is normally driven by engine PCM and opens the shift gate at 5 mph and under. Holley HP can't handle transmission tasks and it can't understand the T56 speed signal either. It can however understand a Hall effect speed sensor....
... and that's where my next idea comes in. The SGI-5 has multiple OC square wave outputs and I'm wondering if I can use one of those to fool the Holley HP into thinking it is looking at a Hall effect sensor. If so, I can have a speed based lockout control. Still exploring the idea.
... and that's where my next idea comes in. The SGI-5 has multiple OC square wave outputs and I'm wondering if I can use one of those to fool the Holley HP into thinking it is looking at a Hall effect sensor. If so, I can have a speed based lockout control. Still exploring the idea.
Update: I also made it work for myself. Software settings are described in Post #353
And I ended up setting all four dip switches to ON position to get the stock speedometer to work properly.

Last edited by QwkTrip; 09-18-2024 at 04:48 PM.
10-10-2015, 04:15 PM
#331
COTM Editor
Thread Starter
iTrader: (22)
Join Date: Mar 2001
Posts: 10,077
Likes: 0
Received 1,941 Likes
on
1,325 Posts
Car: '89 Firebird
Engine: 7.0L
Transmission: T56
Re: What ever happened to QwkTrip's car anyway?
I also had to redo the ECM mounting. I had modified the stock ECM bracket to accept the Holley HP ECM without any special brackets. It looked really nice, but once in the car I found that the wiring has going to interfere with a bracket on the dash, and it was a bit of a long reach for the harness. I turned the ECM 90 degrees and made some aluminum bars to hold it to the stock ECM bracket. Everything fits nicely and all the wiring points down for easy access when I want to plug in a laptop or whatever.
ECM attaches to two aluminum bars, and then those bars are bolted to another set of bars that sandwich the stock plastic bracket in the middle. It also helps support the stock bracket so it doesn't sag under the weight. The Holley ECM is quite heavy! The blue tape is simply covering the sticky residue after removing the original foam pad. Note: Some prep work was done to the bracket prior in Post #215, https://www.thirdgen.org/forums/ltx-...ml#post5833858


ECM attaches to two aluminum bars, and then those bars are bolted to another set of bars that sandwich the stock plastic bracket in the middle. It also helps support the stock bracket so it doesn't sag under the weight. The Holley ECM is quite heavy! The blue tape is simply covering the sticky residue after removing the original foam pad. Note: Some prep work was done to the bracket prior in Post #215, https://www.thirdgen.org/forums/ltx-...ml#post5833858
Last edited by QwkTrip; 04-30-2020 at 06:36 PM.
10-11-2015, 11:48 PM
#332
COTM Editor
Thread Starter
iTrader: (22)
Join Date: Mar 2001
Posts: 10,077
Likes: 0
Received 1,941 Likes
on
1,325 Posts
Car: '89 Firebird
Engine: 7.0L
Transmission: T56
Re: What ever happened to QwkTrip's car anyway?
This has been a looooong time coming. Things are starting to come together bit by bit.

Last edited by QwkTrip; 03-13-2018 at 12:58 AM.
10-12-2015, 09:33 AM
#334
Member
iTrader: (2)
Join Date: Feb 2003
Location: ME
Posts: 219
Likes: 0
Received 0 Likes
on
0 Posts
Car: 1986 IROC-Z
Engine: LS1-ish
Transmission: T56 stage II
Axle/Gears: S60 4:10's
Re: What ever happened to QwkTrip's car anyway?
Well damn I don't get on here very often anymore and it seems like it has been forever since I checked out your build. Nice job man it's coming out awesome!
Oh and love the air intake. I just built mine a couple months ago with that same exact kit. Good stuff! The difference is mine on the drivers side and has an extra hole for a nozzle...")
Oh and love the air intake. I just built mine a couple months ago with that same exact kit. Good stuff! The difference is mine on the drivers side and has an extra hole for a nozzle...
10-12-2015, 11:53 AM
#335
COTM Editor
Thread Starter
iTrader: (22)
Join Date: Mar 2001
Posts: 10,077
Likes: 0
Received 1,941 Likes
on
1,325 Posts
Car: '89 Firebird
Engine: 7.0L
Transmission: T56
Re: What ever happened to QwkTrip's car anyway?
Thanks, guys.
Coptzer, what is the "nozzle" business.... what you got cooking now?
Coptzer, what is the "nozzle" business.... what you got cooking now?
10-13-2015, 08:28 PM
#336
COTM Editor
Thread Starter
iTrader: (22)
Join Date: Mar 2001
Posts: 10,077
Likes: 0
Received 1,941 Likes
on
1,325 Posts
Car: '89 Firebird
Engine: 7.0L
Transmission: T56
Re: What ever happened to QwkTrip's car anyway?
I started to wonder what coolant to use for my engine. I am beginning with a bone dry system so I can do anything I want. I know GM uses DexCool in the LS engine. Ford has their "specialty" green and orange coolant. A friend told me Toyota has awesome long-life coolant. And a local radiator shop told me to use old fashioned green coolant but couldn't explain why.
I have a mix of aluminum water pump and heads, iron block, and copper-brass heater core and radiator. From what I can tell, the radiator shop was right.... I need to use conventional American "green" coolant. Anything else will cause me problems.
Here is an article I found that was a good read.
http://www.motor.com/article.asp?article_ID=816
I am copying it into the next post because I exceeded the word limit for this post.
10-13-2015, 08:29 PM
#337
COTM Editor
Thread Starter
iTrader: (22)
Join Date: Mar 2001
Posts: 10,077
Likes: 0
Received 1,941 Likes
on
1,325 Posts
Car: '89 Firebird
Engine: 7.0L
Transmission: T56
Re: What ever happened to QwkTrip's car anyway?
Article Part 1:
Lift the hood of a new Ford vehicle and you're likely to see a yellow coolant in the overflow jug and an interesting label on it. In pictorial language it says "Do not use orange coolant; yellow coolant is okay."
Sounds pretty straightforward, right? It isn't. Lift the hood of another Ford product (in this case, a Taurus with the pushrod V6) and you'll see that same label, but the jug contains orange coolant. Wait a minute. Something clearly is very wrong. It cautions "don't use orange," but the factory-installed coolant is orange.
Lift the hood of a Chrysler product and you'll see orange coolant in the jug and a "special engine coolant only" warning on the cap. Isn't DexCool the special coolant, and isn't it orange? Yes to both questions, but Chrysler Group says don't use DexCool in its products. It's confusing, to say the least.
The basic answers to what coolant to use where, and when, are pretty simple, but when you go past that, you're getting into some pretty complex territory. And you have to know what coolant you're dealing with to be sure you're doing no harm.
Longtime Motor readers know that the color of the coolant dye really is meaningless. Dye should help you spot a leak, but that's about it. But with these seemingly contradictory warning labels, you really need a basic understanding of what's been happening with coolant formulations and colorings.
You may remember that about 93% of most coolant is ethylene glycol, another few percentage points are water and/or a solvent to keep rust/corrosion inhibitors in solution and the remainder are those inhibitors. The inhibitors make a huge difference, and they're what all the arguments are about.
Didn't we talk about all these coolants last year? You bet, and we'll probably be talking about them for years to come. Since last year, however, Honda and Toyota have moved strongly into extended-life organic acid technology (OAT) coolants. Yes, DexCools also are OATs, but these Japanese formulas are not DexCool, and the two car companies have indicated they absolutely, positively don't want DexCool-type coolants used in their vehicles.
Nevertheless, you have to pick something to install, and to top up with, and we've learned that the systems are not necessarily forgiving of some mixtures of different coolants. There are circumstances where an unfavorable mixture can cause an increase in corrosion.
Taking these issues a step further, this year we've seen more cases that contribute to coolant confusion. These days, it's all too easy to make a mistake.
You have to appreciate a bit of chemistry about the various formulas. You've got to know in basic terms what's different about the different coolants-both conventional and extended-life types-and what it means when you have to pick one. Yes, that includes a bit about the dye colors.
What's In DexCool?
You should know that the term "orange coolant" has come to mean a DexCool-approved brand but that doesn't mean it's really true. If you make this assumption, you'd be wrong. It's what Ford's warning labels could be interpreted to refer to, so that label doesn't serve to clarify things (certainly not when a Ford system contains a very different-non-DexCool, but orange-dyed-coolant). The discontinued Mercury Cougar was an exception; it did contain an orange coolant similar to DexCool.
The "DexCool" designation means the coolant passes General Motors performance testing. Although DexCool is not a specific formula, all three brands that have the label (Texaco Havoline, Prestone Extended Life and Zerex Extended Life) are somewhat similar. In particular, they're OAT coolants, but the similarities go beyond that basic description.
All DexCool-approved coolants to date use two organic acid rust/corrosion inhibitors, one called sebacate, the other called 2-EHA (which stands for 2-ethylhexanoic acid). These organic acids are very stable and last a long time, although they take thousands of miles to become fully effective in protecting coolant passages.
GM recommends a DexCool change every five years or 150,000 miles, whichever comes first. Because most people drive 15,000 to 20,000 miles a year, that translates to a five-year replacement interval. As noted, the thousands of miles required to protect metal is an important trade-off for that longer life. Although like conventional coolants, OATs also contain other inhibitors, for targeted protection.
The inhibitor 2-EHA works well in hard water and is more effective than sebacate at lower pH levels (when the coolant moves from the alkaline end toward the acid side), particularly for cast iron. Well, GM has a number of cast-iron engines. When there's a low coolant level in the coolant passages, the exposed cast iron rusts. Apparently, that rust is washed away later by flowing coolant, and is deposited in the heat exchangers. It eventually produces the rust powder problems that have been so widely observed (see Motor's August 2002 issue at www.motor.com). Why does the coolant level in these engines drop? The original radiator cap design was blamed for some of the issue, but there probably are a number of causes, including owner neglect and normal seepage. However, the rust powder issue is not a problem that was observed with the previously used conventional American coolant.
The inhibitor 2-EHA poses another issue: It's a plasticizer (softens plastic), so it has been blamed for coolant passage gasket leakage. Softening (and the resulting distortion) was reported by Ford, which encountered gasket leakage problems when it tested a DexCool-type formula on its V8 engines. Ford also saw similar issues with other gasket materials. That killed the OAT coolant idea for Ford, which had used a DexCool-like coolant in the '99 Cougar V6.
Could that inhibitor be responsible for the intake manifold coolant gasket leakage on GM 60� V6 engines? Or is there some other service issue involved? (After all, GM isn't the only one with coolant gasket leakage problems.) The experts are still working on it.
What Preceded OATs
Until the extended-life OATs came on the scene, there had been primarily two major coolant inhibitors for aluminum protection-silicates and phosphates-and conventional American coolants have used formulas containing both of them. Silicates are related to sand, and there were questions as to their effect on water pump seals. Some old tests seemed to suggest they were harmful, but there has been no credible evidence to support that stance on late-model designs with reputable brands of coolant. In fact, today's carbide seals are about as durable as you can get, and silicates that remain in solution seem to produce no problem anywhere. In real-world evaluations, there's no evidence of any issue, as silicate inhibitors have been used successfully for many decades in all makes of cars. Where a seal-deterioration issue surfaces, it has been attributed to core sand, from failure to clean engine blocks properly.
Silicates protect very quickly, so if there's some mechanical breakdown in the silicate protection, it re-forms very rapidly. For example, a water pump may suffer cavitation erosion/corrosion (a high coolant/ambient temperatures issue, particularly with certain cooling system designs). That means that as the coolant passes through the pump, bubbles are produced, which then collapse with explosive force, pockmarking the internal parts of the pump. That pockmarking is erosion, the marks being exposed, unprotected metal. If the inhibitors work quickly, the damage stops after minor corrosion. If they work slowly (as with organic acid inhibitors), the pockmarked areas corrode for a longer period.
American conventional green coolants use doses of both silicates and phosphates. Phosphates also protect aluminum quickly, but have raised concerns in hard water. OAT coolants contain no silicates and no phosphates.
European coolants also contain no phosphates, but do contain silicates (at a somewhat lower dose than conventional American coolant) plus other inhibitors. These have been used for a long time, and although they're conventional formulas, there are enhanced versions today, as covered in the section on "Other Extended-Life Coolants."
Japanese conventional coolants contain no silicates, but they do contain phosphates for fast-acting protection, plus other inhibitors. Extensive Japanese tests have shown phosphates to be a good corrosion inhibitor for aluminum, and particularly effective in protecting water pumps from corrosion after cavitation erosion/corrosion.
The questions about 2-EHA were raised not only by Ford (and reportedly DaimlerChrysler) but within Japanese coolant development circles, as well. When Honda introduced its long-life coolant, it specifically excluded 2-EHA, and we can tell you there is unhappiness at Honda regarding DexCool in the new Saturn VUE with the Honda-supplied 3.5L V6. The system is being filled with DexCool because that's what's in the plant for everything else. It would not be simple to set up a separate coolant fill system for the Honda engine.
We can't tell you how this dispute is going to play out, but you do have to make a choice when it's time to change. The engine already has been protected with DexCool (unless there's an assembly line change in the works) and it's reasonable to install that when you service that engine. However, to extend gasket life and protect the water pump impeller and chamber, it wouldn't be a terrible idea to flush the system and switch to a coolant with phosphates and/or silicates (conventional American or G-05) at this point.
10-13-2015, 08:30 PM
#338
COTM Editor
Thread Starter
iTrader: (22)
Join Date: Mar 2001
Posts: 10,077
Likes: 0
Received 1,941 Likes
on
1,325 Posts
Car: '89 Firebird
Engine: 7.0L
Transmission: T56
Re: What ever happened to QwkTrip's car anyway?
Article Part II:
Other Extended-Life Coolants
Ford and Chrysler Group use G-05, a low-silicate, no-phosphate formula long specified by Mercedes, even for its passenger car diesels. Once a similar formula even was made by Texaco for Saturn, with green dye and carrying a 3/36 service interval. Today, the Ford and aftermarket versions have yellow dye-or at least they're supposed to. And the Chrysler Group formula has been dyed orange. Now that we've seen Ford products with orange, it's possible that some of the stuff meant for Chrysler also is being shipped to Ford. Or perhaps it's the DexCool-like coolant used in the old Cougar, although that's doubtful. It's confusing, particularly when you see a "don't use orange" label on the coolant jug and there's orange coolant in the jug.
What is G-05? It's called a HOAT (for hybrid organic acid technology) that today serves for extended intervals, typically 5 years/100,000 miles. Like conventional Euro coolants, it's a low-silicate, no-phosphate formula designed to pass European hard water tests. The reference to OAT in HOAT is for an organic acid inhibitor called benzoate, which actually has been used for many years in almost every American, Japanese and European conventional coolant except what we now call OAT.
Honda and Toyota use a new extended-life OAT coolant-made with sebacate as the only organic acid-no 2-EHA. Sebacate isn't quite as effective in combating corrosion at lower pH levels, but because that's more of a cast-iron issue, it apparently didn't concern the Japanese. Both Honda and Toyota do continue to avoid silicates, but add a dose of phosphates to provide fast-acting aluminum protection, particularly to recoat the water pump after cavitation erosion/corrosion.
What to Use
We used to say that maintaining the coolant level was more important than which type of coolant to use. But there's new evidence that we've been too cavalier in that respect. Sure, for small top-ups or in an emergency situation, it doesn't matter-use what you have. However, there are possible problems with extreme mixtures. An example cited by one coolant chemist: A somewhat diluted mix, perhaps 50% to 60% water, with the remainder (from top-ups) a 50-50 combination of an OAT and a conventional American coolant or a G-05. A remaining inhibitor (borate) could attack aluminum if the silicates are depleted. This becomes more of an issue when a part is being changed, and that new part has no protection against cavitation erosion/corrosion.
Top up with DexCool in GM and VW/Audi vehicles, and '98 Chrysler L/H cars or the '99 Mercury Cougar, if you get one with the original coolant or DexCool. Top up everything else with your second coolant-G-05 or conventional American.
Replacement Parts
Original equipment coolants are validated for factory replacement parts. One of the issues that may arise is the use of an aftermarket replacement radiator or heater core made of copper-brass with lead solder. We have in previous articles pointed out that today's coolant inhibitor packages contain a small amount of copper-brass protection, but may provide little protection if a radiator is made with high-lead solder. Results of industry standard tests of the new Toyota extended-life coolant now show a substantial weight loss (corrosion), both in a 50-50 mix and in a 33% coolant mixture (solder corrosion is much greater in this more diluted solution).
If you have to change a radiator or heater core, use aluminum. Or, if it's an older car and the owner wants the lowest-cost radiator, you might procure a soldered-together copper-brass unit. Conventional American coolant should provide better protection against solder corrosion, which can result in radiator tube restrictions and leaks. But no coolant provides perfect protection.
If you're replacing aluminum parts on an engine, such as a water pump or even a new cylinder head, remember that part's coolant passages have not been protected. In those cases you should perform a complete coolant exchange.
Complete Coolant Service Choices
Chances are you'll standardize on two coolants to cover most situations. One will be a DexCool formula; the other could be a G-05 extended-life or a conventional American (green or gold). A better approach would be to have all three coolants. When it comes to what to use and when, here are recommended or suggested strategies:
GM and VW/Audi vehicles. For these applications, use DexCool because that's in accordance with factory coolant formula recommendations. Sure, the vehicle probably will be out of warranty by the time you get it and have to make a decision. But the OE recommendation is the safe way to go, and because you can easily obtain a DexCool, it's a no-brainer.
Ford and Chrysler vehicles. Here again, it's a no-brainer. Both companies have identified problems with DexCool, so use something else. G-05 is available in the aftermarket, so that's your choice for extended life on vehicles from those makers. However, if your second coolant is conventional American, that's fine. The recommended service interval is shorter, but if the coolant level is maintained and the motorist is not a high-mileage driver, it can serve beyond two years. In fact, Ford long recommended four-year intervals with conventional American coolant.
Japanese vehicles. This is a problem area, because Japanese-spec coolants have never been sold in the U.S. aftermarket and history says conventional American coolants work well in these vehicles. Toyota research indicates the new extended-life coolant contains phosphates to protect the water pump, and DexCool contains no phosphate. Honda has said it will not use a coolant with 2-EHA. So both carmakers exclude DexCool. Best solution with aftermarket coolants: Do a complete coolant exchange, and replace the Japanese OE coolant-conventional or extended-life -with conventional American or G-05.
Coolant Exchange
Never before has the capability to do a complete coolant exchange been more important. Even if you're changing a DexCool system and putting in new DexCool, you want to get the system full, really full. A low coolant level is bad news, particularly with cast-iron engines. Even if the engine is aluminum, a low coolant level could mean engine-damaging temperatures and surely cause poor heater performance in winter. With today's smaller coolant capacities, the system doesn't have to be low by much for problems to surface.
If you're making a change in coolant type, such as any Japanese coolant to American green or G-05, you should get at least 90% of the old stuff out. The only way to do this and ensure a full system when you're done is with coolant exchange equipment.
A complete coolant exchange can be done manually, if you have a lot of time and infinite patience, plus a willingness to lose money on the job. In addition to the coolant exchangers already on the market, we've been seeing new ones designed to handle two or more coolants. They're a recognition of the many different coolants currently in use.
Whatever the coolant, remember the other half of the mixture is water. In hard water areas, always use de-mineralized water. Some coolant formulas are more tolerant of hard water than others, but that doesn't mean it's good for them.
10-14-2015, 11:22 PM
#339
COTM Editor
Thread Starter
iTrader: (22)
Join Date: Mar 2001
Posts: 10,077
Likes: 0
Received 1,941 Likes
on
1,325 Posts
Car: '89 Firebird
Engine: 7.0L
Transmission: T56
Re: What ever happened to QwkTrip's car anyway?
One thing that I am still wrestling with is the trans crossmember. I have a rare Skulte double hump crossmember that I bought used but it just isn't working with my car. I needed to know if it was my car or the part, so I ordered a Hawks crossmember to test fit. And then within an hour I turned around and ordered a new Holley crossmember with integrated torque arm. So I have a few extra parts now. But at least I was able to finally sell my old Spohn crossmember! (That took only 5 years to sell.)
Here is my original problem. The Skulte just won't fit between the rails. It is wedged in as far back as it will go which is making it cockeyed. The 4 bolt holes line up just fine and there is still room left in the slots for adjustment. Problem is the crossmember just won't physically fit between the rails to move it back. The boxed sections don't lend well to bending and I didn't want to cut it up.


At this point I didn't know if it was the crossmember or the car so I tried a Hawks double hump crossmember. Definitely closer to fitting but still can't get the bolt lined up at the trans mount. Again, I had to wedge it in hard to get it that far back and it just won't move another millimeter without some kind of surgery. But at least it is straight in-line with the trans mount so it is an easy fix by slotting the bushing plate at the transmission. I also had to wrestle to get all 4 bolts started and the thing has a lot of stress on it after tightening the bolts.


Holley crossmember isn't delivered yet so that fitup is yet to come. But I'm 0-2 now so I am suspecting that my car is just a bit funky. That makes me worried that I will really struggle with the Holley piece and that is the piece I really want to use. But it may be a little easier because it appears that maybe it doesn't hug the inside of the rails so tightly which would improve my situation. We'll see pretty soon. If I have to cut things up then I didn't improve my situation buying all this stuff. But hey.... you've got to try or you'll never know.
So I have a few extra parts now. But at least I was able to finally sell my old Spohn crossmember! (That took only 5 years to sell.)Here is my original problem. The Skulte just won't fit between the rails. It is wedged in as far back as it will go which is making it cockeyed. The 4 bolt holes line up just fine and there is still room left in the slots for adjustment. Problem is the crossmember just won't physically fit between the rails to move it back. The boxed sections don't lend well to bending and I didn't want to cut it up.
At this point I didn't know if it was the crossmember or the car so I tried a Hawks double hump crossmember. Definitely closer to fitting but still can't get the bolt lined up at the trans mount. Again, I had to wedge it in hard to get it that far back and it just won't move another millimeter without some kind of surgery. But at least it is straight in-line with the trans mount so it is an easy fix by slotting the bushing plate at the transmission. I also had to wrestle to get all 4 bolts started and the thing has a lot of stress on it after tightening the bolts.
Holley crossmember isn't delivered yet so that fitup is yet to come. But I'm 0-2 now so I am suspecting that my car is just a bit funky. That makes me worried that I will really struggle with the Holley piece and that is the piece I really want to use. But it may be a little easier because it appears that maybe it doesn't hug the inside of the rails so tightly which would improve my situation. We'll see pretty soon. If I have to cut things up then I didn't improve my situation buying all this stuff. But hey.... you've got to try or you'll never know.
Last edited by QwkTrip; 03-13-2018 at 12:58 AM.
10-18-2015, 06:15 PM
#340
COTM Editor
Thread Starter
iTrader: (22)
Join Date: Mar 2001
Posts: 10,077
Likes: 0
Received 1,941 Likes
on
1,325 Posts
Car: '89 Firebird
Engine: 7.0L
Transmission: T56
Re: What ever happened to QwkTrip's car anyway?
Still putting the interior back together. It takes longer than you think!
I have 4th gen T/A seats so I installed 4th gen front seat belts as well, both for the color match and for eliminating the double inertia catch. Just a safer setup with the 4th gen belt. I ended up keeping the 3rd gen rear belts though. The 4th gen spool assembly stood too high to fit under the interior cover in the rear. I didn't want to start cutting up that interior cover so decided to let it be. I doubt I will ever notice the color mismatch in the rear.
The front belts bolt to the roof no problem. The piece to floor pan installs different than stock though. You have to remove the stock bracket for the 3rd gen belt and re-use the original mounting point for that bracket. And you have to keep the stock 3rd gen belt pieces on inside of the seats (next to console) because the 4th gen style are not oriented correctly for retrofit.

Removing the stock bracket for lower mount. The correct tool is a TP45 Torx Plus bit. Using a normal torx bit may result in the bolt head stripping.

Then the plastic has to be trimmed off the bottom in order to clear the floor pan.

4th gen belt installed and bolt torqued to 31 lb-ft.

I want to use the 3rd gen headliner trim piece so I used a dremel cut-off wheel to make a small slit in the trim so I could remove the 4th gen piece and install the 3rd gen piece. I'm still working on how to get the 3rd gen trim piece to stay put. Might just end up using velcro to the headliner.

And things are continuing to come together!

I have 4th gen T/A seats so I installed 4th gen front seat belts as well, both for the color match and for eliminating the double inertia catch. Just a safer setup with the 4th gen belt. I ended up keeping the 3rd gen rear belts though. The 4th gen spool assembly stood too high to fit under the interior cover in the rear. I didn't want to start cutting up that interior cover so decided to let it be. I doubt I will ever notice the color mismatch in the rear.
The front belts bolt to the roof no problem. The piece to floor pan installs different than stock though. You have to remove the stock bracket for the 3rd gen belt and re-use the original mounting point for that bracket. And you have to keep the stock 3rd gen belt pieces on inside of the seats (next to console) because the 4th gen style are not oriented correctly for retrofit.
Removing the stock bracket for lower mount. The correct tool is a TP45 Torx Plus bit. Using a normal torx bit may result in the bolt head stripping.
Then the plastic has to be trimmed off the bottom in order to clear the floor pan.
4th gen belt installed and bolt torqued to 31 lb-ft.
I want to use the 3rd gen headliner trim piece so I used a dremel cut-off wheel to make a small slit in the trim so I could remove the 4th gen piece and install the 3rd gen piece. I'm still working on how to get the 3rd gen trim piece to stay put. Might just end up using velcro to the headliner.
And things are continuing to come together!
Last edited by QwkTrip; 09-08-2019 at 12:05 AM.
10-18-2015, 06:55 PM
#341
Member
iTrader: (2)
Join Date: Feb 2003
Location: ME
Posts: 219
Likes: 0
Received 0 Likes
on
0 Posts
Car: 1986 IROC-Z
Engine: LS1-ish
Transmission: T56 stage II
Axle/Gears: S60 4:10's
Re: What ever happened to QwkTrip's car anyway?
By the way, your interior looks awesome. I might have to look into 4th gen seat belts, I never and thought of them as a candidate. I have two sets of 3rd gen belts and neither of them work too well. Good job man.
01-26-2016, 08:02 PM
#342
COTM Editor
Thread Starter
iTrader: (22)
Join Date: Mar 2001
Posts: 10,077
Likes: 0
Received 1,941 Likes
on
1,325 Posts
Car: '89 Firebird
Engine: 7.0L
Transmission: T56
Re: What ever happened to QwkTrip's car anyway?
Third strike out on trans crossmember. I got my long awaited Hooker crossmember with remote torque arm mount. I took a chance knowing that the design is specific to using Hooker engine mounts that move the engine further forward. My luck ran out tonight when I did a fit up.
The Hooker crossmember runs in to the back of the transmission without a chance of getting bolts to line up on car subframe. Even if I fix that, the torque arm mount will run into the reverse lockout solenoid, so that's a no go. It's too bad because this crossmember is really stout!
I've gone through 3 crossmembers so it is time to make a decision which one will be reworked and get on with this show.
01-26-2016, 10:30 PM
#343
COTM Editor
Thread Starter
iTrader: (22)
Join Date: Mar 2001
Posts: 10,077
Likes: 0
Received 1,941 Likes
on
1,325 Posts
Car: '89 Firebird
Engine: 7.0L
Transmission: T56
Re: What ever happened to QwkTrip's car anyway?
Next, I put up the exhaust (Hawks LS7 kit) to check clearance to the Hooker crossmember. The Y-pipe clears everywhere except the rear corners of the trans mount. The Hooker crossmember could be made to work if I notched the front for trans clearance, slotted the holes for the trans bolts, reshaped the back corners for Y-pipe, and never use the top mounting position of torque arm bracket (use the bottom 2 locations). Basically, remove all the material in red shaded areas. Probably several hundred dollars of work by a fab shop.
If I'm going to sink money in fab work then I think it makes more sense to put that money in to welding up the supports for the mid-length torque arm that I have on hand. I can use the Hawks crossmember with that, which is easy for me to make fit at home.


If I'm going to sink money in fab work then I think it makes more sense to put that money in to welding up the supports for the mid-length torque arm that I have on hand. I can use the Hawks crossmember with that, which is easy for me to make fit at home.
Last edited by QwkTrip; 03-13-2018 at 12:57 AM.
01-27-2016, 08:18 AM
#345
COTM Editor
Thread Starter
iTrader: (22)
Join Date: Mar 2001
Posts: 10,077
Likes: 0
Received 1,941 Likes
on
1,325 Posts
Car: '89 Firebird
Engine: 7.0L
Transmission: T56
Re: What ever happened to QwkTrip's car anyway?
I lack the skill set for metal fab.
I tried all last year to get in to Midwest Chassis but they have proven impossible to work with. They won't make appointments and the best I can tell is they only work on the buddy system and I'm not inside their circle.
I found another place over Christmas break. It is another one of those secret society things but I think I can get in. Problem is I don't think they are equipped to align chassis components. This is why I have been searching for bolt-on solution. But you're right, it's probably time I find somebody to do this work and remove the roadblock. Regardless, my car isn't moving until May because I'm not getting an ounce of road salt on that thing.
01-27-2016, 03:15 PM
#346
Senior Member

Re: What ever happened to QwkTrip's car anyway?
You're hitting the same issue I had with the Hawks crossmember. Despite BMR saying their K member leaves everything in the stock location, nothing seems to fit right behind it. With the 4L60E in the car, I had to use an aftermarket dipstick because the factory one would not physically fit between the engine and firewall and I had to lengthen the hole on the trans crossmember toward the rear of the car to line up the trans mount bolt hole.
After installing the T56, I had to lengthen the holes in the transmission mount so I could slide it back and slightly lengthen the hole in the Hawks crossmember toward the rear of the car to get it to line up.
My biggest complaint with the Hawks unit is that it doesn't clear the fuel and brake lines in their stock location. There are other options for relocating the torque arm but they should have engineered it around those lines better.
01-27-2016, 07:05 PM
#347
COTM Editor
Thread Starter
iTrader: (22)
Join Date: Mar 2001
Posts: 10,077
Likes: 0
Received 1,941 Likes
on
1,325 Posts
Car: '89 Firebird
Engine: 7.0L
Transmission: T56
Re: What ever happened to QwkTrip's car anyway?
Good to know. Thanks.
When you've had a car as long as I have (24 years) you learn to hoard certain parts because you may not be able to get them in the future. I have two of those Hawks LS7 Y-pipes, one for auto and one for manual. I tried the auto Y-pipe tonight and it clears the passenger side. One of my options is to give that Y-pipe to a shop and have them cut it up until the driver side clears.
When you've had a car as long as I have (24 years) you learn to hoard certain parts because you may not be able to get them in the future. I have two of those Hawks LS7 Y-pipes, one for auto and one for manual. I tried the auto Y-pipe tonight and it clears the passenger side. One of my options is to give that Y-pipe to a shop and have them cut it up until the driver side clears.
01-28-2016, 05:37 AM
#348
Re: What ever happened to QwkTrip's car anyway?
i don't like hawks in general and try to avoid doing business with them, but i've built a LOT of exhaust systems on these cars, and those relocated fuel lines are to give extra space for the exhaust, that's the whole purpose for that hump there. i guess hawks figures that if you can do a t56 swap, ls1 swap, etc, that you can handle moving the lines up a few inches to give you some extra room. i hear this complaint a lot about that crossmember, and it always makes me laugh. moving those lines takes 20 mins max.
01-28-2016, 09:05 AM
#349
Senior Member
Re: What ever happened to QwkTrip's car anyway?
i don't like hawks in general and try to avoid doing business with them, but i've built a LOT of exhaust systems on these cars, and those relocated fuel lines are to give extra space for the exhaust, that's the whole purpose for that hump there. i guess hawks figures that if you can do a t56 swap, ls1 swap, etc, that you can handle moving the lines up a few inches to give you some extra room. i hear this complaint a lot about that crossmember, and it always makes me laugh. moving those lines takes 20 mins max.
01-28-2016, 10:26 AM
#350
Re: What ever happened to QwkTrip's car anyway?
i can't help you with the no instructions part. i get some stuff with instructions that are useless, some stuff with zero instruction. i build steering shafts from astro van shafts on the side, and include instructions for the modifications necessary to the car side of things for when you get it, but not everyone thinks having instructions are necessary. their mindset is "if they have to be instructed, they probably shouldn't be doing this task anyway". it's just the way people are.