
What ever happened to QwkTrip's car anyway?
 09-05-2014, 11:02 PM
#151
Re: What ever happened to QwkTrip's car anyway?
lol. it's the resistor i have inline to my alternator on my swap....been this way for 4 years now. i did the math at one point and came up with an acceptable voltage drop. it's midnight, i'm not gonna hammer out the math right now. use the info or don't.
 09-06-2014, 01:01 AM
#152
COTM Editor

Thread Starter
iTrader: (22)
Join Date: Mar 2001
Posts: 10,077
Likes: 0
Received 1,941 Likes
on
1,325 Posts
Car: '89 Firebird
Engine: 7.0L
Transmission: T56
Re: What ever happened to QwkTrip's car anyway?
Call me lucky, I just happen to know the people that design the stuff. It will benefit the forum community if I use my unique resources and share what I learn. At least I know somebody will eventually appreciate it.
09-06-2014, 07:50 AM
#153
Senior Member
iTrader: (5)

Join Date: Jan 2009
Location: Golden, CO
Posts: 887
Likes: 0
Received 11 Likes
on
9 Posts
Car: 87 IROC
Engine: L31 350
Transmission: T56
Axle/Gears: 4.10 D44
Re: What ever happened to QwkTrip's car anyway?
[*]Transmission harness sub-assembly. HP EFI can't do anything with transmission so trans will have to be standalone. Bought a Dakota Digital SGI-5 to run my speedometer. Still thinking about a good way to keep the reverse lockout solenoid. I can use brake switch but it doesn't seem terribly robust method.
At least, that's my plan for my T56 swap.
09-06-2014, 07:51 AM
#154
Supreme Member
iTrader: (8)
Join Date: Oct 2001
Location: Il
Posts: 11,901
Received 913 Likes
on
600 Posts
Car: 1989-92 FORMULA350 305 92 Hawkclone
Engine: 4++,350 & 305 CIs
Transmission: 700R4 4800 vig 18th700R4 t56 ZF6 T5
Axle/Gears: 3.70 9"ford alum chunk,dana44,9bolt
Re: What ever happened to QwkTrip's car anyway?
I made that brake diagram so I could find the correct adapters. It didn't help. 
I ended up talking to an engineer that designs tube nuts and he confirmed there isn't off-the-shelf hardware to do the job. He could make adapters for me if I could meet a 1000 piece minimum order quantity. So conversation ended with conclusion that best approach is to cut off old tube nuts and install SAE double flare nuts.
I ended up talking to an engineer that designs tube nuts and he confirmed there isn't off-the-shelf hardware to do the job. He could make adapters for me if I could meet a 1000 piece minimum order quantity. So conversation ended with conclusion that best approach is to cut off old tube nuts and install SAE double flare nuts.
- 3/16 tube uses a 3/8"-24 double flare nut.
- 6mm tube can use a 7/16"-24 double flare nut for 1/4" tube, as long as you properly re-flare the tube.
- His recommendation is to lubricate the tool die with a dab of oil. And do not clamp super hard or the cone will be oversized and you'll get a leak. On the second hit, just snug up the tool and tighten another 1/4 to 1/2 turn.
SLPs overpriced line lock for 3rdgens come with adapters and "prebent" lines for a quick install.
I don't think the line lock kit uses the factory size hard line so they must use a off the shelf adapter?
 09-06-2014, 11:04 AM
#156
COTM Editor
Thread Starter
iTrader: (22)
Join Date: Mar 2001
Posts: 10,077
Likes: 0
Received 1,941 Likes
on
1,325 Posts
Car: '89 Firebird
Engine: 7.0L
Transmission: T56
Re: What ever happened to QwkTrip's car anyway?
Samoco for the $99 controller

Last edited by QwkTrip; 09-06-2014 at 11:16 AM.
09-08-2014, 11:38 AM
#157
Member

Join Date: Jan 2011
Location: Nashville, TN
Posts: 173
Likes: 0
Received 1 Like
on
1 Post
Car: 1988 Camaro Iroc-Z Convertible
Engine: LS1
Transmission: T56
Axle/Gears: 8.8 with 4.10 Gears
Re: What ever happened to QwkTrip's car anyway?
FYI - The spring clamps from Chevy dealer fit the upper radiator hose but are way too small for the lower radiator hose. If you use the Cherokee lower hose then you can get a high quality spring clamp from Caterpillar (part number 140-6364) for only $2.50 each. This clamp has an effective range of 46.5 to 47.5 mm.
09-08-2014, 08:48 PM
#158
COTM Editor
Thread Starter
iTrader: (22)
Join Date: Mar 2001
Posts: 10,077
Likes: 0
Received 1,941 Likes
on
1,325 Posts
Car: '89 Firebird
Engine: 7.0L
Transmission: T56
Re: What ever happened to QwkTrip's car anyway?
Your Cat dealer will order it for you.
09-08-2014, 11:19 PM
#160
COTM Editor
Thread Starter
iTrader: (22)
Join Date: Mar 2001
Posts: 10,077
Likes: 0
Received 1,941 Likes
on
1,325 Posts
Car: '89 Firebird
Engine: 7.0L
Transmission: T56
Re: What ever happened to QwkTrip's car anyway?
I've been trying to figure out how to mount roll stop and proportioning valve. Decided to use the original bracket from the stock prop valve. Pretty simple mod and turned out nice.
I cut off the tab that holds stock prop valve and hammered the rib flat in the area where components will be attached. Hole drilled to mount components.


Test fitup of roll stop and prop valve on each side of bracket with a single thru bolt. The brake lines from master cylinder will provide the extra constraint to keep the blocks from rotating around the bolt.

Mounted in car. I changed the order so that prop valve sticks up high and roll stop is lower for easier access to brake fittings. Package is very compact and tucks close to fender and out of the way. Now I just need to make new short runs and plumb in to factory front and rear lines.

I cut off the tab that holds stock prop valve and hammered the rib flat in the area where components will be attached. Hole drilled to mount components.
Test fitup of roll stop and prop valve on each side of bracket with a single thru bolt. The brake lines from master cylinder will provide the extra constraint to keep the blocks from rotating around the bolt.
Mounted in car. I changed the order so that prop valve sticks up high and roll stop is lower for easier access to brake fittings. Package is very compact and tucks close to fender and out of the way. Now I just need to make new short runs and plumb in to factory front and rear lines.
Last edited by QwkTrip; 04-17-2019 at 08:12 PM.
09-10-2014, 02:43 PM
#161
COTM Editor
Thread Starter
iTrader: (22)
Join Date: Mar 2001
Posts: 10,077
Likes: 0
Received 1,941 Likes
on
1,325 Posts
Car: '89 Firebird
Engine: 7.0L
Transmission: T56
Re: What ever happened to QwkTrip's car anyway?
Got a little bit of good news....
After putting the car back on the ground I saw the wheels were not properly located under the car. The passenger side wheel was pulled in an inch or two while the driver side was located where it should be. Verified the A-arms are fine by placing them on the stock K-member. I talked to BMR and they agreed that I could send the K-member back and they'll replace it if it doesn't align with their jig. That's as generous as you can get considering I bought it NIB second-hand and it is at least 2 years old now. I have no doubt it will end up being replaced and I am really pleased with their willingness to stand behind something that is clearly out of warranty period.
These kind of issues is one of the risks of moving slowly on a project because the parts you buy are out of warranty by the time you use it. Really happy with BMR's customer service on this.
09-10-2014, 04:43 PM
#162
COTM Editor
Thread Starter
iTrader: (22)
Join Date: Mar 2001
Posts: 10,077
Likes: 0
Received 1,941 Likes
on
1,325 Posts
Car: '89 Firebird
Engine: 7.0L
Transmission: T56
Re: What ever happened to QwkTrip's car anyway?

Update: Alternative way to excite the alternator, Post #884, https://www.thirdgen.org/forums/ltx-...ml#post6172816
Last edited by QwkTrip; 05-22-2021 at 07:26 PM.
09-12-2014, 08:31 PM
#163
COTM Editor
Thread Starter
iTrader: (22)
Join Date: Mar 2001
Posts: 10,077
Likes: 0
Received 1,941 Likes
on
1,325 Posts
Car: '89 Firebird
Engine: 7.0L
Transmission: T56
Re: What ever happened to QwkTrip's car anyway?
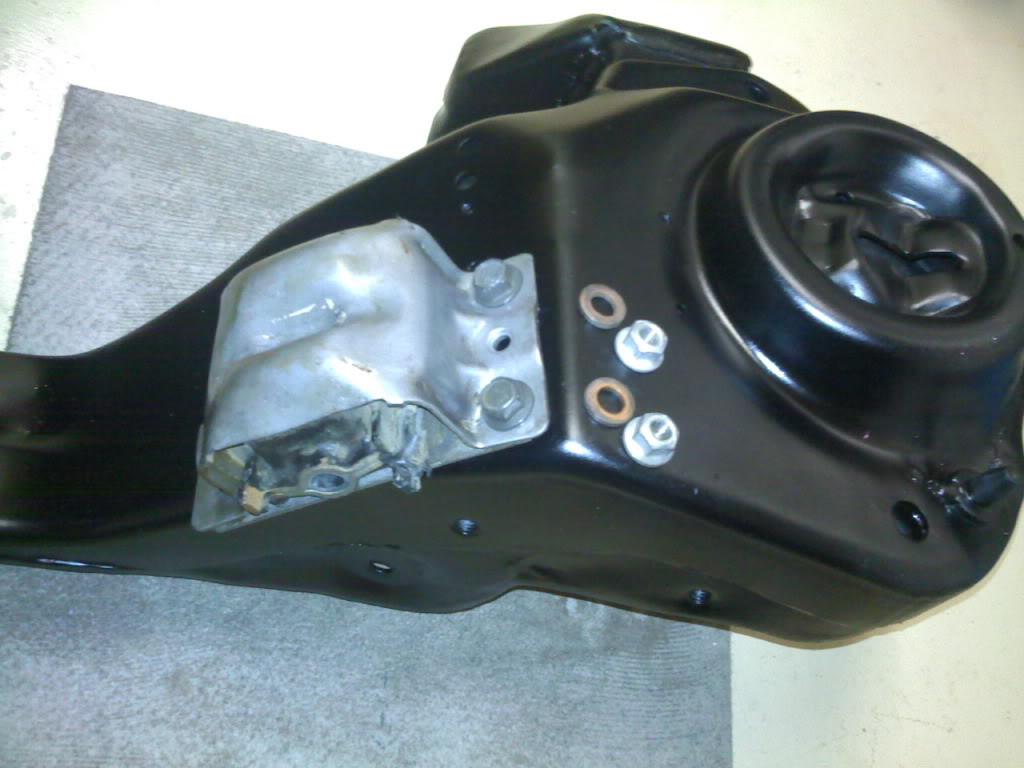
Took the stock K-member to be bead blasted inside and out, etched, primed and painted with frame paint. I was just wanting to keep it from rusting and it turned out to look way better than I ever anticipated! The guy did a fantastic job and it didn't even cost much money.

Last edited by QwkTrip; 03-13-2018 at 01:14 AM.
 09-13-2014, 08:38 AM
#165
Re: What ever happened to QwkTrip's car anyway?
The computer is completely capable of controlling the alt. For those not running a computer, a 470ohm resistor inline is used to knock the voltage down. This was verified using a potentiometer bench testing multiple alts. Im not doubting your friend, but 50ohms is next to nothing, way below any common lightbulb. Most likely he meant 500ohm which isnt an off the shelf resistor
09-13-2014, 11:39 AM
#166
COTM Editor
Thread Starter
iTrader: (22)
Join Date: Mar 2001
Posts: 10,077
Likes: 0
Received 1,941 Likes
on
1,325 Posts
Car: '89 Firebird
Engine: 7.0L
Transmission: T56
Re: What ever happened to QwkTrip's car anyway?
I had it tied to LS1 PCM but it seems the Holley HP does not support that feature. I got the info from the light duty application engineer at Delco Remy. I'll double check and ask if he made a typo by accident. Thanks for the help, Pocket.
") 09-13-2014, 09:18 PM
09-13-2014, 09:18 PM
#168
Supreme Member
iTrader: (8)
Join Date: Oct 2001
Location: Il
Posts: 11,901
Received 913 Likes
on
600 Posts
Car: 1989-92 FORMULA350 305 92 Hawkclone
Engine: 4++,350 & 305 CIs
Transmission: 700R4 4800 vig 18th700R4 t56 ZF6 T5
Axle/Gears: 3.70 9"ford alum chunk,dana44,9bolt
Re: What ever happened to QwkTrip's car anyway?
Took the stock K-member to be bead blasted inside and out, etched, primed and painted with frame paint. I was just wanting to keep it from rusting and it turned out to look way better than I ever anticipated! The guy did a fantastic job and it didn't even cost much money.


 09-14-2014, 12:57 AM
#169
COTM Editor
Thread Starter
iTrader: (22)
Join Date: Mar 2001
Posts: 10,077
Likes: 0
Received 1,941 Likes
on
1,325 Posts
Car: '89 Firebird
Engine: 7.0L
Transmission: T56
Re: What ever happened to QwkTrip's car anyway?
Your behavior is terrible. If you keep this up I'm going to ask the mods to find your OFF button.
09-14-2014, 01:22 AM
#170
COTM Editor
Thread Starter
iTrader: (22)
Join Date: Mar 2001
Posts: 10,077
Likes: 0
Received 1,941 Likes
on
1,325 Posts
Car: '89 Firebird
Engine: 7.0L
Transmission: T56
Re: What ever happened to QwkTrip's car anyway?
Hey, your K-member looks really good too!
I have the LS stands on my K-member. I trial fit it before paint and couldn't get the two halves of engine mounts to line up well enough to get both thru-bolts installed. I could only assemble one side or the other, but not both. This time I fully assembled the engine mounts to the engine and brought the K-member to the mounts. That worked and I was able to put the bolts into the K-member. Little inconvenient that way since I have to tighten the bolts without great access to the top side but it is doable with a bit of patience.
I have the LS stands on my K-member. I trial fit it before paint and couldn't get the two halves of engine mounts to line up well enough to get both thru-bolts installed. I could only assemble one side or the other, but not both. This time I fully assembled the engine mounts to the engine and brought the K-member to the mounts. That worked and I was able to put the bolts into the K-member. Little inconvenient that way since I have to tighten the bolts without great access to the top side but it is doable with a bit of patience.
09-14-2014, 01:37 PM
#171
Supreme Member
iTrader: (8)
Join Date: Oct 2001
Location: Il
Posts: 11,901
Received 913 Likes
on
600 Posts
Car: 1989-92 FORMULA350 305 92 Hawkclone
Engine: 4++,350 & 305 CIs
Transmission: 700R4 4800 vig 18th700R4 t56 ZF6 T5
Axle/Gears: 3.70 9"ford alum chunk,dana44,9bolt
Re: What ever happened to QwkTrip's car anyway?
Thanks, this car isn't getting a killer LSx setup but its getting something fairly special..
09-14-2014, 01:46 PM
#172
COTM Editor
Thread Starter
iTrader: (22)
Join Date: Mar 2001
Posts: 10,077
Likes: 0
Received 1,941 Likes
on
1,325 Posts
Car: '89 Firebird
Engine: 7.0L
Transmission: T56
Re: What ever happened to QwkTrip's car anyway?
The computer is completely capable of controlling the alt. For those not running a computer, a 470ohm resistor inline is used to knock the voltage down. This was verified using a potentiometer bench testing multiple alts. Im not doubting your friend, but 50ohms is next to nothing, way below any common lightbulb. Most likely he meant 500ohm which isnt an off the shelf resistor
The difference is going to be turn on speed. Lower line resistance gives greater current for lower turn-on speed. We're looking to get to a value that is guaranteed turn on below engine idle, even with loss of residual magnetism in the rotor. That's why I am curious what was the turn on speed during the tests you mentioned.
09-15-2014, 08:38 AM
#174
COTM Editor
Thread Starter
iTrader: (22)
Join Date: Mar 2001
Posts: 10,077
Likes: 0
Received 1,941 Likes
on
1,325 Posts
Car: '89 Firebird
Engine: 7.0L
Transmission: T56
Re: What ever happened to QwkTrip's car anyway?
Thanks. We're good.
And now you know one of my little secrets too.
And now you know one of my little secrets too.
09-15-2014, 07:49 PM
#175
COTM Editor
Thread Starter
iTrader: (22)
Join Date: Mar 2001
Posts: 10,077
Likes: 0
Received 1,941 Likes
on
1,325 Posts
Car: '89 Firebird
Engine: 7.0L
Transmission: T56
Re: What ever happened to QwkTrip's car anyway?
For those not running a computer, a 470ohm resistor inline is used to knock the voltage down. This was verified using a potentiometer bench testing multiple alts. Im not doubting your friend, but 50ohms is next to nothing, way below any common lightbulb. Most likely he meant 500ohm which isnt an off the shelf resistor
RADIO SHACK part number 271-133 50 OHM 10 WATT
There is no doubt based on experience here that 470 Ohm resistor can turn on the alternator but it won't deliver near the same reliable performance across operating conditions that the recommended resistor will give. And that's all we really want at the end of the day -- a working alternator that we don't need to give a second thought about.
09-21-2014, 03:00 AM
#176
COTM Editor
Thread Starter
iTrader: (22)
Join Date: Mar 2001
Posts: 10,077
Likes: 0
Received 1,941 Likes
on
1,325 Posts
Car: '89 Firebird
Engine: 7.0L
Transmission: T56
Re: What ever happened to QwkTrip's car anyway?
I swear, I must be one of the most unlucky people to do an LSx swap. Seem like not a single damn thing fits right. This time I can't get the O2 sensor installed because the hole isn't big enough. I had to pull the driver side header out of the vehicle so I can grind away material. These are the bigger 2" primary headers. Fortunately, I found it is possible to drop out the bottom after removing the oil filter. Not a huge deal in the grand scheme of things, but it all adds up to be pretty annoying.

Last edited by QwkTrip; 03-13-2018 at 01:14 AM.
09-21-2014, 10:48 AM
#177
Supreme Member
iTrader: (8)
Join Date: Oct 2001
Location: Il
Posts: 11,901
Received 913 Likes
on
600 Posts
Car: 1989-92 FORMULA350 305 92 Hawkclone
Engine: 4++,350 & 305 CIs
Transmission: 700R4 4800 vig 18th700R4 t56 ZF6 T5
Axle/Gears: 3.70 9"ford alum chunk,dana44,9bolt
Re: What ever happened to QwkTrip's car anyway?
I run my 02 sensor tap right on through those, cleans them right up!
Also use it every time I pull a 02.
Also use it every time I pull a 02.
09-21-2014, 11:26 AM
#178
COTM Editor
Thread Starter
iTrader: (22)
Join Date: Mar 2001
Posts: 10,077
Likes: 0
Received 1,941 Likes
on
1,325 Posts
Car: '89 Firebird
Engine: 7.0L
Transmission: T56
Re: What ever happened to QwkTrip's car anyway?
Got the O2 sensor to thread in. The wide-band sensor is so large that the hole had to be ground flush the full 360 degrees around.
On another note, the clutch hydraulics are installed. I didn't like the direction the Tick hose inlet was pointing so I moved it around to point the opposite direction under the brake booster. That way the hose can have a direct path up to the clutch reservoir. I had to use a heat gun on low setting to slightly heat the cap so it could be pulled off. Then turned the cap around and snapped it back in place while still warm.
Update: Sludge inside master cylinder from using wrong type of hose. Post #1309, https://www.thirdgen.org/forums/ltx-...ml#post6331422

On another note, the clutch hydraulics are installed.
I didn't like the direction the Tick hose inlet was pointing so I moved it around to point the opposite direction under the brake booster. That way the hose can have a direct path up to the clutch reservoir. I had to use a heat gun on low setting to slightly heat the cap so it could be pulled off. Then turned the cap around and snapped it back in place while still warm.Update: Sludge inside master cylinder from using wrong type of hose. Post #1309, https://www.thirdgen.org/forums/ltx-...ml#post6331422
Last edited by QwkTrip; 05-22-2021 at 07:07 PM.
09-22-2014, 10:04 PM
#179
COTM Editor
Thread Starter
iTrader: (22)
Join Date: Mar 2001
Posts: 10,077
Likes: 0
Received 1,941 Likes
on
1,325 Posts
Car: '89 Firebird
Engine: 7.0L
Transmission: T56
Re: What ever happened to QwkTrip's car anyway?
Here is my stab at creating a stand alone T56 transmission harness. I have the sub-harness from my LS1 wiring, just need to make it work. The reverse gear lockout solenoid is normally driven by engine PCM and opens the shift gate at 5 mph and under. Holley HP can't handle transmission tasks and it can't understand the T56 speed signal either. It can however understand a Hall effect speed sensor....
... and that's where my next idea comes in. The SGI-5 has multiple outputs and I'm wondering if I can use one of those to fool the Holley HP into thinking it is looking at a Hall effect sensor. If so, I can have a speed based lockout control. Still exploring the idea.
Update after I got the car driving: This method works perfectly using "Output 1" which is the calibrated AC output signal. Link to how I configured the software in post #353, https://www.thirdgen.org/forums/ltx-...ml#post6003889
Last edited by QwkTrip; 04-30-2020 at 06:28 PM.
09-24-2014, 01:31 AM
#180
COTM Editor
Thread Starter
iTrader: (22)
Join Date: Mar 2001
Posts: 10,077
Likes: 0
Received 1,941 Likes
on
1,325 Posts
Car: '89 Firebird
Engine: 7.0L
Transmission: T56
Re: What ever happened to QwkTrip's car anyway?
Looking for feedback on something from the electrical gurus here.
My cam sensor is in front of engine and I want to shield the wiring because it runs next to the coil packs. I was going to buy shielded wire but choked on the cost. So I made my own by wrapping a single piece of aluminum tape around the harness section and then taping a 2" length of bare wire (16 AWG) to one end. Plan to ground that wire to the firewall.
A) Is my method okay; and
B) Do you think this is sufficient?


My cam sensor is in front of engine and I want to shield the wiring because it runs next to the coil packs. I was going to buy shielded wire but choked on the cost.
So I made my own by wrapping a single piece of aluminum tape around the harness section and then taping a 2" length of bare wire (16 AWG) to one end. Plan to ground that wire to the firewall.A) Is my method okay; and
B) Do you think this is sufficient?
Last edited by QwkTrip; 03-13-2018 at 01:13 AM.
09-26-2014, 08:57 PM
#181
COTM Editor
Thread Starter
iTrader: (22)
Join Date: Mar 2001
Posts: 10,077
Likes: 0
Received 1,941 Likes
on
1,325 Posts
Car: '89 Firebird
Engine: 7.0L
Transmission: T56
Re: What ever happened to QwkTrip's car anyway?
I farmed out my front and rear brakes. My front brakes showed up today. It's a set of C6 Corvette brakes on my original spindles, while retaining the steering stops. This was done by Scott at BigBrakeUpgrade.com and he made it so easy! He started as soon as I could get him my spindles and turned it around in less than 2 weeks. Came with everything I need to hook up -- no parts hunting required. He also made sure I got my own spindles back, which I really appreciate because mine were rust free cores. And if anybody near central Illinois wants a set of 13" Corvette J55 brakes (C4 ZR1) on 1LE spindles then shoot me a note because I'm selling that setup (another fantastic set of rust free parts).
Meanwhile, Bruce at Hawks Thirdgen is working on completing my rear brakes. That is a little bit more of a challenge because all he got to work with was a picture of a caliper because I have no idea what type of brakes are on my rear axle. He's got it figured out and I really appreciate his extra time to help me! Should get all the lines, hoses, and whatever else I need soon.


Tons of clearance to caliper with 17" rims.

He also made sure I got my own spindles back, which I really appreciate because mine were rust free cores. And if anybody near central Illinois wants a set of 13" Corvette J55 brakes (C4 ZR1) on 1LE spindles then shoot me a note because I'm selling that setup (another fantastic set of rust free parts).Meanwhile, Bruce at Hawks Thirdgen is working on completing my rear brakes. That is a little bit more of a challenge because all he got to work with was a picture of a caliper because I have no idea what type of brakes are on my rear axle. He's got it figured out and I really appreciate his extra time to help me! Should get all the lines, hoses, and whatever else I need soon.
Tons of clearance to caliper with 17" rims.
Last edited by QwkTrip; 03-13-2018 at 01:13 AM.
09-28-2014, 06:21 PM
#182
COTM Editor
Thread Starter
iTrader: (22)
Join Date: Mar 2001
Posts: 10,077
Likes: 0
Received 1,941 Likes
on
1,325 Posts
Car: '89 Firebird
Engine: 7.0L
Transmission: T56
Re: What ever happened to QwkTrip's car anyway?
I figured out a way to combine the 3rd gen firewall plug with the 4th gen cable. I've never seen it done this way and is by far the most seamless factory look you can accomplish.
First you must have an expensive pile of parts lying around from all your failed attempts. I have the original 3rd gen throttle cable, a 4th gen throttle cable, and I even tried the Lokar throttle cable (sold through Hawks as a conversion part). You can do this mod with just the 3rd gen and 4th gen throttle cables, but I used parts from all three kits since I already had it and the Lokar wire was easier to thread through the tubes.
Step 1: Clamp the original 3rd gen tube in a vice and use a heat gun to warm the firewall plug. Pull on the plug like hell (gloved hands) and the tube will pull out. Keep the firewall plug and discard everything else.

Step 2: Cut off a ferrule from the end from the 4th gen wire. Preferably you would cut off the end at the foot pedal since the original throttle body ferrule cannot be duplicated at home. However, I cut off the end at the throttle body because I don't have the right tools to do a good and solid swage and I happened to have a wire clamp from the Lokar kit. Pull the wire out and set aside. Cut the 4th gen tube at the firewall plug. You need a good, heavy wire cutter because the tube is lined with many strands of strong wire.

Step 3: Slip the 4th gen tube into the 3rd gen firewall plug. You can make this a water tight seal using adhesive shrink tube. Don't glue the tube inside the firewall plug because the glue could seep out and block the hole for the wire, or worse yet glue your wire in place. The mechanical joint itself is sufficient and the cable will not come out once constrained at both ends by the firewall plug and the throttle bracket (same way Lokar cable is constrained).

Step 4: Slide the 4th gen wire through the tube (or Lokar wire in my case). Re-use the original pedal clip.

Step 5: Cut wire to length for perfect fit. Finish by swaging a new ferrule on the pedal end or using a wire clamp on the throttle blade, whichever you chose to do.

First you must have an expensive pile of parts lying around from all your failed attempts.
I have the original 3rd gen throttle cable, a 4th gen throttle cable, and I even tried the Lokar throttle cable (sold through Hawks as a conversion part). You can do this mod with just the 3rd gen and 4th gen throttle cables, but I used parts from all three kits since I already had it and the Lokar wire was easier to thread through the tubes.Step 1: Clamp the original 3rd gen tube in a vice and use a heat gun to warm the firewall plug. Pull on the plug like hell (gloved hands) and the tube will pull out. Keep the firewall plug and discard everything else.
Step 2: Cut off a ferrule from the end from the 4th gen wire. Preferably you would cut off the end at the foot pedal since the original throttle body ferrule cannot be duplicated at home. However, I cut off the end at the throttle body because I don't have the right tools to do a good and solid swage and I happened to have a wire clamp from the Lokar kit. Pull the wire out and set aside. Cut the 4th gen tube at the firewall plug. You need a good, heavy wire cutter because the tube is lined with many strands of strong wire.
Step 3: Slip the 4th gen tube into the 3rd gen firewall plug. You can make this a water tight seal using adhesive shrink tube. Don't glue the tube inside the firewall plug because the glue could seep out and block the hole for the wire, or worse yet glue your wire in place. The mechanical joint itself is sufficient and the cable will not come out once constrained at both ends by the firewall plug and the throttle bracket (same way Lokar cable is constrained).
Step 4: Slide the 4th gen wire through the tube (or Lokar wire in my case). Re-use the original pedal clip.
Step 5: Cut wire to length for perfect fit. Finish by swaging a new ferrule on the pedal end or using a wire clamp on the throttle blade, whichever you chose to do.
Last edited by QwkTrip; 03-13-2018 at 01:13 AM.
09-29-2014, 08:27 AM
#183
Member
iTrader: (2)
Join Date: Feb 2003
Location: ME
Posts: 219
Likes: 0
Received 0 Likes
on
0 Posts
Car: 1986 IROC-Z
Engine: LS1-ish
Transmission: T56 stage II
Axle/Gears: S60 4:10's
Re: What ever happened to QwkTrip's car anyway?
Dude, I just did the same exact thing with my throttle cable a few weeks ago. Like you, I had never seen it done. And since I already had the 4th gen cable I was determined to make it work, I'm tired of spending money! Only difference is that I cut off the pedal side and found a nice little ferrule at NAPA that clamps nicely to the cable and fits the pedal well. I ended up cutting it to like 34 inches because I didn't like how it fit when I had installed it initially. I used a heat gun putting them together, and heated up the 3rd gen connector and the 4th gen cable, slid them together and they are bonded tight like factory now. Looks factory too. I really need to do a build thread, but I just don't have the time right now.
I guess we think alike, lol. Nice job!
I guess we think alike, lol. Nice job!
09-29-2014, 08:33 PM
#184
COTM Editor
Thread Starter
iTrader: (22)
Join Date: Mar 2001
Posts: 10,077
Likes: 0
Received 1,941 Likes
on
1,325 Posts
Car: '89 Firebird
Engine: 7.0L
Transmission: T56
09-30-2014, 01:53 AM
#185
Junior Member
iTrader: (2)
Join Date: Feb 2007
Location: thurmont maryland
Posts: 78
Likes: 0
Received 0 Likes
on
0 Posts
Car: 1989 iroc z
Engine: 98 ls1, prcs, btr cam
Transmission: rkt56 6 speed
Axle/Gears: midwest chassis 9 inch 4.30wavetrac
Re: What ever happened to QwkTrip's car anyway?
damn....
09-30-2014, 09:55 AM
#186
Re: What ever happened to QwkTrip's car anyway?
Looking for feedback on something from the electrical gurus here.
My cam sensor is in front of engine and I want to shield the wiring because it runs next to the coil packs. I was going to buy shielded wire but choked on the cost. So I made my own by wrapping a single piece of aluminum tape around the harness section and then taping a 2" length of bare wire (16 AWG) to one end. Plan to ground that wire to the firewall.
A) Is my method okay; and
B) Do you think this is sufficient?
My cam sensor is in front of engine and I want to shield the wiring because it runs next to the coil packs. I was going to buy shielded wire but choked on the cost.
So I made my own by wrapping a single piece of aluminum tape around the harness section and then taping a 2" length of bare wire (16 AWG) to one end. Plan to ground that wire to the firewall.A) Is my method okay; and
B) Do you think this is sufficient?
Next, interference shielding is a touchy subject because theres the proper way to do it (at great cost/effort) and theres the fact that it never seems to affect LSx electronics. Main bundles ran next to injector solenoids, PCM bundles laid over coils or reverse, bundles passing through the alt's EM field, heck, GM even placed the crank sensor (hall effect) right next to the starter which has enormous amounts of current going through it and the biggest magnets on the car
If you want to shield it, do so any way you like. FWIW, GM's shields are foil wrapped over twisted wires using a solid 20ga bare alum strand spliced into the main engine harness ground. Most commonly found on truck VSS wires
09-30-2014, 06:31 PM
#187
COTM Editor
Thread Starter
iTrader: (22)
Join Date: Mar 2001
Posts: 10,077
Likes: 0
Received 1,941 Likes
on
1,325 Posts
Car: '89 Firebird
Engine: 7.0L
Transmission: T56
Re: What ever happened to QwkTrip's car anyway?
Great info. Thanks!
10-02-2014, 06:51 PM
#188
COTM Editor
Thread Starter
iTrader: (22)
Join Date: Mar 2001
Posts: 10,077
Likes: 0
Received 1,941 Likes
on
1,325 Posts
Car: '89 Firebird
Engine: 7.0L
Transmission: T56
Re: What ever happened to QwkTrip's car anyway?
These are the new connections I am making to C100. I'm using it for backup lights; speed sensor inputs; driving gauges for oil, coolant, and tachometer; and using the old fuel pump power as the new fuel pump relay driver. I trimmed all wires to same length and made a pigtail with a 10-pin Metripack connector to make it all plug and play.
Edit: ended up with two 8-pin connectors with pinouts shown in post #300, https://www.thirdgen.org/forums/ltx-...ml#post5961350

For reference, the following graphics are the original C100 pinouts from GM shop manual for a 1988 Firebird (the closest I could find). Not everything was same as my car but it was sufficient to help me unravel the mystery.


Edit: ended up with two 8-pin connectors with pinouts shown in post #300, https://www.thirdgen.org/forums/ltx-...ml#post5961350
For reference, the following graphics are the original C100 pinouts from GM shop manual for a 1988 Firebird (the closest I could find). Not everything was same as my car but it was sufficient to help me unravel the mystery.
Last edited by QwkTrip; 04-30-2020 at 06:28 PM.
10-02-2014, 07:04 PM
#189
COTM Editor
Thread Starter
iTrader: (22)
Join Date: Mar 2001
Posts: 10,077
Likes: 0
Received 1,941 Likes
on
1,325 Posts
Car: '89 Firebird
Engine: 7.0L
Transmission: T56
Re: What ever happened to QwkTrip's car anyway?
And my fuel pump circuits will be exactly the same as I was planning with LS1, except I'll simply be using the Holley HP fuel pump driver instead of the LS1 PCM fuel pump driver.
Update: Further simplified wiring method is shown in post #251, https://www.thirdgen.org/forums/ltx-...ml#post5893412

Update: Further simplified wiring method is shown in post #251, https://www.thirdgen.org/forums/ltx-...ml#post5893412
Last edited by QwkTrip; 05-22-2021 at 07:26 PM.
10-07-2014, 05:48 PM
#190
COTM Editor
Thread Starter
iTrader: (22)
Join Date: Mar 2001
Posts: 10,077
Likes: 0
Received 1,941 Likes
on
1,325 Posts
Car: '89 Firebird
Engine: 7.0L
Transmission: T56
Re: What ever happened to QwkTrip's car anyway?
I made a neat discovery today There are two wires that come through C100 that didn't go anywhere in the engine bay. These were just loose leads in the original harness and not documented in the C100 diagram. I looked at a different year C100 diagram and found those wires were for the speed sensor with VIN code E. I traced out the wires inside the car and sure enough, those wires went to an unused connector near my original speed buffer box. I was able to run my T56 speed signal through C100 and it was all pre-wired to the right location.
So I redid my connector to an 8 pin Metripack and every wire that I need to pass through to the interior is going through C100. I have no wires running through the passenger side fender. Updated C100 diagram, https://www.thirdgen.org/forums/ltx-...ml#post5825637
Loose wires in the engine bay (yellow and purple)

Traced to this connector on passenger side.

There are two wires that come through C100 that didn't go anywhere in the engine bay. These were just loose leads in the original harness and not documented in the C100 diagram. I looked at a different year C100 diagram and found those wires were for the speed sensor with VIN code E. I traced out the wires inside the car and sure enough, those wires went to an unused connector near my original speed buffer box. I was able to run my T56 speed signal through C100 and it was all pre-wired to the right location. So I redid my connector to an 8 pin Metripack and every wire that I need to pass through to the interior is going through C100. I have no wires running through the passenger side fender. Updated C100 diagram, https://www.thirdgen.org/forums/ltx-...ml#post5825637
Loose wires in the engine bay (yellow and purple)
Traced to this connector on passenger side.
Last edited by QwkTrip; 03-13-2018 at 01:11 AM.
10-09-2014, 01:00 AM
#191
COTM Editor
Thread Starter
iTrader: (22)
Join Date: Mar 2001
Posts: 10,077
Likes: 0
Received 1,941 Likes
on
1,325 Posts
Car: '89 Firebird
Engine: 7.0L
Transmission: T56
Re: What ever happened to QwkTrip's car anyway?
I decided to go with this scheme for control of AC. It gives me full control over the AC compressor so I can shut it off any time I want, such as wide-open throttle or high rpm. I also can use AC request in my cooling fan strategy. And I will be able to bump up idle whenever the AC compressor comes on.
Link to software parameters of AC and fans defined in post #354,
https://www.thirdgen.org/forums/ltx-...ml#post6003903

Link to software parameters of AC and fans defined in post #354,
https://www.thirdgen.org/forums/ltx-...ml#post6003903
Last edited by QwkTrip; 04-30-2020 at 06:25 PM.
10-11-2014, 09:47 PM
#192
COTM Editor
Thread Starter
iTrader: (22)
Join Date: Mar 2001
Posts: 10,077
Likes: 0
Received 1,941 Likes
on
1,325 Posts
Car: '89 Firebird
Engine: 7.0L
Transmission: T56
Re: What ever happened to QwkTrip's car anyway?
While I've been testing circuits I have noticed that my key switch is really finicky about keeping electrical circuits alive while in the run position. A friend suggested I look at the ignition switch on top of the steering column. I pulled it off and sure enough it was really inconsistent when in the run position, turning off and on with every wriggle of the switch. I figured I had nothing to lose by taking it apart, so I did. Kind of interesting how it is made. Found a bit of corrosion on the copper contacts so I cleaned up all the electrical bits and basically "remanufactured" the part. Put it back together (that took a few tries ) and now it is working perfectly. Not worn out, just old and needed a little TLC. And I don't have to worry about incompatibility of new parts.
) and now it is working perfectly. Not worn out, just old and needed a little TLC. And I don't have to worry about incompatibility of new parts.
10-11-2014, 10:23 PM
#193
COTM Editor
Thread Starter
iTrader: (22)
Join Date: Mar 2001
Posts: 10,077
Likes: 0
Received 1,941 Likes
on
1,325 Posts
Car: '89 Firebird
Engine: 7.0L
Transmission: T56
Re: What ever happened to QwkTrip's car anyway?
Also worked on AC plumbing today. I've never done anything with AC before so this has been a learning exercise. All the o-rings in my system are old and brittle. I think I've hunted down all the o-rings to replace with new. Condenser inlet & outlet, evaporator inlet & outlet, accumulator outlet, high & low pressure sensors, and the often overlooked orifice tube. Not yet sure what to do with the fill valves?
I also ordered a new accumulator. Mine has been sitting open to atmosphere for 15 years so the desiccant is saturated. Just going to start over with new accumulator and fresh desiccant.
Picture of orifice tube coming out of AC line. Mine wouldn't pull easy so I had to buy a special tool for the job. Auto Zone has an orifice tube tool, OEM# 27004.
Last edited by QwkTrip; 04-17-2019 at 08:16 PM.
10-12-2014, 04:08 PM
#194
COTM Editor
Thread Starter
iTrader: (22)
Join Date: Mar 2001
Posts: 10,077
Likes: 0
Received 1,941 Likes
on
1,325 Posts
Car: '89 Firebird
Engine: 7.0L
Transmission: T56
Re: What ever happened to QwkTrip's car anyway?
The total mess of wiring in engine bay is just a partial mess now. I have finally gotten to the point where I could mount my electrical center for the engine harness. All the stock relays are gone that were on the driver side firewall. The new electrical center has fuses and relays for everything in the engine bay.
I used the original upper-left weld nut as one mounting point and drilled a hole and self-tapped the original screw for the lower mount point. If the lower screw strips out then I'll just drill the hole out slightly larger and use a bolt. Lots more wiring still ahead.

Easy access to the fuses.

I used the original upper-left weld nut as one mounting point and drilled a hole and self-tapped the original screw for the lower mount point. If the lower screw strips out then I'll just drill the hole out slightly larger and use a bolt. Lots more wiring still ahead.
Easy access to the fuses.
Last edited by QwkTrip; 04-17-2019 at 08:15 PM.
10-12-2014, 05:36 PM
#195
Member
iTrader: (2)
Join Date: Feb 2003
Location: ME
Posts: 219
Likes: 0
Received 0 Likes
on
0 Posts
Car: 1986 IROC-Z
Engine: LS1-ish
Transmission: T56 stage II
Axle/Gears: S60 4:10's
Re: What ever happened to QwkTrip's car anyway?
Good job man... you're getting there! That looks familiar and good, I love it. I've put my first 250 miles on mine since Friday, breaking in the new rear... can't wait to see yours run!
Last edited by coptzer; 10-12-2014 at 05:40 PM.
10-12-2014, 10:49 PM
#196
COTM Editor
Thread Starter
iTrader: (22)
Join Date: Mar 2001
Posts: 10,077
Likes: 0
Received 1,941 Likes
on
1,325 Posts
Car: '89 Firebird
Engine: 7.0L
Transmission: T56
Re: What ever happened to QwkTrip's car anyway?
You'll have to let me know how yours runs when you can finally lay on it.
10-13-2014, 11:32 PM
#197
COTM Editor
Thread Starter
iTrader: (22)
Join Date: Mar 2001
Posts: 10,077
Likes: 0
Received 1,941 Likes
on
1,325 Posts
Car: '89 Firebird
Engine: 7.0L
Transmission: T56
Re: What ever happened to QwkTrip's car anyway?
I talked to BMR and they agreed that I could send the K-member back and they'll replace it if it doesn't align with their jig.
, but that doesn't take away from BMR's extraordinary commitment to brand quality and just plain ol' goodness of heart!Reps to BMR for the service!
I will be buying my torque arm from them no matter what.And remember, kids, you don't get that kind of result when you buy cheap **** from China.
10-15-2014, 02:06 PM
#199
Member
iTrader: (2)
Join Date: Feb 2003
Location: ME
Posts: 219
Likes: 0
Received 0 Likes
on
0 Posts
Car: 1986 IROC-Z
Engine: LS1-ish
Transmission: T56 stage II
Axle/Gears: S60 4:10's
Re: What ever happened to QwkTrip's car anyway?

Completely different car and is so much fun to drive now. You will not regret all your hard work once you've driven it. I've put almost 400 miles on it since Friday which is probably more than I used it in the last 5 years combined. I'm going to have a real traction problem... and with that beast you've got, haha, good luck!
10-15-2014, 09:10 PM
#200
COTM Editor
Thread Starter
iTrader: (22)
Join Date: Mar 2001
Posts: 10,077
Likes: 0
Received 1,941 Likes
on
1,325 Posts
Car: '89 Firebird
Engine: 7.0L
Transmission: T56
Re: What ever happened to QwkTrip's car anyway?
You were debating gears and I kind of pulled you into the 4.10 ratio. Now that you've driven it do you agree it just feels natural with a T56? Wouldn't even guess the car had them unless somebody told you.