My 1984 HO Z28 LT1/T-56 Swap Log
 04-25-2011, 05:46 PM
#1
Member
Thread Starter

Join Date: Feb 2011
Location: Pacific NW
Posts: 182
Likes: 0
Received 0 Likes
on
0 Posts
Car: 99 Tahoe, 98 Buick, 84 Camaro
Engine: 350, 2800, none at the moment
My 1984 HO Z28 LT1/T-56 Swap Log
Finally, after much reading and many silly questions answered by the kind folks here at TGO, I decided the direction I want to go with my Camaro engine upgrade.
I have decided to go with an LT1/T-56 combination from a 1997 Camaro SS (I was told SLP, but don't see the headers) I got for what I think is a really good deal. It is a bigger challenge than the carburated setup I was concidering, but I think the rewards will out way the pain, at least I hope so.
I picked up the complete engine as seen in the pic below with an uncut wire harness (not the original) and the original computer along with an ECM from a 94/95 Camaro.
Here is a list of what I know or think need to be addressed;
Motor Mounts (Use original from 84)
PS Lines
Fuel Pump (Needs in tank, original carb)
Fuel Lines
Radiator hoses.
Wire Harness W/ECM
ECM Programming (Not sure what all is needed yet)
Clutch Slave and Master cylinders
New trans mount
Driveshaft (Not sure what I'll need here yet)
Exhaust system
Engine electrical data to existing intrument panel and guages.
Here is the new motor;

Here's the Transmission;

Please let me know if there is anything you all can think of that I will need as well. I wont be able to do this without your help. Thanks again.
I have decided to go with an LT1/T-56 combination from a 1997 Camaro SS (I was told SLP, but don't see the headers) I got for what I think is a really good deal. It is a bigger challenge than the carburated setup I was concidering, but I think the rewards will out way the pain, at least I hope so.
I picked up the complete engine as seen in the pic below with an uncut wire harness (not the original) and the original computer along with an ECM from a 94/95 Camaro.
Here is a list of what I know or think need to be addressed;
Motor Mounts (Use original from 84)
PS Lines
Fuel Pump (Needs in tank, original carb)
Fuel Lines
Radiator hoses.
Wire Harness W/ECM
ECM Programming (Not sure what all is needed yet)
Clutch Slave and Master cylinders
New trans mount
Driveshaft (Not sure what I'll need here yet)
Exhaust system
Engine electrical data to existing intrument panel and guages.
Here is the new motor;
Here's the Transmission;
Please let me know if there is anything you all can think of that I will need as well. I wont be able to do this without your help. Thanks again.
Last edited by newZman; 05-03-2011 at 09:51 AM. Reason: Added to list
 04-25-2011, 05:54 PM
#2
Member
Thread Starter
Join Date: Feb 2011
Location: Pacific NW
Posts: 182
Likes: 0
Received 0 Likes
on
0 Posts
Car: 99 Tahoe, 98 Buick, 84 Camaro
Engine: 350, 2800, none at the moment
Re: My 1984 HO Z28 LT1/T-56 Swap Log
Here's the engine bay as it was when I picked up the car;

Here's how it is today... Waiting for the LT1;

Here's that poor sbc that came out... Not in bad shape really;

I'll keep posting as things progress. I am flat broke at this point probably be alot of prep to begin with... I'll keep things in this post relating to engine and trans only, although alot of other stuff is going on at the same time.
Here's how it is today... Waiting for the LT1;
Here's that poor sbc that came out... Not in bad shape really;
I'll keep posting as things progress. I am flat broke at this point probably be alot of prep to begin with... I'll keep things in this post relating to engine and trans only, although alot of other stuff is going on at the same time.
 04-25-2011, 09:42 PM
#5
Member
Thread Starter
Join Date: Feb 2011
Location: Pacific NW
Posts: 182
Likes: 0
Received 0 Likes
on
0 Posts
Car: 99 Tahoe, 98 Buick, 84 Camaro
Engine: 350, 2800, none at the moment
Re: My 1984 HO Z28 LT1/T-56 Swap Log
 Yeah, the previous owner was sticker crazy... even funnier than that I had never heard of Amsoil until I saw that sticker, then I saw the name again on that picker show. Funny stuff.
Thanks for the welcome cprmn14.
Last edited by newZman; 04-25-2011 at 09:46 PM. Reason: oops
05-03-2011, 09:32 AM
#6
Member
Thread Starter
Join Date: Feb 2011
Location: Pacific NW
Posts: 182
Likes: 0
Received 0 Likes
on
0 Posts
Car: 99 Tahoe, 98 Buick, 84 Camaro
Engine: 350, 2800, none at the moment
Re: My 1984 HO Z28 LT1/T-56 Swap Log
I have been doing a bit of research in the area of electrical/PCM. I had a few questions that have been asked but it seems every time I get one question asnwered I end up with one or 2 more... Anyway, here is the thread on my electrical portion of this swap https://www.thirdgen.org/forums/elec...ml#post4910347. I'll try to keep all my electrical and PCM related questions on this thread.
I have to admit the project is a bit intimidating, especially when I look inside the engine bay of my car and see all those wires, then look at that LTX and all that stuff along with it's wires. I have a 1-pc 4-bolt engine setting here that Is real tempting just to go carb setup with, but that's why I started this log. I'ld look like a real weenie if I back out now. Forgive me if I offended any weenies out there . I'll just keep telling myself, I can do this! With help from all you folks at TGO of course.
I have to admit the project is a bit intimidating, especially when I look inside the engine bay of my car and see all those wires, then look at that LTX and all that stuff along with it's wires. I have a 1-pc 4-bolt engine setting here that Is real tempting just to go carb setup with, but that's why I started this log. I'ld look like a real weenie if I back out now. Forgive me if I offended any weenies out there
. I'll just keep telling myself, I can do this! With help from all you folks at TGO of course.
05-03-2011, 10:31 AM
#7
Member
iTrader: (2)

Join Date: Nov 2009
Location: Hubert, NC
Posts: 436
Likes: 0
Received 0 Likes
on
0 Posts
Car: 83 Z28
Engine: F-body LT1 swap
Transmission: T-56 swap
Axle/Gears: 10 bolt w/ 28 spl posi, 4.10, disks
Re: My 1984 HO Z28 LT1/T-56 Swap Log
I have been doing a bit of research in the area of electrical/PCM. I had a few questions that have been asked but it seems every time I get one question asnwered I end up with one or 2 more... Anyway, here is the thread on my electrical portion of this swap https://www.thirdgen.org/forums/elec...ml#post4910347. I'll try to keep all my electrical and PCM related questions on this thread.
I have to admit the project is a bit intimidating, especially when I look inside the engine bay of my car and see all those wires, then look at that LTX and all that stuff along with it's wires. I have a 1-pc 4-bolt engine setting here that Is real tempting just to go carb setup with, but that's why I started this log. I'ld look like a real weenie if I back out now. Forgive me if I offended any weenies out there. I'll just keep telling myself, I can do this! With help from all you folks at TGO of course.
I have to admit the project is a bit intimidating, especially when I look inside the engine bay of my car and see all those wires, then look at that LTX and all that stuff along with it's wires. I have a 1-pc 4-bolt engine setting here that Is real tempting just to go carb setup with, but that's why I started this log. I'ld look like a real weenie if I back out now. Forgive me if I offended any weenies out there
. I'll just keep telling myself, I can do this! With help from all you folks at TGO of course.I will be finishing my LT1 conversion in the next day or two. I have been working on it mostly nights and some times a whole day on a weekend.
Here are some things I learned along the way:
Engine, Tranny mounting and A/C
-The engine will bolt right on the factory clamshells, but If you want to keep A/C you will need to notch the crossmember or indent it with a large hammer like I did. You also need to modify the clamshell on the pass side to clear the A/C compressor.
-A/C lines will have to be custom if you keep it.
-The tranny will need a custom mount. I bought a used Sphon T56 conversion crossmember and torque arm. I saw someone modified the factory crossmember on here if you can fabricate. Otherwise just get a Hawks or Sphon or UMI, etc.
T56 stuff
-I got 4th gen pedals to replace my third gen pedals. I used the LT1 hyrdaulics and had to cut my shifter hole to the rear an inch or so. When using the 4th gen pedals, you have to drill out the top holes since they are smaller then the studs on the booster. I figured that out the hard way.
-Since I converted to a T5 already, I had already modified my harness for the nuteral safety switch and backup lights. Just remember that is something you will need to do.
-The stock drive shaft will work assuming you have a 700R4 or T5. I am using an aluminum unit from a 91 transam. 4th gen drive shafts will work as well.
Fuel System
-I went to the yard and got a sending unit out of a MPI V6 car and the main and return fuel lines to put in my car. (my crossfire feed line went to the pass side) I got a 255 fuel pump from TRE and ordered some braided 6AN line, compression AN fittings, 6AN fittings, and LT1 fuel rail adapters from Jegs. I took that and made my own lines. You can also get a bolt in setup for those style lines to make things simple.
Cooling system
-I run a dual fan setup from a 97 V6 F-body. Picked them up cheap nad they cooled my CFI setup great. I use a aftermarket controller, but the 95 or 97 PCM will run them and make things easier. You just need the high amp relays.
-I also used the factory radiator and got a 93 Z28 upper radiator hose with the extra line to connect to the tube from the rear of the heads. For the lower hose I used a universal 24" SS flex tube and routed it exactly where I wanted.
-I havent finished working out the heater core lines, but will probably have that done this evening.
Power steering
-You can modify the 97 power steering line to go directly to your steering gear. I had to do custom since I run a hydro boost.
Exhaust
-If you are on a budget, get the Hedman D-port headers and Y-pipe to connect with your current exhaust system. If you got the cash, Dyno Don headers and Y-pipe are unbeatable for looks, fit, and power potential. I went with Dyno Don headers which should be here today!
-Just know 93 and up F-body headers or manifolds will not fit our cars. You have to use 82-92 headers.
Computer
-I sent my 96 PCM out to have the rear O2's, EGR, EVAP, Smog pump, and VATS removed. While they were at it I had them do a mail order tune for my mods (CAI, headers, magnaflow cat back, 160* stat, etc). They also reporgrammed my speedo calibration for my gears and changed my on/off temp for the cooling fans.
-Since I used the 96 PCM I put a OBDII port in place of the factory one so I can read engine data and pull codes if I need.
Wiring
-This is where I have the most time spent. Go read Pocket's harness guides and get to town. Select where you are going to mount the PCM and go from there. If you have the budget, Pocket will even do all the hard work for you. It will probably cost less than getting an aftermarket harness and I think he makes it plug and play.
-If you choose to make your own harness like I did, make sure you test each wire before installing it in your car or wrapping it up in tape and loom.
Gauges
-I ran the check engine light feed from the computer to the dash light so my check engine light works as it should.
-I am using a V-6 oil pressure gauge in the dash (80 psi) which is needed for accuracy with the LT1 sending unit which is 80 psi.
-Temp gauge will work fine since the values are the same.
-Tach will work with the white signal wire from the PCM. I have heard you may need to use the firewall mounted filter on some conversions if the tach is jumpy.
-The speedo is the odd ball. You can get the tail housing modified for a cable unit, you can convert to a 90-92 V-8 speedo cluster, or go all after market and get a programmable setup.
-I will be going full aftermarket in the future so for now I will use the gauges that I can and use my GPS to tell me how fast I am going.
I am sure I left something out and someone can chime in here, but this will cover most of the key points of the conversion. Good luck and ask questions!
Last edited by supr_fly03; 05-03-2011 at 10:43 AM.
Trending Topics
05-04-2011, 10:07 AM
#8
Member
Thread Starter
Join Date: Feb 2011
Location: Pacific NW
Posts: 182
Likes: 0
Received 0 Likes
on
0 Posts
Car: 99 Tahoe, 98 Buick, 84 Camaro
Engine: 350, 2800, none at the moment
Re: My 1984 HO Z28 LT1/T-56 Swap Log
Dont be intimidated by the swap. There is a bunch of small stuff that needs to be done, but take your time and do it right. Dont rush anything. It will take longer to go back and fix/troubleshoot/repair something that could have been done right the first time.
I will be finishing my LT1 conversion in the next day or two. I have been working on it mostly nights and some times a whole day on a weekend.
Here are some things I learned along the way:
I will be finishing my LT1 conversion in the next day or two. I have been working on it mostly nights and some times a whole day on a weekend.
Here are some things I learned along the way:
Thanks a ton for taking the time to provide all that info. It is really nice to have all in one spot. It's amazing how much some knowledge can help the confidence.
I will be taking my time since right now I have no funds for car parts and I definitely want things right or at least function reliably. I have set a budget and have been saving some pretty good money on the big stuff providing everything checks out on the LT1.
The car is pretty much stripped down to the carpet and dash at the moment I want to remove the carpet and inspect the floors, especially after reading your post supr_fly03. I had to remove the front couling to replace the headlight header piece.
I too do a lot of shopping at pick-n-pull, cant beat it for price, and the trial run you get taking the part out. I have learned a few things taking the parts out of the wrecked cars that helped me avoid issues with mine.
I'll be checking out pocket's post as you mentioned as well.
My next steps are to get the valve covers, oil pan and intake off the LT1 so I can inspect it then I'll continue to take stuff out of the car for prep and paint. I'll try to keep pics coming of the progress.
Thanks again!
Last edited by newZman; 05-04-2011 at 10:10 AM. Reason: typo +
05-04-2011, 12:19 PM
#9
Member
iTrader: (2)
Join Date: Nov 2009
Location: Hubert, NC
Posts: 436
Likes: 0
Received 0 Likes
on
0 Posts
Car: 83 Z28
Engine: F-body LT1 swap
Transmission: T-56 swap
Axle/Gears: 10 bolt w/ 28 spl posi, 4.10, disks
Re: My 1984 HO Z28 LT1/T-56 Swap Log
Congradulations on your swap completion! I am just getting started and can't wait, dont know how you manage to sleep.
Thanks a ton for taking the time to provide all that info. It is really nice to have all in one spot. It's amazing how much some knowledge can help the confidence.
I will be taking my time since right now I have no funds for car parts and I definitely want things right or at least function reliably. I have set a budget and have been saving some pretty good money on the big stuff providing everything checks out on the LT1.
The car is pretty much stripped down to the carpet and dash at the moment I want to remove the carpet and inspect the floors, especially after reading your post supr_fly03. I had to remove the front couling to replace the headlight header piece.
I too do a lot of shopping at pick-n-pull, cant beat it for price, and the trial run you get taking the part out. I have learned a few things taking the parts out of the wrecked cars that helped me avoid issues with mine.
I'll be checking out pocket's post as you mentioned as well.
My next steps are to get the valve covers, oil pan and intake off the LT1 so I can inspect it then I'll continue to take stuff out of the car for prep and paint. I'll try to keep pics coming of the progress.
Thanks again!

The biggest thing to check while the motor is out is the bottom end. I almost didnt cause the place I got the motor from said they wouldnt warranty it if I did, but I took the advise of the fellow 3rd genners on here and I found every rod bearing (top and bottom shells) was to the copper. The motor only had 120k on it! I pulled the crank and sent it to a local and highly recommended machine shop to have the crank polished. The machine shop got me the Clevite rod and main bearings I wanted, standard volume oil pump, and polished the crank for less than $180. I would pay more in gas to return the motor for another one.
 05-06-2011, 12:20 PM
#10
Member
Thread Starter
Join Date: Feb 2011
Location: Pacific NW
Posts: 182
Likes: 0
Received 0 Likes
on
0 Posts
Car: 99 Tahoe, 98 Buick, 84 Camaro
Engine: 350, 2800, none at the moment
Re: My 1984 HO Z28 LT1/T-56 Swap Log
Well alright! I actually got a couple hours in and started tearing into the LT1. I dont have air setup here and dont have air tools anyway so I'll be doing everything with hand tools. I got a bunch of pictures to help show progress... Man that's work getting all those pics in order  .
.
That's good to know supr_fly03, I'll be taking those caps off for sure now, I may even plasti-gauge them even if they look okay.
The motor is currently being supported by an engine hoist, my engine stand is pretty wimpy so I want to take some weight off before I put it on there.
To start with I sprayed penatrant on everything that even looked like it might be difficult. I actually sprayed the exhaust flanges a couple days before when I was pulling number off the motor. Here's a couple pics of the exhaust manifolds on the engine.


After removing the O2 sensors before and after the catalytic convertor on the odd side and the rubber hoses. I went ahead and removed the attached exhaust components at the exhuast flanges. I used a 7/8" flare nut wrench to remove the sensors after hitting them with a little penatrant. Everything came apart pretty smooth.

As you can see I had to leave the sensor on the even side cause the wrench wall was too thich to fit over the sensor, no big deal.
I went ahead and pulled the exhaust manifolds. No issues here everything came apart smoothly.

.That's good to know supr_fly03, I'll be taking those caps off for sure now, I may even plasti-gauge them even if they look okay.
I hear you on the pick-n-pull, my car is a pull-a-part bastard child. I even have mopar stuff on it now!
The biggest thing to check while the motor is out is the bottom end. I almost didnt cause the place I got the motor from said they wouldnt warranty it if I did, but I took the advise of the fellow 3rd genners on here and I found every rod bearing (top and bottom shells) was to the copper. The motor only had 120k on it! I pulled the crank and sent it to a local and highly recommended machine shop to have the crank polished. The machine shop got me the Clevite rod and main bearings I wanted, standard volume oil pump, and polished the crank for less than $180. I would pay more in gas to return the motor for another one.
The biggest thing to check while the motor is out is the bottom end. I almost didnt cause the place I got the motor from said they wouldnt warranty it if I did, but I took the advise of the fellow 3rd genners on here and I found every rod bearing (top and bottom shells) was to the copper. The motor only had 120k on it! I pulled the crank and sent it to a local and highly recommended machine shop to have the crank polished. The machine shop got me the Clevite rod and main bearings I wanted, standard volume oil pump, and polished the crank for less than $180. I would pay more in gas to return the motor for another one.
To start with I sprayed penatrant on everything that even looked like it might be difficult. I actually sprayed the exhaust flanges a couple days before when I was pulling number off the motor. Here's a couple pics of the exhaust manifolds on the engine.
After removing the O2 sensors before and after the catalytic convertor on the odd side and the rubber hoses. I went ahead and removed the attached exhaust components at the exhuast flanges. I used a 7/8" flare nut wrench to remove the sensors after hitting them with a little penatrant. Everything came apart pretty smooth.
As you can see I had to leave the sensor on the even side cause the wrench wall was too thich to fit over the sensor, no big deal.
I went ahead and pulled the exhaust manifolds. No issues here everything came apart smoothly.
Last edited by newZman; 05-06-2011 at 12:33 PM. Reason: Additional info
05-06-2011, 12:29 PM
#11
Member
Thread Starter
Join Date: Feb 2011
Location: Pacific NW
Posts: 182
Likes: 0
Received 0 Likes
on
0 Posts
Car: 99 Tahoe, 98 Buick, 84 Camaro
Engine: 350, 2800, none at the moment
Re: My 1984 HO Z28 LT1/T-56 Swap Log
Here are a couple pics of the motor mounts as they were on the engine. I had to remove the main mount bolt in order to access all of the bolts attaching the mount to the engine.


Engine mounts came off easily, no penatrant required.

Here are couple pics of the sides of the motor with exhaust manifolds and mounts removed. What's left of the wire harness is still in tact and none of the front engine components have been disturbed.


That's where I am now, next steps will be to remove the front engine components, plugs and wires and put the engine on an engine stand.
Engine mounts came off easily, no penatrant required.
Here are couple pics of the sides of the motor with exhaust manifolds and mounts removed. What's left of the wire harness is still in tact and none of the front engine components have been disturbed.
That's where I am now, next steps will be to remove the front engine components, plugs and wires and put the engine on an engine stand.
05-07-2011, 05:38 PM
#12

Re: My 1984 HO Z28 LT1/T-56 Swap Log
The LT1 F-body PS line always seemed to short for me. I used to have a b-body PS line ('95 caprice LT1 line) for my f-body LT1 setup that I had to bend to fit but recently upgraded to a SS braided PS line from Z28ricer. Here is a pic of the braided PS line installed.


Last edited by Firebat; 05-07-2011 at 05:48 PM.
05-09-2011, 09:31 AM
#13
Member
Thread Starter
Join Date: Feb 2011
Location: Pacific NW
Posts: 182
Likes: 0
Received 0 Likes
on
0 Posts
Car: 99 Tahoe, 98 Buick, 84 Camaro
Engine: 350, 2800, none at the moment
Re: My 1984 HO Z28 LT1/T-56 Swap Log
Didn't get anything done this weekend so not much to report right now.
Is there anything on the front of the LT1 that will cause me problems later if I remove it now, optics etc...?
05-11-2011, 12:53 PM
#14
Member
Thread Starter
Join Date: Feb 2011
Location: Pacific NW
Posts: 182
Likes: 0
Received 0 Likes
on
0 Posts
Car: 99 Tahoe, 98 Buick, 84 Camaro
Engine: 350, 2800, none at the moment
Re: My 1984 HO Z28 LT1/T-56 Swap Log
I managed to get little work done yesterday, I finished pulling the wire harness, controls and fuel rails.
Here's how it is now;


I ran into unknown, for me at least. The connector on the fuel lines where they connect to the fuel rail I had not seen before. After inspecting the connector it was obvious it wasn't coming off without a special tool.

Here's how it is now;
I ran into unknown, for me at least. The connector on the fuel lines where they connect to the fuel rail I had not seen before. After inspecting the connector it was obvious it wasn't coming off without a special tool.
05-11-2011, 01:01 PM
#15
Member
Thread Starter
Join Date: Feb 2011
Location: Pacific NW
Posts: 182
Likes: 0
Received 0 Likes
on
0 Posts
Car: 99 Tahoe, 98 Buick, 84 Camaro
Engine: 350, 2800, none at the moment
Re: My 1984 HO Z28 LT1/T-56 Swap Log
Since I dont know what the special tool is I improvised my own by cutting up an RTV applicator nozzle.


I sliced the largest diameter portion of applicator down the side like shown so it could be placed around the metal part of the fuel line.

Push the "special tool" as far as possibble into the connector.

While maintaining pressure on the tool slowly slide the connector away from the the metal line. When the tools hard stops continue to pull the line off. It should come off with little force. If the line does not slide off easily you can turn the tool around to use the larger diameter end.
I hope this helps someone else.

I sliced the largest diameter portion of applicator down the side like shown so it could be placed around the metal part of the fuel line.
Push the "special tool" as far as possibble into the connector.
While maintaining pressure on the tool slowly slide the connector away from the the metal line. When the tools hard stops continue to pull the line off. It should come off with little force. If the line does not slide off easily you can turn the tool around to use the larger diameter end.
I hope this helps someone else.
Last edited by newZman; 05-11-2011 at 01:02 PM. Reason: typo
05-11-2011, 05:48 PM
#16
Moderator

iTrader: (14)
Join Date: Mar 2000
Location: Littleton, CO USA
Posts: 43,169
Likes: 0
Received 36 Likes
on
34 Posts
Car: 82 Berlinetta/57 Bel Air
Engine: LS1/LQ4
Transmission: 4L60E/4L80E
Axle/Gears: 12B-3.73/9"-3.89
05-12-2011, 10:20 AM
#18
Member
Thread Starter
Join Date: Feb 2011
Location: Pacific NW
Posts: 182
Likes: 0
Received 0 Likes
on
0 Posts
Car: 99 Tahoe, 98 Buick, 84 Camaro
Engine: 350, 2800, none at the moment
Re: My 1984 HO Z28 LT1/T-56 Swap Log
Thanks for the tools tip you guys. I'll have to get one of those in my tool box when I get some funds going again, if that happens  . Anyway, I love tools, you can't have too many.
Yeah, I get creative in a pinch.
. Anyway, I love tools, you can't have too many.Yeah, I get creative in a pinch
.
05-12-2011, 10:26 AM
#19
Member
Thread Starter
Join Date: Feb 2011
Location: Pacific NW
Posts: 182
Likes: 0
Received 0 Likes
on
0 Posts
Car: 99 Tahoe, 98 Buick, 84 Camaro
Engine: 350, 2800, none at the moment
Re: My 1984 HO Z28 LT1/T-56 Swap Log
I took the valve covers and intake mainfold off yesterday afternoon, here's how it sits now;

So what do you all think, should I pull the heads? If I pull them should I have them worked or are they good stock?
Not sure the mileage on the motor and I dont get inside them enough to tell anything unless they had obvious damage, which I dont see.
So what do you all think, should I pull the heads? If I pull them should I have them worked or are they good stock?
Not sure the mileage on the motor and I dont get inside them enough to tell anything unless they had obvious damage, which I dont see.
05-12-2011, 10:09 PM
#20
Senior Member
iTrader: (3)
Join Date: Aug 2008
Location: Dixon, IL
Posts: 706
Likes: 0
Received 0 Likes
on
0 Posts
Car: 91 RS
Engine: LTwon
Transmission: T-56
Axle/Gears: Both
Re: My 1984 HO Z28 LT1/T-56 Swap Log
if your not on a "strict" budget, i would take them off and have them cleaned, decked, and inspected. Might as well since its out and your unaware of the mileage. All that and a new set of gaskets might set you back a few hundred bucks, but well worth it IMO.
05-20-2011, 04:23 PM
#21
Member
Thread Starter
Join Date: Feb 2011
Location: Pacific NW
Posts: 182
Likes: 0
Received 0 Likes
on
0 Posts
Car: 99 Tahoe, 98 Buick, 84 Camaro
Engine: 350, 2800, none at the moment
Re: My 1984 HO Z28 LT1/T-56 Swap Log
Here it is heads, water pump, harmonic balancer and distributor removed.

Here is a close up of one of the cylinder walls, they all looked like this alot of the hone marks are still there and no lips at all.

I got the oil pan off, next will be to remove the oil pump and check a bearing or 2. Hopefully I can get a gasket set do some minimal head stuff and put it back together.

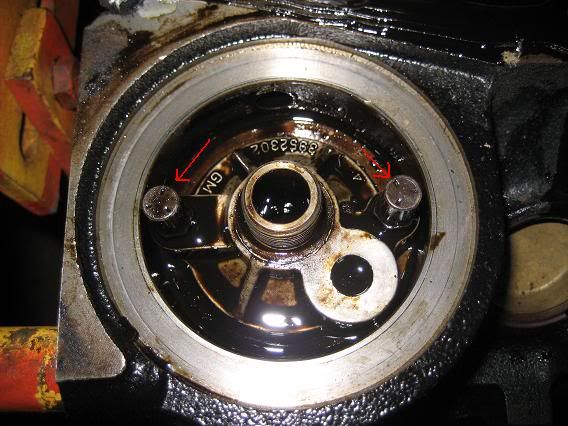
I have a question about this part shown below;

It looks like the 2 studs pointed to would interfere with an oil filter if I try to put one on like this... This engine came with an oil cooler setup but I see alot of folks running without them. My question is this;
Is there another piece or adapter required to use just a filter without the cooler?
05-22-2011, 12:52 PM
#22
Member
Thread Starter
Join Date: Feb 2011
Location: Pacific NW
Posts: 182
Likes: 0
Received 0 Likes
on
0 Posts
Car: 99 Tahoe, 98 Buick, 84 Camaro
Engine: 350, 2800, none at the moment
Re: My 1984 HO Z28 LT1/T-56 Swap Log
I have a question about this part shown below;
It looks like the 2 studs pointed to would interfere with an oil filter if I try to put one on like this... This engine came with an oil cooler setup but I see alot of folks running without them. My question is this;
Is there another piece or adapter required to use just a filter without the cooler?
05-23-2011, 11:07 AM
#23
Member
Thread Starter
Join Date: Feb 2011
Location: Pacific NW
Posts: 182
Likes: 0
Received 0 Likes
on
0 Posts
Car: 99 Tahoe, 98 Buick, 84 Camaro
Engine: 350, 2800, none at the moment
Re: My 1984 HO Z28 LT1/T-56 Swap Log
I had an idea, maybe a good one maybe not... I guess if it is a bad idea nobady will participate .
I found while looking around trying to decide what I wanted to do that there is a ton of stuff here on TGO, some that related to my situation and some that did not.
I figured since I am just getting started I will be showing up here and there and I thought I would like to put links in this thread to other swap logs, either completed or on ongoing that are intended to be completed.
If you want a plug for your swap thread let me know here and I'll start adding them to a list on the first post of this thread. I am not going to link to threads without the thread owner's ok. Provide a brief discription (car existing to new) if not already described in the thread link.
Got a swap you want to plug?
I guess if it is a bad idea nobady will participate .I found while looking around trying to decide what I wanted to do that there is a ton of stuff here on TGO, some that related to my situation and some that did not.
I figured since I am just getting started I will be showing up here and there and I thought I would like to put links in this thread to other swap logs, either completed or on ongoing that are intended to be completed.
If you want a plug for your swap thread let me know here and I'll start adding them to a list on the first post of this thread. I am not going to link to threads without the thread owner's ok. Provide a brief discription (car existing to new) if not already described in the thread link.
Got a swap you want to plug?
05-23-2011, 12:08 PM
#24
Supreme Member
iTrader: (24)
Join Date: Jun 2005
Location: NC
Posts: 7,925
Likes: 0
Received 131 Likes
on
71 Posts
Car: 92 Firebird
Engine: Supercharged 6.0
Transmission: T56
Axle/Gears: 8.8 3.73
Re: My 1984 HO Z28 LT1/T-56 Swap Log
Sounds like a good idea for a new thread to cluster similar swaps together. I wouldnt put them all in this thread with your log
05-23-2011, 12:41 PM
#25
Member
Thread Starter
Join Date: Feb 2011
Location: Pacific NW
Posts: 182
Likes: 0
Received 0 Likes
on
0 Posts
Car: 99 Tahoe, 98 Buick, 84 Camaro
Engine: 350, 2800, none at the moment
Re: My 1984 HO Z28 LT1/T-56 Swap Log
Thanks for the support Pocket.
06-02-2011, 11:17 AM
#26
Member
Thread Starter
Join Date: Feb 2011
Location: Pacific NW
Posts: 182
Likes: 0
Received 0 Likes
on
0 Posts
Car: 99 Tahoe, 98 Buick, 84 Camaro
Engine: 350, 2800, none at the moment
Re: My 1984 HO Z28 LT1/T-56 Swap Log
In my state there are some counties that require emissions testing, so I am curious if the LT1 would pass the tail pipe check?
I would like to go with the GM performance hotcam kit, lifter set and headers as an upgrade to the stock setup.
I would like to go with the GM performance hotcam kit, lifter set and headers as an upgrade to the stock setup.
06-02-2011, 09:07 PM
#27
Member
Thread Starter
Join Date: Feb 2011
Location: Pacific NW
Posts: 182
Likes: 0
Received 0 Likes
on
0 Posts
Car: 99 Tahoe, 98 Buick, 84 Camaro
Engine: 350, 2800, none at the moment
Re: My 1984 HO Z28 LT1/T-56 Swap Log
Anyone have some info??? Will the LT1 with the mods I mention have better or as good tail pipe emissions as the original carburated 305?
06-04-2011, 10:56 AM
#29
Member
Thread Starter
Join Date: Feb 2011
Location: Pacific NW
Posts: 182
Likes: 0
Received 0 Likes
on
0 Posts
Car: 99 Tahoe, 98 Buick, 84 Camaro
Engine: 350, 2800, none at the moment
Re: My 1984 HO Z28 LT1/T-56 Swap Log
The above question was addressed here; https://www.thirdgen.org/forums/ltx-...swap-into.html
06-05-2011, 06:14 PM
#30
Member
Thread Starter
Join Date: Feb 2011
Location: Pacific NW
Posts: 182
Likes: 0
Received 0 Likes
on
0 Posts
Car: 99 Tahoe, 98 Buick, 84 Camaro
Engine: 350, 2800, none at the moment
Re: My 1984 HO Z28 LT1/T-56 Swap Log
I guess I'll have to make multiple posts to get this out, a little more time to work would be nice  .
.
Anyway I managed to get over and work a little bit on the car. I got all the engine electrical out of the engine bay. It was kinda cool how the engine stuff is for the most part seperate from the car stuff, right down to the connector at the firewall going to the fusebox. Here's apicture of that.

I
.Anyway I managed to get over and work a little bit on the car. I got all the engine electrical out of the engine bay. It was kinda cool how the engine stuff is for the most part seperate from the car stuff, right down to the connector at the firewall going to the fusebox. Here's apicture of that.
I
06-05-2011, 06:28 PM
#31
Member
Thread Starter
Join Date: Feb 2011
Location: Pacific NW
Posts: 182
Likes: 0
Received 0 Likes
on
0 Posts
Car: 99 Tahoe, 98 Buick, 84 Camaro
Engine: 350, 2800, none at the moment
Re: My 1984 HO Z28 LT1/T-56 Swap Log
Here's a picture of the wire harness that came out... How's that for intimidating? 

I will be sorting through this pretty soon to figure out what needs to stay and what needs to go. I will probably end up using the relays from a fourth gen as was suggested.
I will be sorting through this pretty soon to figure out what needs to stay and what needs to go. I will probably end up using the relays from a fourth gen as was suggested.
06-05-2011, 06:38 PM
#32
Member
Thread Starter
Join Date: Feb 2011
Location: Pacific NW
Posts: 182
Likes: 0
Received 0 Likes
on
0 Posts
Car: 99 Tahoe, 98 Buick, 84 Camaro
Engine: 350, 2800, none at the moment
Re: My 1984 HO Z28 LT1/T-56 Swap Log
The wire harness that came with the engine was cut at the location shown, but I was lucky enough to get anohter wire harness and ECM with the LT1/T-56 deal I got. I have the original 96/97 ECM that was with the motor and a 94/95 ECM that came with the spare wire harness.
I may get a dual tune setup going between the 2 ECM and make an adapter so that I can swap between the two. Not sure which way to go there yet.
Here's a pic of the original wireharness that was cut;

Here is the spare one that has 2 - 3 less connectors than what was on the original harness.

I will be removing the covering from the wires to verify/change pinouts to match the ECM I decide to go with.
I may get a dual tune setup going between the 2 ECM and make an adapter so that I can swap between the two. Not sure which way to go there yet.
Here's a pic of the original wireharness that was cut;
Here is the spare one that has 2 - 3 less connectors than what was on the original harness.
I will be removing the covering from the wires to verify/change pinouts to match the ECM I decide to go with.
06-05-2011, 06:46 PM
#33
Member
Thread Starter
Join Date: Feb 2011
Location: Pacific NW
Posts: 182
Likes: 0
Received 0 Likes
on
0 Posts
Car: 99 Tahoe, 98 Buick, 84 Camaro
Engine: 350, 2800, none at the moment
Re: My 1984 HO Z28 LT1/T-56 Swap Log
I also got the dash out so that I can route things and make changes easier and replace the heater that looks like it blew up, it was held together with duct tape. Here's a pic of a dash shot;

I still need to get the door panels, seals, head liner off and carpets out of the interior. I also noticed the seal at the bottom of the windshield is deteriorating and probably needs some attention as well. I'm not looking forward to the door panels, I'v never been able to get them off without damage.
That's pretty much where she sits now I'll keep updating as things progress.
06-06-2011, 02:27 PM
#34
Member
Thread Starter
Join Date: Feb 2011
Location: Pacific NW
Posts: 182
Likes: 0
Received 0 Likes
on
0 Posts
Car: 99 Tahoe, 98 Buick, 84 Camaro
Engine: 350, 2800, none at the moment
Re: My 1984 HO Z28 LT1/T-56 Swap Log
I almost forgot, I also got the oil pump and balancer hub pulled. I still need to look at the bearings but I am waiting till I have a way to torque them properly... I have a torque wrench just no way to tell exactly how far I have turned the bolt. I will pull the cam closer to the time I am going to replace it.
Next steps to get the rest of the stuff out of the engine comparment, remove pedals, carpet, seals and door panels.
Next steps to get the rest of the stuff out of the engine comparment, remove pedals, carpet, seals and door panels.
06-11-2011, 10:28 PM
#35
Member
Thread Starter
Join Date: Feb 2011
Location: Pacific NW
Posts: 182
Likes: 0
Received 0 Likes
on
0 Posts
Car: 99 Tahoe, 98 Buick, 84 Camaro
Engine: 350, 2800, none at the moment
Re: My 1984 HO Z28 LT1/T-56 Swap Log
I got the windshield wipers assembly, powerstearing pump and purge canister out of the engine compartment... Here's a pic of the firewall area with the wiper assembly removed.

I want to get the master cylinder, booster and fuel lines out of the engine compartment next. Going pretty slow right now.
I want to get the master cylinder, booster and fuel lines out of the engine compartment next. Going pretty slow right now.
06-12-2011, 08:39 PM
#36
Senior Member
iTrader: (3)
Join Date: Aug 2008
Location: Dixon, IL
Posts: 706
Likes: 0
Received 0 Likes
on
0 Posts
Car: 91 RS
Engine: LTwon
Transmission: T-56
Axle/Gears: Both
Re: My 1984 HO Z28 LT1/T-56 Swap Log
Make sure your careful removing the fuel lines, I twisted up the ends of mine and had to cut them back and flared up, not a big deal if you have a flaring tool (which I don't lol).
I didn't bother with the booster, I always hear what a PITA it was just to clean up the bay a little more, just didn't seem worth it IMO.
Making steady progress my friend!
I didn't bother with the booster, I always hear what a PITA it was just to clean up the bay a little more, just didn't seem worth it IMO.
Making steady progress my friend!
06-13-2011, 09:53 AM
#37
Member
Thread Starter
Join Date: Feb 2011
Location: Pacific NW
Posts: 182
Likes: 0
Received 0 Likes
on
0 Posts
Car: 99 Tahoe, 98 Buick, 84 Camaro
Engine: 350, 2800, none at the moment
Re: My 1984 HO Z28 LT1/T-56 Swap Log
Make sure your careful removing the fuel lines, I twisted up the ends of mine and had to cut them back and flared up, not a big deal if you have a flaring tool (which I don't lol).
I didn't bother with the booster, I always hear what a PITA it was just to clean up the bay a little more, just didn't seem worth it IMO.
Making steady progress my friend!
I didn't bother with the booster, I always hear what a PITA it was just to clean up the bay a little more, just didn't seem worth it IMO.
Making steady progress my friend!
Your comment about the fuel lines brings to mind a couple questions; I am not sure which way to go yet, either replace the fuel tank with a 4th gen or just get a fuel pump and put it in my tank. I am not fimiliar with tanks and pumps, from what I read it looks like it is posssible to put a pump in my tank for the LT1, but I like the changing out the whole tank idea too.
Will I be able to use my existing fuel lines with the new pump setup I go with?
Or can I grab the lines evap canister and tank from a 4th gen and put that in there? Is there anything else I will need to grab?
I should be able to get some more stuff done this week I had some time free up.
06-13-2011, 12:36 PM
#38
Senior Member
iTrader: (3)
Join Date: Aug 2008
Location: Dixon, IL
Posts: 706
Likes: 0
Received 0 Likes
on
0 Posts
Car: 91 RS
Engine: LTwon
Transmission: T-56
Axle/Gears: Both
Re: My 1984 HO Z28 LT1/T-56 Swap Log
Like i said before, it all depends on your budget. The fourth gen tank requires alittle mod, as far as i know you just have to trim back the filler neck. You can just buy a 255phl fuel pump and it will swap right in the place of your old pump.
I went ahead and bought a Walbro 255(dispite the controversy over them failing) and it came with a bolt in harness, and new rubber hose for the pump to the sender. I havent fired it up yet so i couldnt tell you how it works, but ive heard people running them with 0 problems.
As far as fuel lines you can use your stock lines with no mods, and Purechoice makes a direct hookup 24" and 30" fuel line set for $99.95, and comes with all nessesary hardware and connectors. Or you can cut them back, and flare it to keep them hidden down the firewall. Or you can get go to Napa, or a shop that makes hyraulic lines, and get them made for about $15. OR you can get AN' fittings, and about 20' of steel braided hose for about $250(view Pockets fuel fuel line diagram)
like i said, its all about what you want to spend.
06-13-2011, 01:23 PM
#39
Member
Thread Starter
Join Date: Feb 2011
Location: Pacific NW
Posts: 182
Likes: 0
Received 0 Likes
on
0 Posts
Car: 99 Tahoe, 98 Buick, 84 Camaro
Engine: 350, 2800, none at the moment
Re: My 1984 HO Z28 LT1/T-56 Swap Log
Like i said before, it all depends on your budget. The fourth gen tank requires alittle mod, as far as i know you just have to trim back the filler neck. You can just buy a 255phl fuel pump and it will swap right in the place of your old pump.
I went ahead and bought a Walbro 255(dispite the controversy over them failing) and it came with a bolt in harness, and new rubber hose for the pump to the sender. I havent fired it up yet so i couldnt tell you how it works, but ive heard people running them with 0 problems.
As far as fuel lines you can use your stock lines with no mods, and Purechoice makes a direct hookup 24" and 30" fuel line set for $99.95, and comes with all nessesary hardware and connectors. Or you can cut them back, and flare it to keep them hidden down the firewall. Or you can get go to Napa, or a shop that makes hyraulic lines, and get them made for about $15. OR you can get AN' fittings, and about 20' of steel braided hose for about $250(view Pockets fuel fuel line diagram)
like i said, its all about what you want to spend.
I went ahead and bought a Walbro 255(dispite the controversy over them failing) and it came with a bolt in harness, and new rubber hose for the pump to the sender. I havent fired it up yet so i couldnt tell you how it works, but ive heard people running them with 0 problems.
As far as fuel lines you can use your stock lines with no mods, and Purechoice makes a direct hookup 24" and 30" fuel line set for $99.95, and comes with all nessesary hardware and connectors. Or you can cut them back, and flare it to keep them hidden down the firewall. Or you can get go to Napa, or a shop that makes hyraulic lines, and get them made for about $15. OR you can get AN' fittings, and about 20' of steel braided hose for about $250(view Pockets fuel fuel line diagram)
like i said, its all about what you want to spend.
The original 305 in this car, when I got it, had a Holley mechanical fuel pump on the motor... Will I still be able to use my tank and lines? Did these come stock with mechanical fuel pumps with the L69 option or did someone possibly replace the in-tank fuel pump with the mechanical one?
06-16-2011, 10:56 AM
#40
Member
Thread Starter
Join Date: Feb 2011
Location: Pacific NW
Posts: 182
Likes: 0
Received 0 Likes
on
0 Posts
Car: 99 Tahoe, 98 Buick, 84 Camaro
Engine: 350, 2800, none at the moment
Re: My 1984 HO Z28 LT1/T-56 Swap Log
I made a little more progress over the last couple days� I decided I needed to pull everything under the dash out so I could remove rust and paint things under there. Plus I am not sure which way to go with pedals yet.
Check out the rust I found under the dash. It is, for the most part, on the drivers side only, but all the little nut-plate clips along the top of the dash are rusty too, except the last one on the passenger side. Pretty much superficial, but rust is rust and it has to go.


I pulled most of the under dash wire harness out of the way, everything is still connected at the fuse box. I am still debating on what to do about the instrument panel.

I also got the heater core out, I have to say that was a PITA and all the foam on the flapper doors is rotted, not sure how to handle that yet.

Here�s a better picture of the pedals after they were removed from the car. I haven�t got the bracket out yet, that will happen when I remove the booster.

I also managed to get the carpets pulled but ran out of space on my camera before getting the pics so I will add those later.
Next steps; I need to get some plugs so I can cap off the brake lines and remove the booster, master cylinder, brake lines and fuel lines. The booster should be pretty easy to remove now that everything is out of the way.
The fuel lines are connected at the tank with rubber hose and clamps is this typical for high pressure lines?
Check out the rust I found under the dash. It is, for the most part, on the drivers side only, but all the little nut-plate clips along the top of the dash are rusty too, except the last one on the passenger side. Pretty much superficial, but rust is rust and it has to go.
I pulled most of the under dash wire harness out of the way, everything is still connected at the fuse box. I am still debating on what to do about the instrument panel.
I also got the heater core out, I have to say that was a PITA and all the foam on the flapper doors is rotted, not sure how to handle that yet.
Here�s a better picture of the pedals after they were removed from the car. I haven�t got the bracket out yet, that will happen when I remove the booster.
I also managed to get the carpets pulled but ran out of space on my camera before getting the pics so I will add those later.
Next steps; I need to get some plugs so I can cap off the brake lines and remove the booster, master cylinder, brake lines and fuel lines. The booster should be pretty easy to remove now that everything is out of the way.
The fuel lines are connected at the tank with rubber hose and clamps is this typical for high pressure lines?
06-20-2011, 11:16 AM
#41
Member
Thread Starter
Join Date: Feb 2011
Location: Pacific NW
Posts: 182
Likes: 0
Received 0 Likes
on
0 Posts
Car: 99 Tahoe, 98 Buick, 84 Camaro
Engine: 350, 2800, none at the moment
Re: My 1984 HO Z28 LT1/T-56 Swap Log
Here is the inspiration for my project... This is my sons first car project and I have done a great job of keeping my hands out of it and letting him do it himself  . So I have to say I had nothing to do with this one except a little hand here and there. This is a late 70's chevy blazer with a 350 ,flat top pistons, 228/228 cam, Eelbrock Performer with a Holley 670 and Headman headers.

He just put the MSD ignition stuff in this weekend.
I hope you all dont mind me being off topic but I thought it looks cool so I would share. I'll get some updates to the Camaro project soon.
. So I have to say I had nothing to do with this one except a little hand here and there. This is a late 70's chevy blazer with a 350 ,flat top pistons, 228/228 cam, Eelbrock Performer with a Holley 670 and Headman headers.He just put the MSD ignition stuff in this weekend.
I hope you all dont mind me being off topic but I thought it looks cool so I would share. I'll get some updates to the Camaro project soon.
06-24-2011, 10:40 AM
#42
Member
Thread Starter
Join Date: Feb 2011
Location: Pacific NW
Posts: 182
Likes: 0
Received 0 Likes
on
0 Posts
Car: 99 Tahoe, 98 Buick, 84 Camaro
Engine: 350, 2800, none at the moment
Re: My 1984 HO Z28 LT1/T-56 Swap Log
Here are the pics of the interior with the carpets removed. Not really any rust on the floor pan, there is evidence of someone bottoming out though�

Here is a closer view of the dents in the floor, not real big but a couple of them sliced clear through.

It also looks like either the DS or yoke from the rearend came up and hit the top of the DS tunnel. This also created a slice through the steel.

Under the carpet at the feet of the driver and passenger where these visor brackets, strangest thing I ever seen in a car straight from the factory. There were visible lumps under the carpet where these were but I couldn't see any dents underneath the car, so I dismissed it until I pulled the carpets. I was wondering if any has seen this before?

That's what I got now I am working on pulling the fuel lines and brake lines off now. I figure I might as well since I am removing the rearend and front K member anyway.
Here is a closer view of the dents in the floor, not real big but a couple of them sliced clear through.
It also looks like either the DS or yoke from the rearend came up and hit the top of the DS tunnel. This also created a slice through the steel.
Under the carpet at the feet of the driver and passenger where these visor brackets, strangest thing I ever seen in a car straight from the factory. There were visible lumps under the carpet where these were but I couldn't see any dents underneath the car, so I dismissed it until I pulled the carpets. I was wondering if any has seen this before?
That's what I got now I am working on pulling the fuel lines and brake lines off now. I figure I might as well since I am removing the rearend and front K member anyway.
08-10-2011, 11:44 AM
#43
Member
Thread Starter
Join Date: Feb 2011
Location: Pacific NW
Posts: 182
Likes: 0
Received 0 Likes
on
0 Posts
Car: 99 Tahoe, 98 Buick, 84 Camaro
Engine: 350, 2800, none at the moment
Re: My 1984 HO Z28 LT1/T-56 Swap Log
I dont have any progress to report but I have decided what I want to with the engine...
LT4 hotcam kit
GM Performance Roller lifter kit
58mm Throttle body
New opti-spark
New timing chain and gears
My kids got me my first new parts to go on the engine... Here are the valve cover I want to use;

That's all I got for now, I will keep things updated as I go. I'm saving for the hotcam kit now so I can get the engine closed up as soon as possible.
LT4 hotcam kit
GM Performance Roller lifter kit
58mm Throttle body
New opti-spark
New timing chain and gears
My kids got me my first new parts to go on the engine... Here are the valve cover I want to use;
That's all I got for now, I will keep things updated as I go. I'm saving for the hotcam kit now so I can get the engine closed up as soon as possible.
08-11-2011, 07:10 AM
#44
Senior Member
iTrader: (3)
Join Date: Aug 2008
Location: Dixon, IL
Posts: 706
Likes: 0
Received 0 Likes
on
0 Posts
Car: 91 RS
Engine: LTwon
Transmission: T-56
Axle/Gears: Both
Re: My 1984 HO Z28 LT1/T-56 Swap Log
Make sure they will not have clearance issues with your alternator. Some people have had to take notches out of the back of the alt. To get it to fit
08-11-2011, 09:46 AM
#45
Member
Thread Starter
Join Date: Feb 2011
Location: Pacific NW
Posts: 182
Likes: 0
Received 0 Likes
on
0 Posts
Car: 99 Tahoe, 98 Buick, 84 Camaro
Engine: 350, 2800, none at the moment
Re: My 1984 HO Z28 LT1/T-56 Swap Log
I went through my original high res images and found a couple that show the area pretty good. It looks like I will have to do something there as well. It sort of looks like there might be room but the factory valve covers are tapered back on the ends making it look like there is more room than there actually is.
Here's some croppings of the area of concern. Got to love them pics;


It definitely hangs over the flange.
03-27-2013, 10:27 AM
#46
Senior Member

Join Date: Mar 2013
Location: South Carolina
Posts: 548
Likes: 0
Received 11 Likes
on
9 Posts
Car: 92 Vette, 83 Camaro
Engine: 305 going to 95 LT1
Transmission: 5 speed going to T56 6 speed
Axle/Gears: 3.73 posi with disc brakes
Re: My 1984 HO Z28 LT1/T-56 Swap Log
Is there more to this thread? Is there a page 2? I got to 08-11-2011 and it ended. This is a good thread and I would love to see it to the end.
03-28-2013, 12:18 AM
#48
Member
Thread Starter
Join Date: Feb 2011
Location: Pacific NW
Posts: 182
Likes: 0
Received 0 Likes
on
0 Posts
Car: 99 Tahoe, 98 Buick, 84 Camaro
Engine: 350, 2800, none at the moment
Re: My 1984 HO Z28 LT1/T-56 Swap Log
I have been working contract so money has been tight, making up for off time when working makes it hard to catch up. On a positive note I intend on finishing this, I have everything waiting for me to get off my ars and get to it.
I have to admit I have been pretty comfortable parking it on the couch, I could be out there sanding the parts that need it under the dash and the engine bay. I have some small parts that were bare metal from under there that I could rattle can too, I'm sure I could find more.
I'll try to get something new to share soon, things are not going so bad right now, I just need to get motivated. Thanks for the inspiration.
newZman
03-28-2013, 09:54 AM
#49
Senior Member
Join Date: Mar 2013
Location: South Carolina
Posts: 548
Likes: 0
Received 11 Likes
on
9 Posts
Car: 92 Vette, 83 Camaro
Engine: 305 going to 95 LT1
Transmission: 5 speed going to T56 6 speed
Axle/Gears: 3.73 posi with disc brakes
Re: My 1984 HO Z28 LT1/T-56 Swap Log
Hey Zman, I'm counting on you to get going as I need help on my swap which is almost identical to yours. Between the two of us and this forum, we should be able to get these Camaros running. I know up there in the NW, the weather doesn't always cooperate, but Spring is here and we have all summer to work it. My weather problem is heat in the summer, but now I'll have some shade. I started a thread with some pictures, follow along and toss me some advice.
See ya
Tom (Strick1 on the forum)
See ya
Tom (Strick1 on the forum)
03-29-2013, 07:57 PM
#50
Member
Thread Starter
Join Date: Feb 2011
Location: Pacific NW
Posts: 182
Likes: 0
Received 0 Likes
on
0 Posts
Car: 99 Tahoe, 98 Buick, 84 Camaro
Engine: 350, 2800, none at the moment
Re: My 1984 HO Z28 LT1/T-56 Swap Log
Strick, theres probably, at least, 100 other folks out here better qualified to give advice than me, I am much better at taking advice than giving it, when it comes to working on these cars. My experience is limited to some skills with tools and some work on aircraft back in the service a lifetime ago.