
'87 Formula Vin H getting the LSx treatment- She's ALIVE! swap docs collection inside
 02-07-2011, 12:10 AM
#51
Member

iTrader: (5)
Join Date: Mar 2003
Location: Cali
Posts: 409
Likes: 0
Received 0 Likes
on
0 Posts
Car: '85 Camaro
Engine: LS1
Transmission: T56
Axle/Gears: 3.73
Re: '87 Formula getting the LSx treatment
Awesome step-by-step you got going on. Keep us updated with any progress you got going on. This has been helping me a lot on getting the idea of what to do when its my turn 
Nice work man!
Nice work man!
 02-07-2011, 06:39 AM
#52
Re: '87 Formula getting the LSx treatment
That motor looks great! You are doing everything right thats for sure! Def good to see a car coming together like this.
Your boy is going to FREAK the heck out when he pops the hood and sees that sitting in there....
J.
Your boy is going to FREAK the heck out when he pops the hood and sees that sitting in there....
J.
02-12-2011, 09:24 PM
#53
Member
Thread Starter
iTrader: (3)
Join Date: Jul 2008
Location: ND
Posts: 385
Likes: 0
Received 0 Likes
on
0 Posts
Car: 1986 Firebird
Engine: 6.0L LSX
Transmission: 4L60E
Axle/Gears: 3.73
Re: '87 Formula getting the LSx treatment
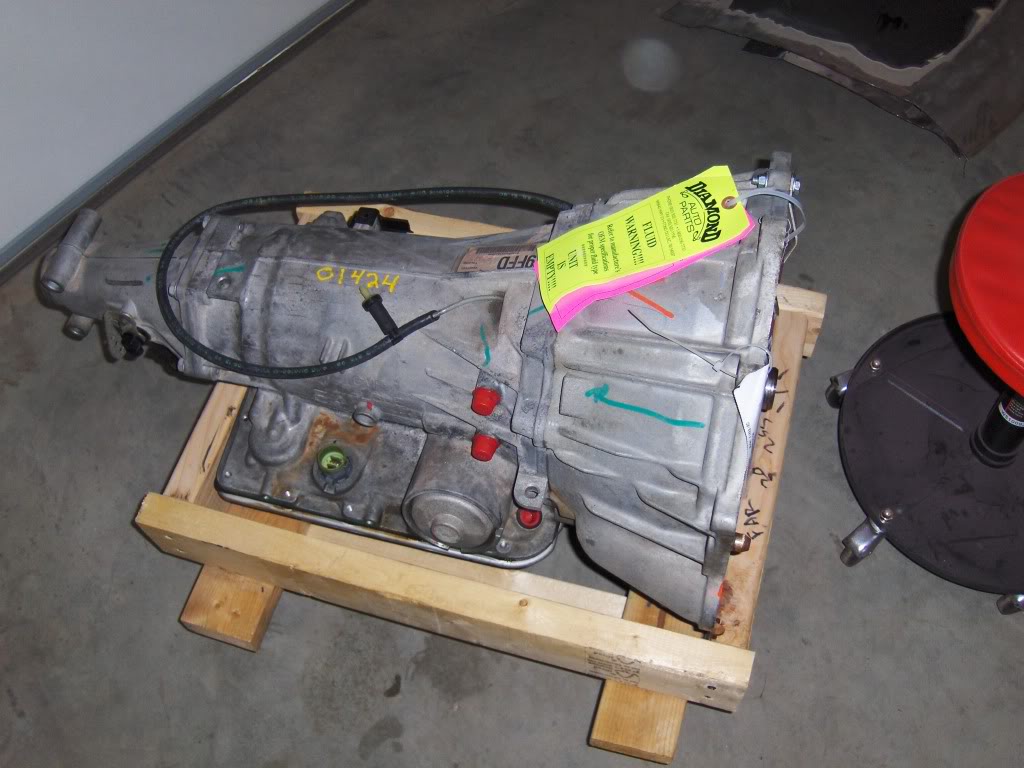
time for another weekend update...transmission showed up. 4L60E out of a 99 firebird with 27k miles.
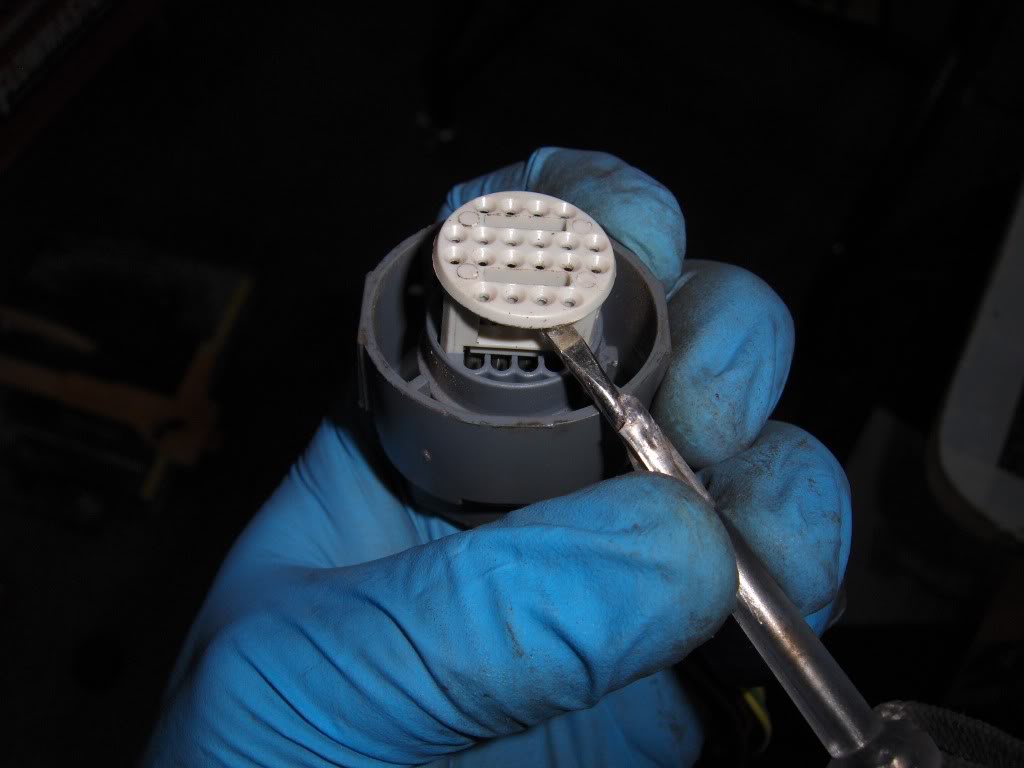
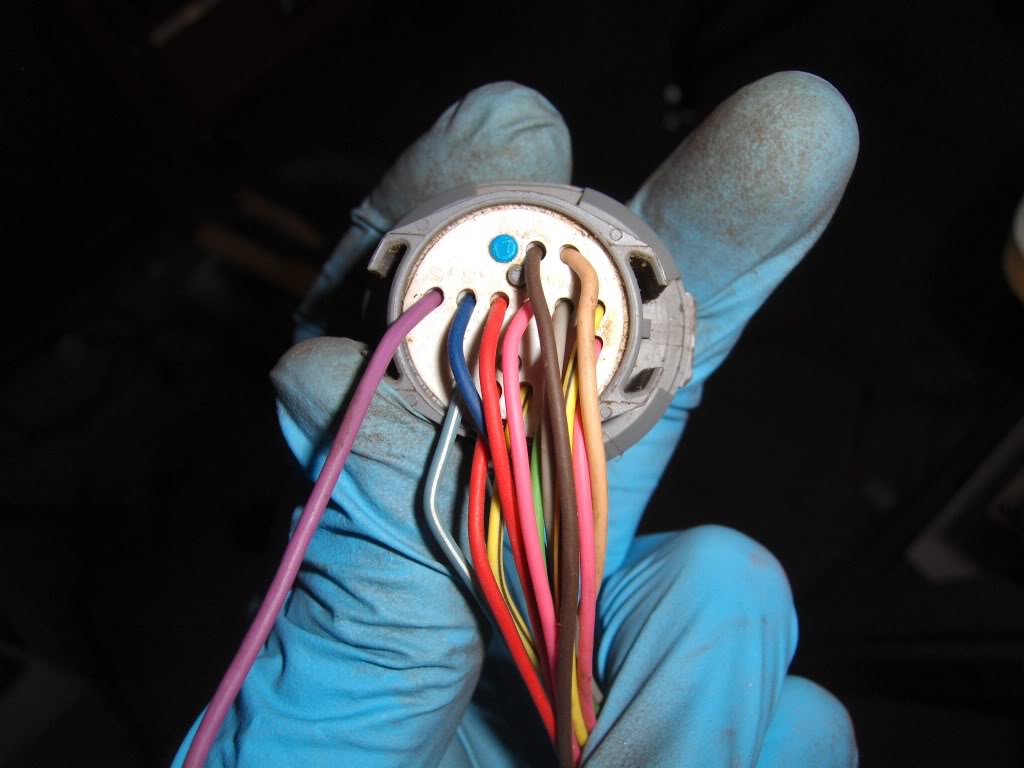
So since I have a truck harness I had to convert the 4L80E transmission connector to work with the 4L60E. The 4L80E uses 2 less wires so I had to add a couple and move one pin.
Essentially what needs to be done to get this to work is to move the brown wire from pin S to pin U. Pin U and T are plugged so the plugs need to be removed. Once that has been done it's as simple as inserting a couple of new pins that you can either make from scratch or salvage from unused pins elsewhere in you harness.
First things that need to be done is remove the cover on the connector
Then pull out pin U plug
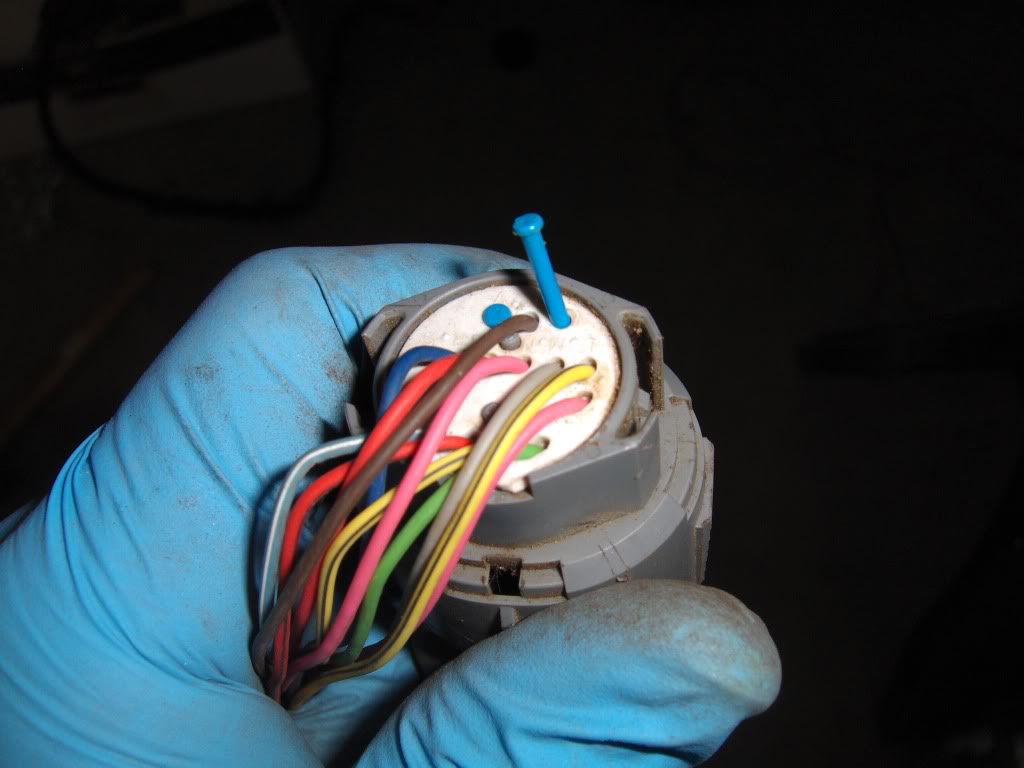
Then T plug
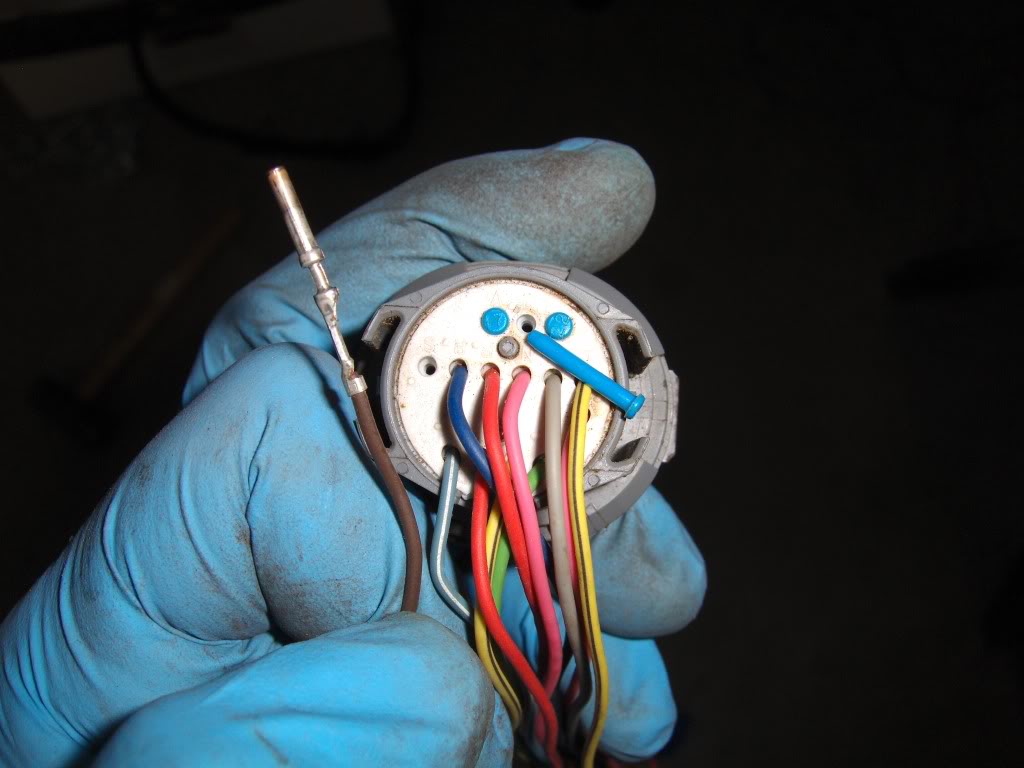
Then all that is left is to reinsert your brown wire that was originally in S into pin U and add the other two wires into pin S and T. PCM assignment is:
C2-42 to T
C2-2 to U
C1-79 to S
C2-47 to B
C2-48 to A
Should look like this when you are done
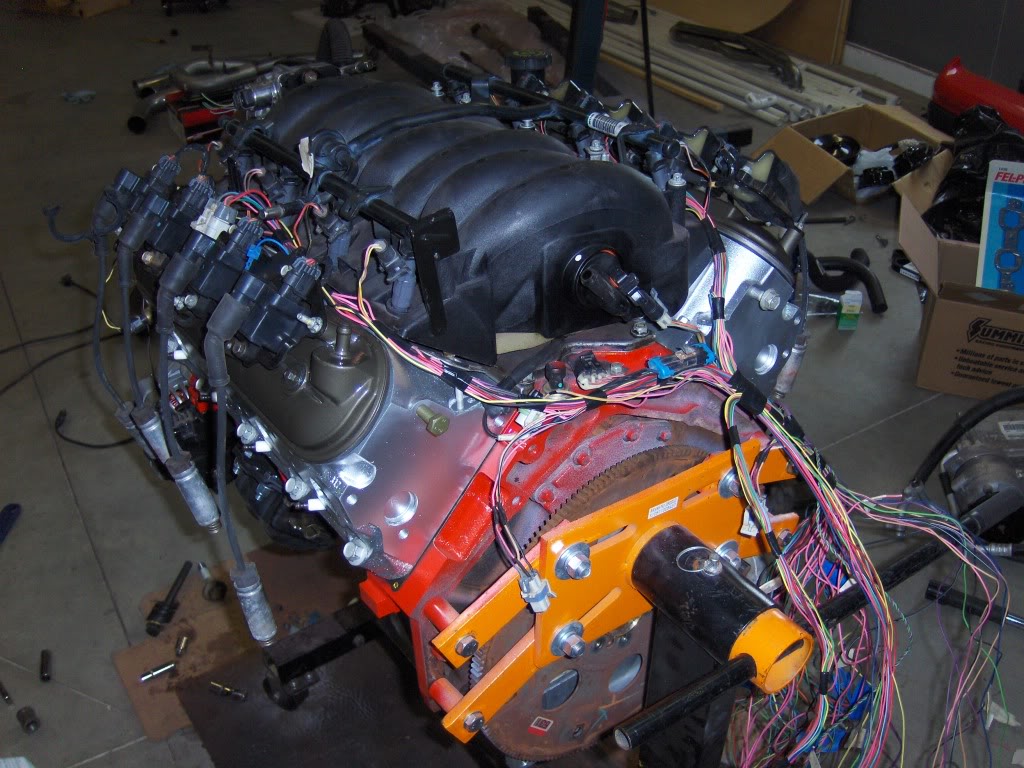
Still waiting for some wire to show up so I can finish the IAT and TPS sensors but decided to do some preliminary routing so the harness is a little more manageable and not such a rats nest.
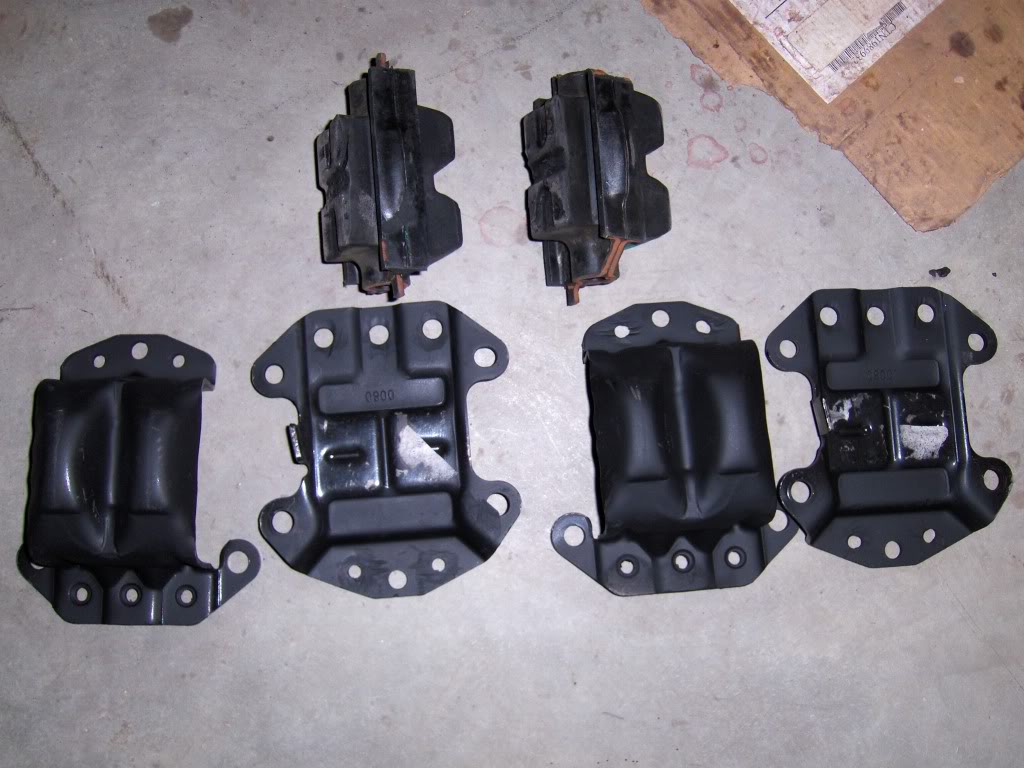
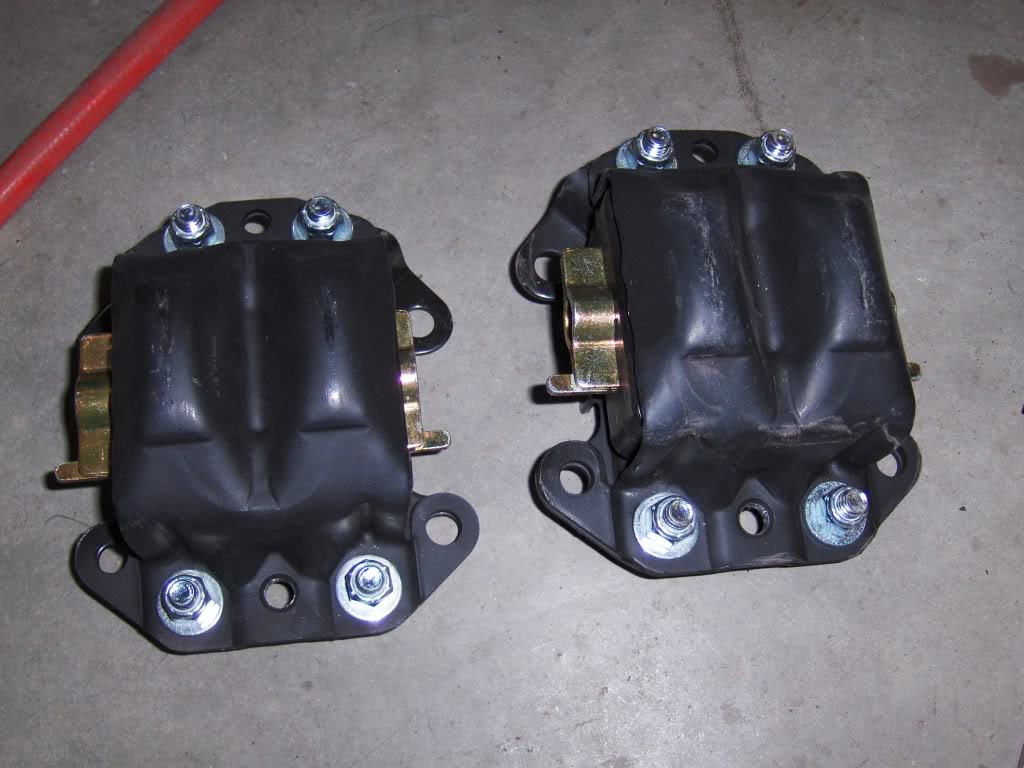
Next on my punch list is to get the motor mounts taken apart and new poly inserts installed. Rivets drilled out and ready for poly inserts.
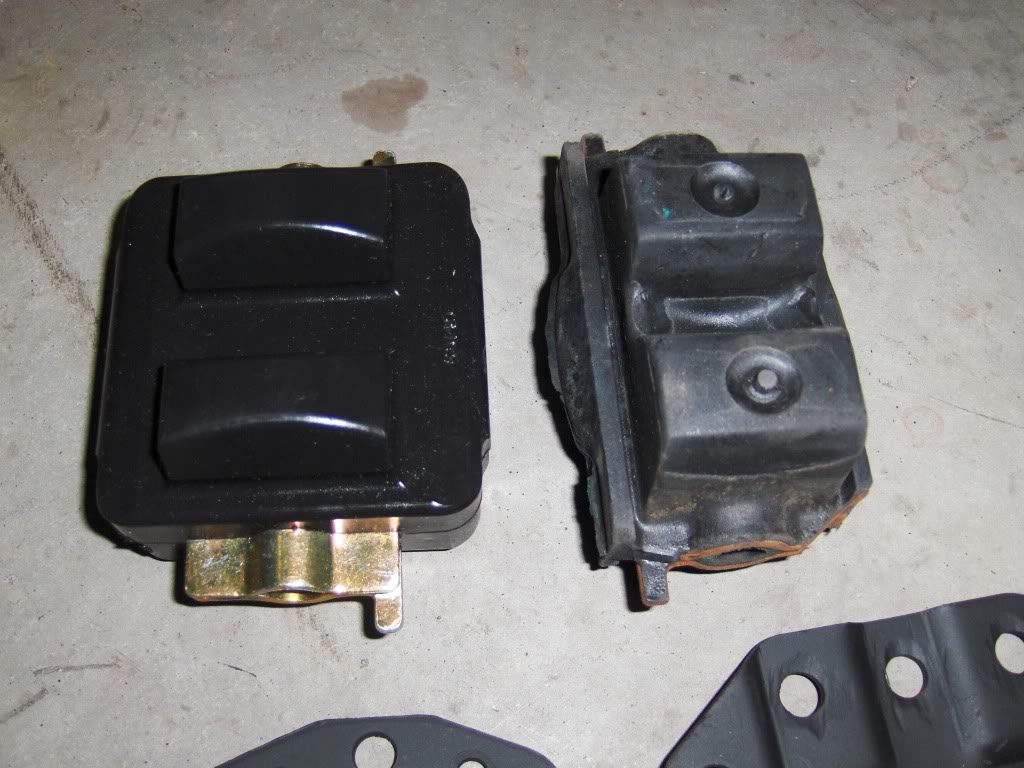
Difference between OEM rubber insert and the new Poly insert

So since I have a truck harness I had to convert the 4L80E transmission connector to work with the 4L60E. The 4L80E uses 2 less wires so I had to add a couple and move one pin.
Essentially what needs to be done to get this to work is to move the brown wire from pin S to pin U. Pin U and T are plugged so the plugs need to be removed. Once that has been done it's as simple as inserting a couple of new pins that you can either make from scratch or salvage from unused pins elsewhere in you harness.
First things that need to be done is remove the cover on the connector

Then pull out pin U plug

Then T plug

Then all that is left is to reinsert your brown wire that was originally in S into pin U and add the other two wires into pin S and T. PCM assignment is:
C2-42 to T
C2-2 to U
C1-79 to S
C2-47 to B
C2-48 to A
Should look like this when you are done

Still waiting for some wire to show up so I can finish the IAT and TPS sensors but decided to do some preliminary routing so the harness is a little more manageable and not such a rats nest.

Next on my punch list is to get the motor mounts taken apart and new poly inserts installed. Rivets drilled out and ready for poly inserts.

Difference between OEM rubber insert and the new Poly insert

Last edited by mille_3; 03-02-2014 at 07:02 PM.
02-12-2011, 09:34 PM
#54
COTM Editor
iTrader: (22)
Join Date: Mar 2001
Posts: 10,011
Likes: 0
Received 1,919 Likes
on
1,309 Posts
Car: '89 Firebird
Engine: 7.0L
Transmission: T56
Re: '87 Formula getting the LSx treatment
Subscribed. 
02-12-2011, 09:44 PM
#55
Member
Thread Starter
iTrader: (3)
Join Date: Jul 2008
Location: ND
Posts: 385
Likes: 0
Received 0 Likes
on
0 Posts
Car: 1986 Firebird
Engine: 6.0L LSX
Transmission: 4L60E
Axle/Gears: 3.73
Re: '87 Formula getting the LSx treatment
Motor mounts re-assembled
So now it's time for the engine to finally make it to it's home. But before I do that I had to do some minor things that is easier to do with the engine out of the car.
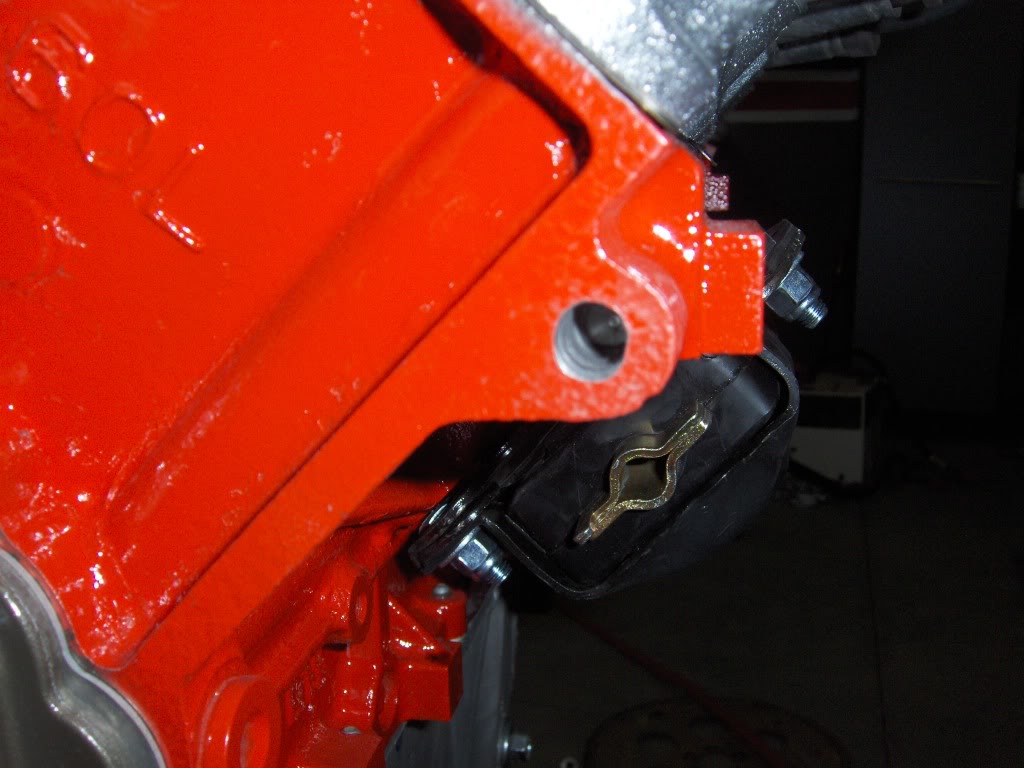
Drilled and tapped the boss on the block to accept the bolt for the alternator. Including this for visual reference for those who are not sure where it needs to be drilled. (BTW the motor mounts are upside down in this shot)
Since I'm using an LS6 intake I have no way of attaching a throttle bracket since the LS6's are typically DBW throttle bodies.
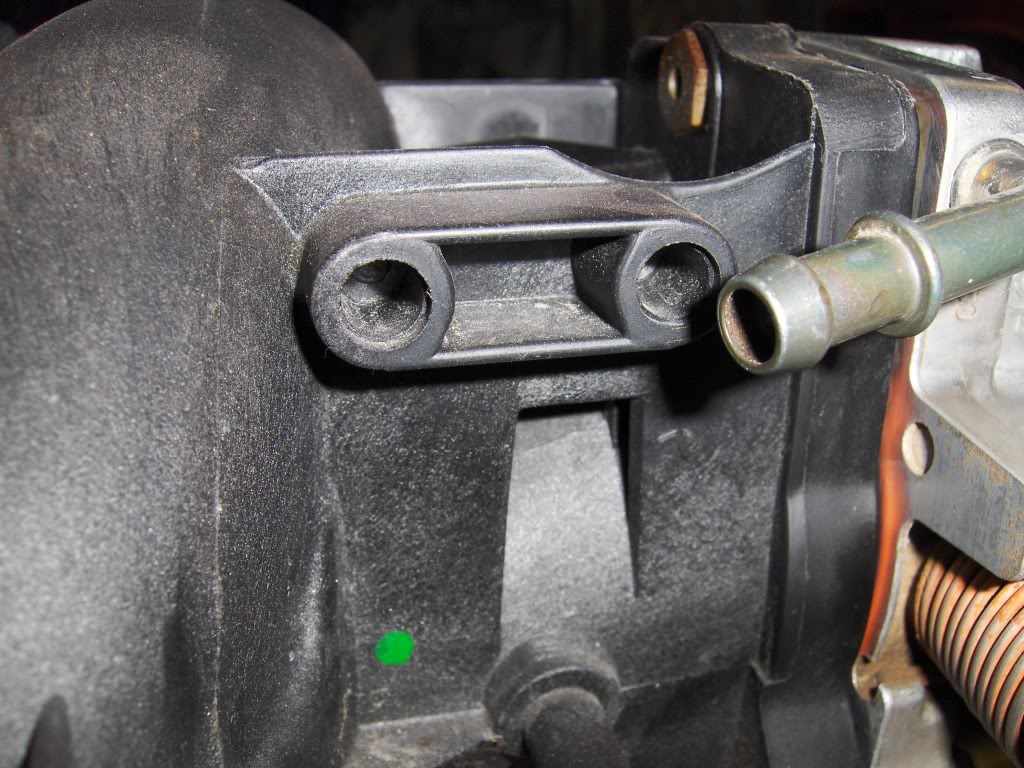
So, I found some pretty cool inserts after a bit of searching around on the internet. You should be able to find these by using the part number in the bag. I think they were like $9 for a bag of 20
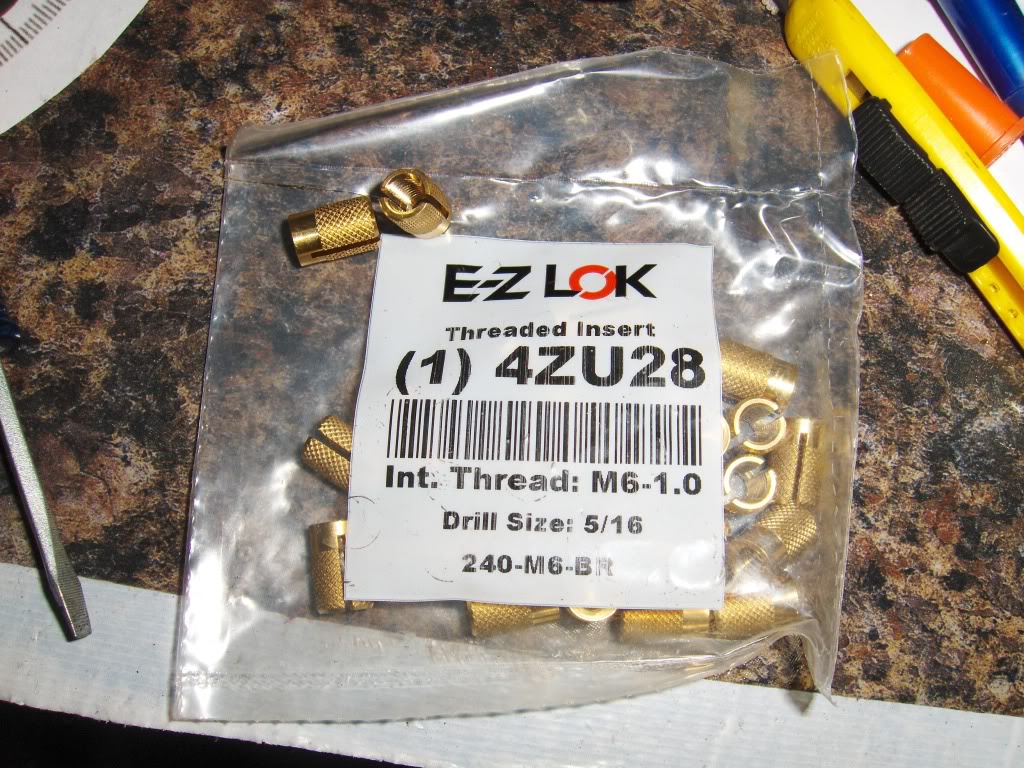
They simply push in to the cavities on the intake and once you insert screws they won't go anywhere.
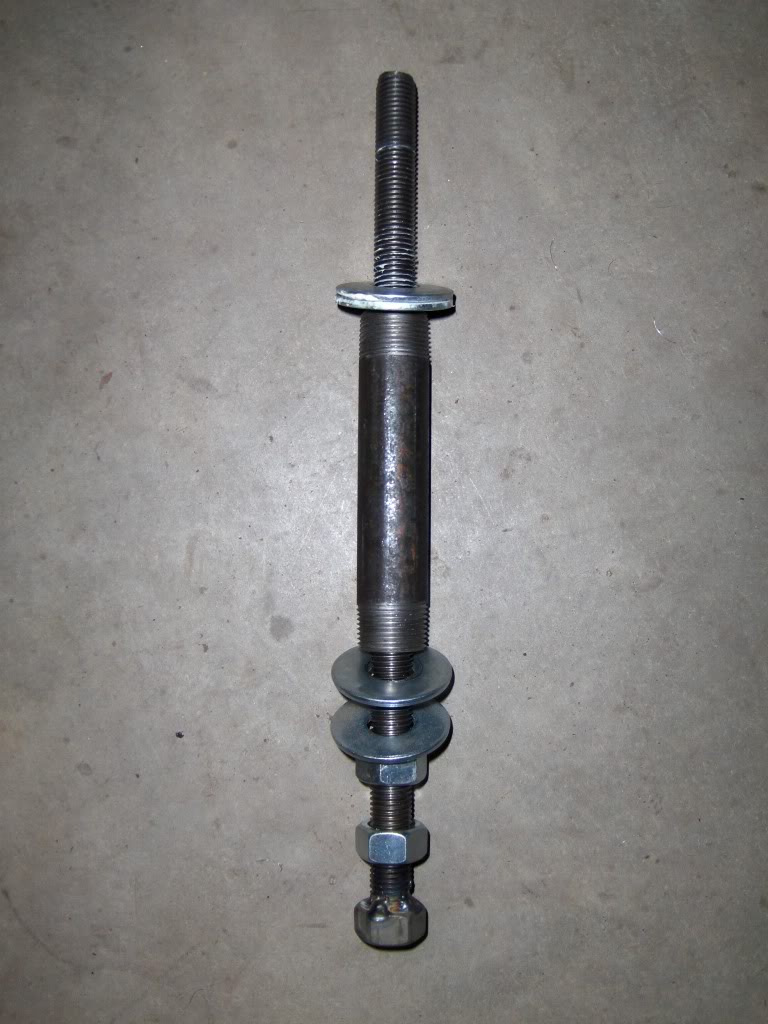
I had to press on the crankshaft balancer. The service manual tells you to crank the hell out of a longer bolt (240ft/lbs) and then use a new bolt and torque to spec. I don't have a torque wrench that goes to 240ft/lbs nor do I want to run the risk of stripping/breaking a bolt off in the crank shaft so I made a simple tool out of threaded rod and a few bolts. The end bolt I welded on to have something to hold against. Been done many ways...this is my version. The most important thing to get this thing to work smoothly is to grease the 2 washers. Worked like butter.
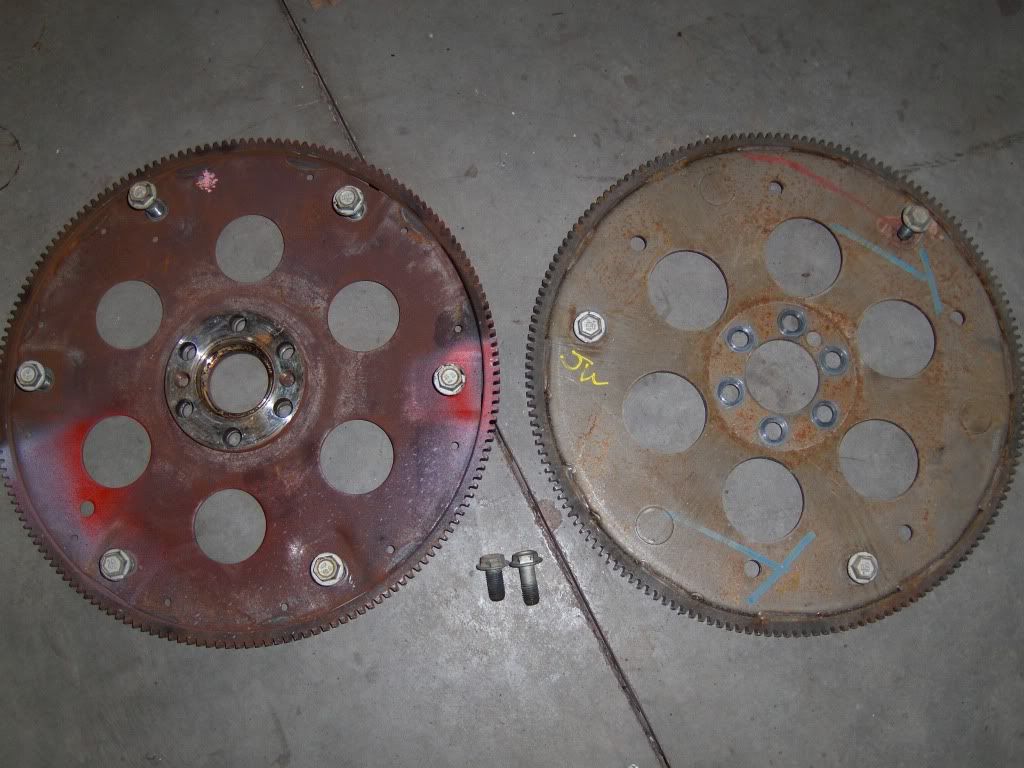
Last thing I had to take care of was to swap out the 4L80E flex plate with a 4L60E. Here you can see the difference between the two. Notice that the 4L80E uses 6 bolts and a spacer for the converter and the 4L60E uses 3 bolts and no spacer. Also notice the difference in length between the bolts (short=4L60E long=4L80E).
FINALLY!!! I'm getting somewhere. The motor mount through bolts were a major pain in the ***. Could have used another set of hands to have made it easier. Spent and hour rocking the engine back and forth until I finally got the damn things through.
That's it for this weekend. Waiting on some more parts, but should hopefully have some more progress next weekend.

So now it's time for the engine to finally make it to it's home. But before I do that I had to do some minor things that is easier to do with the engine out of the car.
Drilled and tapped the boss on the block to accept the bolt for the alternator. Including this for visual reference for those who are not sure where it needs to be drilled. (BTW the motor mounts are upside down in this shot)

Since I'm using an LS6 intake I have no way of attaching a throttle bracket since the LS6's are typically DBW throttle bodies.

So, I found some pretty cool inserts after a bit of searching around on the internet. You should be able to find these by using the part number in the bag. I think they were like $9 for a bag of 20

They simply push in to the cavities on the intake and once you insert screws they won't go anywhere.

I had to press on the crankshaft balancer. The service manual tells you to crank the hell out of a longer bolt (240ft/lbs) and then use a new bolt and torque to spec. I don't have a torque wrench that goes to 240ft/lbs nor do I want to run the risk of stripping/breaking a bolt off in the crank shaft so I made a simple tool out of threaded rod and a few bolts. The end bolt I welded on to have something to hold against. Been done many ways...this is my version. The most important thing to get this thing to work smoothly is to grease the 2 washers. Worked like butter.

Last thing I had to take care of was to swap out the 4L80E flex plate with a 4L60E. Here you can see the difference between the two. Notice that the 4L80E uses 6 bolts and a spacer for the converter and the 4L60E uses 3 bolts and no spacer. Also notice the difference in length between the bolts (short=4L60E long=4L80E).

FINALLY!!! I'm getting somewhere. The motor mount through bolts were a major pain in the ***. Could have used another set of hands to have made it easier. Spent and hour rocking the engine back and forth until I finally got the damn things through.

That's it for this weekend. Waiting on some more parts, but should hopefully have some more progress next weekend.
Last edited by mille_3; 03-02-2014 at 07:07 PM. Reason: Updated links
02-12-2011, 10:22 PM
#56
Member
iTrader: (5)
Join Date: Mar 2003
Location: Cali
Posts: 409
Likes: 0
Received 0 Likes
on
0 Posts
Car: '85 Camaro
Engine: LS1
Transmission: T56
Axle/Gears: 3.73
Re: '87 Formula getting the LSx treatment
Nice progress!!
So HOLD ON!! your telling me since I'm doing a LQ4 also, I have to drill/tap that boss hole to make the f-body alternator fit???
So HOLD ON!! your telling me since I'm doing a LQ4 also, I have to drill/tap that boss hole to make the f-body alternator fit???
02-12-2011, 10:46 PM
#57
Supreme Member
iTrader: (24)
Join Date: Jun 2005
Location: NC
Posts: 7,935
Likes: 0
Received 145 Likes
on
79 Posts
Car: 91 Trans Am
Engine: LSA
Transmission: T56 AWD
Axle/Gears: 8.8 4.10
Re: '87 Formula getting the LSx treatment
Double check your 4L60E flexplate. It needs to be dished for proper starter ring alignment, hard to judge from your pics
daddy, yes all iron blocks require the hole drilled/tapped to use a 98-02 Fbody alt bracket. The Fbody bracket has 3 bolts in the front and one on the side. The iron block has one hole in the proper spot, one undrilled boss (pictured) and one missing boss that cannot be drilled/tapped. The side mount is still present
daddy, yes all iron blocks require the hole drilled/tapped to use a 98-02 Fbody alt bracket. The Fbody bracket has 3 bolts in the front and one on the side. The iron block has one hole in the proper spot, one undrilled boss (pictured) and one missing boss that cannot be drilled/tapped. The side mount is still present
02-12-2011, 10:47 PM
#58
Member
Thread Starter
iTrader: (3)
Join Date: Jul 2008
Location: ND
Posts: 385
Likes: 0
Received 0 Likes
on
0 Posts
Car: 1986 Firebird
Engine: 6.0L LSX
Transmission: 4L60E
Axle/Gears: 3.73
Re: '87 Formula getting the LSx treatment
Yes. It's not that hard. Mount the bracket and use that as a guide to get a straight hole. Keep in mind that max drill depth is 32.5mm and max tap depth is 25mm.
02-12-2011, 11:04 PM
#60
Supreme Member
iTrader: (30)
Join Date: Sep 2005
Location: O'Fallon, MO
Posts: 6,258
Likes: 0
Received 4 Likes
on
4 Posts
Car: 1991 Z28 convertible built 3/1/1990
Engine: Cammed 6.0L LSX
Transmission: T56
Axle/Gears: custom Ford 8.8", 4.10 gears
Re: '87 Formula getting the LSx treatment
That's strange that your intake didn't have the threaded holes for the cable bracket. I'm running an LS6 intake also and mine had a bracket on it. I ran the part number on my intake and it's off a Z06, not even an fbody intake. 
02-12-2011, 11:15 PM
#61
Member
Thread Starter
iTrader: (3)
Join Date: Jul 2008
Location: ND
Posts: 385
Likes: 0
Received 0 Likes
on
0 Posts
Car: 1986 Firebird
Engine: 6.0L LSX
Transmission: 4L60E
Axle/Gears: 3.73
Re: '87 Formula getting the LSx treatment
Mine was off of a ZO6 as well....I'm not sure what determines if they have the threads or not? Not a big deal for me since I found the inserts.
02-12-2011, 11:27 PM
#62
Supreme Member
iTrader: (24)
Join Date: Jun 2005
Location: NC
Posts: 7,935
Likes: 0
Received 145 Likes
on
79 Posts
Car: 91 Trans Am
Engine: LSA
Transmission: T56 AWD
Axle/Gears: 8.8 4.10
Re: '87 Formula getting the LSx treatment
LS6 intakes were using in 3 cars
Fbodys used cable TBs so they have the inserts
Corvettes and Cadillacs have DBW so they require the inserts in this application
Ive seen adapter brackets to hold the cable off the long bolts for the intake to counter this issue, but with inserts being so common/cheap, why not
Fbodys used cable TBs so they have the inserts
Corvettes and Cadillacs have DBW so they require the inserts in this application
Ive seen adapter brackets to hold the cable off the long bolts for the intake to counter this issue, but with inserts being so common/cheap, why not
02-15-2011, 10:01 AM
#63
Member
Thread Starter
iTrader: (3)
Join Date: Jul 2008
Location: ND
Posts: 385
Likes: 0
Received 0 Likes
on
0 Posts
Car: 1986 Firebird
Engine: 6.0L LSX
Transmission: 4L60E
Axle/Gears: 3.73
Re: '87 Formula getting the LSx treatment
Question for Pocket or anyone else that might have the answer....I'm wiring in the original fan and reusing the connector (which I almost threw away). The black/red wire goes to a fan relay so I got that one covered. The black wire, can I just wire that one in with the other ground commons?
On a side note. Found out today that 20 gauge connector pins are on back order from mouser until May 26. Guess I'll have to make due with what I have.
On a side note. Found out today that 20 gauge connector pins are on back order from mouser until May 26. Guess I'll have to make due with what I have.
02-15-2011, 10:45 AM
#64
Supreme Member
iTrader: (24)
Join Date: Jun 2005
Location: NC
Posts: 7,935
Likes: 0
Received 145 Likes
on
79 Posts
Car: 91 Trans Am
Engine: LSA
Transmission: T56 AWD
Axle/Gears: 8.8 4.10
Re: '87 Formula getting the LSx treatment
Fan motor grounds can be grounded anywhere. Generally dual fan cars have an independent ground for the fans. Single fans are generally in with the main harness ground on a cyl head
02-15-2011, 10:59 AM
#65
Member
Thread Starter
iTrader: (3)
Join Date: Jul 2008
Location: ND
Posts: 385
Likes: 0
Received 0 Likes
on
0 Posts
Car: 1986 Firebird
Engine: 6.0L LSX
Transmission: 4L60E
Axle/Gears: 3.73
Re: '87 Formula getting the LSx treatment
Thanks. That's what I thought, but just wanted to double check before I start taping everything up.
02-18-2011, 09:58 AM
#66
Member
Thread Starter
iTrader: (3)
Join Date: Jul 2008
Location: ND
Posts: 385
Likes: 0
Received 0 Likes
on
0 Posts
Car: 1986 Firebird
Engine: 6.0L LSX
Transmission: 4L60E
Axle/Gears: 3.73
Re: '87 Formula getting the LSx treatment
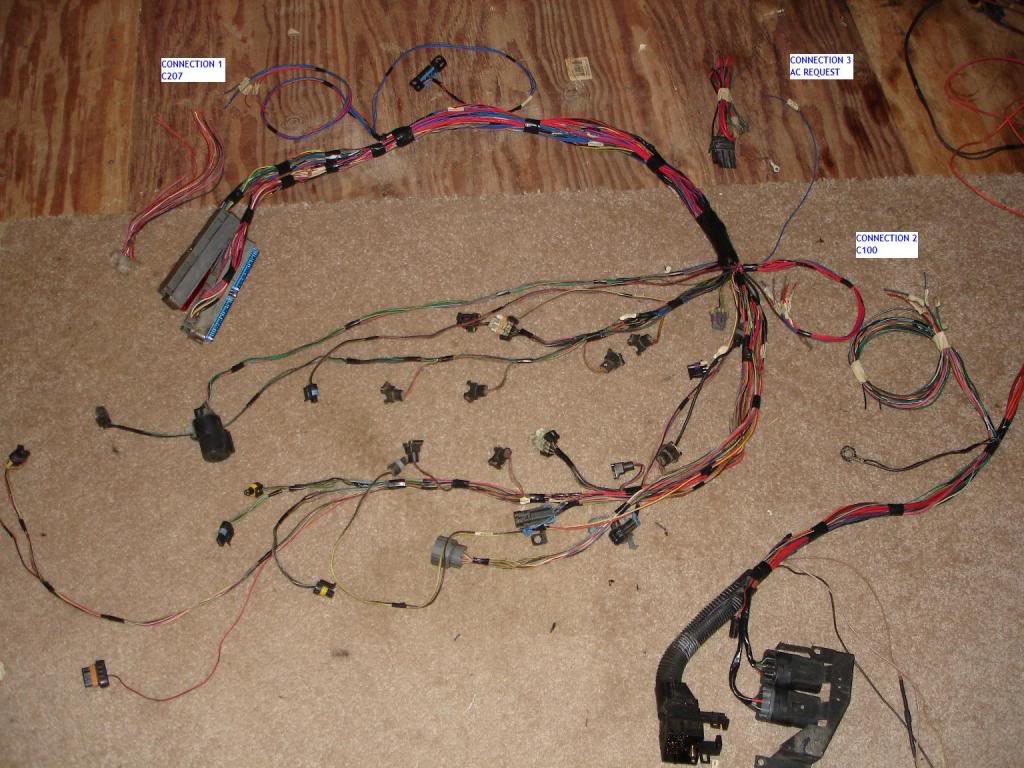
On to the A/C wiring...After a little digging around and a push in the right direction by Pocket, here's where I'm at. For this swap I am using a base calibration out of a 2005 Express Van and even though all the pinouts on a truck harness (GREEN/BLUE) tell you that pin 17 is "not used", it just so happens that with the Van calibration the functionality of "A/C request" is there. So by using the diagram below I'll be controlling the A/C via the PCM. Sweet!
Question: How are you guys that have done this connecting pin 17? Are you just splicing into the green wire at the connector with a butt splice?

Question: How are you guys that have done this connecting pin 17? Are you just splicing into the green wire at the connector with a butt splice?

Last edited by mille_3; 03-02-2014 at 07:08 PM.
02-18-2011, 11:56 AM
#67
Supreme Member
iTrader: (24)
Join Date: Jun 2005
Location: NC
Posts: 7,935
Likes: 0
Received 145 Likes
on
79 Posts
Car: 91 Trans Am
Engine: LSA
Transmission: T56 AWD
Axle/Gears: 8.8 4.10
Re: '87 Formula getting the LSx treatment
Connection #3. Your HVAC connector will have the necessary wire
Please solder the connection
Also make sure your PCM have the IAC driver. Alot of the blue/green PCMs dont
http://www.lt1swap.com/cable_conversion.htm
Please solder the connection
Also make sure your PCM have the IAC driver. Alot of the blue/green PCMs dont
http://www.lt1swap.com/cable_conversion.htm
02-18-2011, 12:13 PM
#68
Member
Thread Starter
iTrader: (3)
Join Date: Jul 2008
Location: ND
Posts: 385
Likes: 0
Received 0 Likes
on
0 Posts
Car: 1986 Firebird
Engine: 6.0L LSX
Transmission: 4L60E
Axle/Gears: 3.73
Re: '87 Formula getting the LSx treatment
Compressor connector to relay is pretty straight forward. I guess what I'm asking is where is the wire that goes from the HVAC controller to the PCM (Pin17)? From what I can gather it's the one coming through the firewall above the trans tunnel. If that is the case, then can I just splice into the green wire at that connector and then on to the PCM(Pin 17)?
02-20-2011, 02:04 PM
#71
Member
Thread Starter
iTrader: (3)
Join Date: Jul 2008
Location: ND
Posts: 385
Likes: 0
Received 0 Likes
on
0 Posts
Car: 1986 Firebird
Engine: 6.0L LSX
Transmission: 4L60E
Axle/Gears: 3.73
Re: '87 Formula getting the LSx treatment
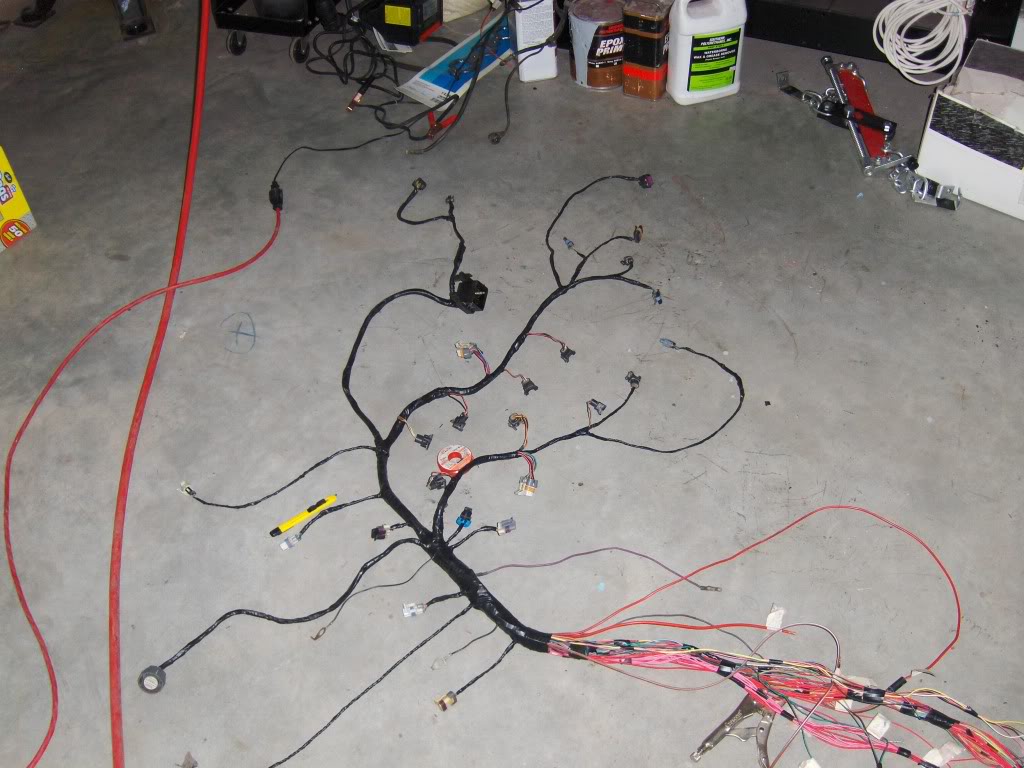
Another weekend spent in the garage, and it feels like I got nothing accomplished. Wiring takes foreveeeeer. But things are starting to come together. Only wire I haven't figured out yet is the TCC Brake Switch/Cruise Control Release Switch Signal wire. I'm guessing that one is somewhere under the dash. I'll save that one for when I have the rest of the rats nest cleaned up a little.
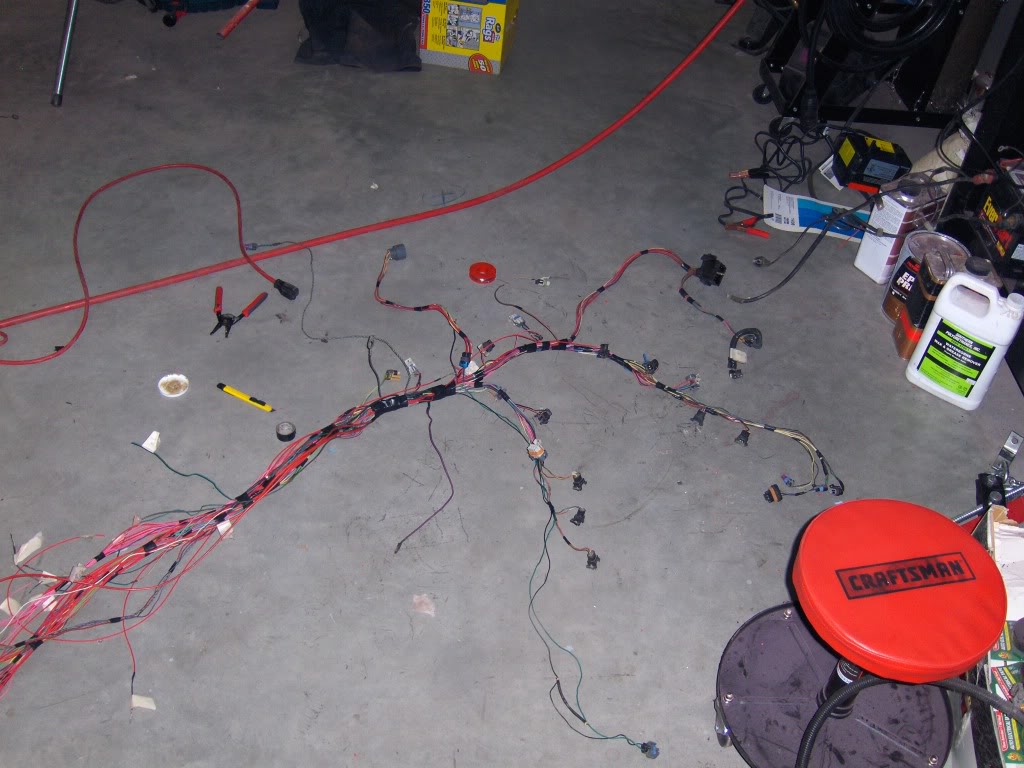
Got the harness routed and laid out to figure out which wires need lengthened.
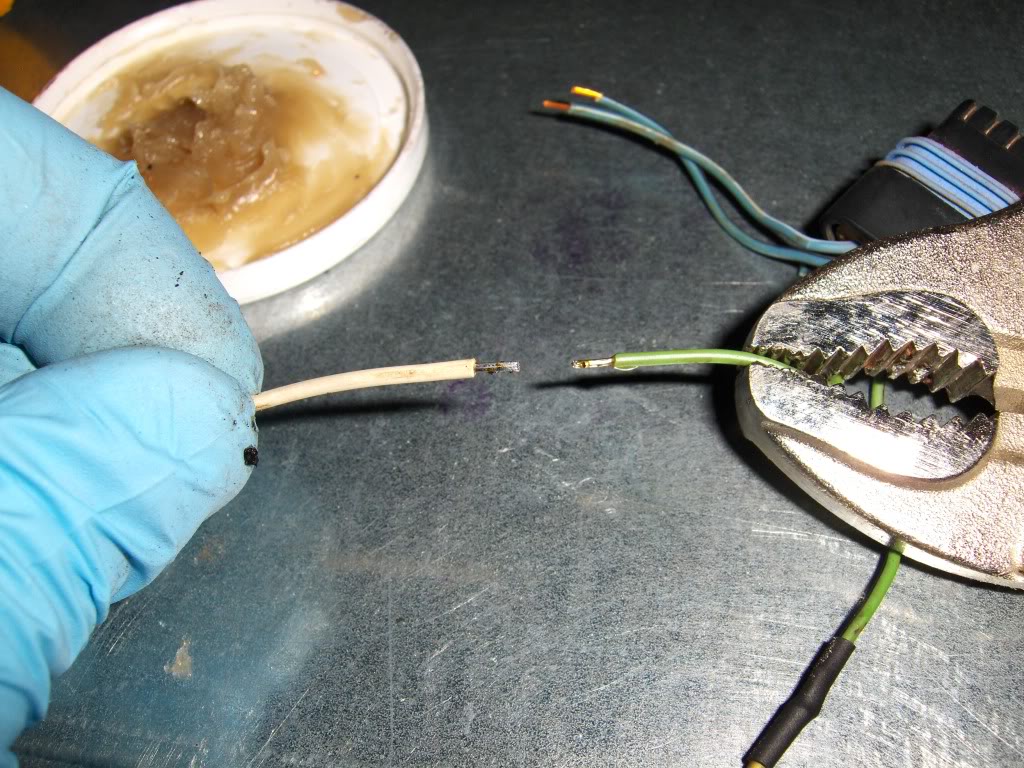
I know people talk about soldering wires etc. but you never really see "how". I used to race R/C cars and did quite a bit of soldering so I figured I'd show you how to do it the "correct" way. Ideally you would want to twist the wires and the solder, but in this case since the whole harness gets taped pretty tightly I chose the second best method. by laying the wires side by side to get maximum surface area adhesion. You see some guys that do end to end soldering, I would not advise it. The connection breaks easily.
So here's a little mini tutorial. Strip your wires back, and flux them (the grease in the pic) and then tin them lightly. Should look like this
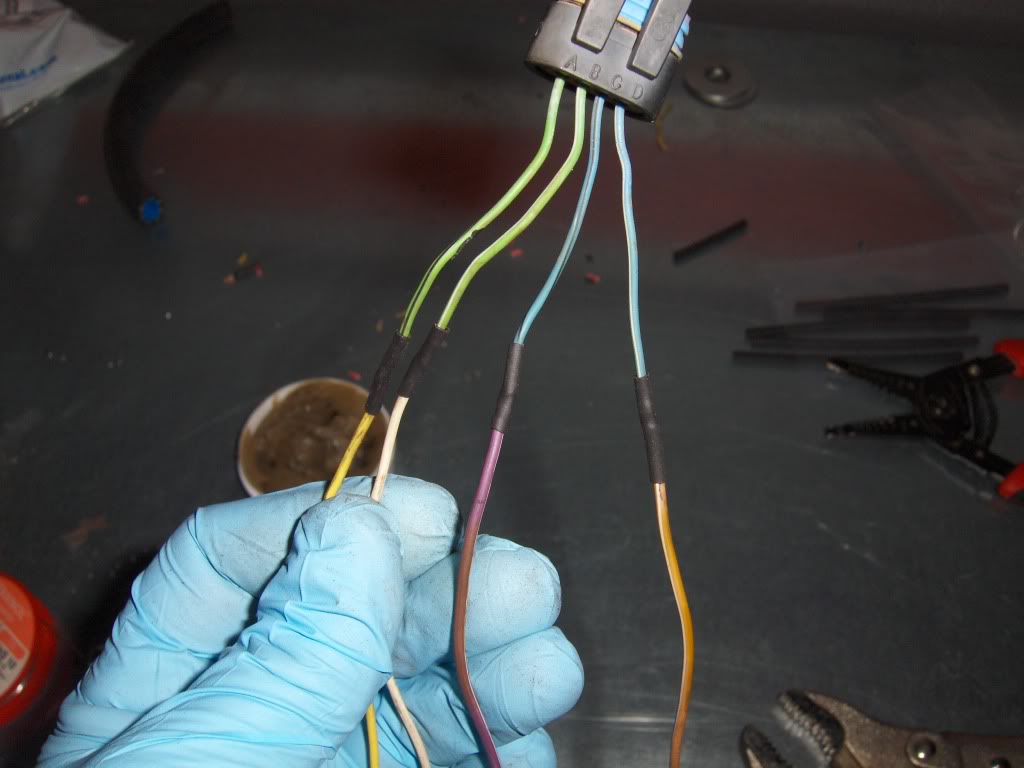
Lay your wires side by side as in the top wire in the picture. Your finished result will look like the bottom wire.

Make sure you heat shrink the wires to prevent shorts. Here is your end result
Harness taped up and ready to be placed in the car. I wanted to confirm that all the wires and connectors were optimally routed before I loom the harness.
Next I drilled a hole in the firewall with a step drill. I chose this location, as have many others, trying to maximize the visual impact the harness has when it's draped all over the engine bay.
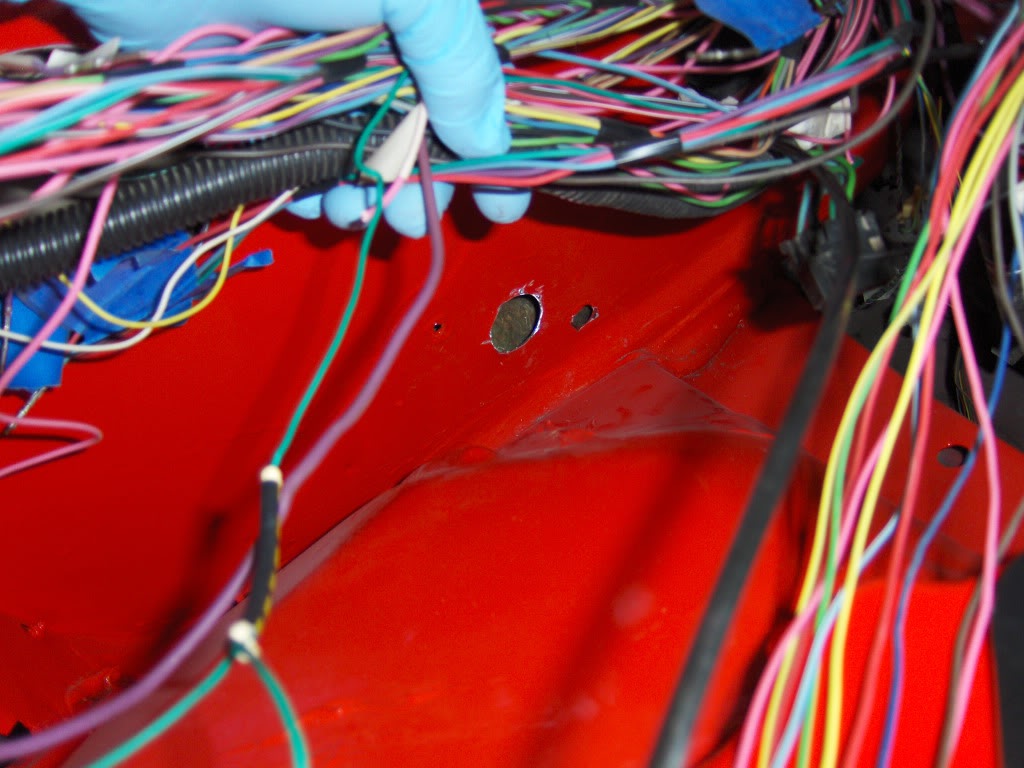
This is the firewall seal with a home made gasket I made out of a foamy placemat.

Installed. Had to drill the bolt holes from the inside. Not much room to drill from the outside. Turned out pretty good I think.
Got the harness routed and laid out to figure out which wires need lengthened.

I know people talk about soldering wires etc. but you never really see "how". I used to race R/C cars and did quite a bit of soldering so I figured I'd show you how to do it the "correct" way. Ideally you would want to twist the wires and the solder, but in this case since the whole harness gets taped pretty tightly I chose the second best method. by laying the wires side by side to get maximum surface area adhesion. You see some guys that do end to end soldering, I would not advise it. The connection breaks easily.
So here's a little mini tutorial. Strip your wires back, and flux them (the grease in the pic) and then tin them lightly. Should look like this

Lay your wires side by side as in the top wire in the picture. Your finished result will look like the bottom wire.

Make sure you heat shrink the wires to prevent shorts. Here is your end result

Harness taped up and ready to be placed in the car. I wanted to confirm that all the wires and connectors were optimally routed before I loom the harness.

Next I drilled a hole in the firewall with a step drill. I chose this location, as have many others, trying to maximize the visual impact the harness has when it's draped all over the engine bay.

This is the firewall seal with a home made gasket I made out of a foamy placemat.

Installed. Had to drill the bolt holes from the inside. Not much room to drill from the outside. Turned out pretty good I think.

Last edited by mille_3; 03-02-2014 at 07:13 PM. Reason: Updated links
02-20-2011, 02:08 PM
#72
Member
Thread Starter
iTrader: (3)
Join Date: Jul 2008
Location: ND
Posts: 385
Likes: 0
Received 0 Likes
on
0 Posts
Car: 1986 Firebird
Engine: 6.0L LSX
Transmission: 4L60E
Axle/Gears: 3.73
Re: '87 Formula getting the LSx treatment
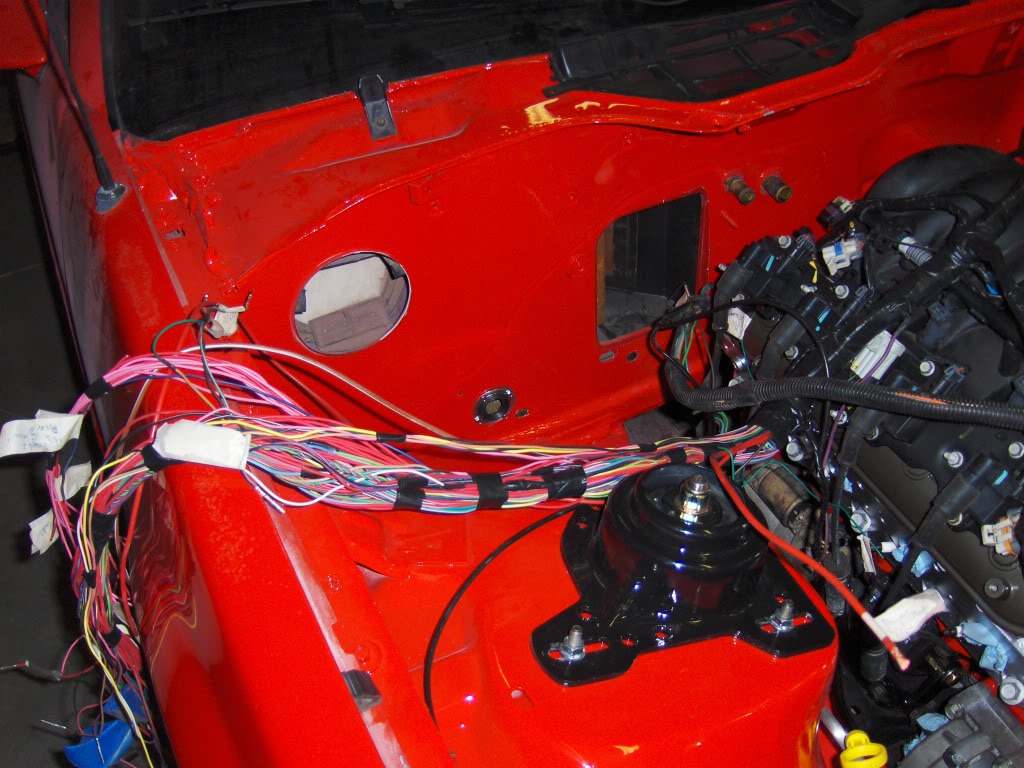
Next up....routing wires through the firewall (yes the car needs a paint job. That's next winter's project  )
)
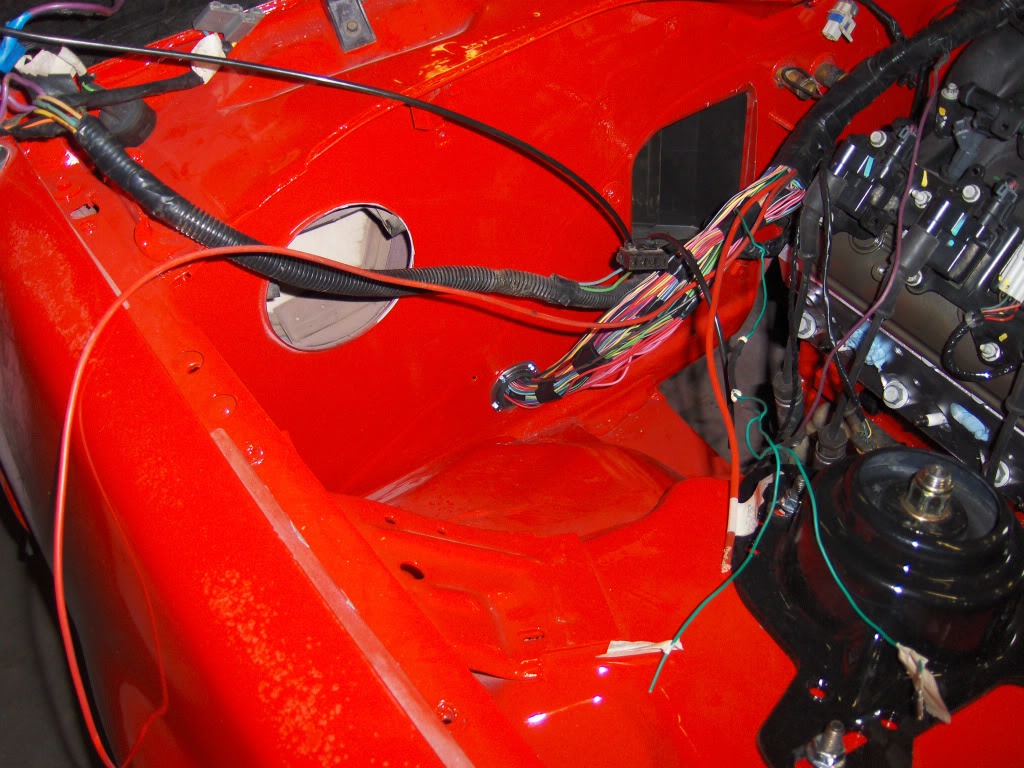
Ugh!......what a mess
Started on the relays.
That's it for this weekend. Next up is the fuse block and pinning the green/blue connectors during the week.
)
Ugh!......what a mess

Started on the relays.

That's it for this weekend. Next up is the fuse block and pinning the green/blue connectors during the week.
Last edited by mille_3; 03-02-2014 at 07:14 PM. Reason: Updated links
02-20-2011, 05:04 PM
#73
02-20-2011, 05:32 PM
#74
Re: '87 Formula getting the LSx treatment
I remember when I was building my harness it seemed like I was getting nowhere fast. Kept removing wires here and there, taping, checking, taping, cutting... Then it seemed like all at once "Hey...I have a complete harness ready to go!"
The small hurdles sometimes take the longest. But you're making great headway, and once you get the wiring finished, its all down hill from there!
J.
The small hurdles sometimes take the longest. But you're making great headway, and once you get the wiring finished, its all down hill from there!
J.
02-20-2011, 07:24 PM
#75
Member
Thread Starter
iTrader: (3)
Join Date: Jul 2008
Location: ND
Posts: 385
Likes: 0
Received 0 Likes
on
0 Posts
Car: 1986 Firebird
Engine: 6.0L LSX
Transmission: 4L60E
Axle/Gears: 3.73
Re: '87 Formula getting the LSx treatment
Well, I was until you said that brake switch is on pin P  That wire is long gone....damn. I must have followed the wrong layout. According to http://i150.photobucket.com/albums/s..._1987_C207.gif Pin P is not used. Guess I'll just tap into the wire on the other side of the connector. See...all better
That wire is long gone....damn. I must have followed the wrong layout. According to http://i150.photobucket.com/albums/s..._1987_C207.gif Pin P is not used. Guess I'll just tap into the wire on the other side of the connector. See...all better
02-20-2011, 07:26 PM
#76
Supreme Member
iTrader: (1)
Join Date: Mar 2007
Location: Apopka, Florida
Posts: 1,237
Likes: 0
Received 7 Likes
on
6 Posts
Car: 1989 Pontiac Trans Am GTA
Engine: cammed LS1
Transmission: Monster SS 4L65E
Axle/Gears: 9 bolt posi w/ 3.70 gears
Re: '87 Formula getting the LSx treatment
I think I'll have Pocket take care of my wiring harness so that I don't have to deal with this nightmare
02-20-2011, 07:36 PM
#77
Member
Thread Starter
iTrader: (3)
Join Date: Jul 2008
Location: ND
Posts: 385
Likes: 0
Received 0 Likes
on
0 Posts
Car: 1986 Firebird
Engine: 6.0L LSX
Transmission: 4L60E
Axle/Gears: 3.73
Re: '87 Formula getting the LSx treatment
Half the fun is doing it yourself But it does seem a bit overwhelming at times. But like ghettocruiser said, little steps at a time.
But it does seem a bit overwhelming at times. But like ghettocruiser said, little steps at a time.
02-20-2011, 10:30 PM
#78
Supreme Member
iTrader: (24)
Join Date: Jun 2005
Location: NC
Posts: 7,935
Likes: 0
Received 145 Likes
on
79 Posts
Car: 91 Trans Am
Engine: LSA
Transmission: T56 AWD
Axle/Gears: 8.8 4.10
Re: '87 Formula getting the LSx treatment
I pulled that scan from ATGO. From doing several older cars and searching the diagrams one year at a time in AllData, I can say that diagram is for the wrong year
If you've got a purple wire on the dash side of pin P, then its gotta go back
Sorry
If you've got a purple wire on the dash side of pin P, then its gotta go back
Sorry
02-21-2011, 08:22 AM
#79
Member
Thread Starter
iTrader: (3)
Join Date: Jul 2008
Location: ND
Posts: 385
Likes: 0
Received 0 Likes
on
0 Posts
Car: 1986 Firebird
Engine: 6.0L LSX
Transmission: 4L60E
Axle/Gears: 3.73
Re: '87 Formula getting the LSx treatment
Hmm. I looked through AllData myself this morning and it looks as if this particular offender is on Pin M and Purple/Black. I was in a rush so I may have read the diagram incorrectly. I'll take a closer look at it this evening.
I'm guessing the C100 diagram is not 100% either in that case. A while back we spoke about F7 LT Green (coolant gauge) which was empty on my connector, but it was actually on F5 Brown for my '87. I should probably go back and double check that one too.
Btw, have I mentioned that I am starting to despise wiring
Last edited by mille_3; 02-21-2011 at 08:35 AM.
02-21-2011, 05:45 PM
#80
Member
Thread Starter
iTrader: (3)
Join Date: Jul 2008
Location: ND
Posts: 385
Likes: 0
Received 0 Likes
on
0 Posts
Car: 1986 Firebird
Engine: 6.0L LSX
Transmission: 4L60E
Axle/Gears: 3.73
Re: '87 Formula getting the LSx treatment
You were correct, not that I doubted you but had to check Hopefully I saved the wires somewhere in the pile with the others.
Hopefully I saved the wires somewhere in the pile with the others. 
Last edited by mille_3; 03-02-2014 at 07:15 PM. Reason: updated links
02-24-2011, 08:50 AM
#81
Member
Thread Starter
iTrader: (3)
Join Date: Jul 2008
Location: ND
Posts: 385
Likes: 0
Received 0 Likes
on
0 Posts
Car: 1986 Firebird
Engine: 6.0L LSX
Transmission: 4L60E
Axle/Gears: 3.73
Re: '87 Formula getting the LSx treatment
Today's $10,000 question: Where is the fuel feed 12V+ hiding? I gave up on finding it in Alldata. Doesn't seem to exist
Had to go buy a new terminal at the dealer$hip for the TCC brakeswitch....$2.54!!! 12700% markup. Talk about a complete ripoff!
Had to go buy a new terminal at the dealer$hip for the TCC brakeswitch....$2.54!!! 12700% markup. Talk about a complete ripoff!
02-24-2011, 09:05 AM
#82
Supreme Member
iTrader: (24)
Join Date: Jun 2005
Location: NC
Posts: 7,935
Likes: 0
Received 145 Likes
on
79 Posts
Car: 91 Trans Am
Engine: LSA
Transmission: T56 AWD
Axle/Gears: 8.8 4.10
Re: '87 Formula getting the LSx treatment
Individual fuse holder near the battery. Feeds the PCM and the fuel pump relay both with 12v battery under a 20A fuse. No idea why GM made it external
You luck out with the relay output to pump 12v, its C207 pin D
You luck out with the relay output to pump 12v, its C207 pin D
02-24-2011, 09:19 AM
#83
Member
Thread Starter
iTrader: (3)
Join Date: Jul 2008
Location: ND
Posts: 385
Likes: 0
Received 0 Likes
on
0 Posts
Car: 1986 Firebird
Engine: 6.0L LSX
Transmission: 4L60E
Axle/Gears: 3.73
Re: '87 Formula getting the LSx treatment
Thanks Pocket. I think I would have torched the car by now because of the wiring if it wasn't for your help.
Off to the $tealer$hip again....ugh.
Off to the $tealer$hip again....ugh.
02-24-2011, 11:25 AM
#84
Supreme Member
iTrader: (24)
Join Date: Jun 2005
Location: NC
Posts: 7,935
Likes: 0
Received 145 Likes
on
79 Posts
Car: 91 Trans Am
Engine: LSA
Transmission: T56 AWD
Axle/Gears: 8.8 4.10
Re: '87 Formula getting the LSx treatment
Why not a junkyard? Ive got several if you're willing to wait a day or two
02-24-2011, 01:32 PM
#85
Member
Thread Starter
iTrader: (3)
Join Date: Jul 2008
Location: ND
Posts: 385
Likes: 0
Received 0 Likes
on
0 Posts
Car: 1986 Firebird
Engine: 6.0L LSX
Transmission: 4L60E
Axle/Gears: 3.73
Re: '87 Formula getting the LSx treatment
Do you know which vehicles I can pull the terminals from? The junkyard here had a TON of 3rd gens, but the section of the junkyard that houses them caught fire about a year ago. Nothing was salvageable.
I only need 1 and it's not like a couple of bucks is going to break the bank. It's just the idea of the ridiculous markup. It's my own fault for being to quick to toss stuff I didn't think I would need. I should know better, but I never learn :P
I only need 1 and it's not like a couple of bucks is going to break the bank. It's just the idea of the ridiculous markup. It's my own fault for being to quick to toss stuff I didn't think I would need. I should know better, but I never learn :P
02-24-2011, 02:06 PM
#86
Supreme Member
iTrader: (24)
Join Date: Jun 2005
Location: NC
Posts: 7,935
Likes: 0
Received 145 Likes
on
79 Posts
Car: 91 Trans Am
Engine: LSA
Transmission: T56 AWD
Axle/Gears: 8.8 4.10
Re: '87 Formula getting the LSx treatment
Its an electric fan connector with a plastic protector cap. 3rd gens and early 90's V8 trucks have them. Ive seen a few misc cars with them like FWD vans but not very often and I dont remember exactly which versions. The trucks also have the 5 pole power distribution blocks that I put on all my harnesses. They just lack the pretty cover
02-24-2011, 02:51 PM
#87
Member
Thread Starter
iTrader: (3)
Join Date: Jul 2008
Location: ND
Posts: 385
Likes: 0
Received 0 Likes
on
0 Posts
Car: 1986 Firebird
Engine: 6.0L LSX
Transmission: 4L60E
Axle/Gears: 3.73
Re: '87 Formula getting the LSx treatment
I'll keep the distribution block in mind. The terminal is going to be easier to just get one from the dealer in this case. If I needed more than 1 I'd be willing to wait a bit.
Another thing that came to mind. You mentioned that a 98 LS1 has an ECT (per truck pinouts) or CTS sensor as you called it, that would work with my harness. Is it only the 98? Trying to look up the sensor at NAPA and it looks like they are all 2 prong senders.
Another thing that came to mind. You mentioned that a 98 LS1 has an ECT (per truck pinouts) or CTS sensor as you called it, that would work with my harness. Is it only the 98? Trying to look up the sensor at NAPA and it looks like they are all 2 prong senders.
02-24-2011, 04:51 PM
#88
Supreme Member
iTrader: (24)
Join Date: Jun 2005
Location: NC
Posts: 7,935
Likes: 0
Received 145 Likes
on
79 Posts
Car: 91 Trans Am
Engine: LSA
Transmission: T56 AWD
Axle/Gears: 8.8 4.10
Re: '87 Formula getting the LSx treatment
ECT CTS, same thing
2 wire CTS' only communicate to the PCM which sent a serial signal to the donor's cluster along with various other bits of info. The 98 Fbody's used a 3 wire CTS that has 2 wires for the PCM part and one wire for the analog gauge
Try searching for coolant sender. 12551708 is the GM PN
http://www.compnine.com/index.php?u=...00&grouptype=B
15326388 is the 2 wire version
http://www.compnine.com/index.php?u=...00&grouptype=B
02-25-2011, 08:17 PM
#89
Member
Thread Starter
iTrader: (3)
Join Date: Jul 2008
Location: ND
Posts: 385
Likes: 0
Received 0 Likes
on
0 Posts
Car: 1986 Firebird
Engine: 6.0L LSX
Transmission: 4L60E
Axle/Gears: 3.73
Re: '87 Formula getting the LSx treatment
Moving right along. All wiring is done with the exception of a ground for the fan and the OBDII and some cleanup of wires. Planning on installing transmission tomorrow.
Got the throttle cable installed.
Now a couple of questions:
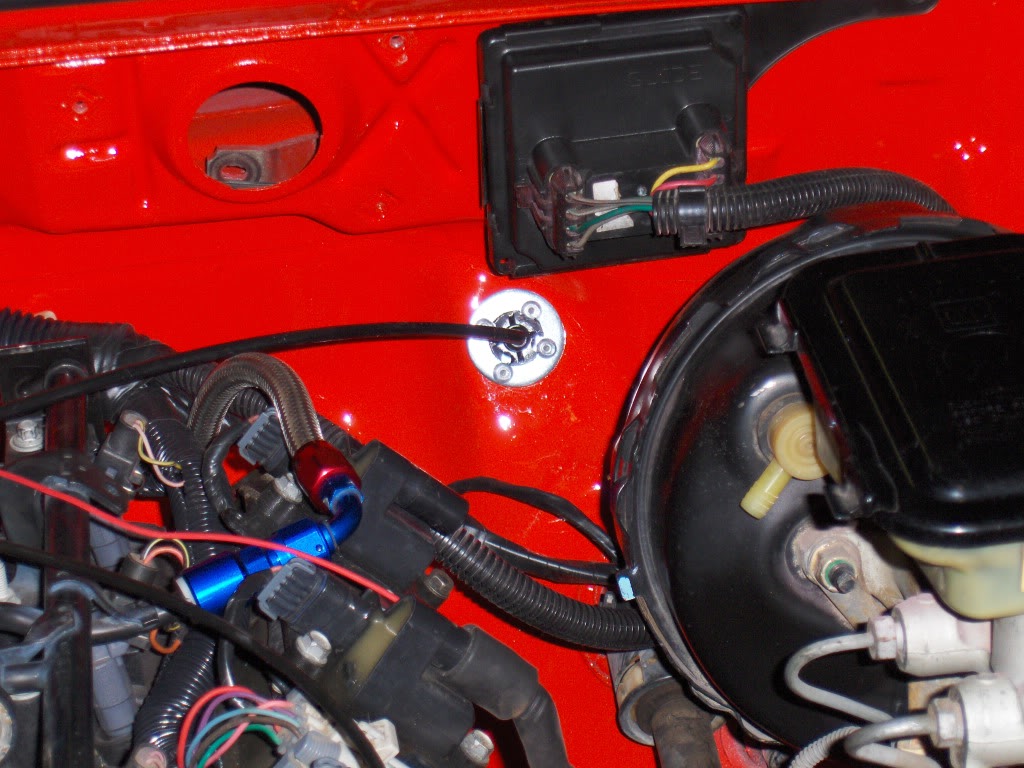
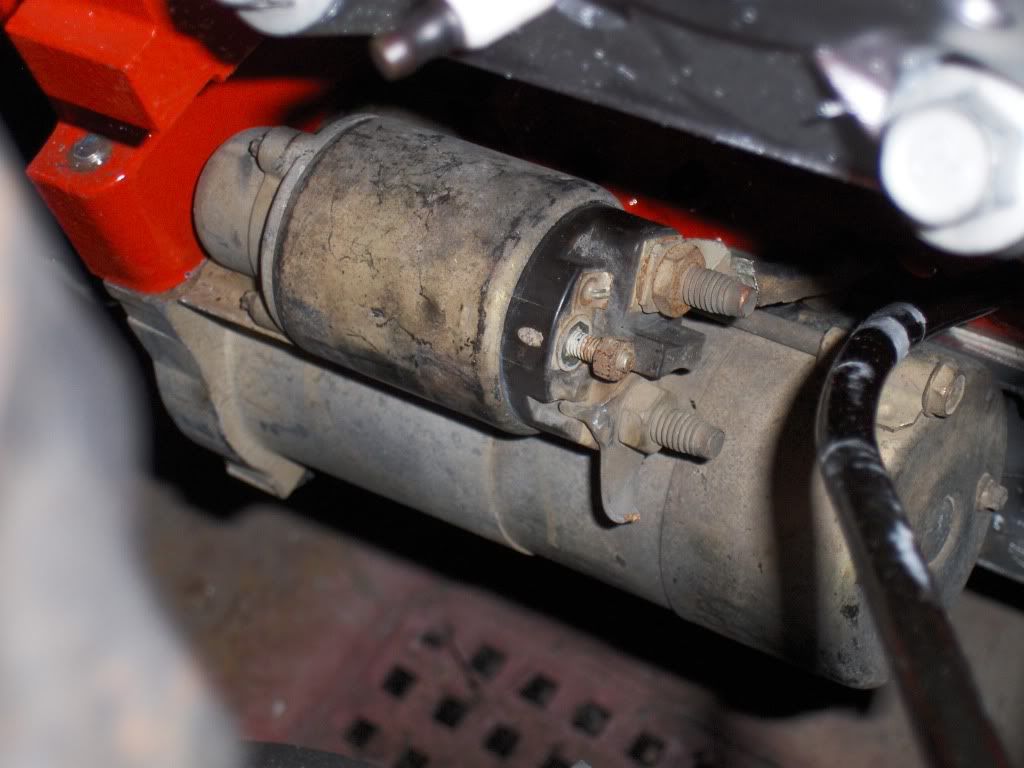
Does the starter get grounded to the chassis? Looks like something broke off in this picture. Is that a ground? .......starter wire not connected in this pic.
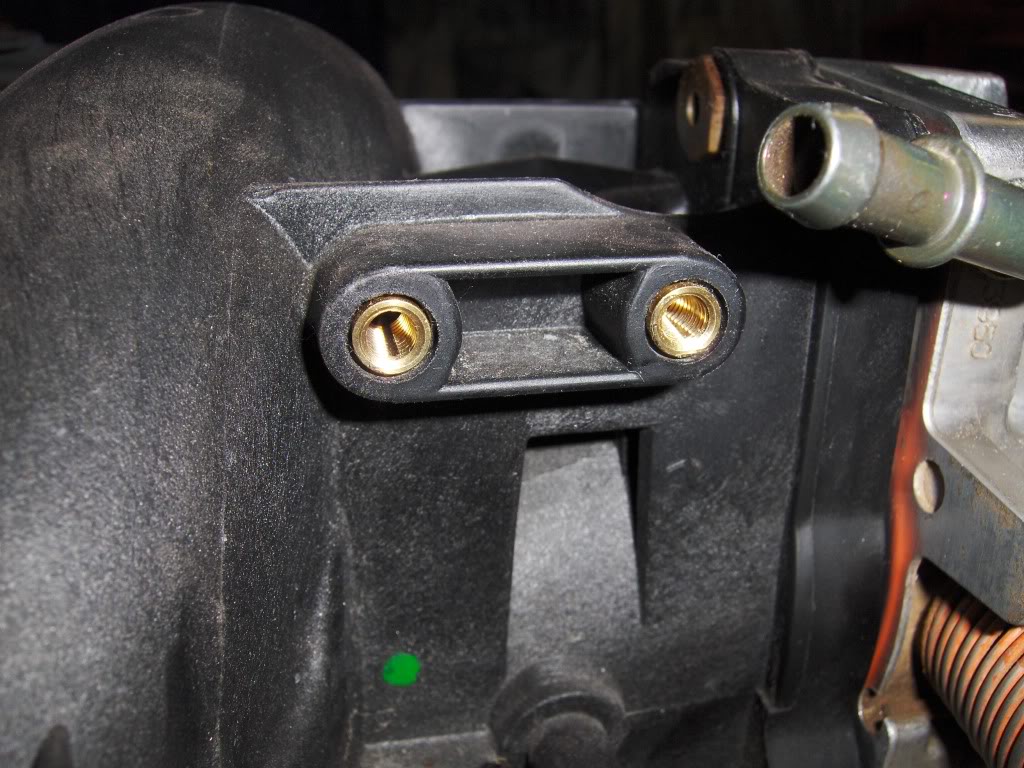
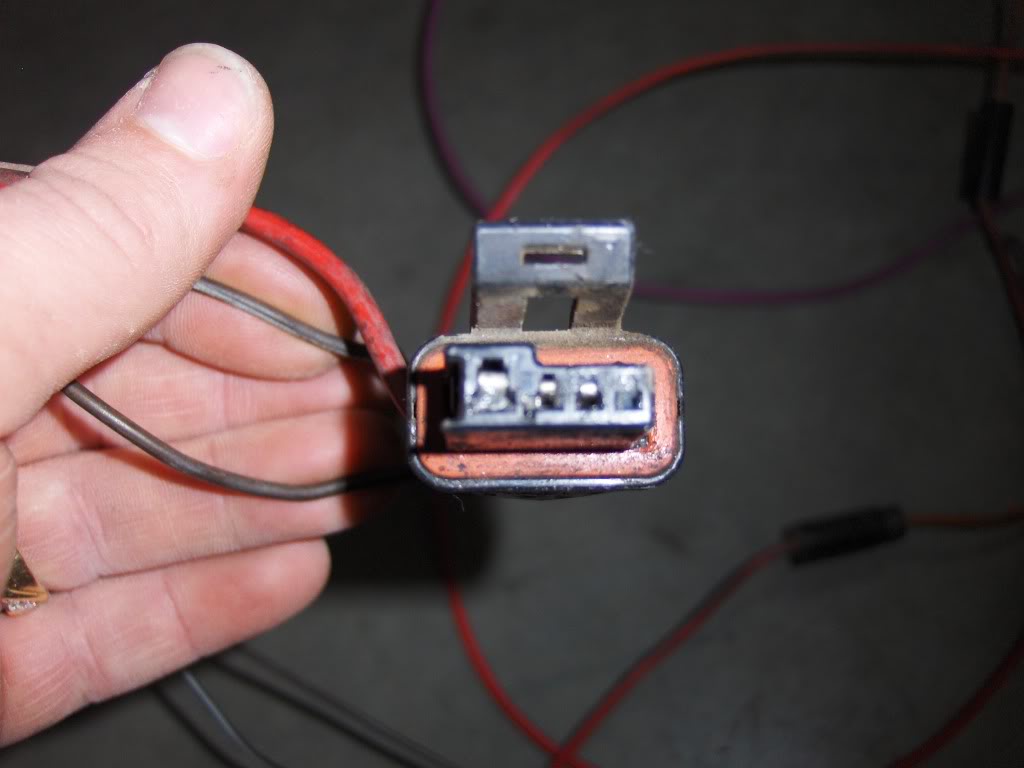
And lastly...tried looking this up in Alldata but no luck. What exactly is this plug for?

Got the throttle cable installed.

Now a couple of questions:
Does the starter get grounded to the chassis? Looks like something broke off in this picture. Is that a ground? .......starter wire not connected in this pic.

And lastly...tried looking this up in Alldata but no luck. What exactly is this plug for?

Last edited by mille_3; 03-02-2014 at 07:19 PM. Reason: updated links
02-25-2011, 08:48 PM
#90
Supreme Member
iTrader: (24)
Join Date: Jun 2005
Location: NC
Posts: 7,935
Likes: 0
Received 145 Likes
on
79 Posts
Car: 91 Trans Am
Engine: LSA
Transmission: T56 AWD
Axle/Gears: 8.8 4.10
Re: '87 Formula getting the LSx treatment
Looking good
The broken piece on the starter is the old positive battery cable terminal. Run your old 3rd gen battery cable to that lug. Small nut is the purple solenoid wire from the C100. Other lug is left alone
Thats the HVAC connector I spoke with you about in a few PMs. It holds 2-3 wires related to your AC and blower motor. BLK is blower grd, Lt grn AC request, lt blu not used for swap. External red power wire feeds the blower motor relay
02-25-2011, 10:15 PM
#91

Re: '87 Formula getting the LSx treatment
another tip for clean installs on the harness is to off set or "stagger" the splices. (don't make them all at the same distance from the connector) this keeps the overall size smaller and avoids a common spot for flex and breakage
02-25-2011, 10:23 PM
#92
Senior Member
iTrader: (8)

Join Date: Sep 2010
Location: Cincinnati, Ohio
Posts: 732
Likes: 0
Received 0 Likes
on
0 Posts
Car: '89 GTA
Engine: 5.7L LS1
Transmission: 4L60E
Axle/Gears: 9 bolt 3.27
Re: '87 Formula getting the LSx treatment
I think it goes both ways, because if you solder all of your connections staggering them can be a major pain.
Last edited by White'89; 02-25-2011 at 10:34 PM.
02-25-2011, 10:33 PM
#93
Senior Member
iTrader: (8)
Join Date: Sep 2010
Location: Cincinnati, Ohio
Posts: 732
Likes: 0
Received 0 Likes
on
0 Posts
Car: '89 GTA
Engine: 5.7L LS1
Transmission: 4L60E
Axle/Gears: 9 bolt 3.27
Re: '87 Formula getting the LSx treatment
Alldata must be the most worthless program ever. We have used it for a number of years now but about all its good for is running up estimates. Occasionally you get lucky but all I have ever used it to do was look up DTC's over 999(cus thats as high as my scanners book goes)
02-26-2011, 06:41 AM
#94
Member
Thread Starter
iTrader: (3)
Join Date: Jul 2008
Location: ND
Posts: 385
Likes: 0
Received 0 Likes
on
0 Posts
Car: 1986 Firebird
Engine: 6.0L LSX
Transmission: 4L60E
Axle/Gears: 3.73
Re: '87 Formula getting the LSx treatment
. With some luck I get to start her up today  . Only "major" project left is installing the swracecars subframe connectors, and of course the tranny which I hope to get knocked out today.
You'd think that the information contained in there would be a bit more extensive, considering people/service shops etc. pay a ton of money for that thing. It doesn't even have a breakdown of the connector faces let alone a simple wiring diagram (for the most part), at least not that I could find. The information is not organized very intuitively. But I can't really complain too much since I get to use it for free.
02-26-2011, 10:33 AM
#95
Member
Re: '87 Formula getting the LSx treatment
You'd think that the information contained in there would be a bit more extensive, considering people/service shops etc. pay a ton of money for that thing. It doesn't even have a breakdown of the connector faces let alone a simple wiring diagram (for the most part), at least not that I could find. The information is not organized very intuitively. But I can't really complain too much since I get to use it for free.
Mike
02-28-2011, 08:45 AM
#96
Member
Thread Starter
iTrader: (3)
Join Date: Jul 2008
Location: ND
Posts: 385
Likes: 0
Received 0 Likes
on
0 Posts
Car: 1986 Firebird
Engine: 6.0L LSX
Transmission: 4L60E
Axle/Gears: 3.73
Re: '87 Formula getting the LSx treatment
Got a few things done this weekend. Got some good news and some bad news. Good news is that I installed the tranny, bad news is that I had to do it twice. Oh but there is more bad news, but I'll get to that in a minute. Didn't notice that the transmission had the guide peg stuck in it on one side. What sucked the most is that I had the car up on stands and the tranny would not clear by about 1 inch when sitting on top of my jack. So I slid the tranny under the car and lined it up with the tunnel and had to lift the damn thing up on the jack by myself (too stubborn to ask for help). Yeah, had to do this twice because of that peg
Some more good news though. Got the power distribution block mounted and 99% of all wires are now connected. Still have the VSS thingamagigy to do. Bad news.....I must have mixed up fuseblock power wire and ignition power wire. Once I powered everything up every light the car has comes on and the ignition switch does nothing..ugh! So I'll be taking part of the harness back apart...Yay!
Anyway, here's where I mounted the power block. Once the coolant overflow tank is installed it'll hide nicely behind it. I had some leftover stuff from a stereo install so I used that.
Some pictures of clearance of the hawks headers. Will have to move the brake lines a little bit
Probably don't need to "preheat" the gas Will need to be re-routed
Routing of the high pressure side of the power steering hose. I reused both hoses from the 4th gen P/S pump since it came with the pump.
So all in all I'm excited that things are nearing an end but kinda bummed abut the mixup with the two wires. Live and learn I guess.
Some more good news though. Got the power distribution block mounted and 99% of all wires are now connected. Still have the VSS thingamagigy to do. Bad news.....I must have mixed up fuseblock power wire and ignition power wire. Once I powered everything up every light the car has comes on and the ignition switch does nothing..ugh! So I'll be taking part of the harness back apart...Yay!
Anyway, here's where I mounted the power block. Once the coolant overflow tank is installed it'll hide nicely behind it. I had some leftover stuff from a stereo install so I used that.

Some pictures of clearance of the hawks headers. Will have to move the brake lines a little bit

Probably don't need to "preheat" the gas
Will need to be re-routed
Routing of the high pressure side of the power steering hose. I reused both hoses from the 4th gen P/S pump since it came with the pump.

So all in all I'm excited that things are nearing an end but kinda bummed abut the mixup with the two wires. Live and learn I guess.
Last edited by mille_3; 03-02-2014 at 07:21 PM.
02-28-2011, 10:57 AM
#97
Supreme Member
iTrader: (24)
Join Date: Jun 2005
Location: NC
Posts: 7,935
Likes: 0
Received 145 Likes
on
79 Posts
Car: 91 Trans Am
Engine: LSA
Transmission: T56 AWD
Axle/Gears: 8.8 4.10
Re: '87 Formula getting the LSx treatment
Nice progress. Hiccups come with the territory. Hope its something simple
Heres a power dist diagram for LS1 swap cars to speed your troubleshooting
IGN wires are covered in the fuseblock diagram. Going over them with a highlighter may help prevent confusion
The brake lines will fit nicely on the other side of the steering shaft with gentle bends. Nearly any header install requires this, LSx or not
Tip for the trans, the best tool I found for installing them is a pair of ratcheting tie down straps. Slide it up on a board with one up front, one in the rear and ratchet it up. I had to get creative when installing a 4L80E by myself. No way I could lift that laying on my back or even get it up on a jack
02-28-2011, 11:20 AM
#99
Member
Thread Starter
iTrader: (3)
Join Date: Jul 2008
Location: ND
Posts: 385
Likes: 0
Received 0 Likes
on
0 Posts
Car: 1986 Firebird
Engine: 6.0L LSX
Transmission: 4L60E
Axle/Gears: 3.73
Re: '87 Formula getting the LSx treatment
Thanks. I think what I did is mix G5 and A4 up. I'm going to try to switch those two around at C100 instead of taking the harness back apart. I don't remember if the terminals are the same size, so that might not even be an option.
Pocket...thanks for the diagram. What are the "extra 12V leads" in your diagram?
Pocket...thanks for the diagram. What are the "extra 12V leads" in your diagram?
Last edited by mille_3; 02-28-2011 at 12:49 PM.
02-28-2011, 02:46 PM
#100
Supreme Member
iTrader: (24)
Join Date: Jun 2005
Location: NC
Posts: 7,935
Likes: 0
Received 145 Likes
on
79 Posts
Car: 91 Trans Am
Engine: LSA
Transmission: T56 AWD
Axle/Gears: 8.8 4.10
Re: '87 Formula getting the LSx treatment
The terminals are swappable
Extra leads went to the old ECM. If reusing as much of the 3rd gen harness as possible, they are left loose with nothing to go to
Extra leads went to the old ECM. If reusing as much of the 3rd gen harness as possible, they are left loose with nothing to go to