
I should not be left unsupervised
 07-31-2010, 07:00 PM
#151
Junior Member

iTrader: (1)

Join Date: Sep 2001
Location: Miami, FL
Posts: 79
Likes: 0
Received 0 Likes
on
0 Posts
Re: I should not be left unsupervised
Well, the car's coming home, but not in a good way. It turns out the BOV just cant vent enough air even at idle. Im going to have to use a larger unit, but for the cost Im going with the vortec SC bypass
MAF needs to move too, "Suction side" as the tuner called. Prob is I must run a recirculating bypass system for that (or SD)
He also said that IATs went to nearly 200* very quickly and would only go higher over time so.....
Time to mod the crap out of it before I take it back. To do list:
FMIC and 3" ducting
cam
headers
gears
Should keep me busy for a while
Have you thought about using a little meth to help with the IATs at WOT. I'm pretty sure I'll be using this on my setup. It won't really help for everyday driving, but it'll definitely help when you want to have some fun.
 08-07-2010, 04:13 PM
#152
Re: I should not be left unsupervised
Bit of an update
So, I needed to move the MAF and while I was at it Id like to attempt to quiet down the blower some. My best guess is the inlet design was seriously screwing with the flow characteristics and created an excess amount of noise from all the turbulence
Quick and dirty original design

You can see how the air is forced to squeeze down from a 4" circle to the 1.5" oval. The necking down causes the air to speed up but when it reaches the rotors it must stop until the next rotor moves past and then start again creating a pulsating flow. In short, my design was flawed

Some loving with the saw-zall and grinder takes me back to square one

The smoothest transition I can make is to simply squish the 4" tube. Easy for this strait piece that absolutely wouldnt fit, not so easy for the old tube with a 90* on the end

This is why you use tack welds
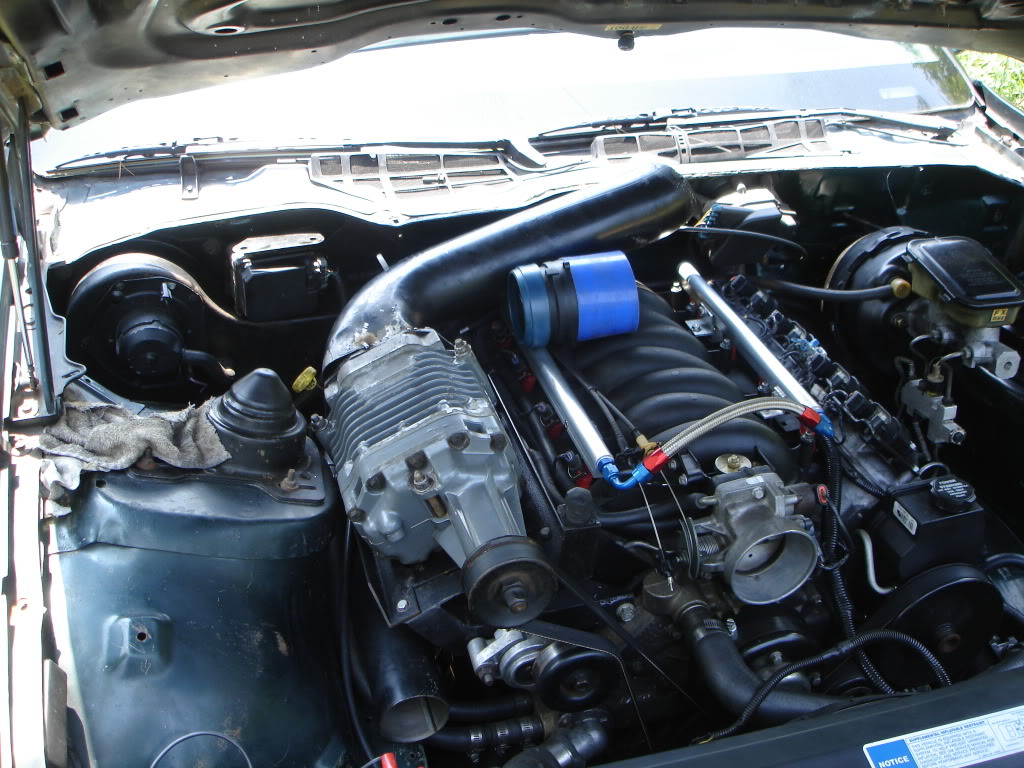
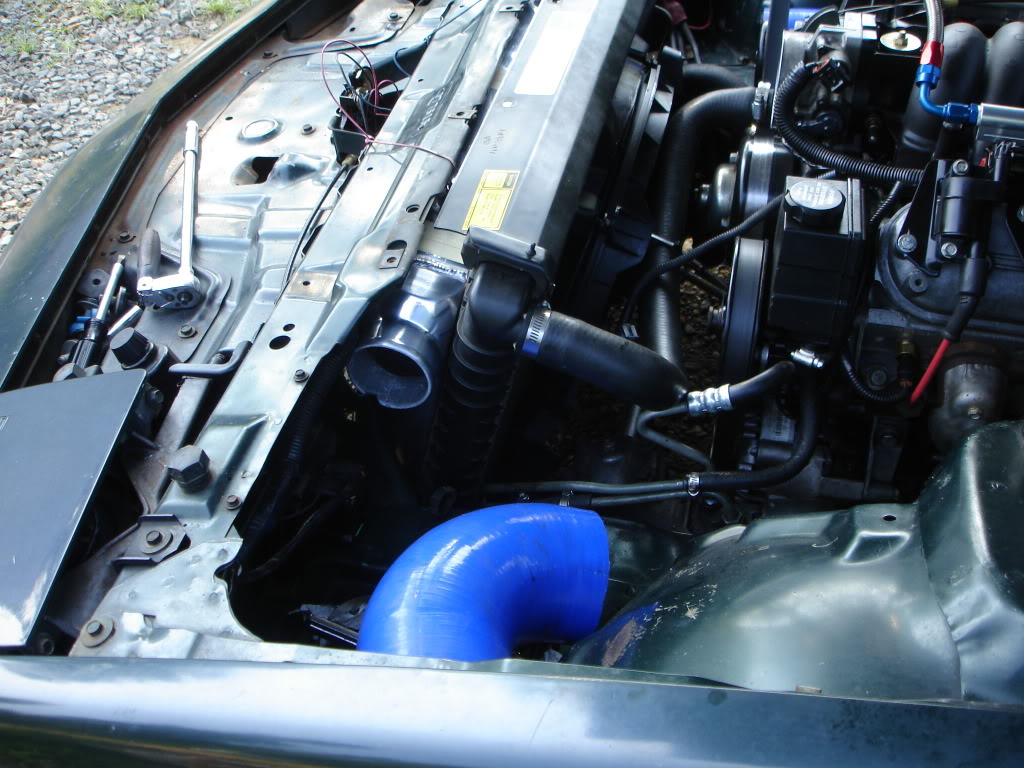
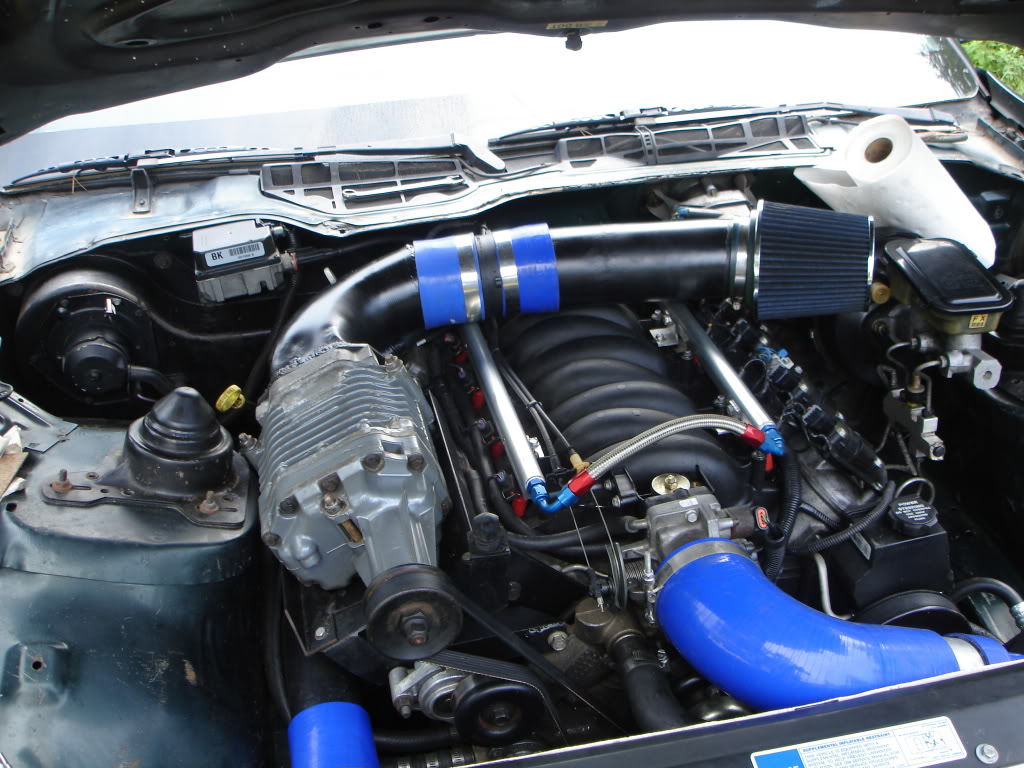
Finished. Notice the long strait section of tube before the MAF. Both of the tuners really griped about not having this previously. At the end of the long 90* at the TB, a short length of 4" tubing will be spliced in. This is where the IAT will be located since the one in the truck MAF is going to give a false reading in front of the SC
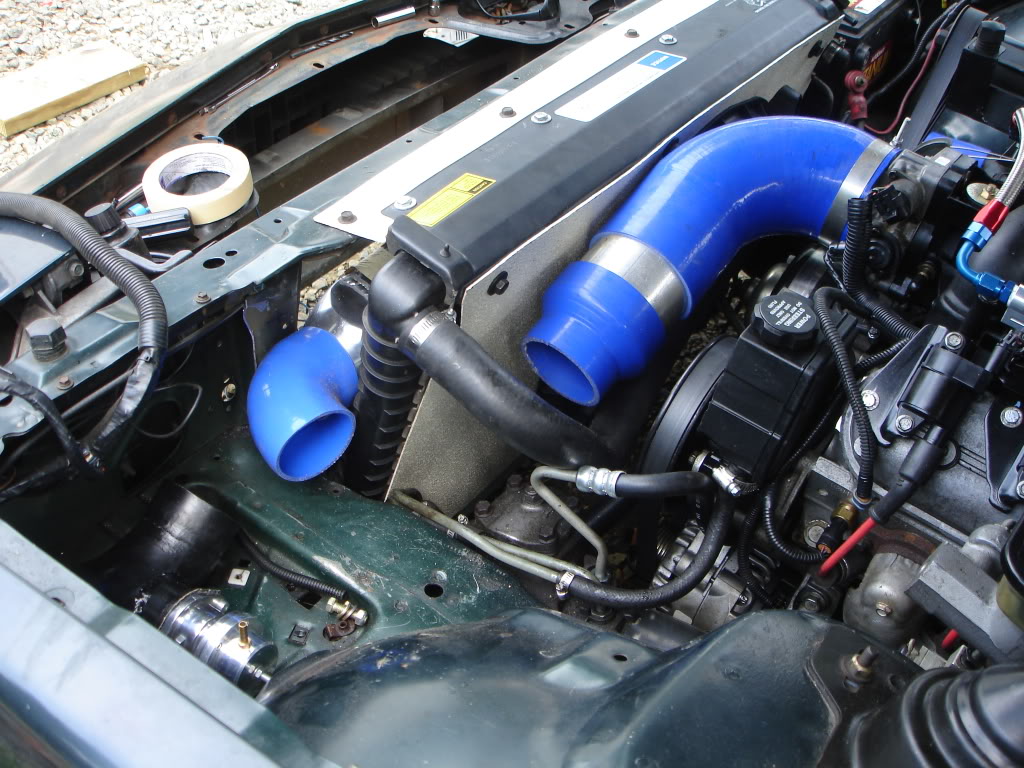
The FMIC plumbing will look like this eventually, just not as swooping. Ive still go to fit the battery up front. Might have to move it to the drivers side though. Not looking forward to custom cables for that
https://www.thirdgen.org/forums/atta...urbo-setup.jpg
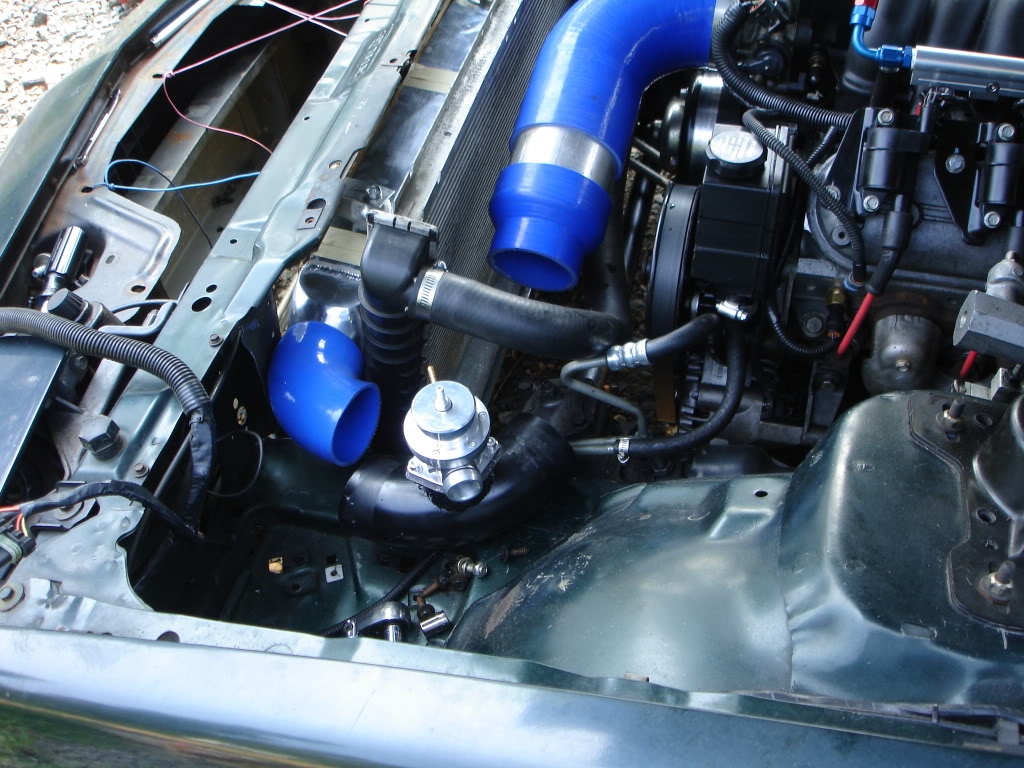
Im going with the Saab bypass valve setup. It's supposed to be good for 5-10psi and under 450hp. We'll see. If it's not enough, Ill order a second, not like they're hard to install
So, I needed to move the MAF and while I was at it Id like to attempt to quiet down the blower some. My best guess is the inlet design was seriously screwing with the flow characteristics and created an excess amount of noise from all the turbulence
Quick and dirty original design
You can see how the air is forced to squeeze down from a 4" circle to the 1.5" oval. The necking down causes the air to speed up but when it reaches the rotors it must stop until the next rotor moves past and then start again creating a pulsating flow. In short, my design was flawed
Some loving with the saw-zall and grinder takes me back to square one
The smoothest transition I can make is to simply squish the 4" tube. Easy for this strait piece that absolutely wouldnt fit, not so easy for the old tube with a 90* on the end
This is why you use tack welds
Finished. Notice the long strait section of tube before the MAF. Both of the tuners really griped about not having this previously. At the end of the long 90* at the TB, a short length of 4" tubing will be spliced in. This is where the IAT will be located since the one in the truck MAF is going to give a false reading in front of the SC
The FMIC plumbing will look like this eventually, just not as swooping. Ive still go to fit the battery up front. Might have to move it to the drivers side though. Not looking forward to custom cables for that
https://www.thirdgen.org/forums/atta...urbo-setup.jpg
Im going with the Saab bypass valve setup. It's supposed to be good for 5-10psi and under 450hp. We'll see. If it's not enough, Ill order a second, not like they're hard to install
08-10-2010, 11:33 AM
#154
Re: I should not be left unsupervised
FedEx man came at 8am this morning
Pretty
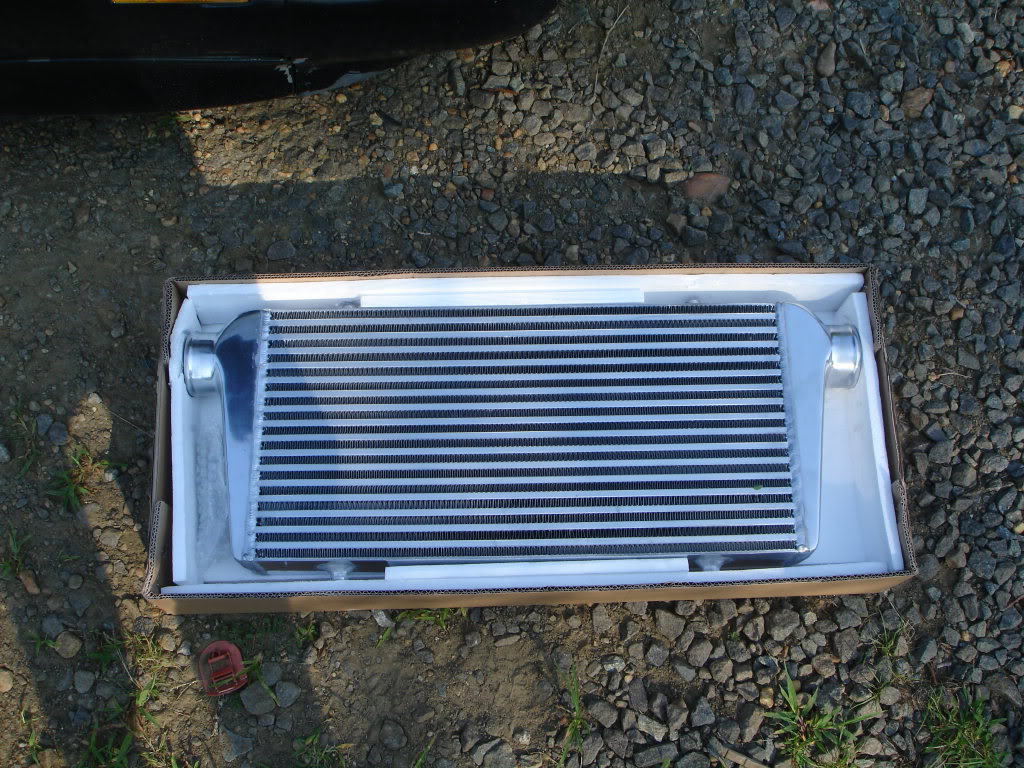
Nice tubing kit, but I cant weld alum, so it goes back up for sale. Ive got a set of 3" exhaust tubing in the mail (ETA today or tomorrow)

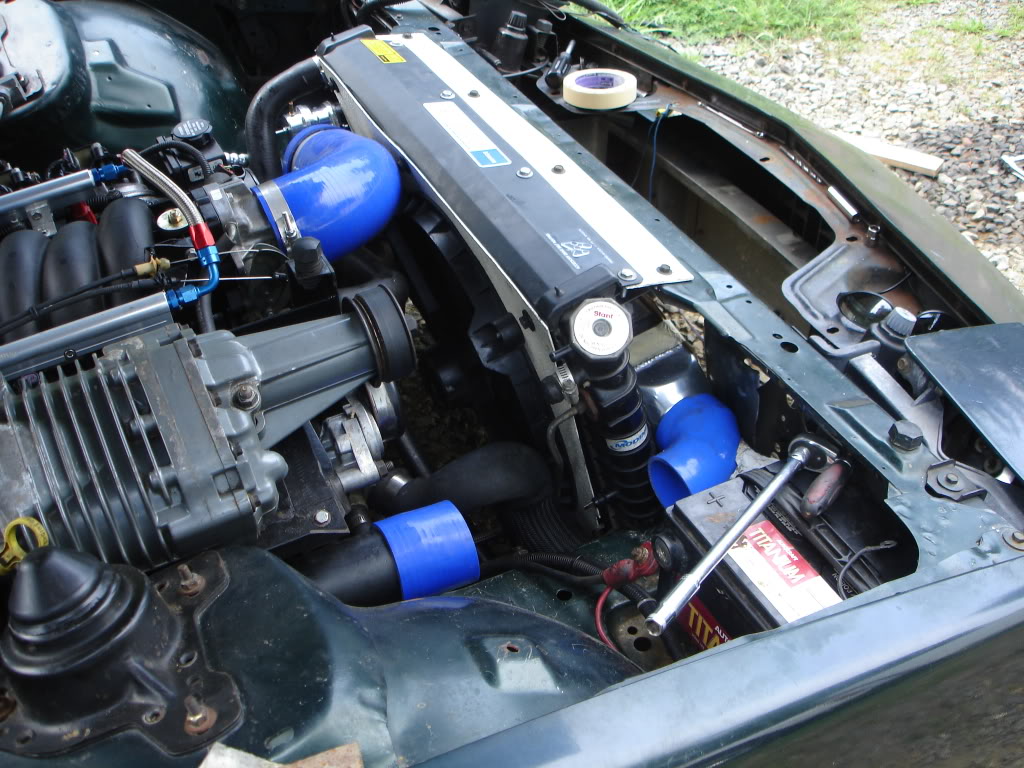
Stuffed up in there. Almost like the 3rd gen rad was designed for it
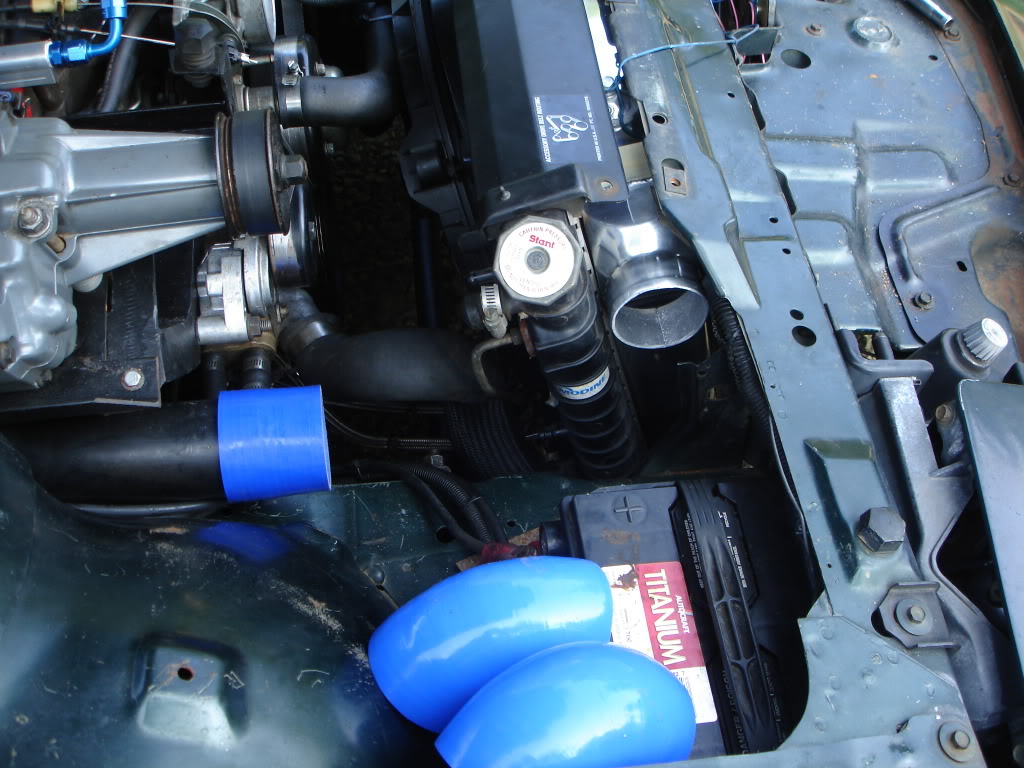
Lots of room on this side too
Fills up the front quite nicely
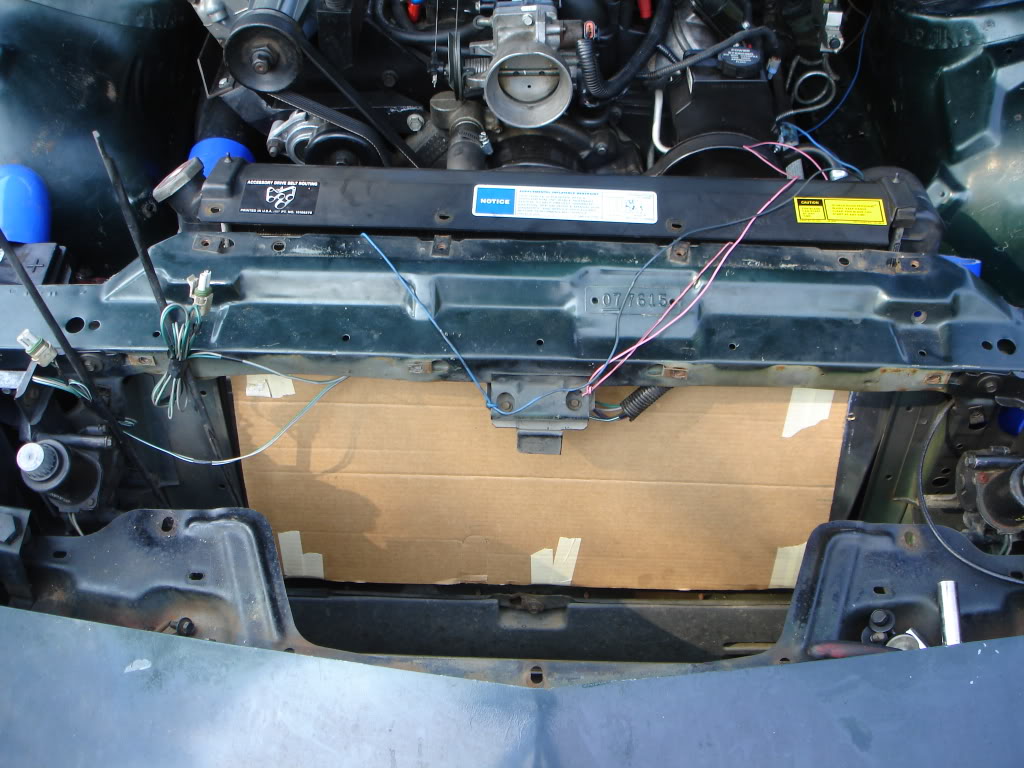
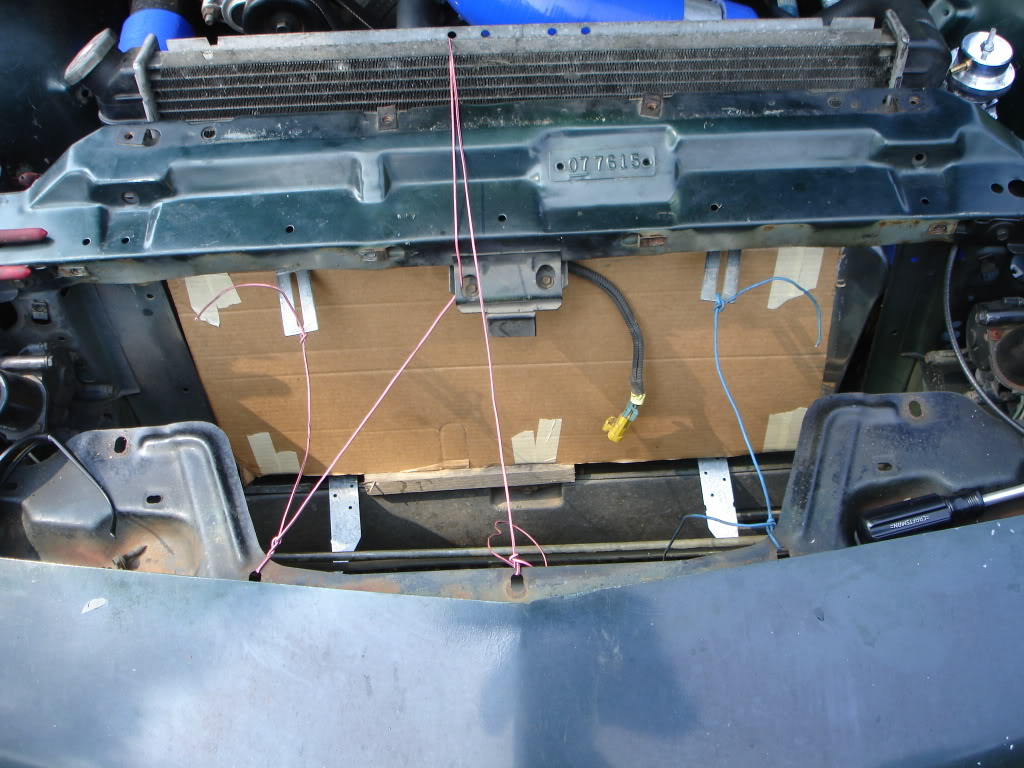
Support trimmed. Nearly a strait shot
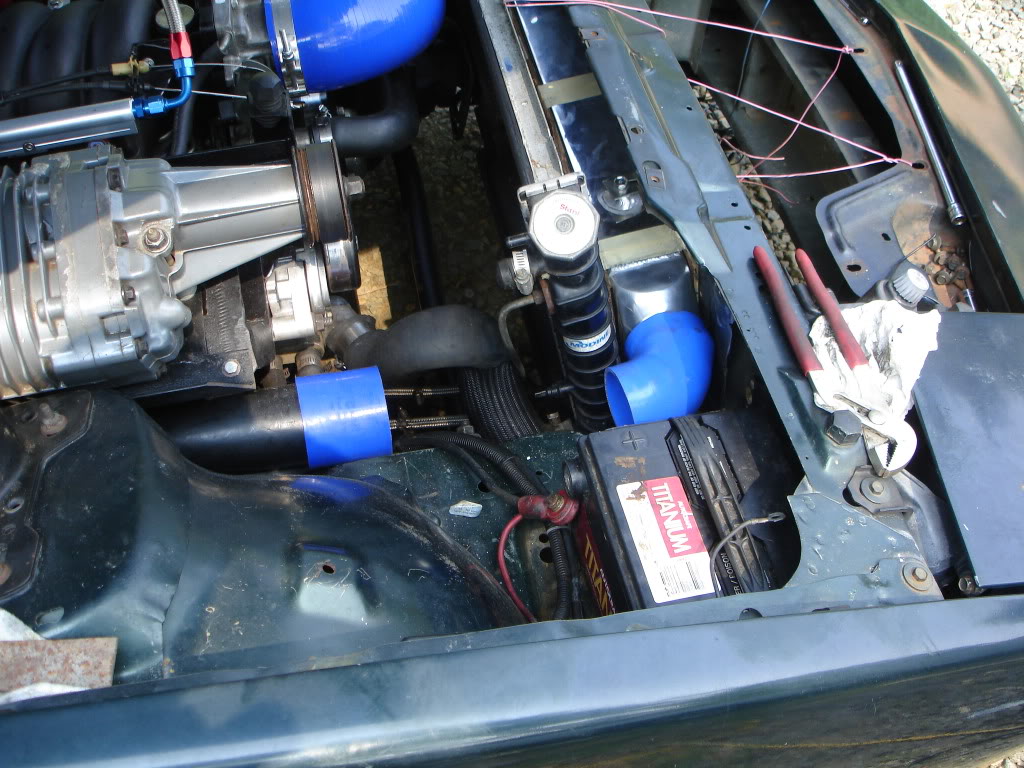
Working on the brackets
Simple 90* and it's done. The last bit of steel after the reducer is for the IAT to be mounted
Now to fab new fan brackets, a shroud, and rubber/plastic inserts to keep air from leaking around the rad/IC
Pretty
Nice tubing kit, but I cant weld alum, so it goes back up for sale. Ive got a set of 3" exhaust tubing in the mail (ETA today or tomorrow)
Stuffed up in there. Almost like the 3rd gen rad was designed for it
Lots of room on this side too
Fills up the front quite nicely
Support trimmed. Nearly a strait shot
Working on the brackets
Simple 90* and it's done. The last bit of steel after the reducer is for the IAT to be mounted
Now to fab new fan brackets, a shroud, and rubber/plastic inserts to keep air from leaking around the rad/IC
08-10-2010, 12:02 PM
#155
Member
Join Date: Nov 2001
Location: Midvale, UT
Posts: 482
Likes: 0
Received 2 Likes
on
2 Posts
Car: 1991 RS
Engine: L03
Transmission: T5
Axle/Gears: 4.11
Re: I should not be left unsupervised
Wow! That looks awesome Pocket! I agree with you, thirdgens seem to be made to have inter-coolers in front of their radiators, there is just the perfect amount of space in there for it! Keep those pictures coming, I'm very excited to see your project continue to progress!
08-10-2010, 03:51 PM
#156
Senior Member
Join Date: Aug 2009
Location: Thunder Bay, On, Canada
Posts: 289
Likes: 0
Received 0 Likes
on
0 Posts
Car: 1985 Camaro
Engine: 2.8l
Transmission: 700r4
Axle/Gears: Stock
Re: I should not be left unsupervised
Looks good. Is there any draw backs to putting the intercooler directly infront of the rad?
08-10-2010, 03:52 PM
#157
TGO Supporter
Join Date: Jul 2001
Location: Cheyenne, Wyoming
Posts: 4,991
Likes: 0
Received 1 Like
on
1 Post
Car: 1992 B4C 1LE
Engine: Proaction 412, Accel singleplane
Transmission: built 700R4 w/custom converter
Axle/Gears: stock w/later 4th gen torsen pos
Re: I should not be left unsupervised
This is really shaping up Pocket.
08-10-2010, 04:49 PM
#158
Re: I should not be left unsupervised
Looks good. Is there any draw backs to putting the intercooler directly infront of the rad?
08-10-2010, 04:54 PM
#159
Re: I should not be left unsupervised
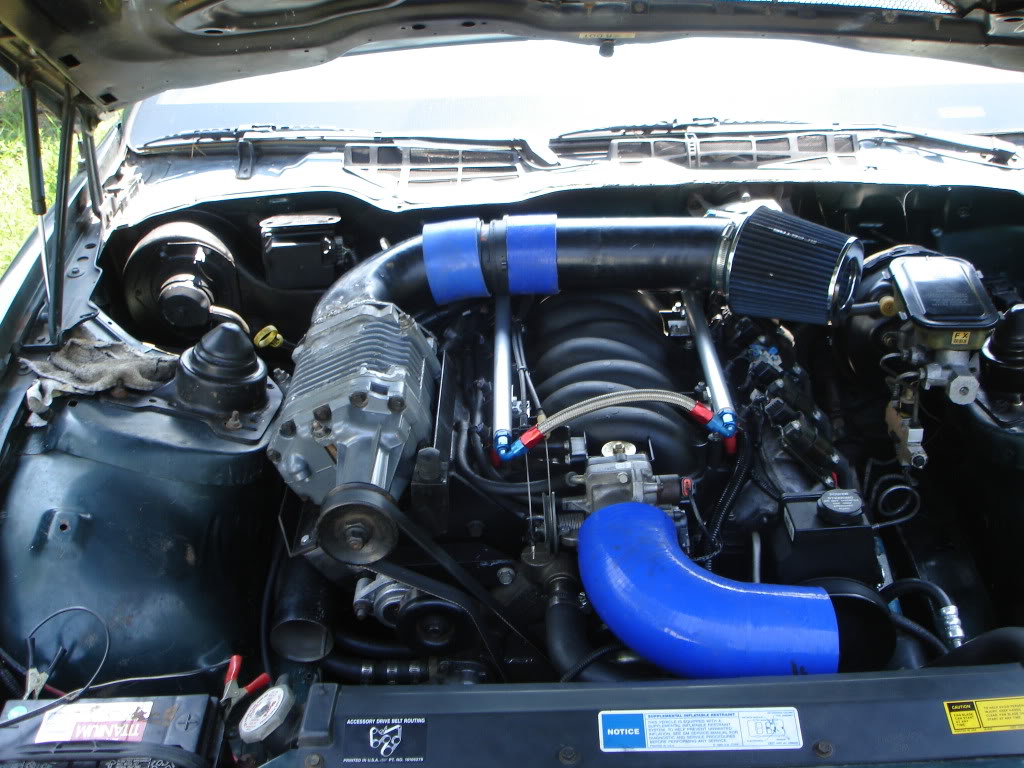
Welded a hard mount for the upper intake section so it wont flop off down the road. Had to add a small ring before the MAF to line things back up. Repainted everything while I was at it
Radiator shroud is done and needs paint. Ill do that when I pull it all again for the cam swap. Fan moved down about 2" and to the pass side about 6". I didnt have any more large metal sheets so I used FRP board. It's about as strong as the stock plastic stuff so we'll see. A fully enclosed fan shroud should seriously boost the cooling capabilities even though its a single fan
Radiator shroud is done and needs paint. Ill do that when I pull it all again for the cam swap. Fan moved down about 2" and to the pass side about 6". I didnt have any more large metal sheets so I used FRP board. It's about as strong as the stock plastic stuff so we'll see. A fully enclosed fan shroud should seriously boost the cooling capabilities even though its a single fan
08-11-2010, 04:40 PM
#160
Re: I should not be left unsupervised
Tubing came in so I finished that little job
Cam also arrived, big thanks to Phil. Old one should make a great lamp
Last thing Im waiting on are the bypass valves. Vortec sells the Bosch units and rates the for 6-10psi <450hp. I should be ok with one, but learning from the first experience, I got two
Cam also arrived, big thanks to Phil. Old one should make a great lamp
Last thing Im waiting on are the bypass valves. Vortec sells the Bosch units and rates the for 6-10psi <450hp. I should be ok with one, but learning from the first experience, I got two
08-11-2010, 06:10 PM
#161
Supreme Member
iTrader: (2)
Join Date: Dec 2006
Location: Hou. TX
Posts: 5,538
Likes: 0
Received 0 Likes
on
0 Posts
Car: 86 TA, 91 B4C
Engine: 5.3, 4.8
Transmission: 4L80 4000, T56
Axle/Gears: 4.30 M12, 23.42 10 bolt
Re: I should not be left unsupervised
Great job man, we are dying for results on a dyno tune!
 08-12-2010, 08:18 PM
#163
Re: I should not be left unsupervised
Did the cam swap today, easiest cam Ive ever done, but that was the only part of the day that went smoothly
Found out I have yellow LS6 springs in the cyl heads already. I check the numbers on the cam, its a base LM7 cam . Springs must have been a dealer recall or a demodded engine. Either way Ive got some room to grow
Dowel rods went smoothly and didnt get stuck like the last 2 engines I did. Lifter trays must be fairly recent because after I spun the cam all 16 stayed up. I slid the rods in anyways for GP
Cam slid in no problem, no snags, nothing
Reassembly was a nightmare: first the alt went to the perfect angle to slide right out of the interference fit bracket and fell to the ground while still plugged in. Needless to say, the PCM wire wasnt happy. Not a big deal, it just broke up near the injectors so I had to strip the loom all the way up to the coils. Resistance check was fine, so I only broke it in one place. Got lucky
Next, I couldnt find my balancer tool. Dont you hate it when tools grow legs? Anyways I had to improvise, and I figured a trip to the hardware store would be all I needed. Apparently metric bolts are still heresy and threaded rods are even more witchcraft. Luckily I did find two large bolts with a decent amount of threads that matched the balancer bolt, so I got them, a nut and some washers. Did you know they have metric washers? And they're 4x as expensive as normal washers. Needless to say I walked out with the std set. My balancer wont care if the washer has an extra .035" of clearance from the rod. Once i was home I cut the heads off the two bolts, chamfered the ends and welded them together so the threads were out at either end. I threaded it in the crank snout and set the balancer in place behind some washers and the nut. Ready to go or so I thought. The new nut was 15/16" as opposed to the 1" OEM. Guess which socket was missing from my toolbox . Long story short I ground the nut flats down to fit a 7/8" socket
After the accessories were back on I moved to the trans lines. Previously I had swapped out my hard lines with OEM quick connects (terrible POS, leaky, floppy etc) for AN stuff just like my fuel system. After much searching I found the trans case took 3/8NPS. The radiator fittings were a bit more trouble to ID, but about a dozen threads indicated it used the same as the case. They didnt fit . So I cut the SS line long and slide a few inches in and sealed it with hose clamps. Looked awful and i was keeping it for long. I had to take a trip down to the local hydraulic company to actually make a decision on what threads it used. Best help I got from the trans forum was that it was some sort of inverted flare and inverted flare fittings dont use a thread size, it's simply based on the tube diameter. Nonsense, its a 1/2" x 20 thread. Anyways, the correct fittings arrived today so I went to put the hose ends on. For some reason the lower end would not stay on the SS line for anything. Id push it all the way in, visually check it, mark the depth with a sharpie and screw the blue piece in. All seemed well and Id do the final tug to make sure it was locked and it would slide right off. Word to the wise, never assemble AN hose ends when you're frustrated, it will only make you more angry. I took a chill break and cut another 1/2" off the hose. Went right on then, no idea what was the matter
And for the grand fiasco of the day, the new black rattle can paint i bought sprayed on black, dried gray and wipes off with a paper towel! Everything will have to be sanded completely clean and resprayed. Im thrilled
Tomorrow Ill finish up with torquing the rockers, welding the BPV ports on, sanding and respraying the plumbing, resealing the blower in/outlets, reassembling the nose section and giving everything a thorough cleaning
Edit:
Trans side is actually 1/4NPS
Found out I have yellow LS6 springs in the cyl heads already. I check the numbers on the cam, its a base LM7 cam
. Springs must have been a dealer recall or a demodded engine. Either way Ive got some room to growDowel rods went smoothly and didnt get stuck like the last 2 engines I did. Lifter trays must be fairly recent because after I spun the cam all 16 stayed up. I slid the rods in anyways for GP
Cam slid in no problem, no snags, nothing
Reassembly was a nightmare: first the alt went to the perfect angle to slide right out of the interference fit bracket and fell to the ground while still plugged in. Needless to say, the PCM wire wasnt happy. Not a big deal, it just broke up near the injectors so I had to strip the loom all the way up to the coils. Resistance check was fine, so I only broke it in one place. Got lucky
Next, I couldnt find my balancer tool. Dont you hate it when tools grow legs? Anyways I had to improvise, and I figured a trip to the hardware store would be all I needed. Apparently metric bolts are still heresy and threaded rods are even more witchcraft. Luckily I did find two large bolts with a decent amount of threads that matched the balancer bolt, so I got them, a nut and some washers. Did you know they have metric washers? And they're 4x as expensive as normal washers. Needless to say I walked out with the std set. My balancer wont care if the washer has an extra .035" of clearance from the rod. Once i was home I cut the heads off the two bolts, chamfered the ends and welded them together so the threads were out at either end. I threaded it in the crank snout and set the balancer in place behind some washers and the nut. Ready to go or so I thought. The new nut was 15/16" as opposed to the 1" OEM. Guess which socket was missing from my toolbox
. Long story short I ground the nut flats down to fit a 7/8" socketAfter the accessories were back on I moved to the trans lines. Previously I had swapped out my hard lines with OEM quick connects (terrible POS, leaky, floppy etc) for AN stuff just like my fuel system. After much searching I found the trans case took 3/8NPS. The radiator fittings were a bit more trouble to ID, but about a dozen threads indicated it used the same as the case. They didnt fit
. So I cut the SS line long and slide a few inches in and sealed it with hose clamps. Looked awful and i was keeping it for long. I had to take a trip down to the local hydraulic company to actually make a decision on what threads it used. Best help I got from the trans forum was that it was some sort of inverted flare and inverted flare fittings dont use a thread size, it's simply based on the tube diameter. Nonsense, its a 1/2" x 20 thread. Anyways, the correct fittings arrived today so I went to put the hose ends on. For some reason the lower end would not stay on the SS line for anything. Id push it all the way in, visually check it, mark the depth with a sharpie and screw the blue piece in. All seemed well and Id do the final tug to make sure it was locked and it would slide right off. Word to the wise, never assemble AN hose ends when you're frustrated, it will only make you more angry. I took a chill break and cut another 1/2" off the hose. Went right on then, no idea what was the matterAnd for the grand fiasco of the day, the new black rattle can paint i bought sprayed on black, dried gray and wipes off with a paper towel! Everything will have to be sanded completely clean and resprayed. Im thrilled
Tomorrow Ill finish up with torquing the rockers, welding the BPV ports on, sanding and respraying the plumbing, resealing the blower in/outlets, reassembling the nose section and giving everything a thorough cleaning
Edit:
Trans side is actually 1/4NPS
Last edited by Pocket; 03-11-2011 at 08:38 PM.
08-13-2010, 12:01 AM
#165
Supreme Member
 08-13-2010, 02:59 PM
#167
Supreme Member
iTrader: (2)
Join Date: Dec 2006
Location: Hou. TX
Posts: 5,538
Likes: 0
Received 0 Likes
on
0 Posts
Car: 86 TA, 91 B4C
Engine: 5.3, 4.8
Transmission: 4L80 4000, T56
Axle/Gears: 4.30 M12, 23.42 10 bolt
Re: I should not be left unsupervised
Well, good job man, it hate when the easy stuff turns difficult but it always happens like that.
08-15-2010, 12:14 PM
#168
Re: I should not be left unsupervised
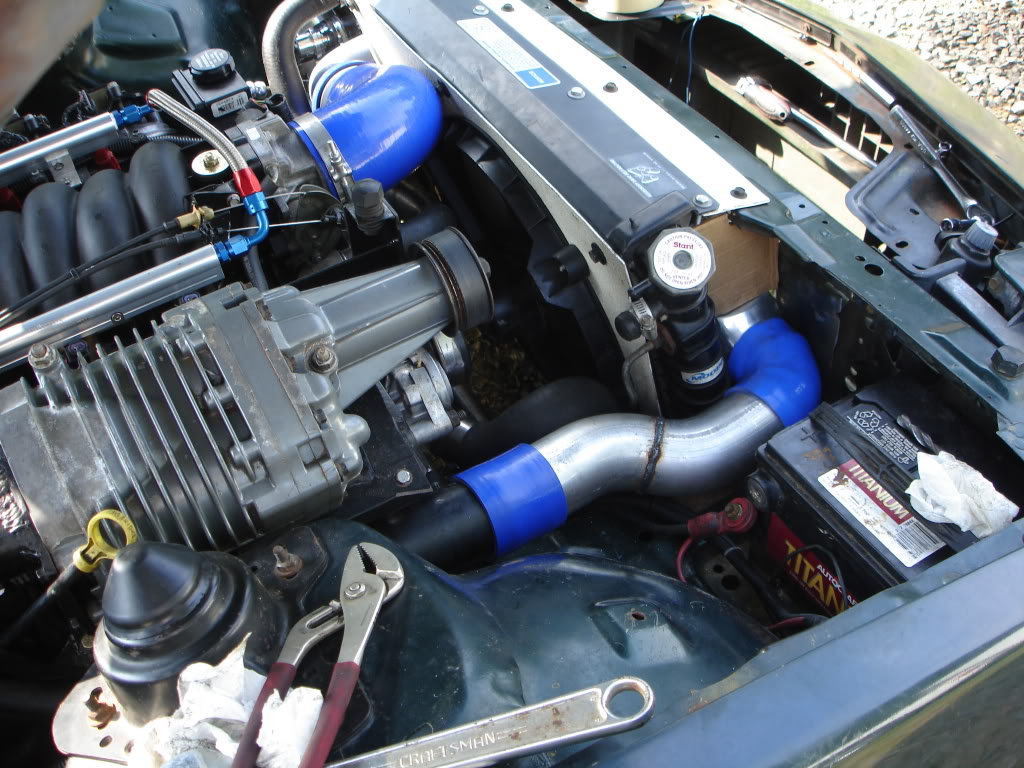
Last few parts started arriving. I ordered a bosch BPV then saw a good deal on an alum cased unit with different springs so I got that too
Im down to the last few things
BPV, 1" silicone coupler for the pressurized side hasnt come in yet, so heater hose and worm clamps rule until it blows off. Outlet is on the SC inlet
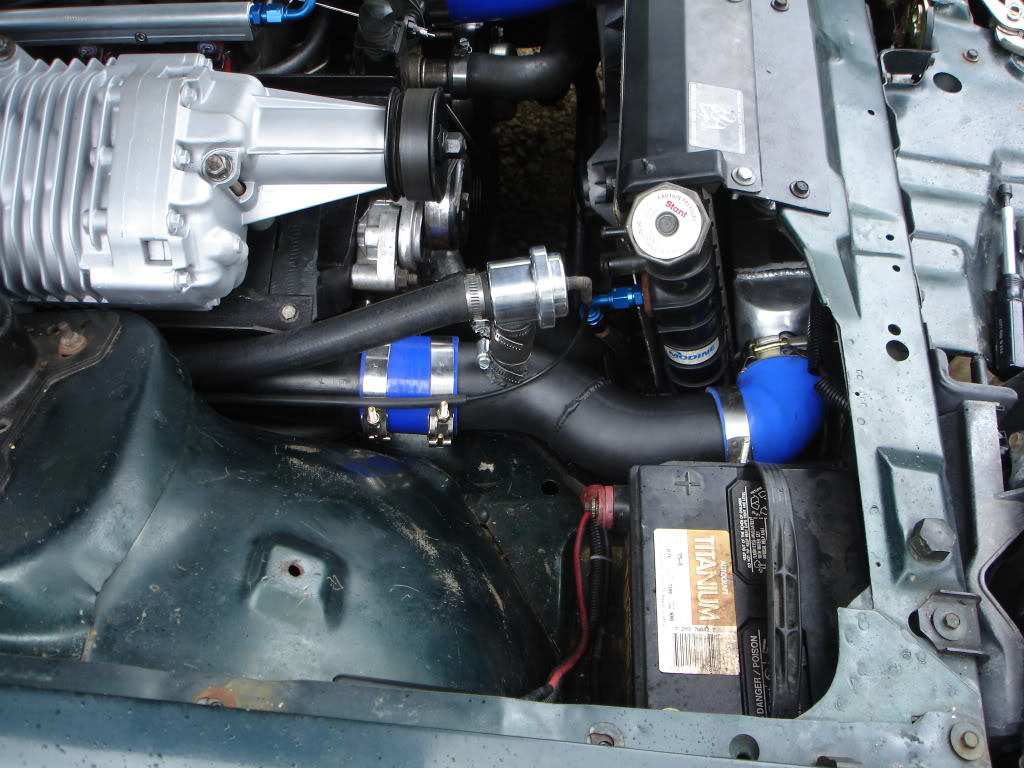
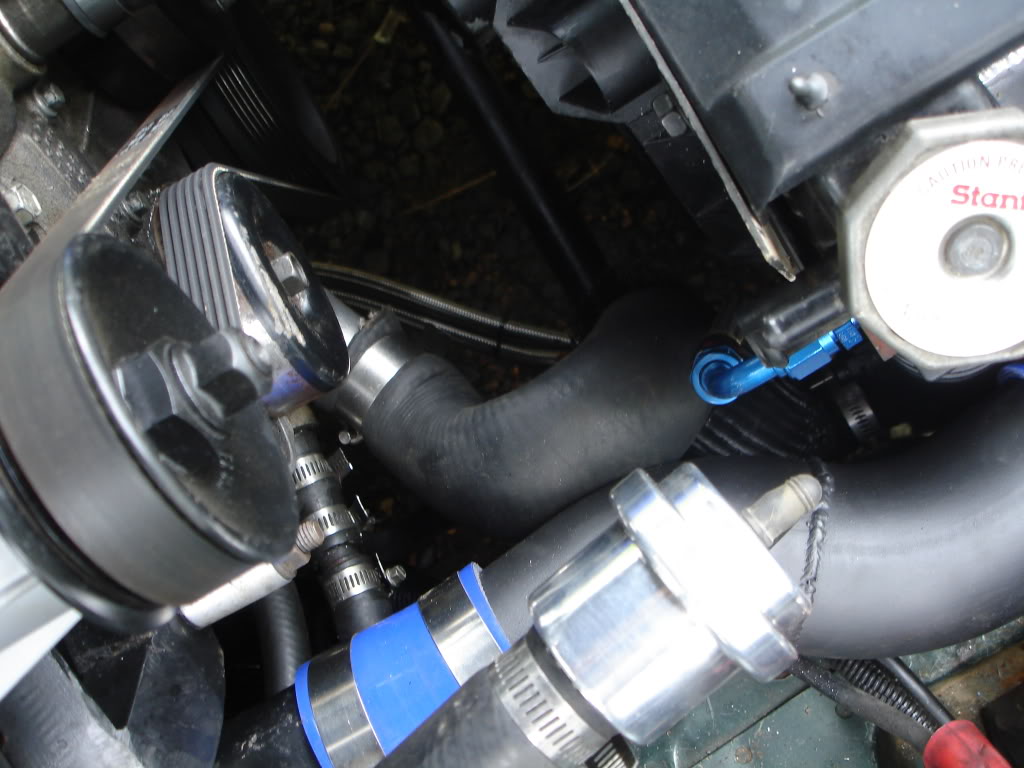
Damned trans line fittings
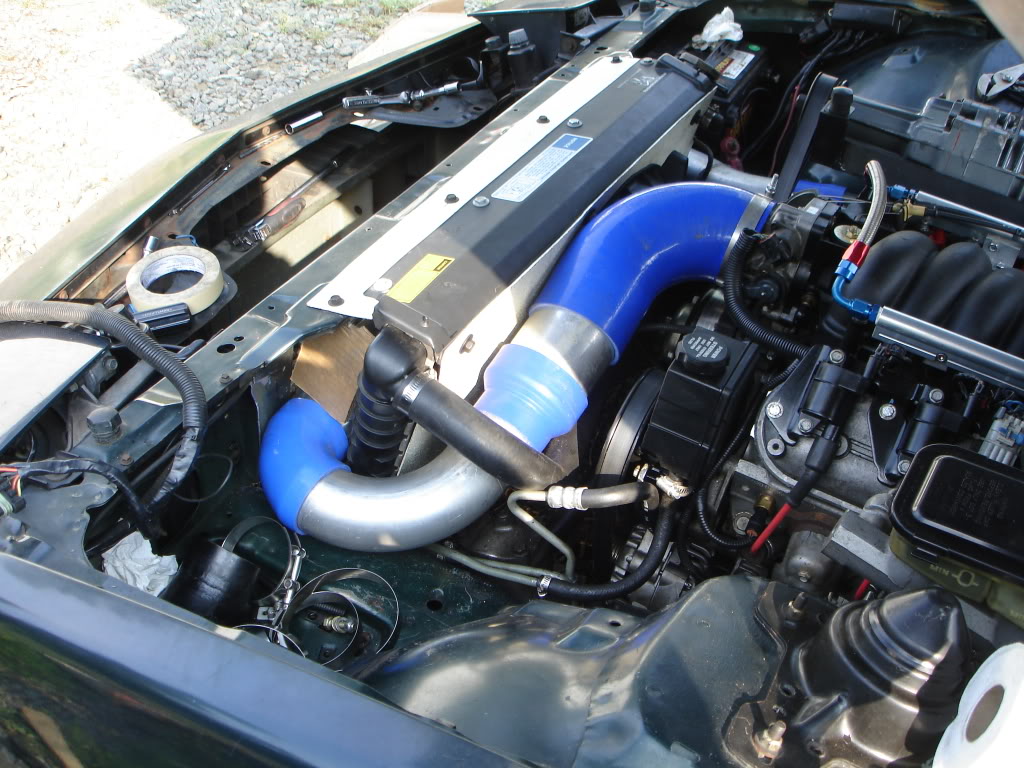
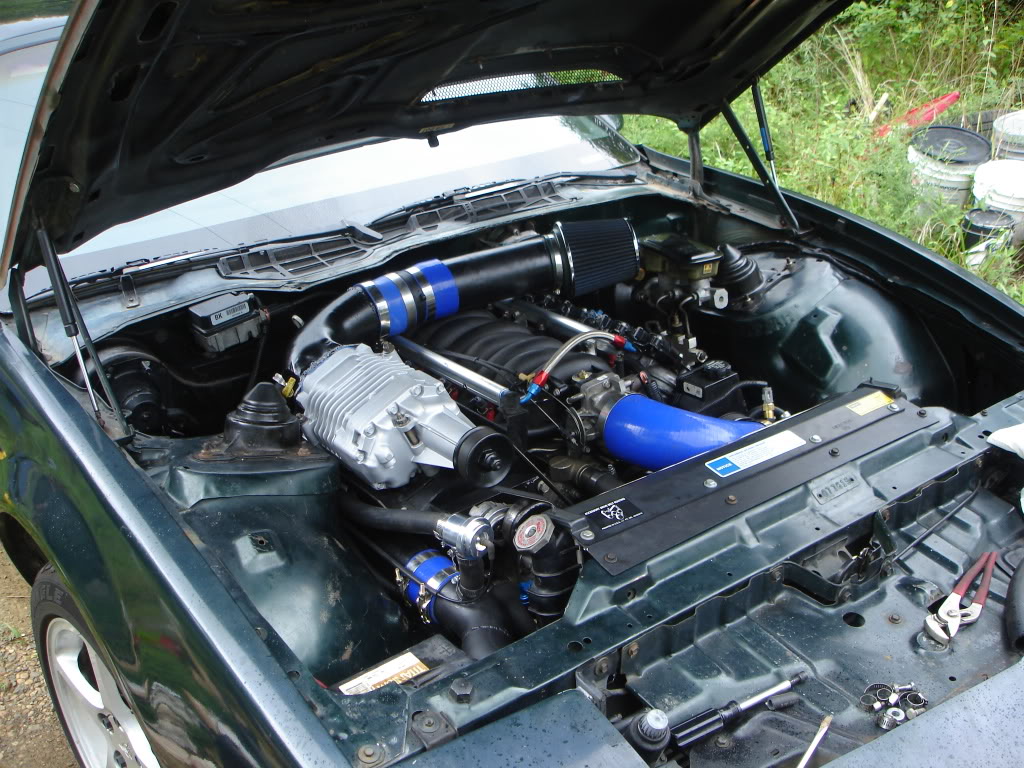
Drivers side is mostly finished. IAT isnt threaded yet because my tap set doesnt go up to 3/8" NPT. I need to get another

Hard to believe it's intercooled
To do list:
Tap the IAT bung
Fab the radiator filler panels
Figure out a new radiator overflow tank (Honda unit most likely)
Various vacuum caps for the reverted PCV system
Fill with fresh coolant
Tune
Im down to the last few things
BPV, 1" silicone coupler for the pressurized side hasnt come in yet, so heater hose and worm clamps rule until it blows off. Outlet is on the SC inlet
Damned trans line fittings
Drivers side is mostly finished. IAT isnt threaded yet because my tap set doesnt go up to 3/8" NPT. I need to get another
Hard to believe it's intercooled
To do list:
Tap the IAT bung
Fab the radiator filler panels
Figure out a new radiator overflow tank (Honda unit most likely)
Various vacuum caps for the reverted PCV system
Fill with fresh coolant
Tune
08-15-2010, 03:27 PM
#169
Supreme Member
iTrader: (2)
Join Date: Dec 2006
Location: Hou. TX
Posts: 5,538
Likes: 0
Received 0 Likes
on
0 Posts
Car: 86 TA, 91 B4C
Engine: 5.3, 4.8
Transmission: 4L80 4000, T56
Axle/Gears: 4.30 M12, 23.42 10 bolt
Re: I should not be left unsupervised
Sooooo....think you will dab some type of box that will pull air thru the formula hood hole? Might as well right? LOL
08-16-2010, 06:50 AM
#171
Supreme Member
iTrader: (2)
Join Date: Dec 2006
Location: Hou. TX
Posts: 5,538
Likes: 0
Received 0 Likes
on
0 Posts
Car: 86 TA, 91 B4C
Engine: 5.3, 4.8
Transmission: 4L80 4000, T56
Axle/Gears: 4.30 M12, 23.42 10 bolt
Re: I should not be left unsupervised
Ok, i thought so with all the work done so far, what is a touch more.
08-16-2010, 09:02 AM
#172
Member
Join Date: Nov 2001
Location: Midvale, UT
Posts: 482
Likes: 0
Received 2 Likes
on
2 Posts
Car: 1991 RS
Engine: L03
Transmission: T5
Axle/Gears: 4.11
Re: I should not be left unsupervised
I gotta give you some major Kudos here Pocket, this project is really neat! I've just barely started to learn how to weld so that I can start learning a bit more about fabrication, so getting to see things like what you did here, is very educational for me, and I really enjoy reading your threads! Keep it up, and I'll keep taking it in!

 08-16-2010, 10:34 PM
#176
Supreme Member
Join Date: Jul 2003
Location: any clime or place...
Posts: 2,779
Likes: 0
Received 2 Likes
on
2 Posts
Car: 1987 Camaro SC, 1999 Z28
Engine: GMPP 350HO, LS1
Transmission: Built 700r4/EDGE 3200, T56
Axle/Gears: 3.42 Eaton 7.625, 3.42 Zexel Torsen
Re: I should not be left unsupervised
sweet! anxious for the results.
awesome craftsmenship and budgeting abilities.
awesome craftsmenship and budgeting abilities.
08-17-2010, 12:43 AM
#177
TGO Supporter
Join Date: Jul 2001
Location: Cheyenne, Wyoming
Posts: 4,991
Likes: 0
Received 1 Like
on
1 Post
Car: 1992 B4C 1LE
Engine: Proaction 412, Accel singleplane
Transmission: built 700R4 w/custom converter
Axle/Gears: stock w/later 4th gen torsen pos
Re: I should not be left unsupervised
08-17-2010, 06:57 AM
#178
Supreme Member
iTrader: (2)
Join Date: Dec 2006
Location: Hou. TX
Posts: 5,538
Likes: 0
Received 0 Likes
on
0 Posts
Car: 86 TA, 91 B4C
Engine: 5.3, 4.8
Transmission: 4L80 4000, T56
Axle/Gears: 4.30 M12, 23.42 10 bolt
Re: I should not be left unsupervised
That seriously reminds me of the fella that runs around with a leaf blower working for the lawn service!!! LOL
08-17-2010, 01:29 PM
#179
08-18-2010, 01:44 PM
#180
Member
Join Date: May 2007
Location: Albuquerque
Posts: 335
Likes: 0
Received 1 Like
on
1 Post
Car: 1989 IROC-Z28 Camaro
Engine: 403 LSX
Transmission: TH400
Axle/Gears: Moser 9" 3.25's
Re: I should not be left unsupervised
Awesome build, but damn that blower sounds horrible!!! That can't be normal.
08-18-2010, 10:16 PM
#182
Supreme Member
Re: I should not be left unsupervised
08-18-2010, 11:02 PM
#183
Member
Join Date: Aug 2005
Location: Round Rock
Posts: 439
Received 0 Likes
on
0 Posts
Car: 1989 Formula 350 LSX
Engine: 5.3, 234/228 cam
Transmission: Stage II 4L60e, Vigilante 3200
Axle/Gears: 3.42
Re: I should not be left unsupervised
This is ridiculous. And I wholly support it LOL! Can't wait to see the end result.
08-19-2010, 02:18 AM
#184
Member
Join Date: Nov 2009
Location: tri-cities Wa
Posts: 376
Likes: 0
Received 0 Likes
on
0 Posts
Car: 83 camaro l69
Engine: turbo lsx
Transmission: th350
Axle/Gears: disk rear, 10bolt.
Re: I should not be left unsupervised
i wonder if a set up like this will work on a carb set up?? ican get my hands on a few of these that are just sitting around... it would be nice to mash the skinny pedal and see the boost just to 8-10psi and not have to wait. why did u do a fmic and not the water to air that usually goes under the supercharger it self?
Last edited by toolegit86; 08-19-2010 at 02:32 AM.
08-19-2010, 04:32 AM
#185
TGO Supporter
Join Date: Jul 2001
Location: Cheyenne, Wyoming
Posts: 4,991
Likes: 0
Received 1 Like
on
1 Post
Car: 1992 B4C 1LE
Engine: Proaction 412, Accel singleplane
Transmission: built 700R4 w/custom converter
Axle/Gears: stock w/later 4th gen torsen pos
Re: I should not be left unsupervised
When you put a cold air kit on a Grand Prix and remove all the intake sound dampening baffle box from the inlet side they sound like that.
When you run them at high RPM it sounds like an indycar.
When you do it on a lightning or cobra with the bigger versions of the blowers, and then run them on the dyno, its enough to bring you to your knees without earmuffs.
08-19-2010, 09:16 AM
#186
Re: I should not be left unsupervised
i wonder if a set up like this will work on a carb set up?? ican get my hands on a few of these that are just sitting around... it would be nice to mash the skinny pedal and see the boost just to 8-10psi and not have to wait. why did u do a fmic and not the water to air that usually goes under the supercharger it self?
08-19-2010, 11:36 AM
#187
Re: I should not be left unsupervised
That is perfectly normal. It's nearly as loud on the intake side.
When you put a cold air kit on a Grand Prix and remove all the intake sound dampening baffle box from the inlet side they sound like that.
When you run them at high RPM it sounds like an indycar.
When you do it on a lightning or cobra with the bigger versions of the blowers, and then run them on the dyno, its enough to bring you to your knees without earmuffs.
08-19-2010, 11:58 AM
#188
Supreme Member
iTrader: (4)
Join Date: Mar 2009
Location: Pepperell, MA
Posts: 3,079
Likes: 0
Received 3 Likes
on
3 Posts
Car: 1987 Trans Am
Engine: LQ9/L92
Transmission: 4L60E
Re: I should not be left unsupervised
my 97 GTP had the horrible stock "kidney" intake, no whine at all. cold air kit (box, filter, etc) helped remind me there was blower on the car 
08-19-2010, 12:37 PM
#189
Re: I should not be left unsupervised
Yeah, since I've postponed my plans to trade it in for a truck, I should probably build something. Unfortunately, nobody makes a CAI for the new GPs, so I'll have to find time to rig something up ******* (hmm... rhymes with "sledneck") style.
My stock setup really looks pretty simple... airbox into a short elbow right to the throttle body. Must be some funny business going on inside the airbox to quiet the noise.
My stock setup really looks pretty simple... airbox into a short elbow right to the throttle body. Must be some funny business going on inside the airbox to quiet the noise.
Last edited by Jim85IROC; 08-19-2010 at 12:41 PM.
08-19-2010, 01:05 PM
#190
Member
Join Date: Nov 2009
Location: tri-cities Wa
Posts: 376
Likes: 0
Received 0 Likes
on
0 Posts
Car: 83 camaro l69
Engine: turbo lsx
Transmission: th350
Axle/Gears: disk rear, 10bolt.
Re: I should not be left unsupervised
i actally had a eaton on my colbalt ss with the smallest pullie and a aem intake fully tuned, i loved the sound they put out...
my vw g60 corrado had a BBM Lysholm and it was super loud no matter what u did. all the time it was just noise. most of the cars we deal with have wipples and kennebells they all have diffrent sounds. u come to love it all.
i was thinkin of doing a similar set up, with the side mount eaton and a fmic with a bov blown though a carb. not expecting much but would be a cool one off set up. and ,much easer set up then a turbo. plus i hate wating for boost. like seeing 10psi once u tap the gas.
and it would be nice since i just did the serptine set up. and the passenger side only has the ac delete pullie and no smog so its kinda useless.
how do u control the boost on the supercharger it self.? i know the pulley should limit u but on some eatons there is a vacuem bypass valve. and my colbalt had a plater under the supercharger it self to quiet it down.
Last edited by toolegit86; 08-19-2010 at 01:24 PM.
08-19-2010, 02:08 PM
#191
Member

Join Date: Aug 2006
Location: G�llivare Sweden
Posts: 169
Likes: 0
Received 0 Likes
on
0 Posts
Car: 1989 Iroc
Engine: LS2
Transmission: GTO T-56
Axle/Gears: 4:th gen Auburn with 3:73
Re: I should not be left unsupervised
Looks like you�ve got a impressive amount of work done in a short time. One of my best friends here in Sweden did a VERY similar build/setup on his 3.0 V6 Alfa Romeo 75, also with a Eaton blower from a Jaguar XJR. It�s been working very good for 2 year now once he got all the "bugs" out..
It�s a bit "strange" about the noise from different blowers...Even the same model of supercharger can make very different noise on different cars. Anyway, what I wanted to say was GREAT JOB, post some more videos once you get it going, we all love to hear it rip :-)
It�s a bit "strange" about the noise from different blowers...Even the same model of supercharger can make very different noise on different cars. Anyway, what I wanted to say was GREAT JOB, post some more videos once you get it going, we all love to hear it rip :-)
08-19-2010, 04:25 PM
#192
Member
Join Date: Nov 2009
Location: tri-cities Wa
Posts: 376
Likes: 0
Received 0 Likes
on
0 Posts
Car: 83 camaro l69
Engine: turbo lsx
Transmission: th350
Axle/Gears: disk rear, 10bolt.
Re: I should not be left unsupervised
what is that charger off of?? i found one off of a 93 bonneville ssei for 100$ thinkin of picking it up if it looks ok.
08-20-2010, 12:08 AM
#193
Junior Member

Join Date: May 2007
Location: birmingham al
Posts: 13
Likes: 0
Received 0 Likes
on
0 Posts
Car: 88 camaro
Engine: 383 stroker
Transmission: th350
Axle/Gears: stock rear end with moser 411s
Re: I should not be left unsupervised
this is awsome cant wait to see some #s
08-25-2010, 03:41 PM
#194
Member
Join Date: Nov 2009
Location: tri-cities Wa
Posts: 376
Likes: 0
Received 0 Likes
on
0 Posts
Car: 83 camaro l69
Engine: turbo lsx
Transmission: th350
Axle/Gears: disk rear, 10bolt.
Re: I should not be left unsupervised
how much boost is the m90 actally giving u??
08-26-2010, 01:00 AM
#197
Supreme Member
08-26-2010, 07:14 AM
#198
Supreme Member
iTrader: (2)
Join Date: Dec 2006
Location: Hou. TX
Posts: 5,538
Likes: 0
Received 0 Likes
on
0 Posts
Car: 86 TA, 91 B4C
Engine: 5.3, 4.8
Transmission: 4L80 4000, T56
Axle/Gears: 4.30 M12, 23.42 10 bolt
Re: I should not be left unsupervised
Friend has a set of 853s for sale, but he would be better off finding something local to avoid shipping.
08-26-2010, 07:39 AM
#199
Re: I should not be left unsupervised
john, you got a line on another set already? i know that you had another 5.3 in the car at one point. you just going to use the heads off your old motor? if not i got a set you can have, just cover shipping.
08-26-2010, 07:56 AM
#200
Re: I should not be left unsupervised
First motor sold 3 days after i pulled it. Not sure how the valve bit it, but its not holding compression. We hooked a compressed air line to it with the rockers off and it was very audibly hissing out the tail pipes. I figured good used heads would be cheaper and faster than machine work on my existing heads. Shame too, so clean
Ive got my eyes on 4 sets local, it'll be back together soon, just not in time for autofair
Ive got my eyes on 4 sets local, it'll be back together soon, just not in time for autofair