
82 LSX swap project
 06-15-2009, 09:34 PM
#51
Re: 82 LSX swap project
Great...you just brought back the wiring headaches 
OK...You have the 4th gen fuse blocks.
Lets start with the battery cables. You have a ground to the engine block, and a ground to the chassis. Then you have a positive that goes to the fuse block. Then ANOTHER positive goes down to the starter. You want your starter to get positive right off the battery. I used a 4th gen battery cable for this since it has the two big positive cables...and put my battery from the drivers side to the passenger side. I mounted the fuse blocks on the drivers side. Then the battery cables fit perfectly.
Now...both the IGN source for the fuse blocks and the starter solenoid signal wire come from the thirdgen bulkhead connector. I think "C100"...whatever the main connector is behind the brake booster. There should be a large pink wire that is switched 12v. Thats what I used to trigger my IGN relay in the fuse box...thus turning all the other circuits on. The starter trigger wire should be a purple wire coming from the bulkhead connector. You can run that right down to the small post on the starter solenoid. As was already stated...nothing goes on that second starter post.
On a related note, also coming from that big connector, there should be a couple red wires. They are the power feeds for the interior of the car as well as your HVAC parts. Those should go down and connect to the starter on the same post as the positive battery cable. These wires power the constant 12v stuff in your car like interior lights, head light circuits, horn, etc. I was able to clean mine up so it was just those two wires coming across the engine bay.
This is why using the 4th gen fuse blocks is such a good idea. Because now everything is plug and play and self contained. Once you power up the IGN relay, the battery voltage is sent where it needs to be and technically, assuming you have fuel and everything connected, the motor will run.
Does that help ya? Or was that clear as mud?
J.
 06-16-2009, 12:43 AM
#52
Senior Member
Thread Starter
iTrader: (2)
Join Date: May 2008
Posts: 433
Likes: 0
Received 0 Likes
on
0 Posts
Re: 82 LSX swap project
Thanks J, that did point me in the right direction. You did give me a general idea. Now some 82 specific details..........
I found the large PURPLE with the small terminal for the starter in the C100 bulkhead connector.
How did u wire it to the ign relay in the LS1 fuse box ? did u just splice it in or did u pull the wires out of the LS1 fuse box (if so how? need a special tool ?)?
By the 3rd gen starter...I also found 2 more thick red wires that goto the + terminal of the starter.
I also found 2 more thick red wires that goto the alternator along with the alternator trigger wire - brown.
Of these 4 which is the one that powers the interior and HVAC ? I would think they would go the alternator + ive rather than the starter + ive to have constant 12 volts. forgive me if I am wrong.
ALso can u shed some light into how u wired the fuel pump. I do have the LS1 fuel pump bulkhead, stripped the abs wiring... But its part of the interior wiring harness and I do see a fuel pump fuse in one of the LS1 fues boxes. (I read somewhere that the fuel pump relay is in the other box but I dont have the lables for that box when I got the donor. I am gona check for that at ls1tech or some local LS1 guys).
feel free to quote me when u reply. I
Last edited by screeminchicken; 06-16-2009 at 12:12 PM.
06-16-2009, 06:21 AM
#53
Re: 82 LSX swap project
How did u wire it to the ign relay in the LS1 fuse box ? did u just splice it in or did u pull the wires out of the LS1 fuse box (if so how? need a special tool ?)?
By the 3rd gen starter...I also found 2 more thick red wires that goto the + terminal of the starter.
I also found 2 more thick red wires that goto the alternator along with the alternator trigger wire - brown.
Of these 4 which is the one that powers the interior and HVAC ? I would think they would go the alternator + ive rather than the starter + ive to have constant 12 volts. forgive me if I am wrong.
ALso can u shed some light into how u wired the fuel pump. I do have the LS1 fuel pump bulkhead, stripped the abs wiring... But its part of the interior wiring harness and I do see a fuel pump fuse in one of the LS1 fues boxes. (I read somewhere that the fuel pump relay is in the other box but I dont have the lables for that box when I got the donor. I am gona check for that at ls1tech or some local LS1 guys).
Again...having a wiring diagram for both the LS1 wiring and for the thirdgen wiring will really help you. But, if you can just get ahold of the fuse cover pictures that will help a bunch too. Once you know which relay is what and which fuse is what..you can start hooking up where you need to (I.E. fuel pump).
I really wish I would have taken better notes on wiring. Ive actually given thought to condensing my fuse blocks. Someone else around here was able to wire things so that only one single block was needed to work everything. I also gave thought to building my own custom relay block to simplify things. Also to free up some room over there to run my intake tubing down under the battery tray. But I dont have much time these days, so Ill probably just leave it alone for now.
J.
Last edited by ghettocruiser; 06-16-2009 at 06:29 AM.
06-16-2009, 12:11 PM
#54
Senior Member
Thread Starter
iTrader: (2)
Join Date: May 2008
Posts: 433
Likes: 0
Received 0 Likes
on
0 Posts
Re: 82 LSX swap project
Sorry , it was purple. UV rays made it look like pink. I am gona correct my previous post if it will let me.
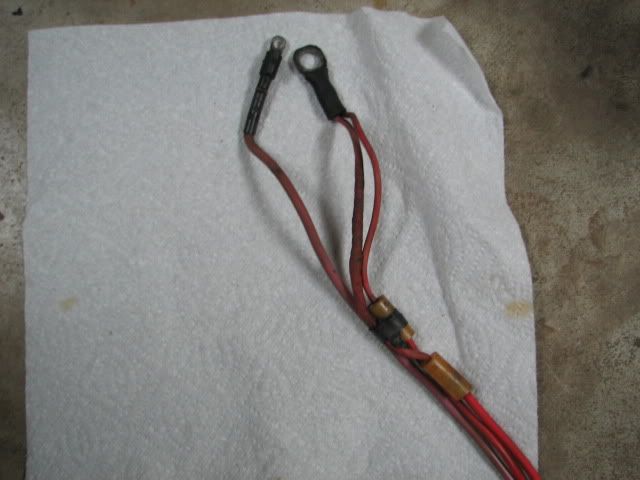
Here are the 2 sets of wires I was talking about
1. Starter wire set
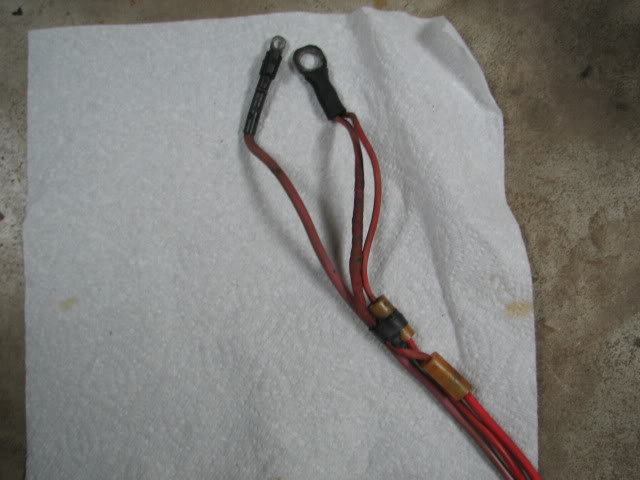
a. purple - starter solinoid.
Two thick red wires -
b. to starter +ive terminal
c. TBD
2. Alt wire set

a. Thick red to alternator +ive terminal
White plug with
b. small brown wire - i think it goes to the volt gauge
c. Thick red wire - I think this is one of the wires that powers the interior (if the above brn wire is for the voltage gauge). Since the voltage can be measured after the accessories are turned on or off.
Here are the 2 sets of wires I was talking about
1. Starter wire set
a. purple - starter solinoid.
Two thick red wires -
b. to starter +ive terminal
c. TBD
2. Alt wire set
a. Thick red to alternator +ive terminal
White plug with
b. small brown wire - i think it goes to the volt gauge
c. Thick red wire - I think this is one of the wires that powers the interior (if the above brn wire is for the voltage gauge). Since the voltage can be measured after the accessories are turned on or off.
Last edited by screeminchicken; 06-17-2009 at 11:19 AM.
06-22-2009, 12:42 PM
#55
Senior Member
Thread Starter
iTrader: (2)
Join Date: May 2008
Posts: 433
Likes: 0
Received 0 Likes
on
0 Posts
Re: 82 LSX swap project
I broke down and goot all the wiring out of the black protector and cleaned them up. After 28 yrs, white looks like yellow, pink like white , purple like pink and so on. I cleaned them up pretty good and made thing a hell of a lot easier.
Anyways, just for the sake of discussion.
The LS1 starter already has a purple trigger wire on it... (not sure where the other side of this purple wire ends up ). looks like it goes thru the C102 connector to the LS1 fuse box.
Is it necessary to run my 3rd gen purple starter trigger wire to the LS1 starter?
Can I just splice it in somewhere up stream ?
Anyways, just for the sake of discussion.
The LS1 starter already has a purple trigger wire on it... (not sure where the other side of this purple wire ends up
). looks like it goes thru the C102 connector to the LS1 fuse box. Is it necessary to run my 3rd gen purple starter trigger wire to the LS1 starter?
Can I just splice it in somewhere up stream ?
06-22-2009, 10:58 PM
#56
Member
iTrader: (1)

Join Date: Sep 2008
Location: NE & KS
Posts: 181
Likes: 0
Received 0 Likes
on
0 Posts
Car: 92 Camaro RS
Engine: LS1
Transmission: T56
Axle/Gears: 3.42
Re: 82 LSX swap project
the purple wire on the ls1 ran to the stock underhood fuse block to the starter relay. the purpose of running it there was so the 4th gen BCM could could control the relay grounding. That way if someone tried to steal the car, the BCM would prevent that relay from pulling in. as if you wanted to know all this......
Just splice your original starter trigger wire to the purple wire that goes to the LS1 starter.
Just splice your original starter trigger wire to the purple wire that goes to the LS1 starter.
06-23-2009, 06:27 AM
#57
Re: 82 LSX swap project
 Just forget about the LS1 wiring when it comes to starter trigger. Just connect the starter to your thirdgen ignition just like it was before you put the LS1 in. All that does is sends 12v down to the starter solenoid while the key is in CRANK. Any other time that wire is dead.
06-23-2009, 07:30 AM
Just forget about the LS1 wiring when it comes to starter trigger. Just connect the starter to your thirdgen ignition just like it was before you put the LS1 in. All that does is sends 12v down to the starter solenoid while the key is in CRANK. Any other time that wire is dead.
06-23-2009, 07:30 AM
#58
Member
iTrader: (1)

Join Date: Aug 2004
Location: Melbourne Florida
Posts: 202
Likes: 0
Received 0 Likes
on
0 Posts
Car: 87 Formula
Engine: '00 LM7
Transmission: 4L60e
Axle/Gears: 3.23 posi
Re: 82 LSX swap project
Sorry , it was purple. UV rays made it look like pink. I am gona correct my previous post if it will let me.
Here are the 2 sets of wires I was talking about
1. Starter wire set
a. purple - starter solinoid.
Two thick red wires -
b. to starter +ive terminal
c. TBD
both red go to starter positive to meet the battery cable. 1 wire is for battery power to ignition stuff, and the other wire is for I think they call it courtesy lights (aka your emergencies, brake lights and whatnot).
2. Alt wire set
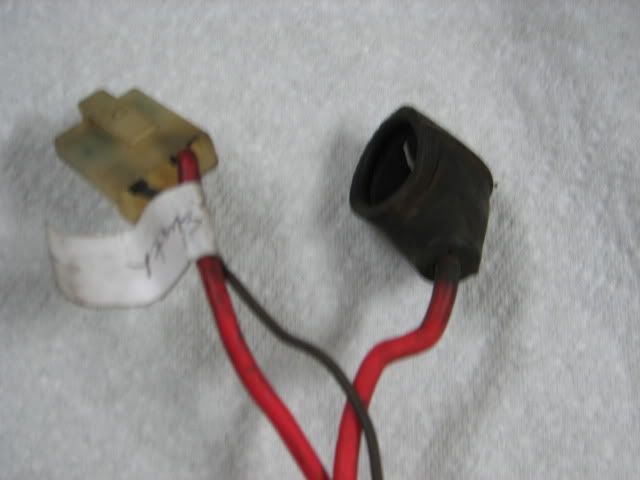
a. Thick red to alternator +ive terminal
White plug with
b. small brown wire - i think it goes to the volt gauge
c. Thick red wire - I think this is one of the wires that powers the interior (if the above brn wire is for the voltage gauge). Since the voltage can be measured after the accessories are turned on or off.
Here are the 2 sets of wires I was talking about
1. Starter wire set
a. purple - starter solinoid.
Two thick red wires -
b. to starter +ive terminal
c. TBD
both red go to starter positive to meet the battery cable. 1 wire is for battery power to ignition stuff, and the other wire is for I think they call it courtesy lights (aka your emergencies, brake lights and whatnot).
2. Alt wire set
a. Thick red to alternator +ive terminal
White plug with
b. small brown wire - i think it goes to the volt gauge
c. Thick red wire - I think this is one of the wires that powers the interior (if the above brn wire is for the voltage gauge). Since the voltage can be measured after the accessories are turned on or off.
the wire with the boot is what sends the alternator power back into the battery. the other (dont quote me on this) is the exciter wire for the alternator itself, which tells it how much load it needs to be under. the voltmeter gauge pulls its reading from the power/ground inside the cab on the gauge cluster and has nothing to do with those wires.
07-22-2009, 09:28 AM
#59
Senior Member
Thread Starter
iTrader: (2)
Join Date: May 2008
Posts: 433
Likes: 0
Received 0 Likes
on
0 Posts
Re: 82 LSX swap project
I finally broke down and brought an alldata book for the LS1 wiring.
Going thru it, I am trying to identify all the circuts connected to the C220 and C230 Female connectors on the LS1. for the most part it makes sense.
looks like the fuel relay enable and the starter relay enable ckts go thru the C230 and C220 connectors to the PCM but it comes from the LS1 BCM.
So how are you guys bypassing the LS1 BCM ?
07-22-2009, 09:36 AM
#60
Senior Member
Thread Starter
iTrader: (2)
Join Date: May 2008
Posts: 433
Likes: 0
Received 0 Likes
on
0 Posts
Re: 82 LSX swap project
Also , I was checking some of the starting safty featurrs that were on the LS1.
The stop lamp switch on the LS1 is different from the one on the 82.
The PNP switch is also different from the one on the 82. (4 gears vs 3 gears)
My 82 did not come with a shift lockout solinoid.
Since I am gona use the LS1 shifter assembly, i am going to keep the LS1 PNP switch and shift lockout solinoid.
question is , can I eleminate the the stock PNP and brake lamp switch from my 82 without causing issues to other circuts?
Also , where is the shifter lockout on the 82 ? is it mechanical ? can that also be independently eliminated?
Thanks
07-22-2009, 10:41 AM
#61
Member
iTrader: (1)
Join Date: Sep 2008
Location: NE & KS
Posts: 181
Likes: 0
Received 0 Likes
on
0 Posts
Car: 92 Camaro RS
Engine: LS1
Transmission: T56
Axle/Gears: 3.42
Re: 82 LSX swap project
i did all my wiring on my car last weekend. it was a piece of cake. From the LS1 PCM, there is a green wire with white tracer. went to the underhood ls1 fuse block. That wire needs to run to your fuelpump relay. I have my BCM plugins unhooked just laying inside the car right now and it works just fine. I have VATS turned off so im not 100% sure if that makes any difference.
07-27-2009, 11:44 AM
#62
Senior Member
Thread Starter
iTrader: (2)
Join Date: May 2008
Posts: 433
Likes: 0
Received 0 Likes
on
0 Posts
Re: 82 LSX swap project
My case is kinda different.
I am using the LS1 brake switch, PNP switch and shifter, LS1 DLC.
So it kinda made scense to keep the LS1 C200 and C230 connectors.
They both had the starter relay enable (YEL/BLK) and fuel pump relay enable (GRY) signals were comming from the BCM to the PCM which then triggers the respective relays in the underhood fusebox.
From what I have been researching, the BCM just grounds the starter trigger wire once it detects the correct resistance in thee key.
The fuel pump I have not been able to find yet.
So it might as well be what andrew said.....get rid of the VATS. If that doesnt work, I might just try directly grounding the wire to the body and see what happens.
Can I just leave the stock 82 brake lamp, DLC and PNP connectors just unhooked and not worry about tracing each wire and removing them from the stock harness ?
08-07-2009, 11:40 AM
#63
Senior Member
Thread Starter
iTrader: (2)
Join Date: May 2008
Posts: 433
Likes: 0
Received 0 Likes
on
0 Posts
Re: 82 LSX swap project
So I made some progress. Actually quite a bit progress on wiring.
Here are some pictures.
The wires to the right are the 82 c100 wires.
The wires going thru the hole on the left was from the 2002 C200A,B,C,D connector comming from the fuse box.

The LS1 fuse box in the driverside. I am not sure how to mount it yet without it flapping around.

This is where I connected the thick red wires from the 82 directly to the battery.
I used the LS1 ign switch which was on the other side of the C200 conn, just spliced the BRN wire (acc power) from the 82 IGN switch to the LS1 IGN switch BRB wire.

The LS1 C220 and C230 connectors comming from the LS1 engine harness going inside the car.

I have 3 more wire I need to figure out what they are and where to connect to. For some reason I cant seem to find a good answer even though I got the alldata book.
Here are some pictures.
The wires to the right are the 82 c100 wires.
The wires going thru the hole on the left was from the 2002 C200A,B,C,D connector comming from the fuse box.
The LS1 fuse box in the driverside. I am not sure how to mount it yet without it flapping around.
This is where I connected the thick red wires from the 82 directly to the battery.
I used the LS1 ign switch which was on the other side of the C200 conn, just spliced the BRN wire (acc power) from the 82 IGN switch to the LS1 IGN switch BRB wire.
The LS1 C220 and C230 connectors comming from the LS1 engine harness going inside the car.
I have 3 more wire I need to figure out what they are and where to connect to. For some reason I cant seem to find a good answer even though I got the alldata book.
08-07-2009, 01:30 PM
#64
Senior Member
Thread Starter
iTrader: (2)
Join Date: May 2008
Posts: 433
Likes: 0
Received 0 Likes
on
0 Posts
Re: 82 LSX swap project
I am trying to make sense of the electrical wiring diagram form Mitchell's book. refresher--> This harness came out of a 02 Pontiac TA.
The PNP switch connector is a 6 pin Female.
A - BLK/WHT --> C220 # E --> GND # G110
B - ORG/BLK --> C220 # H --> PCM Blu Conn Pin# 34 --> PNP switch signal in
C - BRN --> IGN 3 voltage --> ??
D - LT GRN --> Backup lamp supply voltage
E - PPL/WHT --> Starter relay coil supply voltage - Goes to underhood C101 pin# J and also the IP cluster.
F - DRK GRN --> C200A/C200D # A6 ckt # 1433 --> Underhood starter Relay --> Clutch start switch signal.
1. what is IGN 3 voltage and where can I SPLICE it from from ?
2. why does the starter relay supply voltage have to go to the IP cluster? Is this how the voltmeter gauge work ?
3. If the car is a A4 , why is the Clutch start signal required for the starter relay ? I did a advanced search and found this to be same of 06 4L60e's and other similar trans.
Maybe my book is a misprint. Can sombody pls check the wiring in a GM manual or other sources ?
Thanks
08-11-2009, 12:35 AM
#66
Senior Member
Thread Starter
iTrader: (2)
Join Date: May 2008
Posts: 433
Likes: 0
Received 0 Likes
on
0 Posts
MILESTONE !!!!!!!!!
I got it to start for a little bit. Here is a 10 sec video of the whole thing.
beginning u can hear the fuel pump prime. is the fuel pump supposed to be that loud?
Then the engine ran and died all in 1 sec. I didnt have any coolant or gauges so didnt want to push the limit.
In the end, when I turn the key to off position, I can hear the TPS click quite a bit. Is the normal/ok?
Thanks everybody one here and the stickies for getting me this far.
Last edited by screeminchicken; 03-06-2010 at 12:41 AM.
08-11-2009, 08:14 AM
#67
Supreme Member

iTrader: (2)
Join Date: Feb 2006
Location: 39.84N 105.11W
Posts: 1,547
Likes: 0
Received 0 Likes
on
0 Posts
Car: '89 Trans Am GTA
Engine: WAS 350 - now L92 (alum. 378/6.2L)
Transmission: WAS 700R4, now a built T56
Axle/Gears: 3.27 9-bolt
Re: 82 LSX swap project
Congrats on reaching that milestone! 
08-12-2009, 10:42 AM
#68
Senior Member
Thread Starter
iTrader: (2)
Join Date: May 2008
Posts: 433
Likes: 0
Received 0 Likes
on
0 Posts
Re: 82 LSX swap project
Thanks man appriciate the encouragement. When nobody else posted anything , I thought the photobucket link was broken. I thought many more would comment exspecially all the guys who helped get it this far with questions answered and ideas. .......oh well.
I cant wait to get her running for more than a 1 sec. I need to figure out a way to confirm oil preasure.
I cant wait to get her running for more than a 1 sec. I need to figure out a way to confirm oil preasure.
08-12-2009, 10:55 AM
#69
Senior Member
Thread Starter
iTrader: (2)
Join Date: May 2008
Posts: 433
Likes: 0
Received 0 Likes
on
0 Posts
Re: 82 LSX swap project
I just got it to crank her for a sec just to check if i got the wiring right.
I am not sure I am getting oil preasure and still no way of checking it. i am still tring get enough info to re-pin my gauge in my 82 ta.
I tried using a DMM but either i am not using it right or its not reading right.
I put it in the 200 ohm setting.
key off : +ive 5-8 ohms
Key on: -ive 110 to 122 ohms.
during cranking : +ive 50-121 ohms.
i took the fuel pump fuse off, to the coil connector and put the ign in start. i would say 6-8 times at 10-15 sec intervals. each time same result.
what can i do ?
08-12-2009, 03:43 PM
#70
Member

Join Date: Jan 2009
Posts: 141
Likes: 0
Received 0 Likes
on
0 Posts
Car: 91 Formula
Engine: lq4
Transmission: t-56
Re: 82 LSX swap project
pretty sure you can get an adapter kit somewhere to use your original oil pressure sender out of the car in the new engine. cant remember where i saw that now though.
11-26-2009, 12:26 AM
#71
Senior Member
Thread Starter
iTrader: (2)
Join Date: May 2008
Posts: 433
Likes: 0
Received 0 Likes
on
0 Posts
WELCOME ME TO THE DARKSIDE !!!!!
Been doing a few things hear and there but made a big step today

B&M short throw


Flywheel need to resurfaced. Not sure what kind of preasure plate?

Supposedly a spec II clutch.

B&M short throw
Flywheel need to resurfaced. Not sure what kind of preasure plate?
Supposedly a spec II clutch.
 11-26-2009, 12:39 AM
#73
Senior Member
Thread Starter
iTrader: (2)
Join Date: May 2008
Posts: 433
Likes: 0
Received 0 Likes
on
0 Posts
Re: 82 LSX swap project
I thought the T56 was made by the tremec and not BorgWarner.
Any way confirming this is a T56 and what year??

Also need help identifying these connectors and where I can get them. I am going to go thru pocket's notes for the wiring diagram


Any way confirming this is a T56 and what year??
Also need help identifying these connectors and where I can get them. I am going to go thru pocket's notes for the wiring diagram
11-26-2009, 10:40 AM
#74
Guest
Posts: n/a
Re: 82 LSX swap project
Back in '92, Tremec was nothing more than a supplier of Ford F150 5-speed manual transmissions, and Borg-Warner designed and built the T56 for the Viper. GM picked it up for the '93 Z28 / Formula / TransAm, but with different ratios. In '94, the F-cars got the Viper ratios. Somewhere along the way ( between then and now) I'm not sure of the details, but now the T56 is built by Tremec. It's said that the '96 Mustang GT's then-new T45 trans was based on the T56, but if so, it wouldn't've been replaced by the TR3650.
 11-26-2009, 11:18 AM
#77
Senior Member
Thread Starter
iTrader: (2)
Join Date: May 2008
Posts: 433
Likes: 0
Received 0 Likes
on
0 Posts
Re: 82 LSX swap project
Back in '92, Tremec was nothing more than a supplier of Ford F150 5-speed manual transmissions, and Borg-Warner designed and built the T56 for the Viper. GM picked it up for the '93 Z28 / Formula / TransAm, but with different ratios. In '94, the F-cars got the Viper ratios. Somewhere along the way ( between then and now) I'm not sure of the details, but now the T56 is built by Tremec. It's said that the '96 Mustang GT's then-new T45 trans was based on the T56, but if so, it wouldn't've been replaced by the TR3650.
11-26-2009, 11:45 AM
#78
Supreme Member

Join Date: Jul 1999
Location: Adrian, Mi, USA
Posts: 1,551
Likes: 0
Received 25 Likes
on
20 Posts
Car: 1988 Pontiac Firebird Formula
Engine: 5.7 TPI
Transmission: 700R4
Re: 82 LSX swap project
If there is still a GM part number tag on the trans somewhere, you could call the dealer, and see what they have to say.
12-03-2009, 03:00 AM
#79
Senior Member
Thread Starter
iTrader: (2)
Join Date: May 2008
Posts: 433
Likes: 0
Received 0 Likes
on
0 Posts
Re: 82 LSX swap project
This is what I could find out so far from numbers cast on the transmission. The numbers in red are what are on the T56
Courtesy www.autogears.net
Extension Assy (Original Equipment Assemblies)
#13-86-066-904 (1993-95) 1252 3276 13-86-566-009
NOTE: Used w/ idler gear thrust washers.
#13-86-066-904 (1996-02) 13-86-566-024
NOTE: Used w/o idler gear thrust washers.
whats a idler gear thrust washer ?
Clutch Housing (assy)
#13-86-212-905-C4: Concentric Slave Cylinder (CSC) (1998-02) 13-86-212-005
Courtesy HP Pontiac
http://www.highperformancepontiac.co.../photo_01.html
A close-up of the driver's side of the trans reveals the date code upper left; "9" is 1999. To its right is the trans case part number "13-86-065-902." To the far right running vertically are the last 9 digits of the VIN #2X2232452.
I am not sure what the vin # equates to ???
The only concerning thing is according to above website
"13-86," denoting it�s a T-56. The number after it ,"-020," is the design level (latest for F-body) or "-011" or "-013" would be from a Viper and "-025" from a Vette"
But I have a a "-65"???
Courtesy www.autogears.net
Extension Assy (Original Equipment Assemblies)
#13-86-066-904 (1993-95) 1252 3276 13-86-566-009
NOTE: Used w/ idler gear thrust washers.
#13-86-066-904 (1996-02) 13-86-566-024
NOTE: Used w/o idler gear thrust washers.
whats a idler gear thrust washer ?
Clutch Housing (assy)
#13-86-212-905-C4: Concentric Slave Cylinder (CSC) (1998-02) 13-86-212-005
Courtesy HP Pontiac
http://www.highperformancepontiac.co.../photo_01.html
A close-up of the driver's side of the trans reveals the date code upper left; "9" is 1999. To its right is the trans case part number "13-86-065-902." To the far right running vertically are the last 9 digits of the VIN #2X2232452.
I am not sure what the vin # equates to ???
The only concerning thing is according to above website
"13-86," denoting it�s a T-56. The number after it ,"-020," is the design level (latest for F-body) or "-011" or "-013" would be from a Viper and "-025" from a Vette"
But I have a a "-65"
???
12-03-2009, 04:20 AM
#80
Junior Member
Join Date: Feb 2008
Location: iceland
Posts: 55
Likes: 0
Received 0 Likes
on
0 Posts
Car: workcar Legacy Cruising 84 trans am
Engine: Ls1 99 corvette
Transmission: update working to get a T56
Axle/Gears: 2004 GTO IRS

 12-03-2009, 11:41 AM
#82
Member
iTrader: (1)
Join Date: Sep 2008
Location: NE & KS
Posts: 181
Likes: 0
Received 0 Likes
on
0 Posts
Car: 92 Camaro RS
Engine: LS1
Transmission: T56
Axle/Gears: 3.42
Re: 82 LSX swap project
glad to hear you got yourself a t56. i was just about to call you letting you know i have a 6speed in stock here. oh well....
12-03-2009, 05:04 PM
#83
Senior Member
Thread Starter
iTrader: (2)
Join Date: May 2008
Posts: 433
Likes: 0
Received 0 Likes
on
0 Posts
Re: 82 LSX swap project
Thanks anyways
Do u have anyof these laying around ?
Stock shifter
lower boot and ring
Master to slave cylinder flex line
All or any of the connectors that go on the transmission and pedal ?
MC lever to pedal clip
Thanks
12-07-2009, 09:19 PM
#84
Senior Member
Thread Starter
iTrader: (2)
Join Date: May 2008
Posts: 433
Likes: 0
Received 0 Likes
on
0 Posts
Re: 82 LSX swap project
Here is my 2nd set of SSW headers. This time I got 1.75" X 2.5". Since I requested the 02 bungs not be welded on it had to custom ordered of SSW for extra. and there was a 4 week wait time.
I will post detailed pic in the header thread.
I kinda like the raw ss look. it matches the used engine and tranny. Before the only shiny thing on my car was the polished headers.

Thanks Steven !! great job !!
I will post detailed pic in the header thread.
I kinda like the raw ss look. it matches the used engine and tranny. Before the only shiny thing on my car was the polished headers.
Thanks Steven !! great job !!
03-13-2010, 01:02 AM
#85
Senior Member
Thread Starter
iTrader: (2)
Join Date: May 2008
Posts: 433
Likes: 0
Received 0 Likes
on
0 Posts
Re: 82 LSX swap project
Hey guys ......I am back on the bandwagon again.....just got my Tick MC , the monster clutch is on the way
Here are some photos
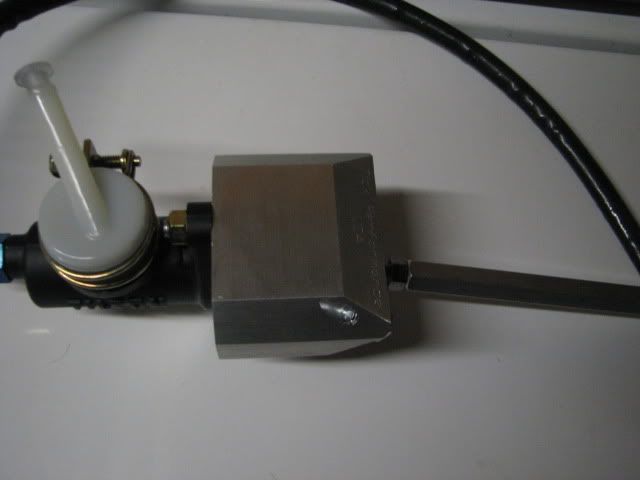
I was going to use the stock MC, but make accross a deal I couldnt pass exspcially since i needed a clutch.
Anyway I had already created a templeted to cut the hole using the stock MC. Now I got to figure out how to mount the Tick MC.
I was searching Jasons, Nicks , Spike-Z & jays photos on how to mount this thing , my car orginally being a automatic.
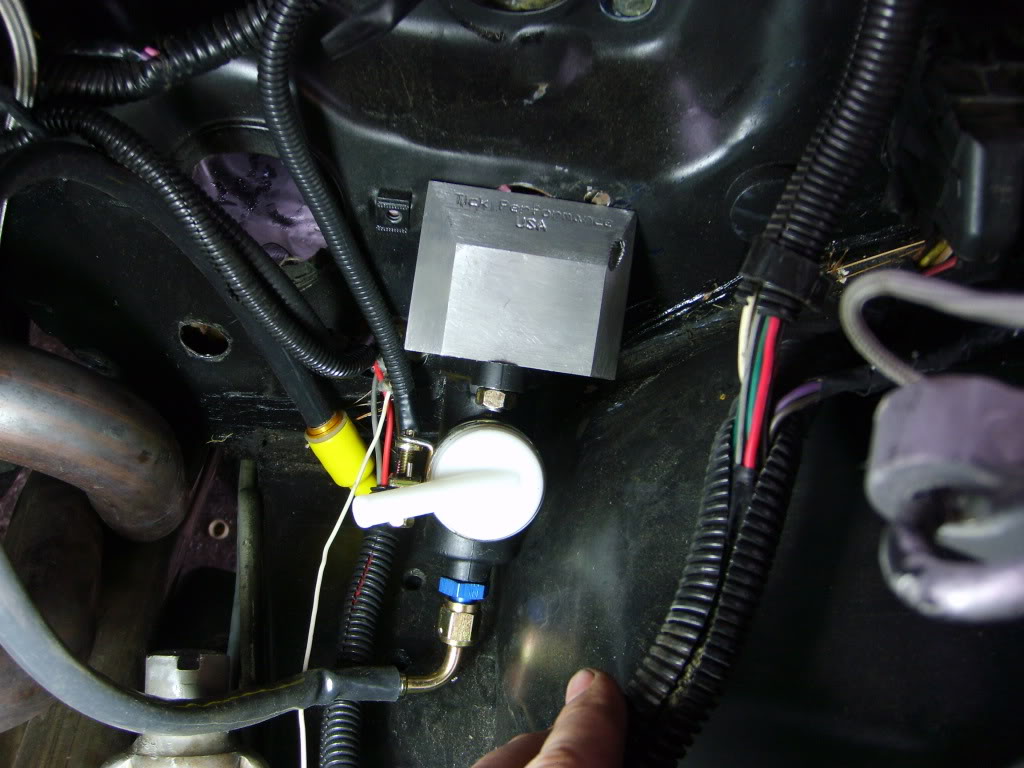
So would this surface highlighted in blue be flat-flush with the firewall? Mocking it against the firewall it seems that there may be a gap at the bottom bw the aluminium bracket and firewall.

Also , What are these 2 little holes in the firewall for orginally ? You guys think I may get lucky. Those plugs are pretty tight in there. So if I remove it there is no going back. Which one the top or bottom.

I kinda notices this on Jason(ghettocruiser's) 87. It was barley visible from under the seam sealer. But he had the cut the whole to mount the Tick.
Any idea's to get the hole correct so the MC rod lines up with the pedal.
Thanks guys
Here are some photos
I was going to use the stock MC, but make accross a deal I couldnt pass exspcially since i needed a clutch.
Anyway I had already created a templeted to cut the hole using the stock MC. Now I got to figure out how to mount the Tick MC.
I was searching Jasons, Nicks , Spike-Z & jays photos on how to mount this thing , my car orginally being a automatic.
So would this surface highlighted in blue be flat-flush with the firewall? Mocking it against the firewall it seems that there may be a gap at the bottom bw the aluminium bracket and firewall.
Also , What are these 2 little holes in the firewall for orginally ? You guys think I may get lucky. Those plugs are pretty tight in there. So if I remove it there is no going back. Which one the top or bottom.
I kinda notices this on Jason(ghettocruiser's) 87. It was barley visible from under the seam sealer. But he had the cut the whole to mount the Tick.
Any idea's to get the hole correct so the MC rod lines up with the pedal.
Thanks guys
03-14-2010, 08:31 PM
#88
Re: 82 LSX swap project
Any idea's to get the hole correct so the MC rod lines up with the pedal.
03-15-2010, 07:22 AM
#90
Re: 82 LSX swap project
I had good luck installing the pedals, lining up the master cylinder brace bolt holes, and drilling those first. Then make a carboard template of the master cylinder, and put it on the outside, so you can figure out where to make your main hole. I used a 1.5" hole saw...I think... Once you get the drill started, just til it and go slow. It'll make a nice oval without too much drama.
Ive never see the plugs like in that one picture. Though, I cant remember exactly what was down there, the only pre-exisiting holes had wires and stuff coming through.
Just take your time with this part whatever you do. You only get one shot at getting that thing installed...unless you want to weld up the holes and start over haha. But it pays to take your time. My 87 wasnt lined up very well, but I took extra steps to make sure my 86 was line up and good to go.
Justin
03-15-2010, 04:36 PM
#91
Junior Member

Join Date: Aug 2008
Location: BC, Canada
Posts: 58
Likes: 0
Received 1 Like
on
1 Post
Car: 88 Camaro Sport Coupe
Engine: 01 LS1, Xer-281-hr, 1.75 ProMagnums
Transmission: 4L60E, Stg2, SuperServos, 3200 stl?
Axle/Gears: 10blt, Torsen, 4.10, T/A Gurdle
Re: 82 LSX swap project
Hey nice project man. Those headers are sure nice, are they the proper Hawks (SSW) conversion headers? I'm just getting started on my LS1 swap but I' sticking with the 4L60E as my donor car was an auto and so is my 88.
I had a question for you on your factory K-member, I saw your pics of the notches you made for the A/C and the oilpan but a few posts later with the engine in the bay you said you still had clearance issues with the pan to the k member. What kind of issue did you have? I was always under the impression that the f-body oilpan cleared fine and the a/c notch was the only required one. My motor is going to have fair bit of cam in it so I don't want the shake to cause the oilpan to touch.
Thanks, Art
03-15-2010, 05:27 PM
#92
Senior Member
Thread Starter
iTrader: (2)
Join Date: May 2008
Posts: 433
Likes: 0
Received 0 Likes
on
0 Posts
Re: 82 LSX swap project
Justin,
If you know the fenace with which i do things you will be scared too. lol. i am for sure going to take my time. did the flat surface of ur tick mc sit flush with the flat part of the firewall ?
IIRC there is only a small flat part right below the brake booster hole.
NArtissimus,
They are the same exact headers just with the o2 bungs not welded on. IIRC there was a polished version being offered for some time. I had both sets and sold one.
I initally cut the K-member for oil pan clearence using photos from members here. It was very close. I didnt mock up the engine when I had the K-member cut and welded the 1st time. I have to take a little bit more off for my comfort. There is always slight difference. because of small frame tweeks, what mounts u use, what bushing is in the mounts etc. I would suggest if possible to mount the engine with all the parts you are going to use then mark the K-member and the cut and weld.
03-15-2010, 06:06 PM
#93
Junior Member
Join Date: Aug 2008
Location: BC, Canada
Posts: 58
Likes: 0
Received 1 Like
on
1 Post
Car: 88 Camaro Sport Coupe
Engine: 01 LS1, Xer-281-hr, 1.75 ProMagnums
Transmission: 4L60E, Stg2, SuperServos, 3200 stl?
Axle/Gears: 10blt, Torsen, 4.10, T/A Gurdle
Re: 82 LSX swap project
I thought they looked the same, and hearing about no other headers working for the conversion. Nice to see some better in-car pics of them. Are you using their y-pipe too or getting a custom one made? I was looking at the set but for me to get it shipped to Canada would cost me a fortune. But I think I have another solution that no-one has come across yet... read on heh
I still have everything in the shop waiting for the weather to agree. I bought a 2nd k-member to do all the mocking and cutting before I pull my car apart. I knew I had to cut for the a/c so I figured it would save alot of time.
I have a brand new Bassani 3/4 length headers and y-pipe on the LS1 that came in the car and they will work with a small notch cut into the rear passenger side a-arm pocket to clear one of the tubes. Collectors are quite snug to the block and will clear fine.
I'm using the Hawks mounts with stock engine side (car has 75000miles so they shouldn't be that bad for wear) and I'll have to to look closer to the oilpan clearance once I've notched the a-arm pocket and can swing the k-member up onto the engine and get the mounts bolted together.
Keeping fingers crossed... But again I like your pics of the k-member mods with the measurements and will go with them. Thanks alot!
03-16-2010, 01:32 AM
#94
Junior Member
iTrader: (3)
Join Date: Nov 2008
Location: Lima, Ohio and Ft. Lauderdale, FL
Posts: 93
Likes: 0
Received 1 Like
on
1 Post
Car: 1983 Camaro Z28
Engine: 350
Transmission: 700R4
Axle/Gears: 3.42
Re: 82 LSX swap project
Looks great! If you don't mind me asking, how much was the pressure washer for the day?
03-16-2010, 07:17 AM
#95
Re: 82 LSX swap project
screemin... Yeah Im pretty sure it sits flat. One thing I had to do was remove some of the seam sealer down there. Mine was sitting on that stuff. Once I removed some of that, it sat nice...Ill see if I have a picture handy...


You can see where I had to clean up the firewall some. Things got ugly down there real quick haha. I noticed the tick doesnt quite cover up my hole that I made, but its not a big deal. I just put some RTV there to keep noise, water, dirt out.
J.
You can see where I had to clean up the firewall some. Things got ugly down there real quick haha. I noticed the tick doesnt quite cover up my hole that I made, but its not a big deal. I just put some RTV there to keep noise, water, dirt out.
J.
03-16-2010, 08:17 AM
#96
Senior Member
Thread Starter
iTrader: (2)
Join Date: May 2008
Posts: 433
Likes: 0
Received 0 Likes
on
0 Posts
Re: 82 LSX swap project
Thanks Jason. I got all the seam sealer out when i Preasure washed the engine bay. I will see how mine turns out.
Did some work early today since Aug of 2009. I hope I can keep the pace. Just posting these for people asking about removing dash.
5 X 7mm nuts up top
2 X 10mm nuts on the 2 bottom corners.
Remove the top bolts first if you are doing it by your self.

Mine was a nightmare the threads of the top bolts were ground smooth maybe due to fibration. I had to go get a dremal. and cut the heads off
Then these wires


Did some work early today since Aug of 2009. I hope I can keep the pace. Just posting these for people asking about removing dash.
5 X 7mm nuts up top
2 X 10mm nuts on the 2 bottom corners.
Remove the top bolts first if you are doing it by your self.
Mine was a nightmare the threads of the top bolts were ground smooth maybe due to fibration. I had to go get a dremal. and cut the heads off
Then these wires
03-17-2010, 03:09 AM
#97
Senior Member
Thread Starter
iTrader: (2)
Join Date: May 2008
Posts: 433
Likes: 0
Received 0 Likes
on
0 Posts
Re: 82 LSX swap project
You have to buy gas and kerosene for the hot water. be carfull not to burn yourself its gets so hot it like high preasure steam.
I say I spend about 150 for 3 days including gas, kerosene, Insurance, transportation (it is very heavy compared to a normal preasure washer) and taxes.
03-17-2010, 03:20 AM
#98
Senior Member
Thread Starter
iTrader: (2)
Join Date: May 2008
Posts: 433
Likes: 0
Received 0 Likes
on
0 Posts
Re: 82 LSX swap project
I think I am going to rethink-redo my wiring. Even though on my 1st startup, the fuel pump clicked on and it cranked and also it seemed like it wanted to run. I never ran....... Non of my gauges worked. So didnt have the ***** to keep trying.
My problems are non of the gauges work, and I guess the way I have it hooked up is I have 2 fuse boxes, 2 ign switches, 2 sets of alternator wires and 2 sets of starter wires.
I need to combine them all into 1 all going thru just the 82 C100 connector
I am going to reread all of Jon's sticky and try again.
Getting the dash out of the way should help with the clutch MC install. I am also going to remove the engine out again to swap the Transmissions.
I am also going to redo the fuel lines correctly per the sticky
03-17-2010, 07:25 AM
#99
Senior Member
Thread Starter
iTrader: (2)
Join Date: May 2008
Posts: 433
Likes: 0
Received 0 Likes
on
0 Posts
Re: 82 LSX swap project
Well I didnt get lucky with the LS1 Clutch pedal assembly as many others here have.....
I was able to get it in after I removed all the padding but It doesnt line up at all

None of the 4 holes for the brake MC line up

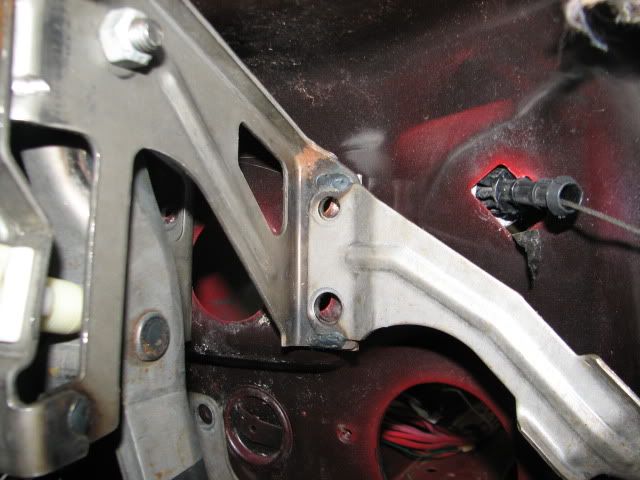
Not even close

looks like its not clearing this part of the bracket against the firewall

This was a know problem
 .
.
but looks like the the existing plug would have worked for the clutch MC.The bracket sits flush against the firewall.

I was able to get it in after I removed all the padding but It doesnt line up at all
None of the 4 holes for the brake MC line up
Not even close
looks like its not clearing this part of the bracket against the firewall
This was a know problem
.but looks like the the existing plug would have worked for the clutch MC.The bracket sits flush against the firewall.
03-17-2010, 07:31 AM
#100
Senior Member
Thread Starter
iTrader: (2)
Join Date: May 2008
Posts: 433
Likes: 0
Received 0 Likes
on
0 Posts
Re: 82 LSX swap project
So what do you guys suggest....look at modifying the 4th gen pedals or look for a 3rd gen pedal set ?
How difficult is for a set of 3rd gen pedal to come by ?
I am thinking that if I cut off those screw studs hold the accel pedal part things may get a little better. Alas I dont have a stud gun or welder to put those back in the correct position
How difficult is for a set of 3rd gen pedal to come by ?
I am thinking that if I cut off those screw studs hold the accel pedal part things may get a little better. Alas I dont have a stud gun or welder to put those back in the correct position