
Interior Restoration -- Lots of Pics
 09-09-2013, 12:20 PM
#51
Member
Thread Starter

Join Date: Oct 2007
Location: Texas
Posts: 186
Likes: 0
Received 0 Likes
on
0 Posts
Car: 1988 IROC-Z
Engine: 350
Transmission: 700R4
Re: Interior Restoration -- Lots of Pics
there's a button on the bottom of the switch.. press it while pulling the stalk. It is not easy.. but, it will come out. Once the button and rod are out.. you can unscrew the plastic nut.
hope that helps.
j
hope that helps.
j
 09-09-2013, 12:36 PM
#52
Member

iTrader: (1)

Join Date: Jul 2013
Location: Pensacola FL
Posts: 123
Likes: 0
Received 0 Likes
on
0 Posts
Car: 1986 Camaro Sport Coupe (Part Out)
Engine: 2.8 MPFI V6
Transmission: 700R4 Automatic 4 speed
Axle/Gears: 3.42 Open With Drum Brakes
Re: Interior Restoration -- Lots of Pics
Thanks. I'll keep that in mind when I go to pull mine apart.
09-09-2013, 01:12 PM
#53
Member
iTrader: (6)
Join Date: Aug 2012
Location: TN
Posts: 466
Likes: 0
Received 0 Likes
on
0 Posts
Car: 1990 Camaro RS
Engine: L31
Transmission: 700R4
Re: Interior Restoration -- Lots of Pics
You have to have the headlight **** pulled all the way out, then you can push the small metal button on the underside and slide it out the rest of the way. Just replaced mine, the screw was broke and what was there was covered in glue so they zip tied it in place, lol.
09-09-2013, 01:32 PM
#54
Member
iTrader: (1)
Join Date: Jul 2013
Location: Pensacola FL
Posts: 123
Likes: 0
Received 0 Likes
on
0 Posts
Car: 1986 Camaro Sport Coupe (Part Out)
Engine: 2.8 MPFI V6
Transmission: 700R4 Automatic 4 speed
Axle/Gears: 3.42 Open With Drum Brakes
Re: Interior Restoration -- Lots of Pics
Thanks for clarifying it. I just want to be sure I am doing it right when the time comes.
09-09-2013, 01:34 PM
#55
Supreme Member
Re: Interior Restoration -- Lots of Pics
1. Reach up and locate (by feel) the headlight switch. On the underside of the switch, find the little spring loaded button. The image attached is a switch from a 1st Gen RS but the buttons are typically the same for all GM switches. Notice the button next to the headlight door vacuum ports.
2. While holding down the button, pull the headlight switch **** out to remove it.
3. Remove the panel that the headlight switch mounts to to gain access to the headlight switch mounting nut. It appears there are four screws holding the panel to the dash. IIRC, two are fake; the other two are real.
2. While holding down the button, pull the headlight switch **** out to remove it.
3. Remove the panel that the headlight switch mounts to to gain access to the headlight switch mounting nut. It appears there are four screws holding the panel to the dash. IIRC, two are fake; the other two are real.
09-09-2013, 02:08 PM
#56
Member
iTrader: (1)
Join Date: Jul 2013
Location: Pensacola FL
Posts: 123
Likes: 0
Received 0 Likes
on
0 Posts
Car: 1986 Camaro Sport Coupe (Part Out)
Engine: 2.8 MPFI V6
Transmission: 700R4 Automatic 4 speed
Axle/Gears: 3.42 Open With Drum Brakes
Re: Interior Restoration -- Lots of Pics
I am amazed at all the answers I have gotten on such a simple question. Thanks so much guys! paulo57509 do you have access to a whole 1986 Camaro assembly guide? I only have an '84 Camaro shop manual that I reference when I need to look something up.
09-09-2013, 04:21 PM
#57
Member
Thread Starter
Join Date: Oct 2007
Location: Texas
Posts: 186
Likes: 0
Received 0 Likes
on
0 Posts
Car: 1988 IROC-Z
Engine: 350
Transmission: 700R4
Re: Interior Restoration -- Lots of Pics
So, wire brushed the surface rust.. then a nice coat of this rustoleum I got at Home Depot. Seems to be doing the trick.
j
j
09-11-2013, 07:34 AM
#58
Junior Member

Join Date: Aug 2013
Location: sw washington
Posts: 46
Likes: 0
Received 1 Like
on
1 Post
Car: 1986 Sport Coupe
Engine: 305 V-8 670 cfm Holley st avenger
Transmission: T5
Axle/Gears: 13-42
Re: Interior Restoration -- Lots of Pics
I am impressed with people's determanation although im more or less doing the same thing but doing the thousands of dollars in the important stuff first which is so far DEEP BREATH......new fluid and seal for the rear end. ..new shocks and struts...tie rod ends...sway bar bushings. ..front brakes. ..fuel lines...brake lines. ...new edelbrock valve and air cleaner...used t5 tranny.....removed all ac and emissions stuff thanks to the po it wasnt worth saving. . Removed.all wiring except the nessary to operate it including ecm removal...used edelbrock intake...removed all interior except first foot of console to hold the radio and heater control. ..just bought yesterday a set of iroc sway bars and a dash pad that is in way better condition than my old one. ..and im sure im forgetting some things and the list continues anyways. its still on my mechanics/friends lift for two months now and we hit it every weekend. The can of worms was the t5 while it was on his lift we were searching for one for a couple of weeks he started saying this has to go thats go to go this needs to be replaced ect ect. Its been fun and I wish the same for all of you. As for pics he says thats gay....idk dont ask so im going to take some when hes not around and I cant wait to get it back on the road just in time for the rain arrrrrrg
Last edited by 1986 305 RS; 09-11-2013 at 07:38 AM.
09-11-2013, 03:24 PM
#59
Supreme Member
iTrader: (6)

Join Date: Oct 2006
Location: West of Toronto
Posts: 3,041
Likes: 0
Received 7 Likes
on
7 Posts
Car: 89 IROC
Engine: 305 TPI / ZZ4 cam
Transmission: Stage 2 700R4, LS1 driveshaft
Axle/Gears: Strange 3.42 w/ Auburn
Re: Interior Restoration -- Lots of Pics
I am impressed with people's determanation although im more or less doing the same thing but doing the thousands of dollars in the important stuff first which is so far DEEP BREATH......new fluid and seal for the rear end. ..new shocks and struts...tie rod ends...sway bar bushings. ..front brakes. ..fuel lines...brake lines. ...new edelbrock valve and air cleaner...used t5 tranny.....removed all ac and emissions stuff thanks to the po it wasnt worth saving. . Removed.all wiring except the nessary to operate it including ecm removal...used edelbrock intake...removed all interior except first foot of console to hold the radio and heater control. ..just bought yesterday a set of iroc sway bars and a dash pad that is in way better condition than my old one. ..and im sure im forgetting some things and the list continues anyways. its still on my mechanics/friends lift for two months now and we hit it every weekend. The can of worms was the t5 while it was on his lift we were searching for one for a couple of weeks he started saying this has to go thats go to go this needs to be replaced ect ect. Its been fun and I wish the same for all of you. As for pics he says thats gay....idk dont ask so im going to take some when hes not around and I cant wait to get it back on the road just in time for the rain arrrrrrg
 09-11-2013, 05:18 PM
#60
Member
iTrader: (2)

Join Date: Oct 2010
Location: Des Moines, Iowa
Posts: 199
Likes: 0
Received 4 Likes
on
3 Posts
Car: 1991 Camaro RS yellow
Engine: was '91 V6, now '89 5.7/355 TPI
Transmission: 4 speed automatic
Axle/Gears: Moser 3.73 with zexel posi
Re: Interior Restoration -- Lots of Pics
One option is to replace the carpet in front only & reuse carpet in back hatch area.
09-13-2013, 03:40 PM
#62
Member
Thread Starter
Join Date: Oct 2007
Location: Texas
Posts: 186
Likes: 0
Received 0 Likes
on
0 Posts
Car: 1988 IROC-Z
Engine: 350
Transmission: 700R4
Re: Interior Restoration -- Lots of Pics
Finally got replacement dash -- it's not as it was supposed to be.. but, I'm going to try to make it work. It's got three broken plastic mounts:
Dashpad mount

Under Gauge Cluster Mounts


Would you suggest washers? Gotta be a work around.. the rest of the dash is usable.
Also, the air vents just flop around.. how have you stopped that? Velcro in the back? just want to tighten them up so they stay like stock.
thx!
j
Dashpad mount
Under Gauge Cluster Mounts
Would you suggest washers? Gotta be a work around.. the rest of the dash is usable.
Also, the air vents just flop around.. how have you stopped that? Velcro in the back? just want to tighten them up so they stay like stock.
thx!
j
09-13-2013, 07:02 PM
#63
Member
iTrader: (6)
Join Date: Aug 2012
Location: TN
Posts: 466
Likes: 0
Received 0 Likes
on
0 Posts
Car: 1990 Camaro RS
Engine: L31
Transmission: 700R4
Re: Interior Restoration -- Lots of Pics
Can you trim the broke pieces out of your old dash and epoxy them to the new? I used automotive silencer tape on my vents to firm them back up.
09-13-2013, 07:44 PM
#64
Member
iTrader: (1)
Join Date: Jul 2013
Location: Pensacola FL
Posts: 123
Likes: 0
Received 0 Likes
on
0 Posts
Car: 1986 Camaro Sport Coupe (Part Out)
Engine: 2.8 MPFI V6
Transmission: 700R4 Automatic 4 speed
Axle/Gears: 3.42 Open With Drum Brakes
Re: Interior Restoration -- Lots of Pics
I'd like to hear the fix for the floppy air vents. My parts car has that problem too.
09-13-2013, 10:55 PM
#65
Member
Thread Starter
Join Date: Oct 2007
Location: Texas
Posts: 186
Likes: 0
Received 0 Likes
on
0 Posts
Car: 1988 IROC-Z
Engine: 350
Transmission: 700R4
Re: Interior Restoration -- Lots of Pics
more pics.. did more work today. Brushed away more of the surface rust. It's gone.. put more of the coating on .. and I feel good about it. While working inside the car.. I cam across a part where either the factory or a previous owner cut a hole in the floor -- I took some shots of it.. anyone have any idea what this might be?


Got the upper door trim off and the weather stripping. Was a pain.. but, figured some stuff out. You need to have the window down (duh) to take them off. The weather stripping is a pain.. unless you loosen the the felt keeping the glass snug. Once you do -- you can pull the glass toward you and get a wrench on the small screws holding the felt in. Yes, there is one on each side behind the corner triangle. Two nuts and a bolt and that's loose. Then you can move it enough to get to the last screw.

Doors are looking really clean:


The Weather Striping around the doors will definitely have to be replaced.. no saving it. It's brittle and done


BTW, here's the Fuse Panel. It's always just hung there. I don't know how it mounts. Do you?

Now, I'll have to buy some window and rear hatch switches. If you didn't see my thread here: https://www.thirdgen.org/forums/inte...1-2-weeks.html -- Go check it out. My parts finally came in.. and there were major problems even after 3 1/2 weeks.
Back at it tomorrow. Trying to take my time and make the car great.
Thanks for the input.
j
Got the upper door trim off and the weather stripping. Was a pain.. but, figured some stuff out. You need to have the window down (duh) to take them off. The weather stripping is a pain.. unless you loosen the the felt keeping the glass snug. Once you do -- you can pull the glass toward you and get a wrench on the small screws holding the felt in. Yes, there is one on each side behind the corner triangle. Two nuts and a bolt and that's loose. Then you can move it enough to get to the last screw.
Doors are looking really clean:
The Weather Striping around the doors will definitely have to be replaced.. no saving it. It's brittle and done
BTW, here's the Fuse Panel. It's always just hung there. I don't know how it mounts. Do you?
Now, I'll have to buy some window and rear hatch switches. If you didn't see my thread here: https://www.thirdgen.org/forums/inte...1-2-weeks.html -- Go check it out. My parts finally came in.. and there were major problems even after 3 1/2 weeks.
Back at it tomorrow. Trying to take my time and make the car great.
Thanks for the input.
j
09-13-2013, 11:01 PM
#66
Member
Thread Starter
Join Date: Oct 2007
Location: Texas
Posts: 186
Likes: 0
Received 0 Likes
on
0 Posts
Car: 1988 IROC-Z
Engine: 350
Transmission: 700R4
Re: Interior Restoration -- Lots of Pics
LOCKS UPDATE -- after tons of WD-40 .. the driver's side lock is working great. The passenger side is not playing along. It's better.. but, not there yet. It is a replacement actuator (on both sides) and it was moving around a bit. Tightened it down and it worked a bit better. I guess what I don't understand is why we can't just cut down on the throw. Just seems like there's too much length on the lock metal rod. The power mirrors don't work. I need to figure out why.
Will update over the weekend.
j
Will update over the weekend.
j
09-14-2013, 03:41 PM
#68
Member
iTrader: (1)
Join Date: Jul 2013
Location: Pensacola FL
Posts: 123
Likes: 0
Received 0 Likes
on
0 Posts
Car: 1986 Camaro Sport Coupe (Part Out)
Engine: 2.8 MPFI V6
Transmission: 700R4 Automatic 4 speed
Axle/Gears: 3.42 Open With Drum Brakes
Re: Interior Restoration -- Lots of Pics
LOCKS UPDATE -- after tons of WD-40 .. the driver's side lock is working great. The passenger side is not playing along. It's better.. but, not there yet. It is a replacement actuator (on both sides) and it was moving around a bit. Tightened it down and it worked a bit better. I guess what I don't understand is why we can't just cut down on the throw. Just seems like there's too much length on the lock metal rod. The power mirrors don't work. I need to figure out why.
Will update over the weekend.
j
Will update over the weekend.
j
09-15-2013, 03:16 AM
#69
Member
Thread Starter
Join Date: Oct 2007
Location: Texas
Posts: 186
Likes: 0
Received 0 Likes
on
0 Posts
Car: 1988 IROC-Z
Engine: 350
Transmission: 700R4
Re: Interior Restoration -- Lots of Pics
thx.. I'm definitely going to keep it stock with the power mirrors.. just have to figure them out.

j
j
09-22-2013, 10:08 PM
#70
Member
Thread Starter
Join Date: Oct 2007
Location: Texas
Posts: 186
Likes: 0
Received 0 Likes
on
0 Posts
Car: 1988 IROC-Z
Engine: 350
Transmission: 700R4
Re: Interior Restoration -- Lots of Pics
I'll say this.. I NEVER expected there would be this many parts involved.. but, I'm not sorry I did this. It's quite a project and great at getting my mind off the daily grind. Took the tracks off of the seats.. and broke the seats down today.. helpful hint.. the bolts are east on the non-power seat.. keeping in mind it's difficult to put the track all the way back by hand.. strong spring. It can be done.. and the bolts come right out.. the power seat is more of a challenge.. that becomes simple. Hook it back up and put the seat front and back all the way up -- not forward.. UP. Then the bolts are easy.  Hope this helps. Got the correct dome light.. and it's too big for the opening .. so obviously -- it's a newer headliner.. so I'll have to cut it to make it fit right.. I guess. Still working through it. Am contemplating what's next. I've got the interior paint.. will be painting lots of plastics.. and have a ton of new parts. This interior is gonna be cherry.. then -- mechanical.
Hope this helps. Got the correct dome light.. and it's too big for the opening .. so obviously -- it's a newer headliner.. so I'll have to cut it to make it fit right.. I guess. Still working through it. Am contemplating what's next. I've got the interior paint.. will be painting lots of plastics.. and have a ton of new parts. This interior is gonna be cherry.. then -- mechanical. Last edited by 72SSboy; 09-22-2013 at 10:44 PM.
09-22-2013, 10:41 PM
#71
Member
iTrader: (6)
Join Date: Aug 2012
Location: TN
Posts: 466
Likes: 0
Received 0 Likes
on
0 Posts
Car: 1990 Camaro RS
Engine: L31
Transmission: 700R4
Re: Interior Restoration -- Lots of Pics
To me the interior is very important, it's not what people see first but it's what you live in.
09-22-2013, 11:19 PM
#73
Supreme Member
Re: Interior Restoration -- Lots of Pics
When you go to put the top of your console back on remove the two bolts that hold the e-brake down. You can move it all over the place to get the top around it and then bolt it back it down when you're done. I have had to do this on three of the third gens I've owned.
09-22-2013, 11:51 PM
#74
Member
Thread Starter
Join Date: Oct 2007
Location: Texas
Posts: 186
Likes: 0
Received 0 Likes
on
0 Posts
Car: 1988 IROC-Z
Engine: 350
Transmission: 700R4
Re: Interior Restoration -- Lots of Pics
smart.. great advice.. thx. Not sure when I'll do it yet.. but, will definitely do that.
09-23-2013, 05:06 AM
#75
Re: Interior Restoration -- Lots of Pics
Finally got replacement dash -- it's not as it was supposed to be.. but, I'm going to try to make it work. It's got three broken plastic mounts:
Dashpad mount
[/snip]
Under Gauge Cluster Mounts
[/snip]
Would you suggest washers? Gotta be a work around.. the rest of the dash is usable.
Also, the air vents just flop around.. how have you stopped that? Velcro in the back? just want to tighten them up so they stay like stock.
thx!
j
Dashpad mount
[/snip]
Under Gauge Cluster Mounts
[/snip]
Would you suggest washers? Gotta be a work around.. the rest of the dash is usable.
Also, the air vents just flop around.. how have you stopped that? Velcro in the back? just want to tighten them up so they stay like stock.
thx!
j
Here ya guys go.
https://www.thirdgen.org/ventfix
09-23-2013, 03:24 PM
#76
Member
Thread Starter
Join Date: Oct 2007
Location: Texas
Posts: 186
Likes: 0
Received 0 Likes
on
0 Posts
Car: 1988 IROC-Z
Engine: 350
Transmission: 700R4
Re: Interior Restoration -- Lots of Pics
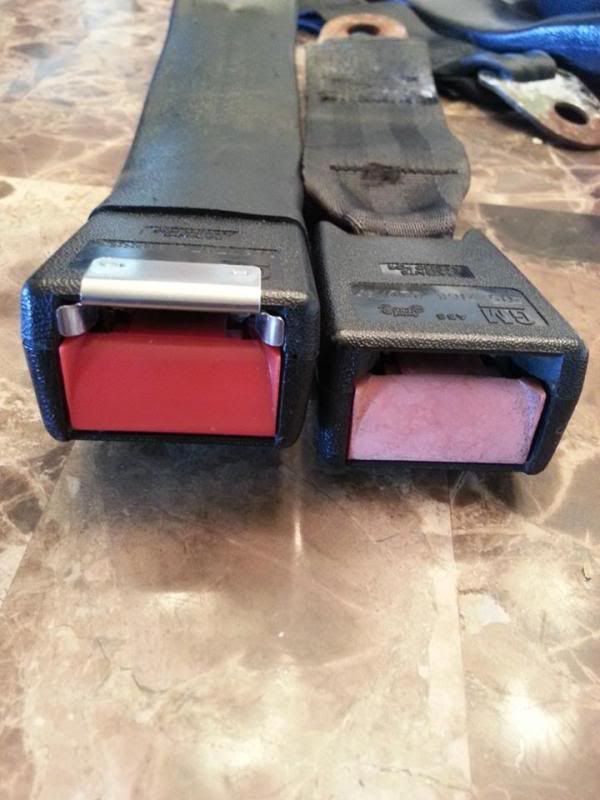
and, now for one of the easiest repairs so far. The seat belt kits you can buy on ebay for 12.95 completely worth it.. and then some.

All four look like new now..
All four look like new now..
Last edited by 72SSboy; 09-23-2013 at 04:43 PM.
09-23-2013, 04:46 PM
#77
Member
Thread Starter
Join Date: Oct 2007
Location: Texas
Posts: 186
Likes: 0
Received 0 Likes
on
0 Posts
Car: 1988 IROC-Z
Engine: 350
Transmission: 700R4
Re: Interior Restoration -- Lots of Pics
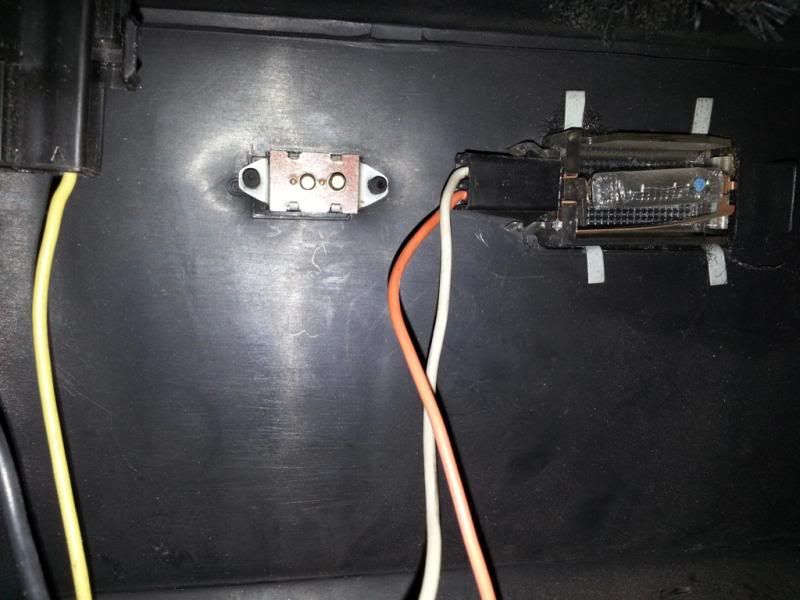
First of all -- the hatch motor Kurf sent me -- perfect. easy to use the lock you already have. Careful twisting the plastic off as I also pulled the spring on the lock mech when I did it. A little patience and I got the spring back on .. and all is well..

now for the rear area light.. I might be on something -- but, shouldn't there be something connected to the switch?
The switch is on the left.. and the light on the right.. from the backside. Does anyone have a picture of what the switch should look like from this vantage point? I'm guessing there's some sort of the plug on it.
thx!
j
10-02-2013, 01:32 AM
#78
Member
Thread Starter
Join Date: Oct 2007
Location: Texas
Posts: 186
Likes: 0
Received 0 Likes
on
0 Posts
Car: 1988 IROC-Z
Engine: 350
Transmission: 700R4
Re: Interior Restoration -- Lots of Pics
Quick update: Trying to decide if now is the time to paint.. and, I expect my seat covers in a couple of weeks. Still looking for a good WHITE PAINT hatch release switch.. and still not sure how the fuse panel should be mounted..
10-02-2013, 06:15 PM
#79
Junior Member
iTrader: (1)

Join Date: Jul 2008
Location: Fairborn, OH
Posts: 63
Likes: 0
Received 0 Likes
on
0 Posts
Car: 1984 Camaro Sport Coupe
Engine: 2.8l v6 soon to be 350
Transmission: auto
Re: Interior Restoration -- Lots of Pics
ebay. com/itm/FatMat-100-Square-Foot-Sound-Control-Deadener-For-All-Cars-Trucks-1-Selling-/120919500607?pt=Car_Audio_Video&hash=item1c275d273f&vxp=mtr
I used this stuff for my interior project. It is not as thick as dynamat but it made a HUGE difference! Had plenty to do the roof and doors too as well as my HHR. Definitely would do it again!
I used this stuff for my interior project. It is not as thick as dynamat but it made a HUGE difference! Had plenty to do the roof and doors too as well as my HHR. Definitely would do it again!
10-02-2013, 06:25 PM
#81
Junior Member
iTrader: (1)
Join Date: Jul 2008
Location: Fairborn, OH
Posts: 63
Likes: 0
Received 0 Likes
on
0 Posts
Car: 1984 Camaro Sport Coupe
Engine: 2.8l v6 soon to be 350
Transmission: auto
Re: Interior Restoration -- Lots of Pics
No problem...it is hard to tear one of these cars down to any extent because you get the restoration fever. Just a few more dollars and then it will be done...just a few more
10-02-2013, 06:32 PM
#82
Member
Thread Starter
Join Date: Oct 2007
Location: Texas
Posts: 186
Likes: 0
Received 0 Likes
on
0 Posts
Car: 1988 IROC-Z
Engine: 350
Transmission: 700R4
Re: Interior Restoration -- Lots of Pics
you happen to have a pic or two of how it looks in your car and on the doors?
thx
thx
10-02-2013, 06:41 PM
#83
Junior Member
iTrader: (1)
Join Date: Jul 2008
Location: Fairborn, OH
Posts: 63
Likes: 0
Received 0 Likes
on
0 Posts
Car: 1984 Camaro Sport Coupe
Engine: 2.8l v6 soon to be 350
Transmission: auto
Re: Interior Restoration -- Lots of Pics
 Sorry about the quality...
 Mostly covered the rear section, and then anywhere that was flat. No pics of the doors or roof.
10-02-2013, 06:44 PM
#84
Junior Member
iTrader: (1)
Join Date: Jul 2008
Location: Fairborn, OH
Posts: 63
Likes: 0
Received 0 Likes
on
0 Posts
Car: 1984 Camaro Sport Coupe
Engine: 2.8l v6 soon to be 350
Transmission: auto
Re: Interior Restoration -- Lots of Pics
I removed left over jute padding from the glued points by putting ice in a zip loc bag on it and then using a wire wheel to take the top cold layer off. PITA, but it made the floor more level. Noway can you remove it all, but it worked well enough to have something solid for the fat mat to stick to.
10-02-2013, 06:48 PM
#85
Member
Thread Starter
Join Date: Oct 2007
Location: Texas
Posts: 186
Likes: 0
Received 0 Likes
on
0 Posts
Car: 1988 IROC-Z
Engine: 350
Transmission: 700R4
Re: Interior Restoration -- Lots of Pics
great.. I was hoping for a solution that would also work on the doors and not be as expensive..
10-06-2013, 10:39 AM
#86
Junior Member
iTrader: (2)

Join Date: Oct 2011
Location: colona illinois
Posts: 84
Likes: 0
Received 3 Likes
on
3 Posts
Car: 88 trans am 72 olds cutlass
Engine: soon to be 5.3 455 olds
Transmission: soon to be t-56 2004r
Axle/Gears: 3.23 3.73
Re: Interior Restoration -- Lots of Pics
The fuse block mounts with 2 screws at the edge of the block. You should see a thin flat piece with 2 holes in it that will hinge. Once you put the screws in there is a plastic tab on the fuse block that will lock the fuse block in. Its set up so you can push on the tab and hinge the block down for easy access but keep it bolted to the dash. I can get pics if you need them. If you put the bottom dash panel on you will see where the box should be located.
10-06-2013, 10:44 PM
#88
Supreme Member
Re: Interior Restoration -- Lots of Pics
First of all -- the hatch motor Kurf sent me -- perfect. easy to use the lock you already have. Careful twisting the plastic off as I also pulled the spring on the lock mech when I did it. A little patience and I got the spring back on .. and all is well..
now for the rear area light.. I might be on something -- but, shouldn't there be something connected to the switch?
The switch is on the left.. and the light on the right.. from the backside. Does anyone have a picture of what the switch should look like from this vantage point? I'm guessing there's some sort of the plug on it.
thx!
j
 10-07-2013, 01:05 AM
#90
Member
Thread Starter
Join Date: Oct 2007
Location: Texas
Posts: 186
Likes: 0
Received 0 Likes
on
0 Posts
Car: 1988 IROC-Z
Engine: 350
Transmission: 700R4
Re: Interior Restoration -- Lots of Pics
not really.. very straight forward. A picture and instructions were included. I only replaced the spring on one that I felt needed it. While I had it apart, I WD-40ed the mechanics inside.
good luck!
j
good luck!
j
10-07-2013, 09:34 AM
#91
Member

Join Date: Jan 2011
Location: Saratoga Area, New York
Posts: 446
Likes: 0
Received 1 Like
on
1 Post
Car: 1990 Formula Firebird
Engine: 305 TBI (LO3)
Transmission: WC T-5 out of an 88 T/A
Axle/Gears: 10 bolt, 3.42 & Torsen Posi
Re: Interior Restoration -- Lots of Pics
Also you may want to check your door handles while the panel is off. My outer door handle on the driver side was loose and was hitting the paint when I opened the door. There are two nuts on the inside that hold it on. You can't really see them but you can get in there with a wrench and snug them down if they are loose.


 10-11-2013, 03:26 PM
#94
Member
Thread Starter
Join Date: Oct 2007
Location: Texas
Posts: 186
Likes: 0
Received 0 Likes
on
0 Posts
Car: 1988 IROC-Z
Engine: 350
Transmission: 700R4
Re: Interior Restoration -- Lots of Pics
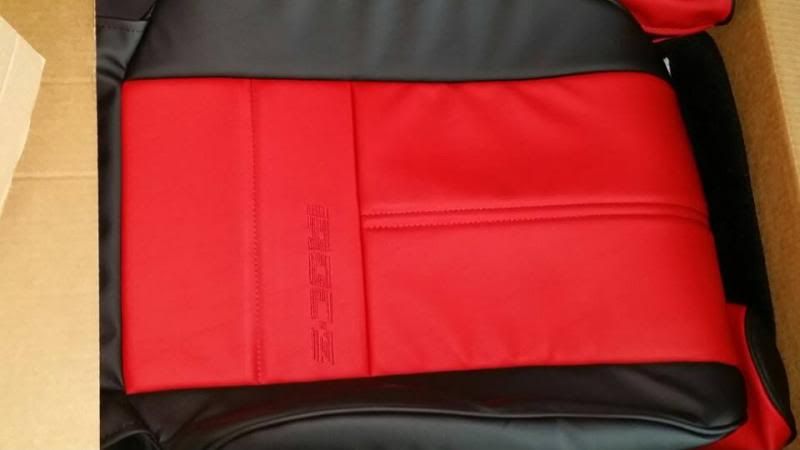
Mo Pics --
Got them from Princess at Lethalinteriors.com
Asked for the color scheme.. and asked for the IROC logo embroidered right where you see it. I LOVE how they turned out.


Got them from Princess at Lethalinteriors.com
Asked for the color scheme.. and asked for the IROC logo embroidered right where you see it. I LOVE how they turned out.
10-11-2013, 04:10 PM
#95
Supreme Member

Join Date: Apr 2011
Location: Huntsville, AL
Posts: 1,051
Likes: 0
Received 0 Likes
on
0 Posts
Car: 89 Black IROC-Z convertible
Engine: 305 TBI
Transmission: Auto
Re: Interior Restoration -- Lots of Pics
Those seat covers look awesome. Get some pics up when you get them installed! Are you doing door panels too?
10-11-2013, 04:32 PM
#97
Supreme Member
Join Date: Apr 2011
Location: Huntsville, AL
Posts: 1,051
Likes: 0
Received 0 Likes
on
0 Posts
Car: 89 Black IROC-Z convertible
Engine: 305 TBI
Transmission: Auto
Re: Interior Restoration -- Lots of Pics
After they dry, slowly work the vents back into the dash, compressing the foam as you go. If you got the foam in the right spot, you can't see the foam and the vents will stay put. I did this about 3 years ago and the vents still stay in the position they are turned to.
10-11-2013, 05:48 PM
#98
Member
iTrader: (1)
Join Date: Jul 2013
Location: Pensacola FL
Posts: 123
Likes: 0
Received 0 Likes
on
0 Posts
Car: 1986 Camaro Sport Coupe (Part Out)
Engine: 2.8 MPFI V6
Transmission: 700R4 Automatic 4 speed
Axle/Gears: 3.42 Open With Drum Brakes
Re: Interior Restoration -- Lots of Pics
@72SSboy I pulled out the carpet in my car and found a similar hole like you found on the transmission tunnel. I'll post some pictures of it tomorrow.
Info for my car:
1986 Chevrolet Camaro Sport Coupe
Engine:2.8 MFI V6
Transmission: 700R4 (Bell housing exclusively mounts to the 2.8)
Just thought I'd let you know your not the only one with that kind of hole.
Info for my car:
1986 Chevrolet Camaro Sport Coupe
Engine:2.8 MFI V6
Transmission: 700R4 (Bell housing exclusively mounts to the 2.8)
Just thought I'd let you know your not the only one with that kind of hole.
