
Restoring interior plastic and carpet how-to
 04-23-2011, 10:33 AM
#1
Member

Thread Starter

Join Date: Mar 2002
Location: York, Pa
Posts: 103
Likes: 0
Received 3 Likes
on
3 Posts
Car: 2001 Firehawk, `86 Trans Am project
Engine: LS1 in both
Transmission: T56 six speed in both
Restoring interior plastic and carpet how-to
This is a requested write up on my process for restoring interior plastics and carpet. If everyone thinks it is worthwhile, feel free to make it a sticky.
As some of you know, I am restoring an `86 Trans Am. I am working with a car that came stripped with virtually no interior, and certainly no Carmine Red parts, which is the color I will be going with. Finding parts in Carmine Red is difficult enough, much less in decent condition. For the ones that I have found, 25 years of sun and scratches have taken their toll. I want this car to be like new, so I will need to restore nearly every piece, or pay $100`s/$1000`s for all new pieces if even available. Since I am on a working man`s budget, I am going to do my best to salvage the pieces I can find.
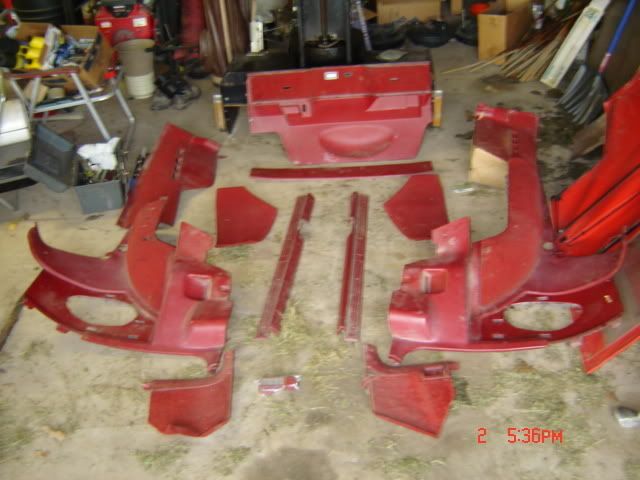
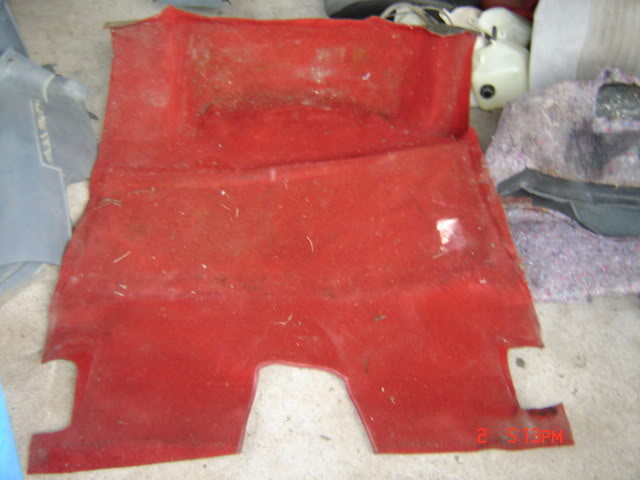
I am starting with a set of carmine panels and rear deck carpet that someone was willing to part with for $25. Here is what I had to start with:
Here is the sail panel and door sills. I will clean these up for an example:
IMG_20110403_145558-1.jpg?t=1303573004
IMG_20110403_145529.jpg?t=1303569765
As you can see, the typical sun fading and scratches from 25 years of use and baking out in the sun.
I`ll start buy using very warm water and liberal amounts of dish detergent. This will clean the parts of their dirt/dust/grime, plus the warm water and the dish detergent will strip any oils from protectants (Armor-All).
IMG_20110417_123952.jpg?t=1303569839
The carpeted areas can also be done this way. Here, I have removed the drivers side carpeted area from the sail panel, but it is not necessary to remove them. For the passenger side, I left the carpet attached to the panel. The carpeted areas are held on from the factory with hot glue, and these can be removed by heating the area from behind the sail panel with a hair dryer and pulling away slowly as the glue becomes gooey. DO NOT use the hair dryer directly on the carpeted face. It will *very easily* melt the carpet away and you will have a bare spot.
Again, the combination of warm water and dish detergent will remove oils, or in my case, black grease stains. I am using a bristle brush and gently scrubbing in a circular motion. I have noticed if you apply too much pressure while scrubbing, it will change the texture and pattern of the carpeting as well as cause fraying:
IMG_20110423_101034.jpg?t=1303569850
If you are following this entire how-to and using the adhesion promoter, this step might not be necessary, but it will help to ensure the dye will have a good surface to adhere to.
I am going to use 1000 grit sandpaper and water with just a little bit of dish detergent to "scuff" up the plastic to allow the dye to really dig into the plastic.
IMG_20110417_124515.jpg?t=1303570552
After drying, if leaving the carpeted areas attached to the panels, the carpeted areas will need to be masked. Yes, this is possible. I am going to try to get under the corners as best I can, but it doesn`t have to be perfect. If you are going to dye the piece back to its original color, chances are that within, say a quarter inch of the edge of the carpeted section, there is little fading or scratching. Painters tape would be ideal here, since it has low adhesion and will release itself pretty easily from the carpet. Unlike something like masking or packing tape which can pull up the carpet from the backing. I am using cheap tape that I found out Ollies for $1, and doesn`t adhere well anyway.
IMG_20110417_123559.jpg?t=1303570432
As some of you know, I am restoring an `86 Trans Am. I am working with a car that came stripped with virtually no interior, and certainly no Carmine Red parts, which is the color I will be going with. Finding parts in Carmine Red is difficult enough, much less in decent condition. For the ones that I have found, 25 years of sun and scratches have taken their toll. I want this car to be like new, so I will need to restore nearly every piece, or pay $100`s/$1000`s for all new pieces if even available. Since I am on a working man`s budget, I am going to do my best to salvage the pieces I can find.
I am starting with a set of carmine panels and rear deck carpet that someone was willing to part with for $25. Here is what I had to start with:
Here is the sail panel and door sills. I will clean these up for an example:
IMG_20110403_145558-1.jpg?t=1303573004
IMG_20110403_145529.jpg?t=1303569765
As you can see, the typical sun fading and scratches from 25 years of use and baking out in the sun.
I`ll start buy using very warm water and liberal amounts of dish detergent. This will clean the parts of their dirt/dust/grime, plus the warm water and the dish detergent will strip any oils from protectants (Armor-All).
IMG_20110417_123952.jpg?t=1303569839
The carpeted areas can also be done this way. Here, I have removed the drivers side carpeted area from the sail panel, but it is not necessary to remove them. For the passenger side, I left the carpet attached to the panel. The carpeted areas are held on from the factory with hot glue, and these can be removed by heating the area from behind the sail panel with a hair dryer and pulling away slowly as the glue becomes gooey. DO NOT use the hair dryer directly on the carpeted face. It will *very easily* melt the carpet away and you will have a bare spot.
Again, the combination of warm water and dish detergent will remove oils, or in my case, black grease stains. I am using a bristle brush and gently scrubbing in a circular motion. I have noticed if you apply too much pressure while scrubbing, it will change the texture and pattern of the carpeting as well as cause fraying:
IMG_20110423_101034.jpg?t=1303569850
If you are following this entire how-to and using the adhesion promoter, this step might not be necessary, but it will help to ensure the dye will have a good surface to adhere to.
I am going to use 1000 grit sandpaper and water with just a little bit of dish detergent to "scuff" up the plastic to allow the dye to really dig into the plastic.
IMG_20110417_124515.jpg?t=1303570552
After drying, if leaving the carpeted areas attached to the panels, the carpeted areas will need to be masked. Yes, this is possible. I am going to try to get under the corners as best I can, but it doesn`t have to be perfect. If you are going to dye the piece back to its original color, chances are that within, say a quarter inch of the edge of the carpeted section, there is little fading or scratching. Painters tape would be ideal here, since it has low adhesion and will release itself pretty easily from the carpet. Unlike something like masking or packing tape which can pull up the carpet from the backing. I am using cheap tape that I found out Ollies for $1, and doesn`t adhere well anyway.
IMG_20110417_123559.jpg?t=1303570432
Last edited by Hawk312; 04-23-2011 at 10:37 AM.
 04-23-2011, 10:34 AM
#2
Member
Thread Starter
Join Date: Mar 2002
Location: York, Pa
Posts: 103
Likes: 0
Received 3 Likes
on
3 Posts
Car: 2001 Firehawk, `86 Trans Am project
Engine: LS1 in both
Transmission: T56 six speed in both
Re: Restoring interior plastic and carpet how-to
After masking, the part is ready for the adhesion promoter. If you are using something like Dupli-Color interior dyes, this may be optional. From what I understand, adhesion promoter is part of their formula. I will be using PPG dye, and I will be using Bulldog adhesion promoter, available at Pep Boys or other parts stores. I used this on my 2001 Firehawk as well, and, after applying the dye and allowing it to dry, it is virtually impossible for the dye to be removed, even by aggressively scratching it with a fingernail.
IMG_20110417_124821.jpg?t=1303571142
Here are the parts after a quick shot of the adhesion promoter. After 10 minutes, it will be ready for dye. Light mist coats are used, and I ran the can under warm water for about 10 seconds get a smoother and thinner application:
IMG_20110418_161542-1.jpg?t=1303571148
Again, I am using PPG interior dye, which should be available at your local jobber. I had this mixed to the exact interior color code, available inside your console or door jam depending on the year of your car. They should also have swatches with standard color codes sorted by the year and make of car, which is what I had to do.
Here is what I am using:
IMG_20110413_202300.jpg?t=1303571158
I am going to use several mist coats to cover the plastic with the dye. It might be a good idea to run the can under warm water. This will both thin the dye and add pressure to the can which will make for a smoother application with less chance of runs. The first few coats will be a light mist, and the final coat will be just a little heavier to make sure it has the proper texture.
After applying the dye and removing the mask, this is what we have:
IMG_20110418_162409-1.jpg?t=1303571843
IMG_20110418_162357.jpg?t=1303571925
IMG_20110418_162345.jpg?t=1303571839
04-23-2011, 10:34 AM
#3
Member
Thread Starter
Join Date: Mar 2002
Location: York, Pa
Posts: 103
Likes: 0
Received 3 Likes
on
3 Posts
Car: 2001 Firehawk, `86 Trans Am project
Engine: LS1 in both
Transmission: T56 six speed in both
Re: Restoring interior plastic and carpet how-to
Now the interior pieces look like new.  And it is very durable. About 5 years ago, I did the same thing to the door panels on my Firehawk. It has been very durable, still looks like new, and I can apply Armor-All just like the rest of the interior without any concerns:
white01hawkint.jpg?t=1303572186
white01hawkint2.jpg?t=1303572227
And, if you are using adhesion promoter, you can even use the cheap Krylon semi-flat sprays at Wal-Mart for pretty decent results. I used this on the center console in the `81 Camaro I restored. The console was originally tan, and the console lid was originally green:
P1001667.jpg?t=1303572301
Hope this helps. Good luck everyone!
And it is very durable. About 5 years ago, I did the same thing to the door panels on my Firehawk. It has been very durable, still looks like new, and I can apply Armor-All just like the rest of the interior without any concerns:white01hawkint.jpg?t=1303572186
white01hawkint2.jpg?t=1303572227
And, if you are using adhesion promoter, you can even use the cheap Krylon semi-flat sprays at Wal-Mart for pretty decent results. I used this on the center console in the `81 Camaro I restored. The console was originally tan, and the console lid was originally green:
P1001667.jpg?t=1303572301
Hope this helps. Good luck everyone!
04-23-2011, 06:13 PM
#4
Junior Member

Join Date: Dec 2003
Location: NJ
Posts: 50
Likes: 0
Received 0 Likes
on
0 Posts
Car: 86 Z28
Engine: 355
Transmission: 700R4
Axle/Gears: 9 bolt, 3.45
Re: Restoring interior plastic and carpet how-to
good stuff, ive done similar with my caprice and my girlfriends camaro. The most important thing before painting the panels is CLEAN. clean clean clean. Do that and the adhesion promoter and itll last and be plenty durable. Its the people that give one wipedown and spray thick coats on them that are complaining about peeling and chipping a month later. Clean and multiple thin coats- just enough to achieve the color you want.
 04-24-2011, 02:03 PM
#7
Re: Restoring interior plastic and carpet how-to
Indeed this works if you CLEAN CLEAN CLEAN... lol
Just to note.
When i did mine the carpet was already very frayed
so thinking out of the box i used an electric shaver
and gave it a shave. WORKED great.
Just to note.
When i did mine the carpet was already very frayed
so thinking out of the box i used an electric shaver
and gave it a shave. WORKED great.
Trending Topics
04-24-2011, 09:14 PM
#8
Member

Join Date: Oct 2010
Location: Laconia, NH
Posts: 192
Likes: 0
Received 0 Likes
on
0 Posts
Car: 1986 Firebird Trans Am
Engine: Chevy 355
Transmission: Built 700R4
Axle/Gears: 9 bolt 2.77
Re: Restoring interior plastic and carpet how-to
Wow, I was just wondering how I was going to redo my interior. Thanks so much for the writeup!! I was just going to use spray paint if they didn't have an OEM replacement in color haha.
 04-25-2011, 05:27 PM
#10
Member
iTrader: (2)
Join Date: Dec 2009
Location: Washington State
Posts: 264
Likes: 0
Received 0 Likes
on
0 Posts
Car: 1991 Camaro RS
Engine: 3.1L V6 Soon to be 3.4 :D
Transmission: Auto 4-Speed
Axle/Gears: 3.23
Re: Restoring interior plastic and carpet how-to
Outstanding tutorial, you just saved me the money of buying a completely new interior. I'm putting this tutorial in my back pocket for a rainy day.
04-26-2011, 07:01 AM
#11
Member
Thread Starter
Join Date: Mar 2002
Location: York, Pa
Posts: 103
Likes: 0
Received 3 Likes
on
3 Posts
Car: 2001 Firehawk, `86 Trans Am project
Engine: LS1 in both
Transmission: T56 six speed in both
Re: Restoring interior plastic and carpet how-to
Thanks everyone. Hopefully I saved some of you $$$. I know I would not hesitate to do the above, even on a "decent" interior. My Firehawk interior wasn`t that bad before dyeing it; I just wanted it to be perfect.
04-26-2011, 07:10 AM
#12
Senior Member
iTrader: (4)
Join Date: Apr 2008
Location: Crawfordsville, IN
Posts: 676
Likes: 0
Received 1 Like
on
1 Post
Car: 1984 Camaro 'Vert
Engine: 350
Transmission: 700R4
Re: Restoring interior plastic and carpet how-to
Here's another vote to make this a sticky. We have tons of questions every week on this forum that could be answered with this article.
04-26-2011, 08:21 AM
#13
Junior Member

Join Date: Dec 2009
Location: Wylie Tx
Posts: 8
Likes: 0
Received 0 Likes
on
0 Posts
Car: 1989 RS,
Engine: 305 TBI....for now
Transmission: T-5.... for now
Axle/Gears: '89 3.73
Re: Restoring interior plastic and carpet how-to
Great write up Hawk. I’ll be putting this to good use in a few months.
04-26-2011, 01:08 PM
#14
Member
iTrader: (8)

Join Date: Mar 2007
Location: Shreveport Louisianna Barksdale AFB
Posts: 343
Likes: 0
Received 0 Likes
on
0 Posts
Car: 85 Camaro
Engine: forged 383 11:1
Transmission: T56 TDP STAGE 2
Axle/Gears: 99 ws6 3.42 posi rear
Re: Restoring interior plastic and carpet how-to
Awsome write up I like I like. Will go back through my interior and do this to top off what I previously already did to freshen up old parts I gathered.
I used duplicolor vinyl and fabric coating on my seats carpet speaker covers and what ever else needed a touch up that wasnt just plastics. Helped a great deal with the look though it needs many coats.
I used duplicolor vinyl and fabric coating on my seats carpet speaker covers and what ever else needed a touch up that wasnt just plastics. Helped a great deal with the look though it needs many coats.
04-26-2011, 01:29 PM
#15
Supreme Member
iTrader: (4)
Join Date: Mar 2009
Location: Pepperell, MA
Posts: 3,079
Likes: 0
Received 3 Likes
on
3 Posts
Car: 1987 Trans Am
Engine: LQ9/L92
Transmission: 4L60E
Re: Restoring interior plastic and carpet how-to
great job on cleaning those up. and everyone appreciates a good step-by-step!
04-28-2011, 05:47 PM
#16
Junior Member

Join Date: May 2010
Location: Montana
Posts: 61
Likes: 0
Received 0 Likes
on
0 Posts
Car: 1991 Camaro RS
Engine: ewww...the 3.1L
Transmission: Not sure. It shifts quite hard.
Axle/Gears: 3.23 8.75" 10 bolt
Re: Restoring interior plastic and carpet how-to
Thanks for the step by step. Just use more product if your doing a color change?
05-06-2011, 09:20 PM
#17
Supreme Member
iTrader: (5)
Join Date: Nov 2010
Location: Mantua NJ
Posts: 5,845
Received 74 Likes
on
66 Posts
Car: 1 Owner 1986 TA with a WS6 package
Engine: 5.0 EFI
Transmission: THM700R4
Axle/Gears: 277 Posi Speedo
Re: Restoring interior plastic and carpet how-to
Hey Hawk, how you making out with your project here,got anymore picks to show.
05-06-2011, 09:48 PM
#18
Member

Join Date: Aug 2004
Location: Lexington, SC
Posts: 484
Likes: 0
Received 0 Likes
on
0 Posts
Car: 1986 Z28 Camaro
Engine: 350 with .440" lopey cam
Transmission: 6spd T56
Axle/Gears: Detroit Truetrac with 3.73 gears
Re: Restoring interior plastic and carpet how-to
Nice guide, think I would like to do this to my interior but where do you get the PPG Interior dye? You said in the guide that you can get it at your local jobber... not sure exactly what that means lol.
You said you had yours mixed, will a place like lowes have this and be able to mix it based purely on the color code in the door jam?
Thanks!
You said you had yours mixed, will a place like lowes have this and be able to mix it based purely on the color code in the door jam?
Thanks!
05-07-2011, 05:39 AM
#19
Supreme Member
Join Date: Jul 2009
Location: Kitchener, ON
Posts: 2,328
Likes: 0
Received 8 Likes
on
5 Posts
Car: 1988 GTA
Engine: LB9
Transmission: T5
Axle/Gears: 3.45
Re: Restoring interior plastic and carpet how-to
No, you can't get this from a hardware store. Your trim colour will be identified on your SPID sticker which is usually located in the centre console.
You can buy the paint from an auto body paint supplier - every town has one. Check the yellow pages. I got it from a NAPA store.
You can buy the paint from an auto body paint supplier - every town has one. Check the yellow pages. I got it from a NAPA store.
06-29-2011, 08:39 PM
#20
Junior Member
iTrader: (5)
Join Date: Jan 2011
Location: Little Falls, New York
Posts: 51
Likes: 0
Received 0 Likes
on
0 Posts
Car: 1989 Camaro Iroc-z
Engine: 305 TPI
Transmission: 700R4
Re: Restoring interior plastic and carpet how-to
Looks great man! I plan on doing the same to my carmine red interior plastics..what was the color code?
06-30-2011, 07:51 AM
#21
Supreme Member
iTrader: (5)
Join Date: Nov 2010
Location: Mantua NJ
Posts: 5,845
Received 74 Likes
on
66 Posts
Car: 1 Owner 1986 TA with a WS6 package
Engine: 5.0 EFI
Transmission: THM700R4
Axle/Gears: 277 Posi Speedo
Re: Restoring interior plastic and carpet how-to
I don't want to step on Hawks thread but I got the same paint that Hawk has(Thanks to Hawk)and my interior plastics look brand new.Thanks a lot Hawk for the thread.
06-30-2011, 09:39 AM
#22
Re: Restoring interior plastic and carpet how-to
Would this same procedure apply when painting a different color panel (say painting a black panel to become light saddle beige?) I'm planning on buying a new top panel (the one that goes behind the headliner on the roof) and painting it beige.
06-30-2011, 01:29 PM
#23
Supreme Member
iTrader: (5)
Join Date: Nov 2010
Location: Mantua NJ
Posts: 5,845
Received 74 Likes
on
66 Posts
Car: 1 Owner 1986 TA with a WS6 package
Engine: 5.0 EFI
Transmission: THM700R4
Axle/Gears: 277 Posi Speedo
Re: Restoring interior plastic and carpet how-to
I would imagine that you could,maybe multiple coats.
06-30-2011, 01:41 PM
#24
Junior Member
iTrader: (5)
Join Date: Jan 2011
Location: Little Falls, New York
Posts: 51
Likes: 0
Received 0 Likes
on
0 Posts
Car: 1989 Camaro Iroc-z
Engine: 305 TPI
Transmission: 700R4
Re: Restoring interior plastic and carpet how-to
I've seen tutorials on youtube of someone dying a black center console tan, so I'm guessing it can be done. Now that I know this it will be A LOT easier finding interior for my car. Lol also mantaguy..do you remember what the paint code was?
06-30-2011, 08:35 PM
#25
Supreme Member
iTrader: (5)
Join Date: Nov 2010
Location: Mantua NJ
Posts: 5,845
Received 74 Likes
on
66 Posts
Car: 1 Owner 1986 TA with a WS6 package
Engine: 5.0 EFI
Transmission: THM700R4
Axle/Gears: 277 Posi Speedo
Re: Restoring interior plastic and carpet how-to
The place we ordered from is called BAPS Auto Paints and Supply 717-767-6544 there in York PA.The brand code is 72676,OEM Code72C,Carmine.This paint ain't cheap,it cost $118.00 for 3 cans shipped.But it's a lot cheaper than replacing all the plastics.
Keep us posted!
Keep us posted!
06-30-2011, 09:15 PM
#26
Junior Member
iTrader: (5)
Join Date: Jan 2011
Location: Little Falls, New York
Posts: 51
Likes: 0
Received 0 Likes
on
0 Posts
Car: 1989 Camaro Iroc-z
Engine: 305 TPI
Transmission: 700R4
Re: Restoring interior plastic and carpet how-to
Alright thanks man! I'll try my local paint place and see what they can do..and if I dont get anywhere I'll definitely try that..now all I need are a couple more decent interior pieces..lol
06-30-2011, 09:27 PM
#27
Supreme Member
iTrader: (5)
Join Date: Nov 2010
Location: Mantua NJ
Posts: 5,845
Received 74 Likes
on
66 Posts
Car: 1 Owner 1986 TA with a WS6 package
Engine: 5.0 EFI
Transmission: THM700R4
Axle/Gears: 277 Posi Speedo
Re: Restoring interior plastic and carpet how-to
I thought that's what the paint was for?
06-30-2011, 09:33 PM
#28
Junior Member
iTrader: (5)
Join Date: Jan 2011
Location: Little Falls, New York
Posts: 51
Likes: 0
Received 0 Likes
on
0 Posts
Car: 1989 Camaro Iroc-z
Engine: 305 TPI
Transmission: 700R4
Re: Restoring interior plastic and carpet how-to
Yeah well right now I'm looking for a couple pieces now that aren't cracked in any color really, then I'll just dye it to match the Carmine red like mine. Original Carmine pieces are sooo hard to find lol
06-30-2011, 10:10 PM
#29
07-01-2011, 10:48 PM
#30
Junior Member
iTrader: (5)
Join Date: Jan 2011
Location: Little Falls, New York
Posts: 51
Likes: 0
Received 0 Likes
on
0 Posts
Car: 1989 Camaro Iroc-z
Engine: 305 TPI
Transmission: 700R4
Re: Restoring interior plastic and carpet how-to
Yeah so I think as soon as I figure out what I'm doing my interior should look like brand new...hopefully lol
07-01-2011, 11:17 PM
#31
Re: Restoring interior plastic and carpet how-to
That's what I had to do with that long piece that holds up the headliner in the rear, it was impossible to find one in Carmine red. I ended up buying a grey one and painting it with the SEM portola red paint.
07-02-2011, 12:48 AM
#32
Member
Join Date: Jun 2011
Location: King George,VA
Posts: 227
Likes: 0
Received 0 Likes
on
0 Posts
Car: 1985 Z28
Engine: '69 350 4 Bolt Main .30 Over
Transmission: 700r4/B&M Shift Kit and Flywheel
Axle/Gears: GM 10 Bolt 3.23 Gears
Re: Restoring interior plastic and carpet how-to
Subscribed.Thanks for the lesson
07-02-2011, 07:38 AM
#33
Member

Join Date: Mar 2007
Location: Slinger WI
Posts: 185
Received 0 Likes
on
0 Posts
Car: 55 chevy Belair & 86IROC Z
Engine: 350 in 55 86IROC Z LT1
Transmission: 55 4speed IROC Z4L60e
Axle/Gears: 12 bolt 410 in55 and 342 inCamaro
Re: Restoring interior plastic and carpet how-to
thanks I learn some thing today where and get the 86 seat material from all want is to redo the bucket seats
07-02-2011, 08:28 AM
#34
Junior Member
iTrader: (5)
Join Date: Jan 2011
Location: Little Falls, New York
Posts: 51
Likes: 0
Received 0 Likes
on
0 Posts
Car: 1989 Camaro Iroc-z
Engine: 305 TPI
Transmission: 700R4
Re: Restoring interior plastic and carpet how-to
Ha! That's the exact piece I need, that and a passenger side door sill. What did you do to dye those? Basically the same thing Hawk did?
07-02-2011, 03:23 PM
#35
Member
Thread Starter
Join Date: Mar 2002
Location: York, Pa
Posts: 103
Likes: 0
Received 3 Likes
on
3 Posts
Car: 2001 Firehawk, `86 Trans Am project
Engine: LS1 in both
Transmission: T56 six speed in both
Re: Restoring interior plastic and carpet how-to
Guys,
You should be able to dye light gray pieces with this stuff, but it might take 3-4 coats. I would imagine you could dye dark gray or black, but I would think it would take a million coats (I may be exaggerating).
Sticky, anyone?
You should be able to dye light gray pieces with this stuff, but it might take 3-4 coats. I would imagine you could dye dark gray or black, but I would think it would take a million coats (I may be exaggerating).
Sticky, anyone?
07-02-2011, 03:35 PM
#36
Supreme Member
iTrader: (5)
Join Date: Nov 2010
Location: Mantua NJ
Posts: 5,845
Received 74 Likes
on
66 Posts
Car: 1 Owner 1986 TA with a WS6 package
Engine: 5.0 EFI
Transmission: THM700R4
Axle/Gears: 277 Posi Speedo
Re: Restoring interior plastic and carpet how-to
Hawk,I did a set of gray front seat belt receivers and it took 2 coats,BAM 1 perfect set of carmine front seat belts.
07-02-2011, 04:08 PM
#38
Senior Member
Re: Restoring interior plastic and carpet how-to
Subscribed! Great step by step!
07-02-2011, 04:25 PM
#39

 07-02-2011, 04:58 PM
#41
Re: Restoring interior plastic and carpet how-to
My plastic was dry rotted and crumbling. I found some light grey
for cheap and used the SEM black.
Before clean

After clean

After Paint. Not a good pic. Cargo carpet is new black. Plastic carpet
was painted with the SEM as well and shaved with electric razor to get
the fuzz off. Plastic carpet had to be brushed and repainted to get good
covering then brushed again to get it soft 'get the stiffness out'.
Pictures really don't do it justice.

STICKY IT... lol
for cheap and used the SEM black.
Before clean
After clean
After Paint. Not a good pic. Cargo carpet is new black. Plastic carpet
was painted with the SEM as well and shaved with electric razor to get
the fuzz off. Plastic carpet had to be brushed and repainted to get good
covering then brushed again to get it soft 'get the stiffness out'.
Pictures really don't do it justice.
STICKY IT... lol
The following users liked this post:
1986BANDIT (09-13-2019)
07-02-2011, 05:08 PM
#42
Member

Join Date: Oct 2008
Location: Glendale, Az
Posts: 106
Likes: 0
Received 0 Likes
on
0 Posts
Car: 83 Trans Am
Engine: Soon to be 6.0l LQ9
Transmission: Soon to be 4L60E
Axle/Gears: 3.23
Re: Restoring interior plastic and carpet how-to
subscribed..and sticky please!
07-02-2011, 10:16 PM
#43
Re: Restoring interior plastic and carpet how-to
My hatch plastics are so pitted that they still don't look perfect, mine doesn't have the carpet on them like the OP's. When you get the headliner trim I recommend fiberglassing the back side of it to strengthen it, those things are very brittle.
07-12-2011, 04:22 PM
#44
Member

Join Date: Jun 2010
Location: New Jersey
Posts: 215
Likes: 0
Received 0 Likes
on
0 Posts
Car: 1986 Camaro Iroc Z
Engine: V8 305 TPI
Transmission: 700R4
Re: Restoring interior plastic and carpet how-to
I used a piece of random plastics yesterday to try it out. The paint scratches right off...any idea how to put like a protective coating over it??
I used duplicator adhesion promoter and rustoleum plastic paint.
I also washed the piece with soap and water..any ideas here guys??
I used duplicator adhesion promoter and rustoleum plastic paint.
I also washed the piece with soap and water..any ideas here guys??
07-12-2011, 06:30 PM
#45
Supreme Member
iTrader: (5)
Join Date: Nov 2010
Location: Mantua NJ
Posts: 5,845
Received 74 Likes
on
66 Posts
Car: 1 Owner 1986 TA with a WS6 package
Engine: 5.0 EFI
Transmission: THM700R4
Axle/Gears: 277 Posi Speedo
Re: Restoring interior plastic and carpet how-to
Do exactly what Hawk312 did,I followed his directions and used the same paint as he did and my paint doesn't scratch or come off.I did use the Dupli-Color Adhesion Promoter and it worked well.Maybe you should get the paint from BAPS it is made by GM.and it is for the interior trim.
07-12-2011, 06:34 PM
#46
Supreme Member
iTrader: (5)
Join Date: Nov 2010
Location: Mantua NJ
Posts: 5,845
Received 74 Likes
on
66 Posts
Car: 1 Owner 1986 TA with a WS6 package
Engine: 5.0 EFI
Transmission: THM700R4
Axle/Gears: 277 Posi Speedo
Re: Restoring interior plastic and carpet how-to

My plastic was dry rotted and crumbling. I found some light grey
for cheap and used the SEM black.
Before clean
After clean
After Paint. Not a good pic. Cargo carpet is new black. Plastic carpet
was painted with the SEM as well and shaved with electric razor to get
the fuzz off. Plastic carpet had to be brushed and repainted to get good
covering then brushed again to get it soft 'get the stiffness out'.
Pictures really don't do it justice.
STICKY IT... lol
07-16-2011, 04:46 PM
#47
Junior Member

Join Date: Jul 2011
Location: Paso Robles, CA
Posts: 9
Likes: 0
Received 0 Likes
on
0 Posts
Car: '92 Camaro RS
Re: Restoring interior plastic and carpet how-to
Just the thread I needed! This'll save me so much money on my restoration project! Any tips on how to restore the shift/gear indicator (the strip to the left of the shifter, with the P, R, N, D, etc...I have no idea what its called :-P) Mine is so faded and scratched up.
07-16-2011, 06:54 PM
#48
Supreme Member
iTrader: (128)

Join Date: Aug 2009
Location: Central California
Posts: 1,821
Likes: 0
Received 38 Likes
on
35 Posts
Car: 92 Camaro RS
Engine: LO3
Transmission: T5
Axle/Gears: stock
Re: Restoring interior plastic and carpet how-to
Just the thread I needed! This'll save me so much money on my restoration project! Any tips on how to restore the shift/gear indicator (the strip to the left of the shifter, with the P, R, N, D, etc...I have no idea what its called :-P) Mine is so faded and scratched up.
https://www.thirdgen.org/shiftindicator
07-16-2011, 08:07 PM
#50
Junior Member
iTrader: (1)

Join Date: Nov 2009
Location: Humble, TX
Posts: 93
Likes: 0
Received 0 Likes
on
0 Posts
Car: 1992 Trans Am Conv.
Engine: 305 TPI
Transmission: Auto
Re: Restoring interior plastic and carpet how-to
About the Bulldog, do you spray it lightly also? How long does it take to dry? Nice job. I'm going to dye my tan interior the same color and will be using your method to do the job.
Thanks
Thanks