
my LED dash light project


 09-03-2011 | 07:43 PM
#53

Junior Member
Joined: Aug 2011
Posts: 22
Likes: 0
Car: 1991 Pontiac Firebird
Engine: 5.7L 350
Transmission: Automatic
Re: my LED dash light project
I'm planning on doing this for my 91 Bird. But since the LED's are polar sensitive, would it be a PITA to put them in then find out which ones you put in backwards? Or does it not matter for these lights?
09-03-2011 | 09:48 PM
#54

Member
Joined: Oct 2010
Posts: 133
Likes: 0
From: Harford County MD
Car: 1991 Z-28
Engine: 5.7L(350ci) TPI L98
Transmission: 700r4
Axle/Gears: G92
Re: my LED dash light project
Turn your lights on before putting your dash back together so you can see which ones you need to turn around.
 09-08-2011 | 03:23 PM
#56
Member
Joined: Aug 2011
Posts: 173
Likes: 0
From: miami
Car: 87 camaro Z28 convertible
Engine: 350 carb
Transmission: th-700r4
Axle/Gears: Posi traction 3.42 gears
Re: my LED dash light project
I am so going to do this  . How many bulds do I need? And there the 194s right?
. How many bulds do I need? And there the 194s right?
09-09-2011 | 06:08 PM
#57
Member
Joined: Oct 2010
Posts: 133
Likes: 0
From: Harford County MD
Car: 1991 Z-28
Engine: 5.7L(350ci) TPI L98
Transmission: 700r4
Axle/Gears: G92
Re: my LED dash light project
So since I figured out that 194's are what you need, what can the 74's be used for, is there anywhere in the car that uses them?
09-13-2011 | 09:47 PM
#58
Member
Joined: Oct 2010
Posts: 133
Likes: 0
From: Harford County MD
Car: 1991 Z-28
Engine: 5.7L(350ci) TPI L98
Transmission: 700r4
Axle/Gears: G92
Re: my LED dash light project
Alright, So I finally got to doing it, posted some pics here, going to do a formal write up of how to do it on a 91/92 Dash cluster.
Pics:
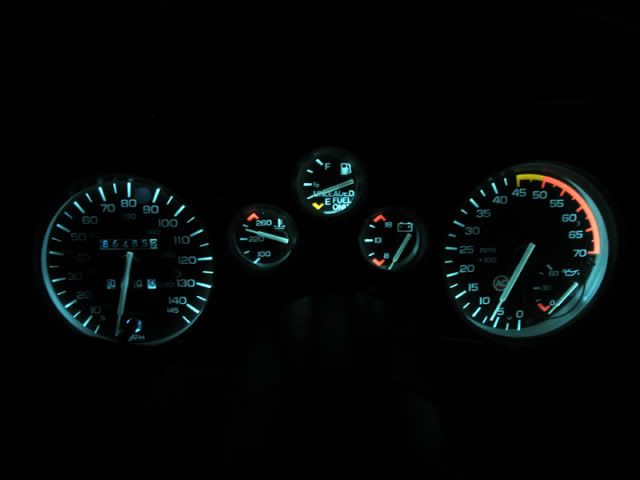
The one in the day I just wanted to show you because I was fearing that with ambient light the blue would give a green tint to the lettering. Other is the console at night, sharp eyed people will notice the red gauge to the left, I took the middle pic before I did the gauges. 3rd pic is the gauge cluster, right now all I did was the backlights and then indicator and hi-beam lights in blue. Next order I'm going to switch the indicator lights to purple and the hi-beam indicator to pink, as well as the warning lights to crazy colors. (I'll make sure to upload those pics when it happens.)
Alright, going to start the long write up now.
Edit: The picture is my girlfriend, not my daughter, I'm only 19 hahaha
Pics:
The one in the day I just wanted to show you because I was fearing that with ambient light the blue would give a green tint to the lettering. Other is the console at night, sharp eyed people will notice the red gauge to the left, I took the middle pic before I did the gauges. 3rd pic is the gauge cluster, right now all I did was the backlights and then indicator and hi-beam lights in blue. Next order I'm going to switch the indicator lights to purple and the hi-beam indicator to pink, as well as the warning lights to crazy colors. (I'll make sure to upload those pics when it happens.)
Alright, going to start the long write up now.
Edit: The picture is my girlfriend, not my daughter, I'm only 19 hahaha
Last edited by Inpheksion; 09-13-2011 at 09:52 PM.
09-13-2011 | 10:48 PM
#59
Senior Member
Joined: Aug 2010
Posts: 680
Likes: 1
From: Lincoln, NE
Car: 86 Iroc-Z28
Engine: 5.3
Transmission: 4l60
Re: my LED dash light project
Alright, So I finally got to doing it, posted some pics here, going to do a formal write up of how to do it on a 91/92 Dash cluster.
Pics:
The one in the day I just wanted to show you because I was fearing that with ambient light the blue would give a green tint to the lettering. Other is the console at night, sharp eyed people will notice the red gauge to the left, I took the middle pic before I did the gauges. 3rd pic is the gauge cluster, right now all I did was the backlights and then indicator and hi-beam lights in blue. Next order I'm going to switch the indicator lights to purple and the hi-beam indicator to pink, as well as the warning lights to crazy colors. (I'll make sure to upload those pics when it happens.)
Alright, going to start the long write up now.
Edit: The picture is my girlfriend, not my daughter, I'm only 19 hahaha
09-13-2011 | 11:34 PM
#60
Member
Joined: Oct 2010
Posts: 133
Likes: 0
From: Harford County MD
Car: 1991 Z-28
Engine: 5.7L(350ci) TPI L98
Transmission: 700r4
Axle/Gears: G92
Re: my LED dash light project
As with any bit of instructions, please read these start to finish at least once, maybe more, before even taking the first torx screw out.
Interior light replacement guide for 1991-1992 Camaro ONLY.
Alright. First off, what you'll need:
--------------------------------
Tools:
Basic understanding of electrics, just to know how it flows, and the difference between hot/ground since the bulbs are polar.
Some Torx screwdrivers
A small socket and bit-driver or ratchet (I forget exact the sizes of the tools, I apologize)
A small pair of needle nose pliers (some of the smaller bulb sockets are hard to unplug with your fingers).
Some sandpaper.
A very thin pair of tweezers or screwdriver to bend tiny wires (I used an impossibly small allen key.
Also, when doing the gauge lights (Not as necessary for console lights) I would recommend doing these in a garage that you can make pitch black, or have a few heavy moving blankets to lay over the winders to make it pitch black inside the car, this will make recognizing if the lights are on much, much easier.
--------------------------------
Bulbs:
(1) Size 194 for the gear indicator
(1) Size 194 HVAC controls
(4) Size 194 for the backlighting of the gauge cluster
(2) Size 74 for indicator lights [one for left, one for right]
(1) Size 74 for Hi-Beam indicator light
(?) One Size 161 bulb for each of the warning lights, depending on what your car has (Parking Brake, Service Engine, Security, Inflating Safety Device Reset light etc.)
I will recommend buying 1 or 2 more extra bulbs of each size in case you damage one or one is faulty.
-------------------------------
Let's get started!!
Center Console
1. Drop down or remove the kick panel (underdash pad): (5) Torx screws to remove it, these may be under small plastic caps.
2. HVAC Controls first, take out the (4) small Torx screws holding the bezel over the stereo and HVAC controls and remove the bezel.
3. Undo the screws holding the HVAC controls in, this may be 2 to 4 screws.
4. Pull the HVAC controls out gently as far as you can, depending on your wiring it may come all the way out or just a small bit, either way, you should be fine.
5. The lightbulb socket is in the upper right corner of the control box, it is a quarter turn to release it, do this gently as to not damage anything.
6. Gently remove the stock bulb, making sure not to shatter it, if you do, take your time to carefully remove all the fragments from the socket.
7. Gently insert the new bulb into the socket. Turn your interior lights on now to ensure the bulb lights up, if it does not, remove it and turn it around in the socket to reverse the polarity. It should now light up, if it does not, use the first tool I recommended to figure out why
8. Re-insert the socket into the HVAC controller and lock it into place.
9. Reverse steps 4, 3 and 2. If you're going to do the gauge lights at the same time, leave the kickpanel off, if you're only doing the center console, feel free to put that back on now as well.
Gear Indicator
1. Remove all the small Torx screws holding the panel down.
2. Begin to gently pull the panel off. I recommend starting at the front as there is a wedge catch holding the back down. Depending on your skill, this may require some finagling and wiggling, but by the grace of everything good in the world, as with anything BE GENTLE
The few minutes it'll take being gentle, are much shorter than the time you'll have to spend looking for another and installing another panel if you break it.
3. Remove the quarter turn bulb socket.
4. Gently remove the old bulb
5. Gently insert the new bulb into the socket. Turn your interior lights on now to ensure the bulb lights up, if it does not, remove it and turn it around in the socket to reverse the polarity. It should now light up, if it does not, use the first tool I recommended to figure out why
6. Lock the bulb back in place and replace the panel. Make sure you put the wedge catch under the console and then let the front drop into place. You can now replace all those little torx screws. Hopefully you weren't an **** like me and lost one.
Gauge Cluster
Note: These are slightly more difficult and time consuming than the center console lights.
1. Remove the two small screws holding the bottom of the black gauge trim on.
2. Removing the headlight ****: Do this by moving your headlights into the ON position, and then press the release button in, this is a small, spring loaded button you will be able to see if you look up from the bottom of the dash, while holding the button in, gently pull the **** and stalk out, if you do not know how to do this, I would recommend searching for a thread on the subject in this forum, there are many good threads with more detailed instructions on how to do this.
3. Gently pull the black trim off, with some gentle pulls it will pop off.
4. Unplug your electrics from the trim. (Foglamp switch, Rear Defrost, Lighter, depending on what you have)
5. Gently remove the trim the rest of the way, do this by pulling it towards you and then pull it off by letting the steering column go through the gap in the bottom, this may require you to rotate the trim a bit.
6. Replace your headlight stalk, Do this by inserting it into the hole until it reaches the end, it does not require much force for it to catch, so do not force it. If you do not feel it catch, while applying slight pressure, rotate the stalk until it does click. To make sure you didn't accidentally turn the interior lights dimmer to off while doing this, make sure the dimmer is turned up. (I did this my first time, and spent about 10 minutes checking fuses because I couldn't figure out why the lights wouldn't turn on.
7. Remove the 4 screws holding the gauge cluster in.
8. Pull the gauges out towards you. They will pull towards you and then lay them flat on the column, you will now see the rear of the gauges and just take a moment to inspect it so you can see how the wiring, sockets and contacts work, this could help you later on while trouble-shooting.
9. Locate the (4) size 194 sockets and remove them. They are just more quarter turn lights. I would recommend only doing one set of lights at a time just to keep hassle and confusion down.
10. Remove the stock lights from the sockets, it will take some lateral wiggling and pulling, again, be gentle and try not to break the bulbs.
11. Take one of the new bulbs, bend the contact wire away from the base, doing this gently and slowly away from the base.
12. Inspect the socket in comparison to the bulbs base, they may require sanding to thin them down to fit, depending on the manufacturer of the bulbs.
13. The bulbs should fit quite snugly into the socket, however it should not require a large amount of force to insert them in I cannot stress this enough.
DO NOT FORCE THE BULBS INTO THE SOCKET IF IT DOES NOT FIT AND BE PATIENT.
14. Now, begin sanding the base of the bulb little by little. The middle should not need to be thinned, only the edges. Take your time, and occasionally test to see how it fits into the socket. Use some thinking power to figure for yourself how thin it should be, remember, you do not want to have to use a large amount of force to insert it in the socket, however, you don't want it to fall out on the road.
15. Now once your bulbs are nice and sanded, straighten the wires on the bulbs and insert them into the socket, the wires should be sticking out the back of the socket. .
16. Bend the wires to touch the contacts on the back of socket. One on each side, hot & ground of course. Make good visual checks that the contacts are touching the wires so that current will flow
17. Put all the quarter turn sockets back in.
18. Carefully pop the cluster back in, you will hear or feel a nice click as everything on the back clicks into place.
19. Make it Dark!As in Pitch black.
20. Turn your interior lights on to see which ones work and which do not. Since the light from one bulb will bleed to the other gauges on the back numbers, the easiest way to see which ones are working is to look at the needles. One bulb will illuminate the speedo needle, another will illuminate the two left-handed of the small gauges, another of the right hand small gauges and the 4th bulb, the tach needle.
21. Determine which ones aren't working, for these, to reverse the polarity you do not need to remove the bulb from the socket, you only need to remove the socket and spin it around.
22. Repeat 20 and 21 until all four are working.
23. For the Size 161 bulbs, use approximately the same methods.
24. Hi-Beam and Indicator Lights(Size 74): These sockets are what I would recommend the needle nose pliers for, because I could not get enough grip on them with just me fingers. I will warn though, since you are using pliers you will be numb to feeling the tolerance of the plastic, so be very gentle as to not break anything.
25. These bulbs are a huge PITA to remove from the sockets, so be ready for some frustration.
26. Remove said bulbs from the sockets, I have found the easiest way it to rock the bulb back and forth in the socket, applying pressure as it reach the ends of the range of motion. Only apply as much pressure as you feel confident in. Eventually they will come out, what happened with mine is the base of the bulb began to deteriorate, and then the bulbs could be removed.
27. Insert your new bulbs, make sure the bulbs are making contact with the tabs in the socket and that it fits snugly in the socket without falling out. If it is not snug, you may have to bend the tabs in the socket to apply more pressure to the bulb.
28. Make it pitch dark again and follow the same process to test that they are working. Small reminders: The key must be on for the indicator lights to function, and the headlights fully on for the hi-beam indicator.
29. Go about rotating the sockets and checking the lights to ensure everything is working well.
30. Pop the cluster back in one final time and replace the 4 screws that hold the cluster in.
31. At this point I would recommend waiting until nightfall and taking the car out for a drive to make sure that bumps on the road and typical stress that driving puts on the car doesn't make any of the lights flicker. If they do, you have to take it back apart and make sure the contacts and wires are all in snugly pressed together.
32. If everything is good and ready to go, you are ready to put your car back together.
33. Remove the headlight stalk.
34. Place the black trim back around the column, re attack all your switches and electrics that are in the trim
35. Replace the two screws at the bottom of the trim.
36. Replace your headlight stalk, following the same method as before.
37. Replace the kick-panel, you should now be back together! (Hopefully I didn't miss any steps)
Also, I am aware I used to words gently and patience a lot, but I cannot stress how important these are while doing anything such as this. Force and hurry will lead to nothing but issues.
I hope this helped! Feel free to point out any mistakes I made or additions I should include! (I wrote this in one sitting and didn't scrutinize over it for a long time)
Last edited by Inpheksion; 09-14-2011 at 10:11 PM.
09-13-2011 | 11:35 PM
#61
Member
Joined: Oct 2010
Posts: 133
Likes: 0
From: Harford County MD
Car: 1991 Z-28
Engine: 5.7L(350ci) TPI L98
Transmission: 700r4
Axle/Gears: G92
Re: my LED dash light project
Good eye.Edit: Also, I would just like to mention the location mine is mounted is incredibly nice and neat. I would recommend mounting it there. the wires can be fed though the lighter hole, and it looks very clean and doesn't look out of place or inhibits view.
Last edited by Inpheksion; 09-13-2011 at 11:38 PM.
09-14-2011 | 12:22 AM
#62
Senior Member
Joined: Aug 2010
Posts: 680
Likes: 1
From: Lincoln, NE
Car: 86 Iroc-Z28
Engine: 5.3
Transmission: 4l60
Re: my LED dash light project
You answered your own question Good eye.
Edit: Also, I would just like to mention the location mine is mounted is incredibly nice and neat. I would recommend mounting it there. the wires can be fed though the lighter hole, and it looks very clean and doesn't look out of place or inhibits view.
Good eye.Edit: Also, I would just like to mention the location mine is mounted is incredibly nice and neat. I would recommend mounting it there. the wires can be fed though the lighter hole, and it looks very clean and doesn't look out of place or inhibits view.
Thought so just figured id check i love the intensity of the blue and look to replace all my guages with the cobalt line
09-14-2011 | 07:06 AM
#63
Member
Joined: Oct 2010
Posts: 133
Likes: 0
From: Harford County MD
Car: 1991 Z-28
Engine: 5.7L(350ci) TPI L98
Transmission: 700r4
Axle/Gears: G92
Re: my LED dash light project
Yeah, I love the gauge, but I would not recommend doing that if your car is a daily driver. They don't dim well, and I know that the light is far to bright on my 1 gauge at night when I have a headache or something, so I can't imagine a dash full of them would be any better.
09-14-2011 | 06:53 PM
#65
Member
Joined: Oct 2010
Posts: 133
Likes: 0
From: Harford County MD
Car: 1991 Z-28
Engine: 5.7L(350ci) TPI L98
Transmission: 700r4
Axle/Gears: G92
Re: my LED dash light project
Bulbs:
(1) Size 194 for the gear indicator
(1) Size 194 HVAC controls
(4) Size 194 for the backlighting of the gauge cluster
(2) Size 74 for indicator lights [one for left, one for right]
(1) Size 74 for Hi-Beam indicator light
(?) Size 161 bulb for each of the warning lights, depending on what your car has (Parking Brake, Service Engine, Security, Inflating Safety Device Reset light etc.)
I will recommend buying 1 or 2 more extra bulbs of each size in case you damage one or one is faulty.
-------------------------------
Did you read the write up? I outlined how many bulbs for each application already
09-14-2011 | 10:07 PM
#66
Supreme Member

Joined: Jun 2005
Posts: 1,800
Likes: 2
From: Bremerton, WA
Car: 1992 RS / 1989 RS
Engine: 3.1L MFI / Vortec 383 TBI
Transmission: T5 / LS-T56
Axle/Gears: 3.42 open / 3.73 Eaton posi
Re: my LED dash light project
That writeup is fine for the 90-92 instrument panel. His 89 (like mine) has front lit gauges (reflected off the bezel) and takes 11 size 194 for the gauge lighting IIRC, everything else should be about the same. Also, the gauge cluster comes out different and has the speedometer cable to contend with.
11-07-2011 | 03:08 PM
#68

Junior Member
Joined: Jun 2011
Posts: 43
Likes: 0
From: vancouver canada
Car: 89 Camaro RS
Engine: 2.8L V6 MPFI
Transmission: 5Speed
Re: my LED dash light project
ok my understanding is all of this is plug and play i just replace my regular bulbs with ones from superbrightleds and there will be no trouble? ive read people soulder and stuff but is this true?
11-17-2011 | 11:42 PM
#69

Junior Member
iTrader: (2)
Joined: Jul 2011
Posts: 74
Likes: 0
From: Crowley, LA
Car: 1992 RS
Engine: 305
Transmission: 700r4
Axle/Gears: 2.73
Re: my LED dash light project
Its pretty easy. The solder, i hafta solder mine in. They hve a tendency to bounce around and cut off for some reason. Just the wires, not the bulb. And i dont have anything small enough around the house to mash the contacts together. So im gonna drop some solder onto it. I dont plan on changing them any time soon, but solders normally easy to pick off any way, right? Unless im doing it wrong. Haha
11-17-2011 | 11:47 PM
#70
Member
iTrader: (1)
Joined: May 2010
Posts: 254
Likes: 0
From: Dallas
Car: 85z28(sold),91 rs, 15'Mazda3GT
Engine: 5.7L V8 350 (ZZ4)
Transmission: 700r4 rebuilt with kits+ vette serv
Re: my LED dash light project
IMO, install the widest angle LED's you can. If your panel uses #194 bulbs, SuperBright's WLED-x5 is the way to go. I think the extra cost is worth it. Very even light distribution.
http://www.superbrightleds.com/cgi-b...%2FWLED-x5.htm
I really don't care for colored light (red or blue; been there, done that) so I went with "cool white's". Boring, but I like it.
http://www.superbrightleds.com/cgi-b...%2FWLED-x5.htm
I really don't care for colored light (red or blue; been there, done that) so I went with "cool white's". Boring, but I like it.
11-18-2011 | 12:20 AM
#71
Junior Member
iTrader: (2)
Joined: Jul 2011
Posts: 74
Likes: 0
From: Crowley, LA
Car: 1992 RS
Engine: 305
Transmission: 700r4
Axle/Gears: 2.73
Re: my LED dash light project
Plug and play for the most part. I had trouble pulling the old lights out, no biggie at all. The led's, u gotta take the contact wire on the bottom, straighten both and push it into the bulb holder. Then bend the contact wire to the contacts on the bulb holder. Put back on the dash and do the rest. Then hook up the dash and make sure they all work. If they dont, the ones that dont need to be flipped. Just rotate the bulb holder so the contacts switch.
11-18-2011 | 12:23 AM
#72
Junior Member
iTrader: (2)
Joined: Jul 2011
Posts: 74
Likes: 0
From: Crowley, LA
Car: 1992 RS
Engine: 305
Transmission: 700r4
Axle/Gears: 2.73
Re: my LED dash light project
Tomorrow im going to take them out and solder them in place, to make sure the connections stay tight. And im going to either spray paint the back of the cluster housing silver or put aluminum foil in it so they shine even brighter. =} very easy mod. =}
11-18-2011 | 06:03 PM
#73
Thread Starter
Member
Joined: Nov 2009
Posts: 177
Likes: 1
From: Pittsfield, NH
Car: 1988 Base Coupe
Engine: 350
Transmission: T5
Axle/Gears: 9 bolt w/ disk brakes - 3.70
Re: my LED dash light project
ive had my LEDs in for about 9 months now and the one in my HVAC controls has gone out and one of the ones in my cluster is getting flakey, when I first turn on the lights is comes on for about 10 minutes then goes out, I am assuming a bad resistor. Unfortunately the car is a DD right now so i dont have time to pull it apart and find out
11-23-2011 | 05:54 AM
#75
Supreme Member

Joined: Jan 2000
Posts: 3,178
Likes: 46
From: Tracy, CA
Car: '87 IROC
Engine: LB9
Transmission: TH700R4
 11-23-2011 | 06:00 AM
#76
Supreme Member
Joined: Jan 2000
Posts: 3,178
Likes: 46
From: Tracy, CA
Car: '87 IROC
Engine: LB9
Transmission: TH700R4
Re: my LED dash light project
Totally plug and play. No bending wires, no soldering.....at least not for your '85.
Pull the existing incandescent 194 bulbs and pop in the LED replacements. Some replacements are polarity sensitive (+ to +, - to -) so you'll need to confirm that they turn on before buttoning up the cluster. If some don't come on, just pull them out of the socket and turn them around.
Pull the existing incandescent 194 bulbs and pop in the LED replacements. Some replacements are polarity sensitive (+ to +, - to -) so you'll need to confirm that they turn on before buttoning up the cluster. If some don't come on, just pull them out of the socket and turn them around.
11-23-2011 | 01:04 PM
#78
Member
iTrader: (1)
Joined: May 2010
Posts: 254
Likes: 0
From: Dallas
Car: 85z28(sold),91 rs, 15'Mazda3GT
Engine: 5.7L V8 350 (ZZ4)
Transmission: 700r4 rebuilt with kits+ vette serv
Re: my LED dash light project

Totally plug and play. No bending wires, no soldering.....at least not for your '85.
Pull the existing incandescent 194 bulbs and pop in the LED replacements. Some replacements are polarity sensitive (+ to +, - to -) so you'll need to confirm that they turn on before buttoning up the cluster. If some don't come on, just pull them out of the socket and turn them around.
Pull the existing incandescent 194 bulbs and pop in the LED replacements. Some replacements are polarity sensitive (+ to +, - to -) so you'll need to confirm that they turn on before buttoning up the cluster. If some don't come on, just pull them out of the socket and turn them around.
 11-23-2011 | 05:22 PM
#79
Thread Starter
Member
Joined: Nov 2009
Posts: 177
Likes: 1
From: Pittsfield, NH
Car: 1988 Base Coupe
Engine: 350
Transmission: T5
Axle/Gears: 9 bolt w/ disk brakes - 3.70
 11-25-2011 | 03:18 PM
#80

Junior Member
Joined: Nov 2011
Posts: 2
Likes: 0
11-28-2011 | 12:14 PM
#81

Junior Member
Joined: Jul 2009
Posts: 38
Likes: 0
From: Naperville IL
Car: 1990 Iroc-Z
Engine: L98 355 TPI
Transmission: 700r4
Axle/Gears: 3.23
Re: my LED dash light project
Try superbrightLEDs. they make the bulb w/the resistor built in = plug and play. Super easy. I just need to figure out the color I want t use. Cheap too. Between 1 and 3 per dash bulb, depending on type and options. they make LED bulbs for other applications like tail lights for instance. They even have a bulb list for your specific car. NO, I do not work for them. Just suprised that this cheap upgrade worked out.
http://www.superbrightleds.com/cgi-b...ini-wedge.html
http://www.superbrightleds.com/cgi-b...ini-wedge.html
11-28-2011 | 05:47 PM
#83
Member
iTrader: (3)
Joined: Sep 2011
Posts: 310
Likes: 0
From: Batesville, AR
Car: 1990 Formula Firebird
Engine: 350 (5.7) TPI
Transmission: WC T5
Axle/Gears: 3.42 POSI
Re: my LED dash light project
Sounds too much a pain for 90-92... Oh wait, I just unscrewed trim piece, unscrewed cluster and it falls out into hand?
11-29-2011 | 10:48 AM
#84
Junior Member
Joined: Jul 2009
Posts: 38
Likes: 0
From: Naperville IL
Car: 1990 Iroc-Z
Engine: L98 355 TPI
Transmission: 700r4
Axle/Gears: 3.23
Re: my LED dash light project
Yep, I have a 90 iroc and with a little practice it gets to the point where it just takes seconds. I also had that crappy steering wheel replaced with a grant so it makes it a bit easier.
02-18-2012 | 04:07 PM
#85
Member
Joined: Jun 2011
Posts: 205
Likes: 0
From: Jacksonville, Fl
Car: 1990 RS
Engine: 305
Transmission: Built-700R4
Re: my LED dash light project
Well reviving an old thread, but I just ordered my bulbs. I will be doing this next weekend!!! You can barely see my gauges at night.
This is a great thread + GREAT write up by Inpheksion!!!!
This is a great thread + GREAT write up by Inpheksion!!!!
02-18-2012 | 08:09 PM
#87
Junior Member
Joined: Jul 2009
Posts: 38
Likes: 0
From: Naperville IL
Car: 1990 Iroc-Z
Engine: L98 355 TPI
Transmission: 700r4
Axle/Gears: 3.23
Re: my LED dash light project
I just got done installing my leds in the cluster yesterday! Had no idea that superledbrights also had the sockets for the 198 bulbs.
02-18-2012 | 08:35 PM
#88
Junior Member
Joined: Nov 2011
Posts: 51
Likes: 0
From: Middletown, PA
Car: 91 Z28
Engine: 5.7 TPI
Transmission: 700R4
Axle/Gears: 10 bolt w/3.73
Re: my LED dash light project
IMO, install the widest angle LED's you can. If your panel uses #194 bulbs, SuperBright's WLED-x5 is the way to go. I think the extra cost is worth it. Very even light distribution.
http://www.superbrightleds.com/cgi-b...%2FWLED-x5.htm
I really don't care for colored light (red or blue; been there, done that) so I went with "cool white's". Boring, but I like it.
http://www.superbrightleds.com/cgi-b...%2FWLED-x5.htm
I really don't care for colored light (red or blue; been there, done that) so I went with "cool white's". Boring, but I like it.
 03-25-2012 | 04:45 PM
#90

Junior Member
Joined: Oct 2009
Posts: 51
Likes: 0
Re: my LED dash light project
Totally plug and play. No bending wires, no soldering.....at least not for your '85.
Pull the existing incandescent 194 bulbs and pop in the LED replacements. Some replacements are polarity sensitive (+ to +, - to -) so you'll need to confirm that they turn on before buttoning up the cluster. If some don't come on, just pull them out of the socket and turn them around.
Pull the existing incandescent 194 bulbs and pop in the LED replacements. Some replacements are polarity sensitive (+ to +, - to -) so you'll need to confirm that they turn on before buttoning up the cluster. If some don't come on, just pull them out of the socket and turn them around.
I just ordered 10 red, blue, and white LEDs from ebay and will try them all out when they get here in a week.
I wasn't sure which color I wanted to go with, and they're $2 for 10, so you can't beat that.
I am wondering whether they aren't as bright as the LEDs from www.superbrightleds.com, but I figure if I don't like the brightness from teh ones on ebay I'll get superbright's cool white 194's.
I own an 86 TA, and my gauges are lit with a clear plastic lens bent to refract the light towards the gauges, and I'm mostly concerned with whether the light will reach them sufficiently since the LEDs I bought arent 360 degrees. Will that be a problem?
This thread is great, keep it goin. Pics up when I do the mods


 12-16-2012 | 10:33 PM
#93

Member
Joined: Mar 2005
Posts: 412
Likes: 1
From: Houston
Car: 1986 IROC-Z28 & 1987 GTA
Engine: 305 TPI & 350 TPI
Transmission: 700R4
Re: my LED dash light project
Very interested in doing this, but when I visit superbright leds, i get this page http://www.superbrightleds.com/cat/l...11-322--95029/
With multiple options & sizes for the bulb, which is the correct one for an 86? & is it 10 or eleven bulbs for the instrument cluster?
Also, I'm assuming the high beam indicator plus turn signal indicators are sold seperatly? (http://www.superbrightleds.com/cat/l...11-322--95441/)
&
http://www.superbrightleds.com/cat/l...11-322--95028/
Again both have many option bulbs, which is the correct?
THX!
12-16-2012 | 10:53 PM
#94

Joined: Sep 2007
Posts: 2,178
Likes: 1
From: Port Orchard,WA
Car: 89 Camaro RS
Engine: 355 SD TPI
Transmission: WCT5
Axle/Gears: 3.08 Posi
Re: my LED dash light project
Usually the 5led 194 is your best bet, I did my cluster by hand and I'm going to be using superbrights bulbs when I swap my dash, I used the 6led version in my map light on my mirror and it was a verrrrry tight squeeze, I've got blue 5led 194 bulbs in my aftermarket gauges and the brightness is more than I could ask for, on stock gauges it should work out perfectly just choose a 5led 194 bulb in the color you want, I went with the widest angle possible can't remwmber off the top of my head but it worked well
12-16-2012 | 11:08 PM
#95
Member
Joined: Mar 2005
Posts: 412
Likes: 1
From: Houston
Car: 1986 IROC-Z28 & 1987 GTA
Engine: 305 TPI & 350 TPI
Transmission: 700R4
Re: my LED dash light project
So is it this one
http://www.superbrightleds.com/morei...edge-base/199/
or
http://www.superbrightleds.com/morei...edge-base/206/
& has anyone used the 15 led one? To bright?
http://www.superbrightleds.com/morei...ase-tower/910/
http://www.superbrightleds.com/morei...edge-base/199/
or
http://www.superbrightleds.com/morei...edge-base/206/
& has anyone used the 15 led one? To bright?
http://www.superbrightleds.com/morei...ase-tower/910/
12-17-2012 | 08:40 AM
#96
Supreme Member
Joined: Jan 2000
Posts: 3,178
Likes: 46
From: Tracy, CA
Car: '87 IROC
Engine: LB9
Transmission: TH700R4
01-27-2013 | 11:11 PM
#97
Junior Member
Joined: Aug 2012
Posts: 59
Likes: 0
From: Gilman, IA
Car: 1992 Camaro RS
Engine: L03 V8
Transmission: Automatic
02-05-2013 | 10:28 AM
#98
Junior Member
Joined: Oct 2012
Posts: 79
Likes: 0
From: Kissimmee, FL
Car: 1987 Camaro Iroc-z
Engine: 383
Transmission: T-5
Re: my LED dash light project
Hey guys, you're giving alot of good info, I have an 88 iroc and want to redo the whole instrument cluster with blue leds. What kind do I need and how many?
Also, my a/c controls don't light up (bulbs must have burnt out) what leds do I need for this and how many, thanks.
ps tranny is a 5speed so there's no need to light up that section
Thanks again guys and apologize for any inconvenience
Also, my a/c controls don't light up (bulbs must have burnt out) what leds do I need for this and how many, thanks.
ps tranny is a 5speed so there's no need to light up that section
Thanks again guys and apologize for any inconvenience

Thread
Thread Starter
Forum
Replies
Last Post