4th gen A-Pillar's finally done.
#1
Thread Starter
Senior Member
iTrader: (2)
Joined: Oct 1999
Posts: 893
Likes: 0
From: Hattiesburg, MS, USA
Car: 1992 Jade Green---Trans Am Converti
Engine: LS1
Transmission: T56
4th gen A-Pillar's finally done.
Ok, so after two years and trying different things, my a-pillar's are finally done.
Aside from the door panels, these are some of the most difficult things to make look right. While some seem to be pleased with cutting and forcing the 4th gen pillar to fit, there was no way I would ever consider the 4th gen pillar by itself to be acceptable. Maybe those with t-tops have an easier time since the 4th gen has to neck down to a similar shape. With my convertible, I have to match up with a header piece that goes a quarter of the way down the pillar.
The verts are going to be the easiest one's to do this on, but the process could easily be done on t-top or hard-top models.
First step is to attach the 3rd gen trim like normal. Next cut down the 4th gen pillar so that it slides right into the dash and clears the 3rd gen pillar, windshield, etc. You will wind up with a very small section of the 4th gen pillar left. Take some long sheet-rock screws and screw the two trim pieces together. Just get screw them together enough to keep them together. Remove and put back the 'merged' piece several times to make sure it stays lined up and has no issues being put back in.
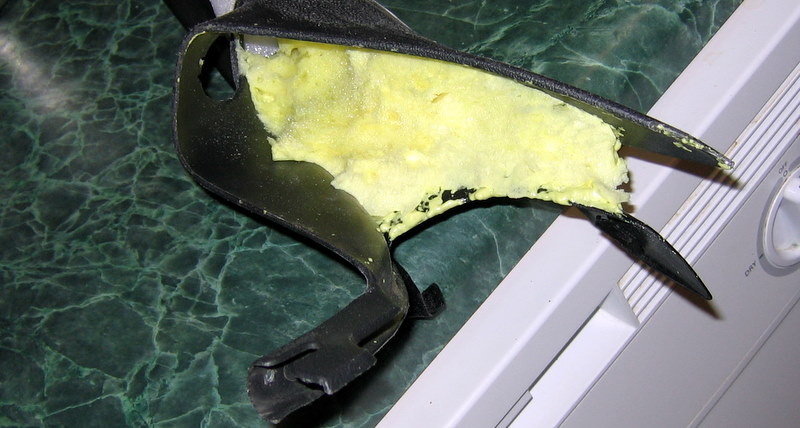
Now fill the open area between the two pillars with expanding foam. This will 'glue' the two pieces together enough for now. Once the foam is set, remove the screws.
You should end up with something like this:

Next I got some cone shaped styrofoam and cut a section off. Match the big end to the shape of the 4th gen pillar and hot glue this to the 3rd gen pillar. (You can see some temporary plastic epoxy I used instead of screws on this side, the screws work much better.)

Next I got some Crayola Model Magic modeling putty. This stuff is easily molded and hardens after a day or two in the air. Cover the entire piece with this, working it to the general shape you want. It's hard to get straight lines, so just make it rough.

After it hardens, take some 100 grit sandpaper and make it smooth. Test fit it in the car again to makes sure it flows. On the first side I cut the 4th gen pillar too short against the windshield. I had to frame out an extension with glue and tooth picks and then stick more of the Crayola stuff on.

I had originally went right to bondo and primer, but the Crayola stuff stays a little spongy forever. Just putting it in and out of the dash was causing some cracking. So I took a pair of my wife's pantyhose and stretched a leg over the entire piece. The stretching of the hose gives you some nice contours over the entire piece, blending everything together. Coat the hose in fiberglass resin. This soaks in and makes the piece hard and fairly crack resistant.

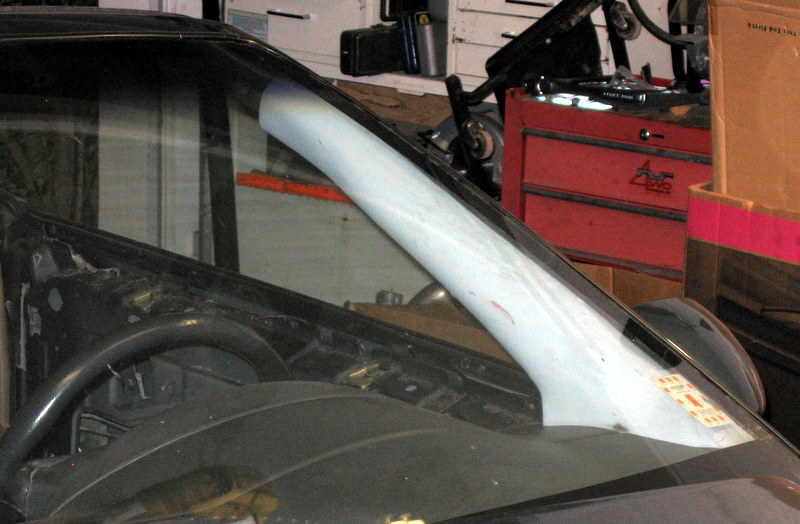
Fill the imperfections and minor issues with bondo and primer and you get something that looks like this:

Now, with all the strange angles I thought I would have to have someone stitch together pieces of vinyl to cover it. After pretty much everyone around here said it was impossible I went with some SEM spray texture and paint. The texture spray is nice, but you have to sand it down to get an even look. That is really hard on something as curvy as this. It turned out ok, but I wasn't really happy. It looked pretty good, but I'm pretty ****.


I had moved on to recovering my seats and wanted to wrap most of the plastic in the car with matching vinyl. After trying to wrap some of the semi-complex pieces that cover the back of the seats, I found my life-long method of spraying glue and sticking within 5 minutes was not cutting it.
I did some research and found some people having good luck with all-purpose contact cement. The good news is you can stick the vinyl on up to 4 hours after applying the glue. The bad news is you have to wait 20-30 minutes for the glue to set up before you can stick the vinyl, plus once you press it together its on there. Although, because you have to brush the glue on, you can apply it in very small increments which gets the vinyl to do some very impressive things as you wrap it around since it does not pull back off when set.
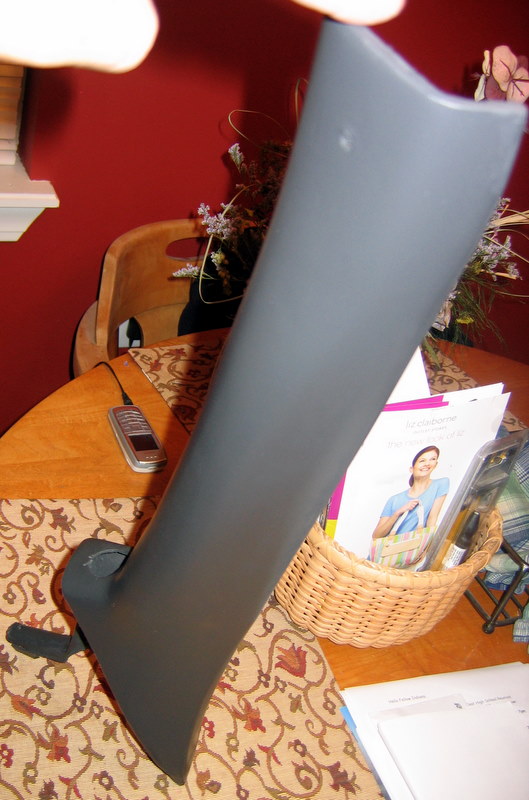
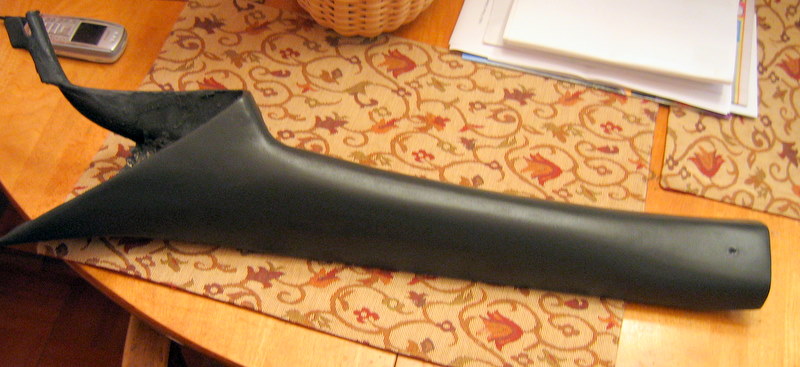
So after cutting my teeth covering some pieces for the seat, I thought it might be possible to wrap the a-pillar in a single piece of vinyl. It sucked, but worked! Time wise it took about 5 hours, but most of that was waiting for the glue to set. Actual work time was about an hour. I got the main section glued, and then slowly applied glue and wrapped small sections at a time. The results are a factory looking piece, with much better durability then the stock plastic.

Don't have any final pictures in the car yet as I pulled the dash pad to fix a crack and wound up cutting the defrost vent out and wrapping the pad in vinyl as well. As soon as I get a suitable grill glued in the pad I'll have some more pics. So was it a lot of work? Yes. Was it worth it? Most definitely. I've put too much time into the car to slap something in there that's just acceptable or 'ok'.
If everything stays on track, I should have everything but the door panels finished in a week. I'll start a new thread for the full interior, but feel free to check out my site documenting the entire car since I've owned it here:
http://www.ms-fbodies.com/jade_ta.htm
Hope this long *** thread inspires someone,
Kevin D.
Aside from the door panels, these are some of the most difficult things to make look right. While some seem to be pleased with cutting and forcing the 4th gen pillar to fit, there was no way I would ever consider the 4th gen pillar by itself to be acceptable. Maybe those with t-tops have an easier time since the 4th gen has to neck down to a similar shape. With my convertible, I have to match up with a header piece that goes a quarter of the way down the pillar.
The verts are going to be the easiest one's to do this on, but the process could easily be done on t-top or hard-top models.
First step is to attach the 3rd gen trim like normal. Next cut down the 4th gen pillar so that it slides right into the dash and clears the 3rd gen pillar, windshield, etc. You will wind up with a very small section of the 4th gen pillar left. Take some long sheet-rock screws and screw the two trim pieces together. Just get screw them together enough to keep them together. Remove and put back the 'merged' piece several times to make sure it stays lined up and has no issues being put back in.
Now fill the open area between the two pillars with expanding foam. This will 'glue' the two pieces together enough for now. Once the foam is set, remove the screws.
You should end up with something like this:

Next I got some cone shaped styrofoam and cut a section off. Match the big end to the shape of the 4th gen pillar and hot glue this to the 3rd gen pillar. (You can see some temporary plastic epoxy I used instead of screws on this side, the screws work much better.)

Next I got some Crayola Model Magic modeling putty. This stuff is easily molded and hardens after a day or two in the air. Cover the entire piece with this, working it to the general shape you want. It's hard to get straight lines, so just make it rough.

After it hardens, take some 100 grit sandpaper and make it smooth. Test fit it in the car again to makes sure it flows. On the first side I cut the 4th gen pillar too short against the windshield. I had to frame out an extension with glue and tooth picks and then stick more of the Crayola stuff on.

I had originally went right to bondo and primer, but the Crayola stuff stays a little spongy forever. Just putting it in and out of the dash was causing some cracking. So I took a pair of my wife's pantyhose and stretched a leg over the entire piece. The stretching of the hose gives you some nice contours over the entire piece, blending everything together. Coat the hose in fiberglass resin. This soaks in and makes the piece hard and fairly crack resistant.

Fill the imperfections and minor issues with bondo and primer and you get something that looks like this:

Now, with all the strange angles I thought I would have to have someone stitch together pieces of vinyl to cover it. After pretty much everyone around here said it was impossible I went with some SEM spray texture and paint. The texture spray is nice, but you have to sand it down to get an even look. That is really hard on something as curvy as this. It turned out ok, but I wasn't really happy. It looked pretty good, but I'm pretty ****.


I had moved on to recovering my seats and wanted to wrap most of the plastic in the car with matching vinyl. After trying to wrap some of the semi-complex pieces that cover the back of the seats, I found my life-long method of spraying glue and sticking within 5 minutes was not cutting it.
I did some research and found some people having good luck with all-purpose contact cement. The good news is you can stick the vinyl on up to 4 hours after applying the glue. The bad news is you have to wait 20-30 minutes for the glue to set up before you can stick the vinyl, plus once you press it together its on there. Although, because you have to brush the glue on, you can apply it in very small increments which gets the vinyl to do some very impressive things as you wrap it around since it does not pull back off when set.
So after cutting my teeth covering some pieces for the seat, I thought it might be possible to wrap the a-pillar in a single piece of vinyl. It sucked, but worked! Time wise it took about 5 hours, but most of that was waiting for the glue to set. Actual work time was about an hour. I got the main section glued, and then slowly applied glue and wrapped small sections at a time. The results are a factory looking piece, with much better durability then the stock plastic.

Don't have any final pictures in the car yet as I pulled the dash pad to fix a crack and wound up cutting the defrost vent out and wrapping the pad in vinyl as well. As soon as I get a suitable grill glued in the pad I'll have some more pics. So was it a lot of work? Yes. Was it worth it? Most definitely. I've put too much time into the car to slap something in there that's just acceptable or 'ok'.
If everything stays on track, I should have everything but the door panels finished in a week. I'll start a new thread for the full interior, but feel free to check out my site documenting the entire car since I've owned it here:
http://www.ms-fbodies.com/jade_ta.htm
Hope this long *** thread inspires someone,
Kevin D.
Last edited by shr00m; 07-06-2007 at 03:07 AM.
#3
Supreme Member
iTrader: (3)
Joined: Aug 2006
Posts: 1,439
Likes: 0
From: Tucson, Arizona
Car: 1987 IROC-Z Camaro
Engine: L98 5.7L TPI
Transmission: 700-R4
Axle/Gears: 3.27 BW
Re: 4th gen A-Pillar's finally done.
99% of the time, I think the bat-nose hood looks horrid. Even on the 4th gens they came on.
But you, my friend, have one sexy car. As far as innovation and looks, I have to say it's probably my favorite thirdgen, even if I do feel you're doing evil by installing 4thgen parts. :P I can't wait to see it finished. I bet it's gonna win awards wherever it goes.
But you, my friend, have one sexy car. As far as innovation and looks, I have to say it's probably my favorite thirdgen, even if I do feel you're doing evil by installing 4thgen parts. :P I can't wait to see it finished. I bet it's gonna win awards wherever it goes.
#4
Joined: Jan 2001
Posts: 3,177
Likes: 55
From: Conroe, TX
Car: 1987 GTA
Engine: LS1
Transmission: 4L60e
Re: 4th gen A-Pillar's finally done.
Just wanted to chime in that you're doing a fantastic job on that car. Real quality work. I'll check out your site to see if you have any pics of the vinyl on the rear plastics.
#5
Re: 4th gen A-Pillar's finally done.
Today I just got thinking about doing something to my a pillars that is almost exactly what you have done. Good work.
Where do you buy the crayola stuff at? Walmart?
Where do you buy the expaning foam at?
Where do you buy the crayola stuff at? Walmart?
Where do you buy the expaning foam at?
#6
Thread Starter
Senior Member
iTrader: (2)
Joined: Oct 1999
Posts: 893
Likes: 0
From: Hattiesburg, MS, USA
Car: 1992 Jade Green---Trans Am Converti
Engine: LS1
Transmission: T56
Re: 4th gen A-Pillar's finally done.
Thaks for the compliments guys!
They might have it at Walmart, but I got a big tub of it at Hobby Lobby. The tub has like 4 individual bags so you don't have to waste a lot since it will start hardening when open it. Plus the bulk tub comes in all white, versus having to mix together a rainbow of colors to get enough.
Kevin D.
They might have it at Walmart, but I got a big tub of it at Hobby Lobby. The tub has like 4 individual bags so you don't have to waste a lot since it will start hardening when open it. Plus the bulk tub comes in all white, versus having to mix together a rainbow of colors to get enough.
Kevin D.
Thread
Thread Starter
Forum
Replies
Last Post
Polo Z03
Auto Detailing and Appearance
7
09-10-2015 07:43 PM
4th, a, apillar, bondo, camaro, convertible, fbody, gen, generation, make, pillar, ram, remove, replacement, smooth, windshield


