
Home brew road racer
 03-11-2013, 07:45 AM
#151
Senior Member

Join Date: Feb 2005
Location: Albany NY
Posts: 514
Likes: 0
Received 5 Likes
on
4 Posts
Car: 84 Trans AM (sold), 87 IROC, 09 C6
Engine: Lt1 in IROC
Transmission: 5 speeds
Axle/Gears: Moser 12 bolt tru tracker 3.42
Re: Home brew road racer
can't wait to see it all together! you painting it your self too?
 03-11-2013, 08:08 AM
#152
Member
Join Date: Nov 2011
Location: Fort Gordon, GA
Posts: 142
Likes: 0
Received 0 Likes
on
0 Posts
Car: 83 Z28
Engine: LG4
Transmission: T5
Re: Home brew road racer
Man, this build is REALLY looking awesome. My only concern is the seat mounts. I'm not sure I'd like to have my *** bolted up to a plate. When I worked on the big race teams, our cars had tabs welded to the frame. There was a seat sub-frame that adjusted and connected the seat to the frame. All tubing on tubing, no sheet metal or plate metal.
03-11-2013, 08:44 AM
#153
Member
Join Date: May 2001
Location: state of confusion
Posts: 438
Likes: 0
Received 1 Like
on
1 Post
Car: '08 Mustang GT
Engine: 4.6L
Transmission: � � 0 . . . |-|-|
Axle/Gears: 8.8", 3.55
Re: Home brew road racer
Depending on how thick the metal that the seat is bolted to is, it could be stiffened by steel strips as panel stiffeners (not as thickness "doublers") or tubing welded to the floor. If the floor is relatively thin, you probably need to do more to keep the bolts from pulling out.
Something like this at least ↓↓↓
Norm
Something like this at least ↓↓↓
Norm
Last edited by Norm Peterson; 03-11-2013 at 08:52 AM.
03-17-2013, 07:03 PM
#154
Member

Join Date: Feb 2008
Posts: 230
Likes: 0
Received 0 Likes
on
0 Posts
Re: Home brew road racer
Your project is awesome, great ideas and execution. Some really good work there, and very interesting to see the autocross/road race fabrication style. I love that kind of thing and you have given me some great ideas.
One thing that makes me wonder though, why didn't you just run frame rails along side the door jamb area (like you have done), and then just come in from these rails and tie into the front section of the stock unibody/frame rails before the "bend" and eliminate the last, turned in portion of the stock rails? You could still run anything you need straight across the floorboard area to mount different things, and would eliminate a lot of congestion around the transmission tail shaft and open up some room.
One thing that makes me wonder though, why didn't you just run frame rails along side the door jamb area (like you have done), and then just come in from these rails and tie into the front section of the stock unibody/frame rails before the "bend" and eliminate the last, turned in portion of the stock rails? You could still run anything you need straight across the floorboard area to mount different things, and would eliminate a lot of congestion around the transmission tail shaft and open up some room.
03-21-2013, 10:50 PM
#155

Re: Home brew road racer
Possibly, if I can't get a buddy to do it for me. There will be a few body mods coming up but nothing to change the basic look of the car.
To answer about the seat mounting I have made brackets of 1/4 by 2 steel that are welded to the 4 x 1 1/2 rectangular tube framework that runs along the tunnel and over to the SFC's. I will make similar brackets to mount the seat belts to. I'll have pictures to post next time.
I really appreciate everyone following along and reading your comments. It gives me motivation to keep at it and do my best. Having had the floor cut out of this car for over a year now, to see it with the new floors in place and a seat bolted in gave me a great sense of satisfaction.
Although the substructure in the middle of the car was "plan B" when the simple X bracing didn't work I think it greatly improved the overall stiffness of the car statically and torsionally. It is still basically a ladder type frame design with little cross bracing but it divides the large interior space into smaller, inter connected spaces that help support each other. Once the floor pans are welded back in I don't think flex or twist will be an issue. All I have to do is make sure The front of the car is braced as well.
Last edited by 83RDRACR; 03-21-2013 at 10:53 PM. Reason: correcting tubing size
03-25-2013, 09:29 PM
#156
Re: Home brew road racer
Man, this build is REALLY looking awesome. My only concern is the seat mounts. I'm not sure I'd like to have my *** bolted up to a plate. When I worked on the big race teams, our cars had tabs welded to the frame. There was a seat sub-frame that adjusted and connected the seat to the frame. All tubing on tubing, no sheet metal or plate metal.
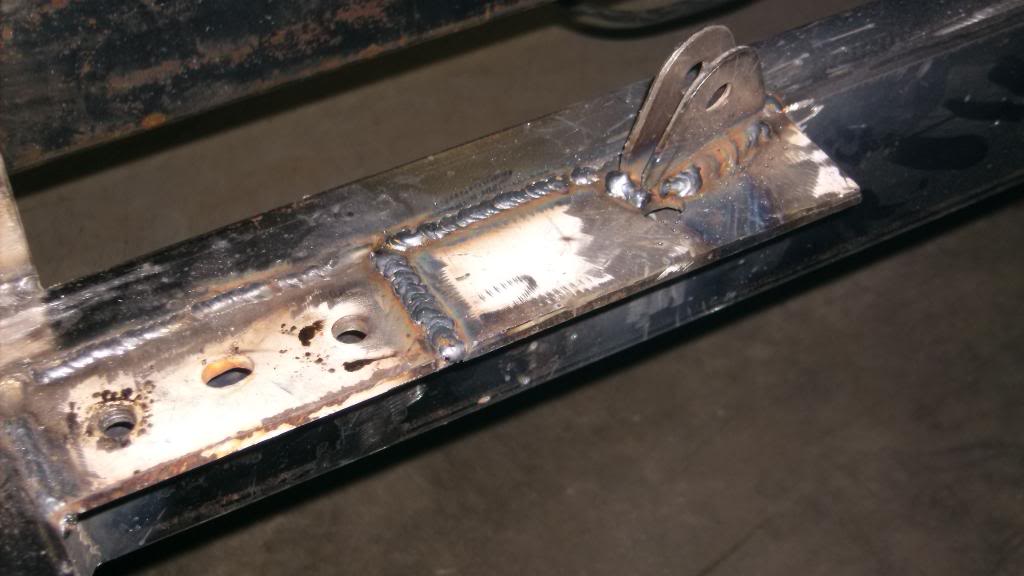
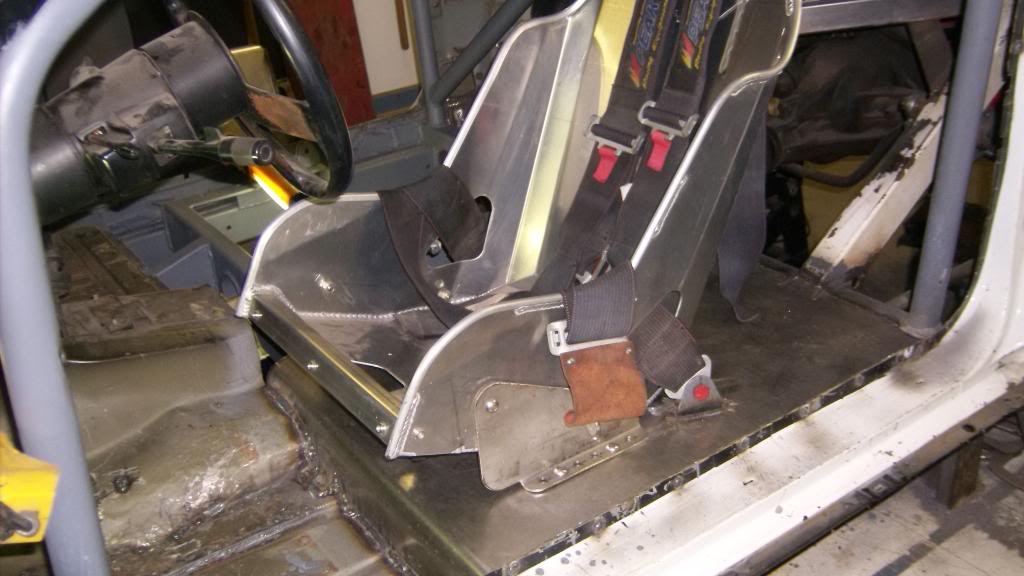
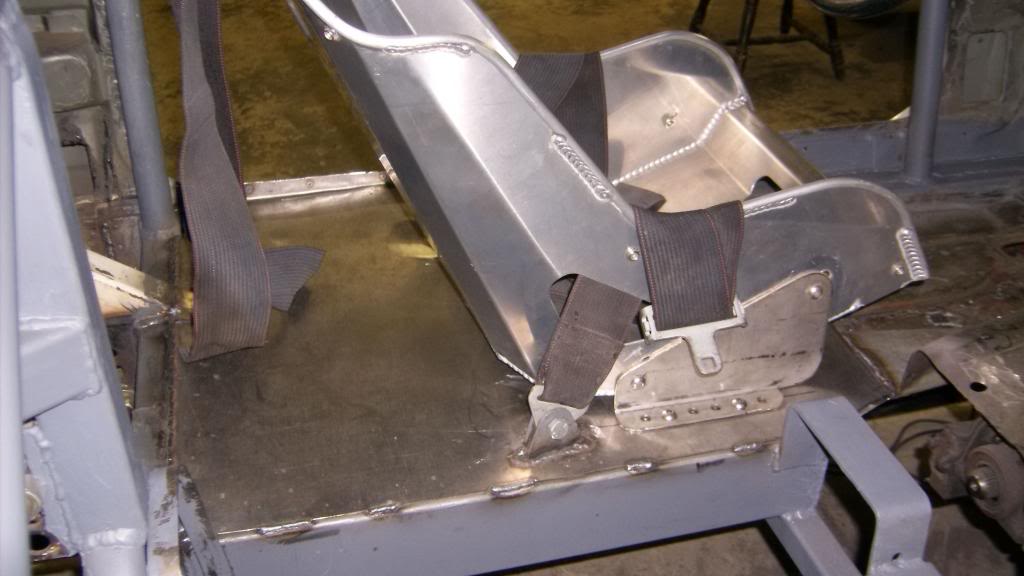
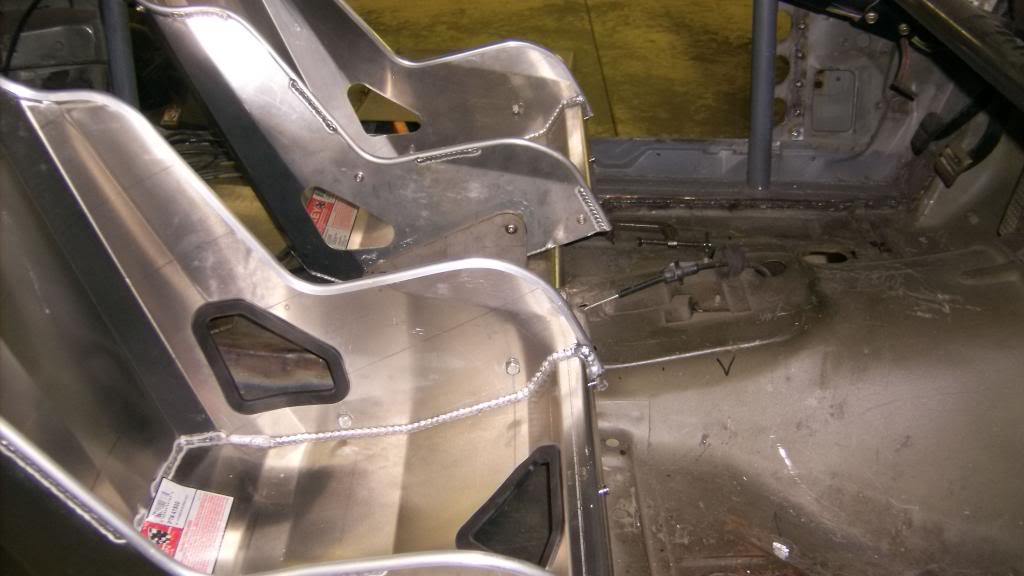
Before I dropped the X-bracing idea, there was not a strong enough structure around the seat area to mount it to so I made the 1x1 tube frame work that would set on top of the floor and weld to the door sill and trans tunnel to mount the seat on. It had to sit on top of the floor because the exhaust lies under the seat with about 3/4 inch of clearance. I wasn't thrilled with this but it was strong and simple.
[IMG]
 [/IMG]
[IMG]
 [/IMG]
[IMG]
 [/IMG]
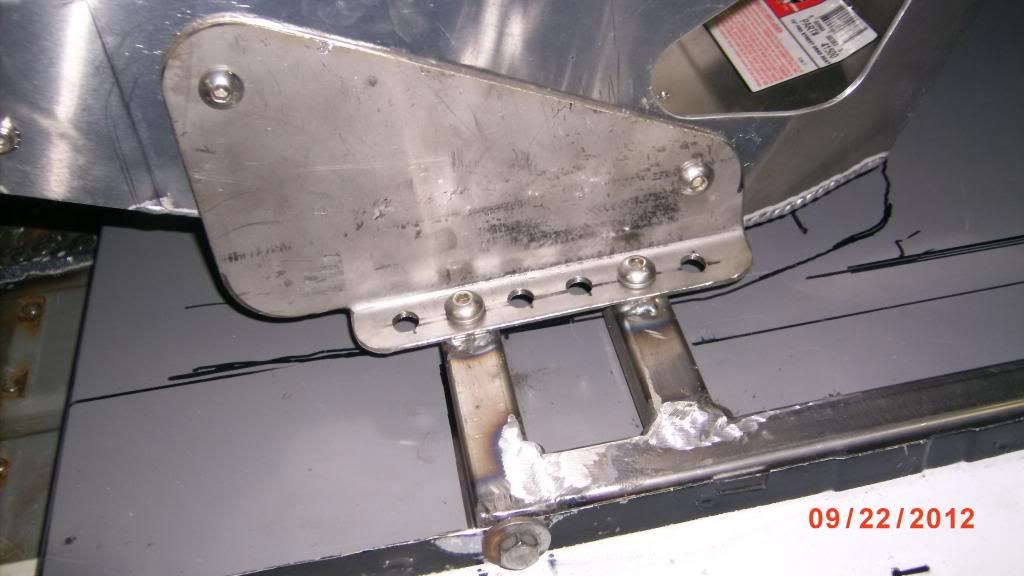
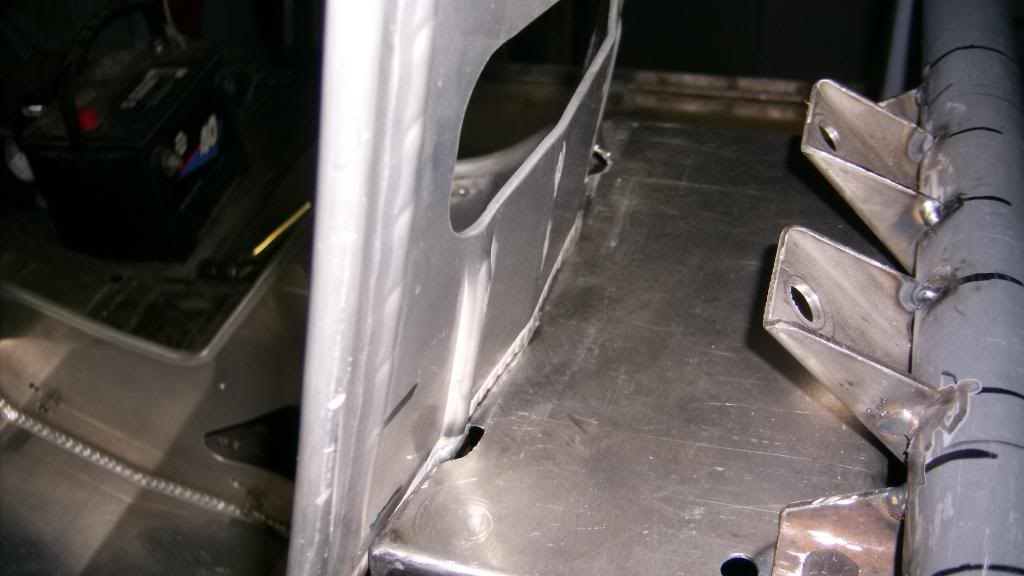
When the X-bracing idea proved a no-go and I put in the center structure I had the strong structure I needed to mount the seat to. I had originally envisioned a clear floor pan with the brackets under it and the seat bolting through the floor pan. I made the brackets from some 1/4 x 2 strap that was left over from the weight bench. I made one bracket per side for the seat mount and two smaller ones to anchor the lap belts.
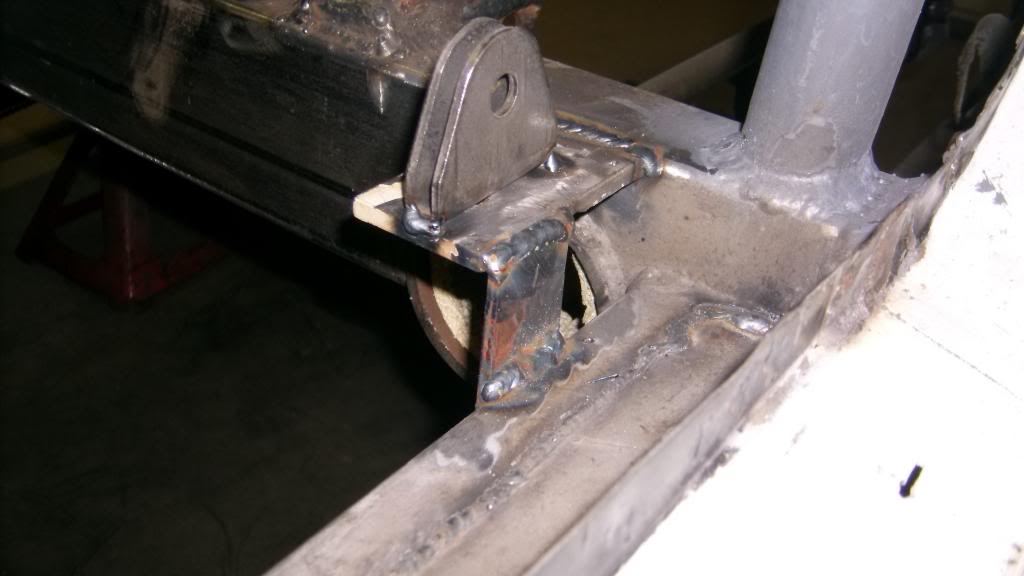
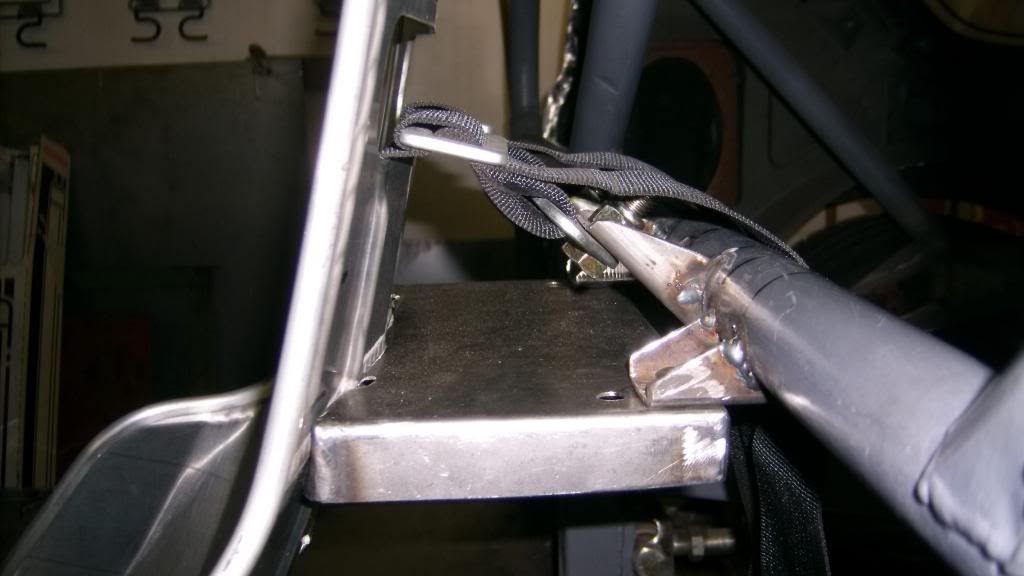
The seat belt brackets were to far back for proper alignment and caused the belt to bind in the opening on the side of the seat.
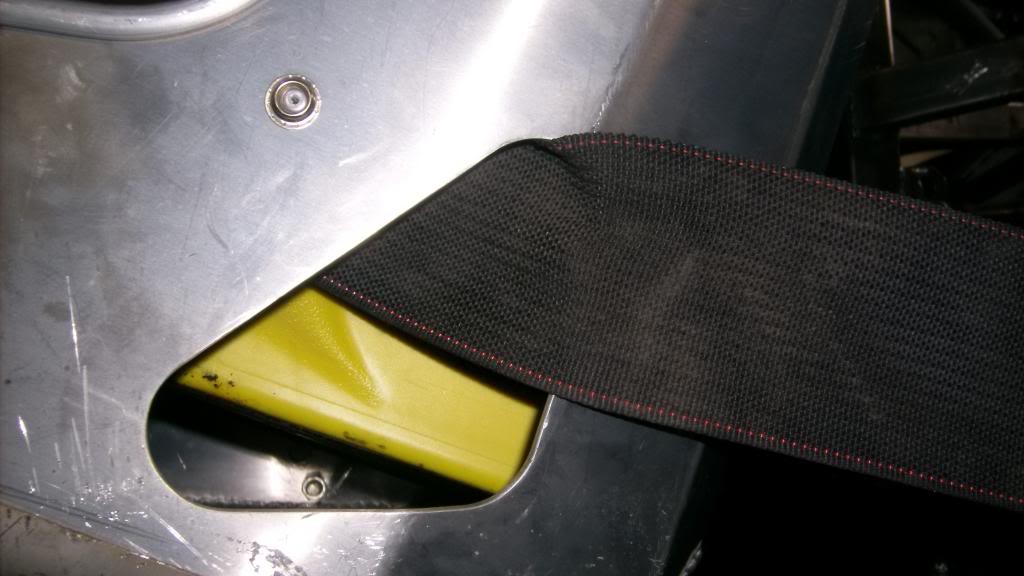
I moved the seat belts forward so they entered the opening at about a 45* angle which placed them just behind the back of the seat. If I had thought this out a little better to begin with I could have combined the seat and belt brackets and made as one piece. As it is I ended up welding two pieces together.
drivers side left

drivers side right
 03-25-2013, 09:48 PM
#157
Re: Home brew road racer
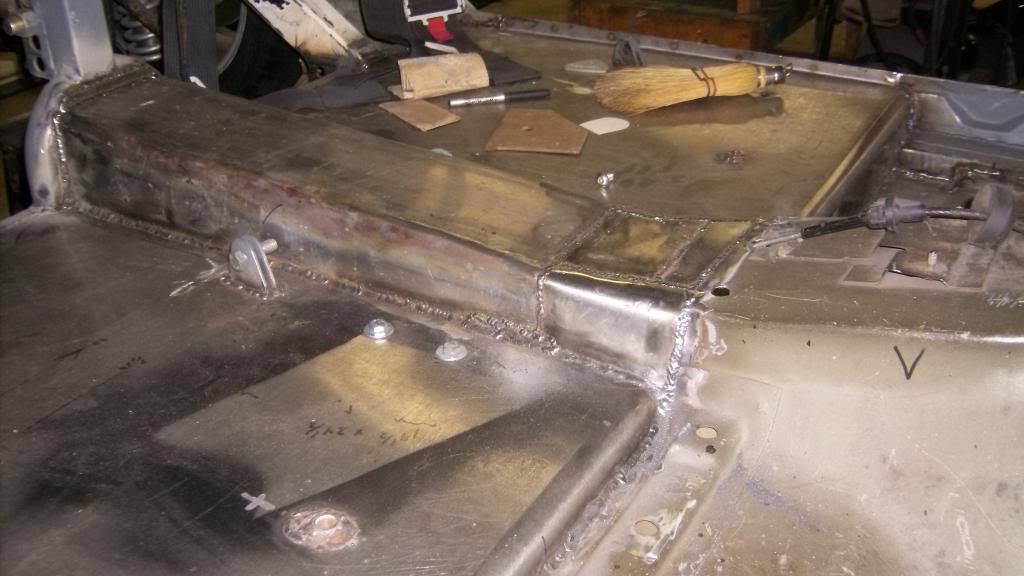
In anticipation of finally getting floors back in the car I wanted to prep and paint all of the framework that I put in. After a couple hours of grinding and sanding, and washing everything down with lacquer thinner I mixed some more of the epoxy primer and painted all of the new structure in the interior of the car. With it painted you can better see how the sub structure in the center ties the outer SFC's and the relocated OE front sub frames together while also connecting the OE sub frames to the rear crossmember as well. Although it was plan "B" I think it came out pretty well.


 04-25-2013, 08:14 PM
#159
Re: Home brew road racer
Man, this build is REALLY looking awesome. My only concern is the seat mounts. I'm not sure I'd like to have my *** bolted up to a plate. When I worked on the big race teams, our cars had tabs welded to the frame. There was a seat sub-frame that adjusted and connected the seat to the frame. All tubing on tubing, no sheet metal or plate metal.


 04-25-2013, 08:54 PM
#161
Re: Home brew road racer
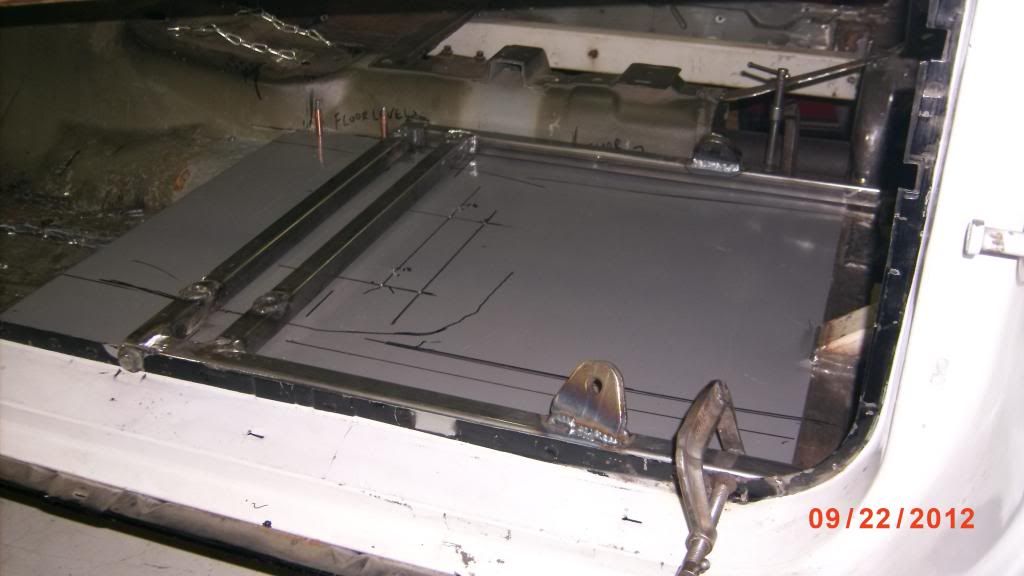
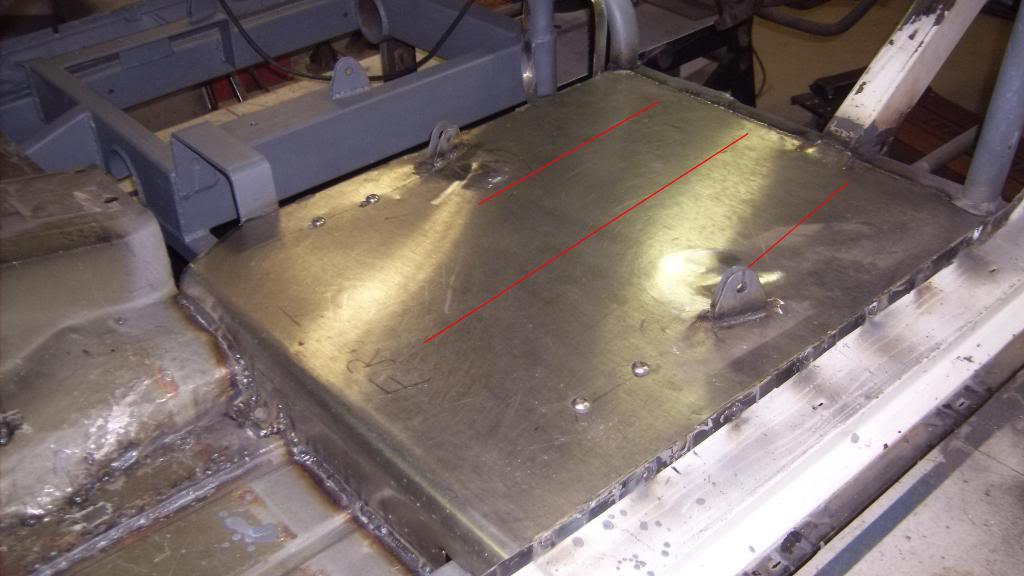
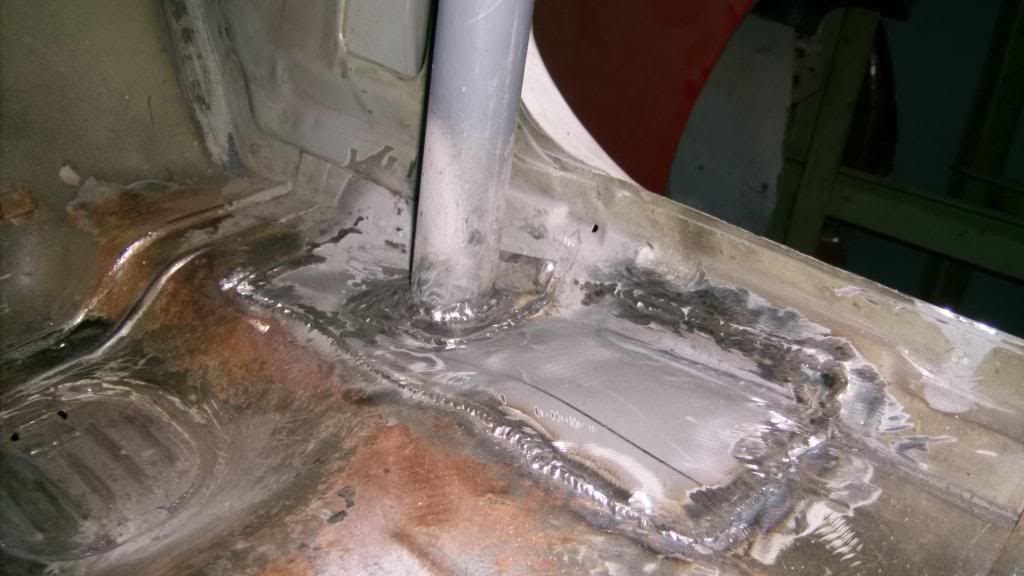
Installed driver side floor pan and I am glad to say it fit very well. The pan has a 1/2" bent up lip along door side. I drilled several 3/8 holes through the factory pinch weld lip and plug welded my floor pan lip to it. I was worried about the floor pan "oil canning" or acting like a drum head. If I had a bead roller I would have put a few stiffening beads in it but I don't so I clamped a long piece of 1/4 steel strap down the center front to back and clamped a piece of channel over the top of that from the trans tunnel to the door pinch weld. This effectively pushed the floor down in the center about an 1/8 of an inch and put the whole panel in a state of tension. I welded the floor in place this way and when I pulled the braces off there was no oil canning or popping when I pressed down or even knelt on the floor pan.
I welded around the lap belt anchors to seal those holes off and stich-welded the floor pan to the rear cross member and the OE front floor. I still have to make a small filler piece at the rear corner to seal off around the bottom of the main hoop and a small "L" shaped filler piece to fill in at the front edge of the floor where the SFC passes through.
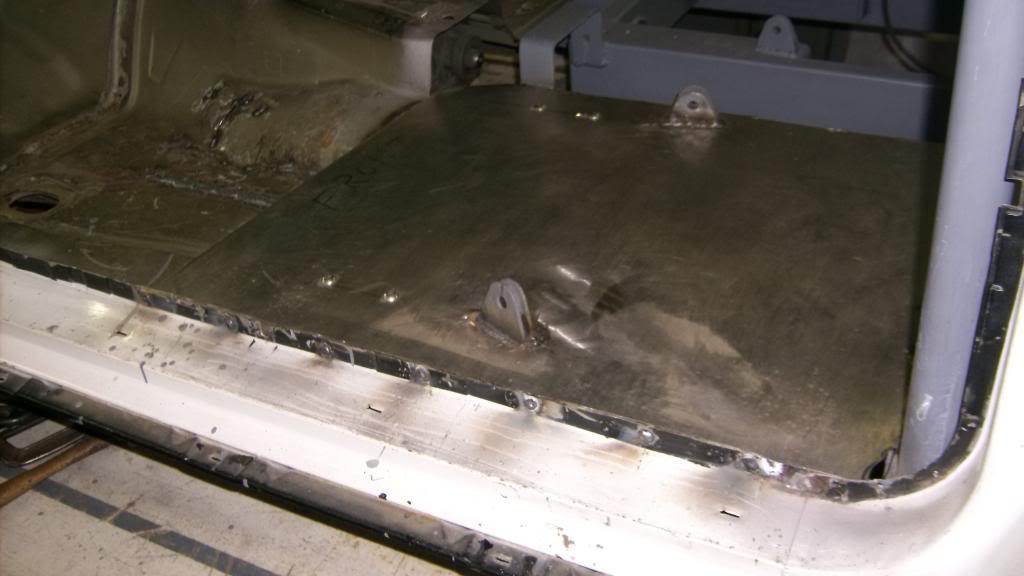
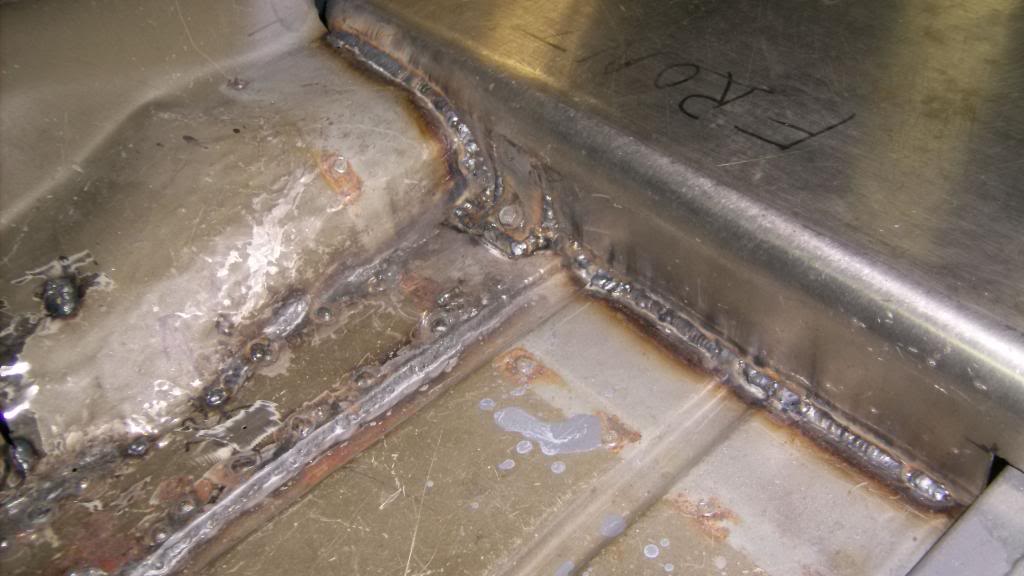
I welded around the lap belt anchors to seal those holes off and stich-welded the floor pan to the rear cross member and the OE front floor. I still have to make a small filler piece at the rear corner to seal off around the bottom of the main hoop and a small "L" shaped filler piece to fill in at the front edge of the floor where the SFC passes through.


 04-25-2013, 09:20 PM
#163
Re: Home brew road racer
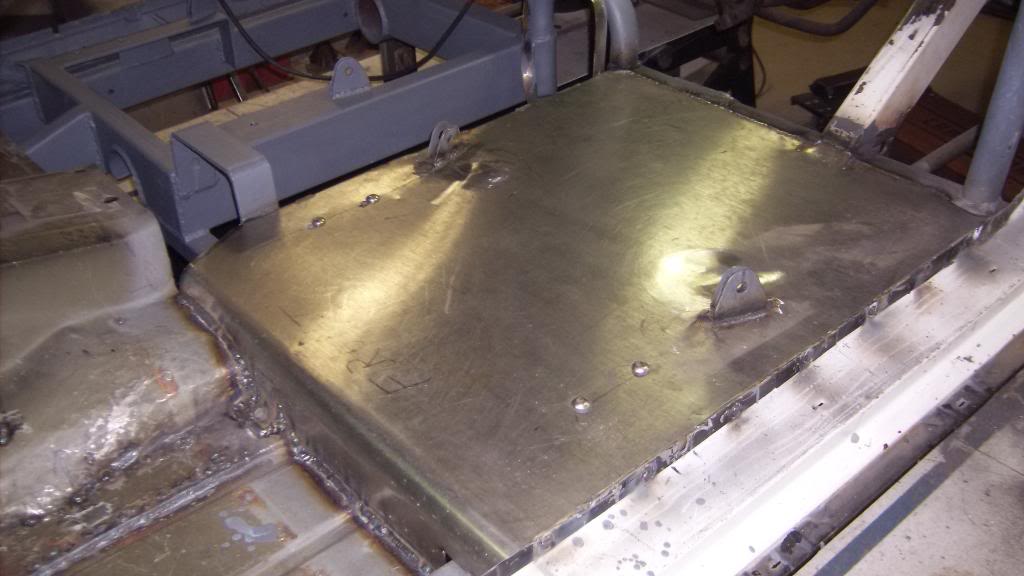
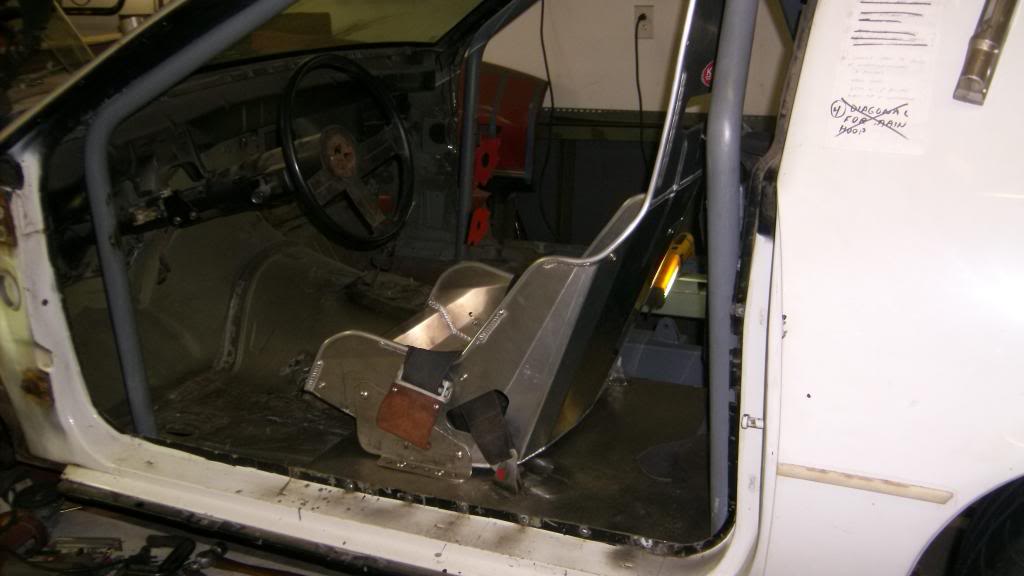
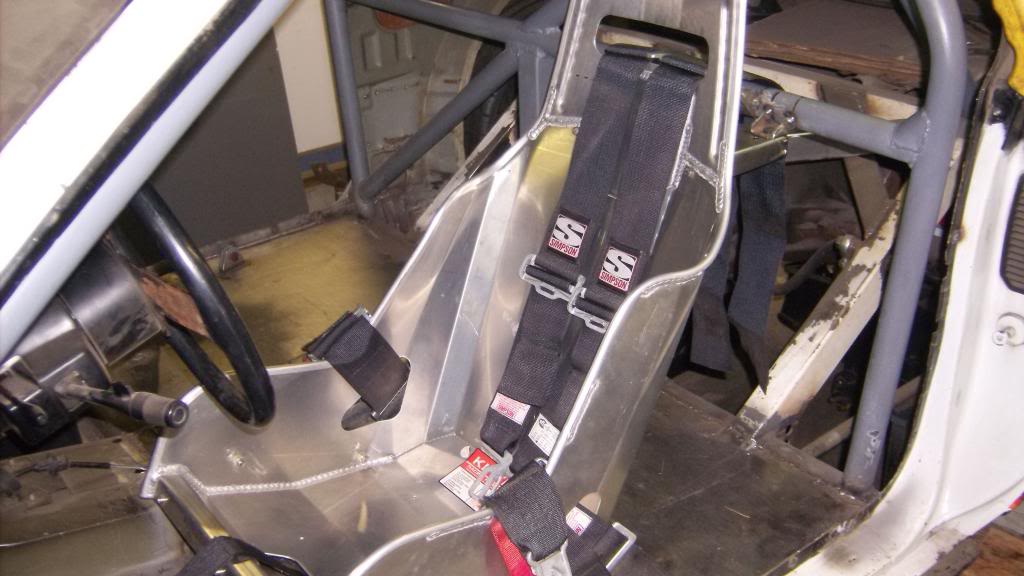
Here are a few pics with the driver seat installed with an old set of seat belts. The shoulder belts I am going to use will bolt in and not wrap around like in pic. I want to combine the shoulder belt mount and upper seat mount into one piece so a little design work to do on that. Also need to add mount under seat for crotch strap.


 06-12-2013, 09:21 PM
#164
Re: Home brew road racer
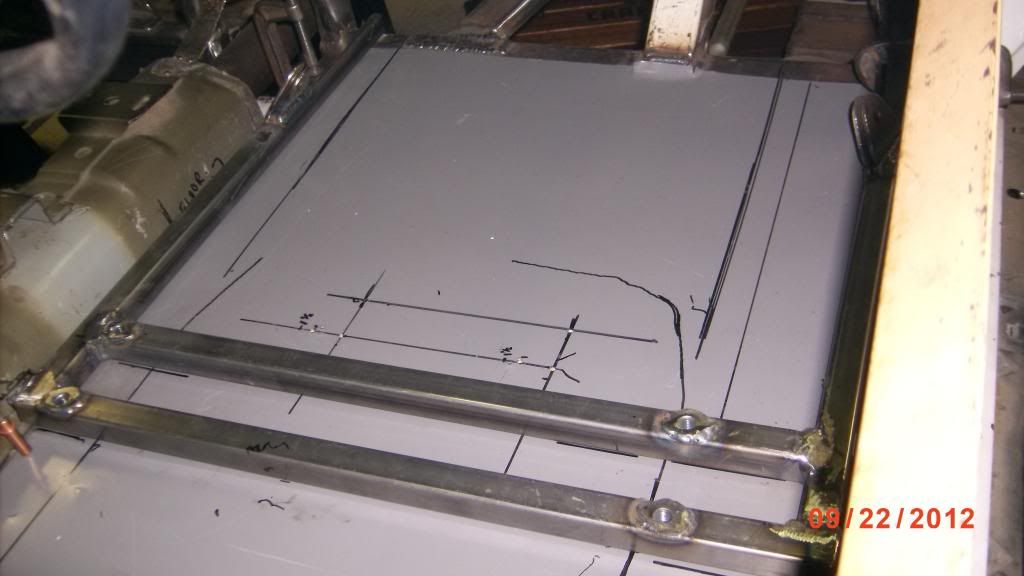
I am just about done with the floor pans and tunnel but crawling and kneeling on my new floor pans has caused them to oil can badly. A quick and simple cure for this would be to take a length of 1/2" angle iron, lay it open "V" down lengthwise in the center of the floor pan and weld it to the floor pan. However I am hoping to keep the area behind the seat open and flat.
I was thinking of cutting three long slots into each floor pan and then welding the slots back shut. I am hoping this would stiffen the metal and keep it from popping and help reduce any drumming or droning noise from the mufflers that will be directly under the floor. Any suggestions????
CURRENT FLOOR PAN

FLOOR PAN WITH WELDED RIBS
I was thinking of cutting three long slots into each floor pan and then welding the slots back shut. I am hoping this would stiffen the metal and keep it from popping and help reduce any drumming or droning noise from the mufflers that will be directly under the floor. Any suggestions????
CURRENT FLOOR PAN
FLOOR PAN WITH WELDED RIBS
 06-13-2013, 07:35 AM
#165
Member
Join Date: May 2001
Location: state of confusion
Posts: 438
Likes: 0
Received 1 Like
on
1 Post
Car: '08 Mustang GT
Engine: 4.6L
Transmission: � � 0 . . . |-|-|
Axle/Gears: 8.8", 3.55
Re: Home brew road racer
Maybe another layer of sheet metal (perhaps 16 gauge) separated from the existing floor by something like 1/4" plywood structurally bonded top and bottom? Definitely stronger, and the plywood will tend to damp out most of the panel vibration modeshapes. I think I'd fold the top steel over and tack or stitch it to the existing metal.
Norm
Norm
07-04-2013, 09:21 PM
#166
Re: Home brew road racer
Maybe another layer of sheet metal (perhaps 16 gauge) separated from the existing floor by something like 1/4" plywood structurally bonded top and bottom? Definitely stronger, and the plywood will tend to damp out most of the panel vibration modeshapes. I think I'd fold the top steel over and tack or stitch it to the existing metal.
Norm
Norm
I mentioned in an early post that there will be some concessions made to make the car more tolerable to drive on the highway for some distance. One of those concessions is to line the floor, tunnel and front and rear firewalls with a heat and sound barrier like Dynamat and install a thin layer of carpet to keep the interior from looking too industrial. Maybe I could bond the plywood to the floor and further secure it with with large head steel pop rivets and then cover it up with the Dynamat and carpet.
07-04-2013, 09:53 PM
#167
Re: Home brew road racer
I haven't put up any pictures for a while as its been tough getting time to work on it. I did manage to get the tunnel and floors pretty much finished. Putting a 90 degree, 1/2" radius bend in a 2ft long piece of 14ga stainless was no easy task. The main tunnel could use a little hammer and dolly work to get some of the hammer dings out and I thought about smoothing out the welds with a grinder but I plan to cover it with some light padding and carpet and maybe a simple console so it will probably stay as is.
main tunnel section
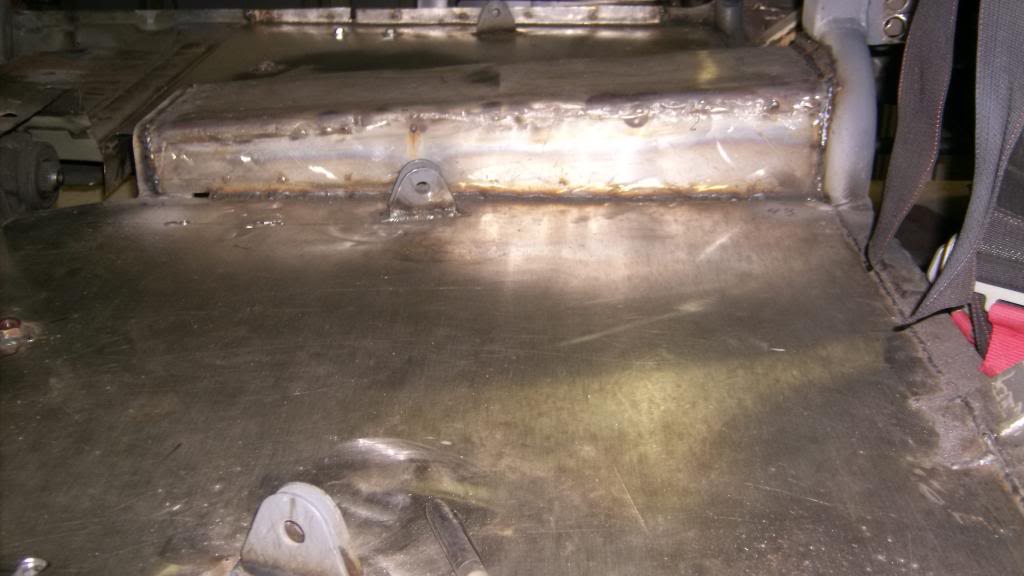
rear of tunnel
transition to factory tunnel
All welded up

passenger side
I had cut a pretty large hole in the passenger floor so I could weld the the front A pillar tube directly to the SFC. I made a patch for that and finished welding up all of the small holes that were left behind from cutting off and moving frame rails along side the transmission.
main tunnel section

rear of tunnel

transition to factory tunnel

All welded up

passenger side

I had cut a pretty large hole in the passenger floor so I could weld the the front A pillar tube directly to the SFC. I made a patch for that and finished welding up all of the small holes that were left behind from cutting off and moving frame rails along side the transmission.
 08-05-2013, 09:44 PM
#168
Re: Home brew road racer
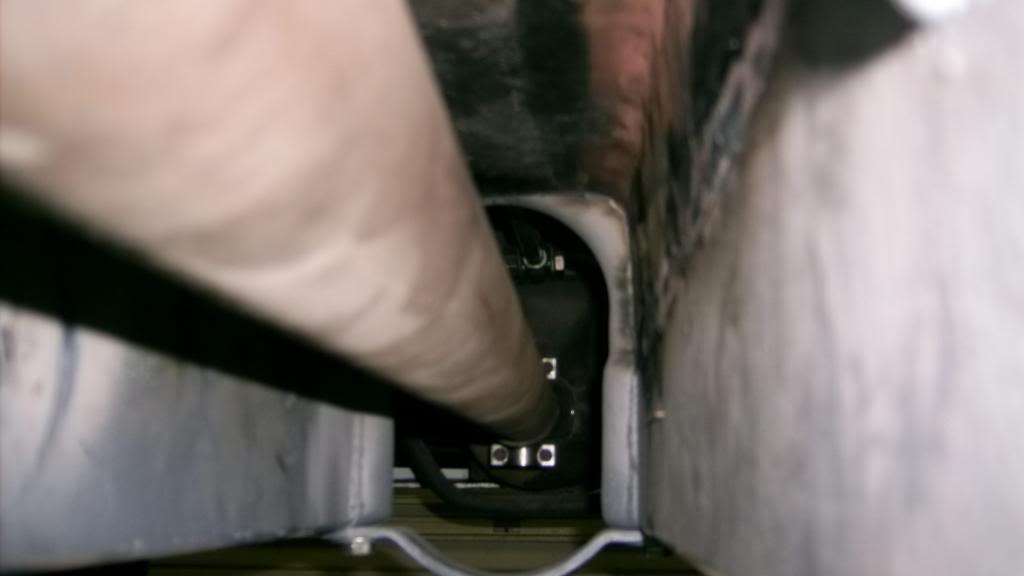
I have not had much time to work on the car but did get to throw in the driveshaft and mock up the exhaust to check clearance. All came out according to plan which is a good thing as the whole purpose of raising the floor was to run true duals and get the mufflers tucked up so that the lowest part of the car is the SFC's and not the exhaust.
With muffler even with bottom of SFC there is about 3/4 inch clearance to floor pan.
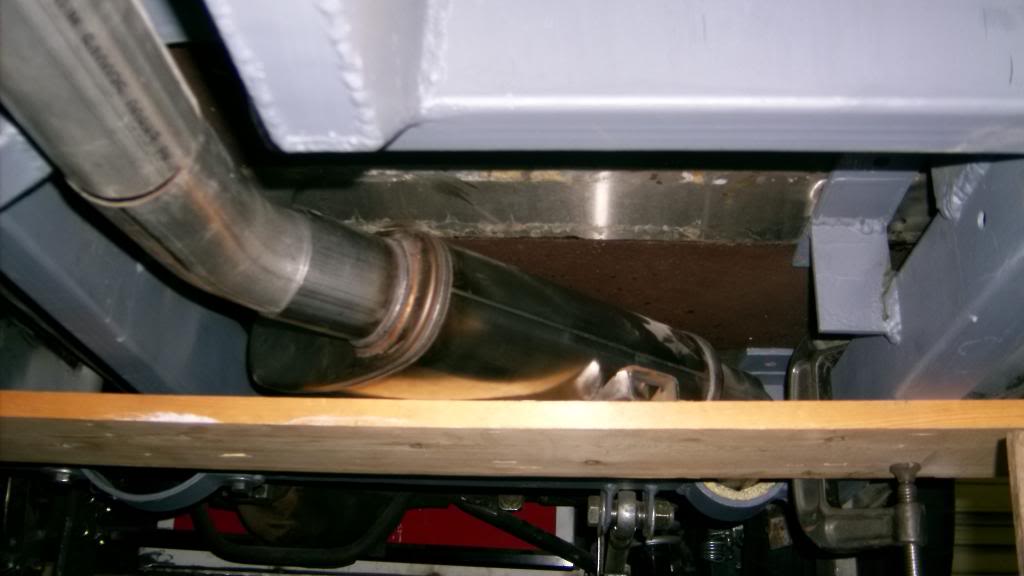
Mid pipe is higher than OE sub frame
exhaust is simple straights and 45 degree pipes. Will probably make final in stainless to match the Magnaflow mufflers.
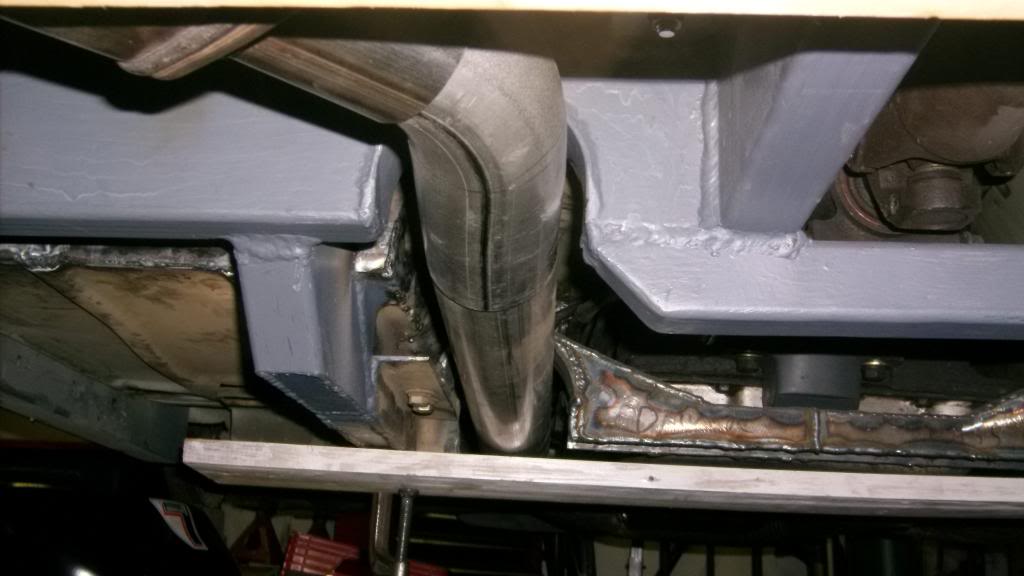
driveshaft in tunnel
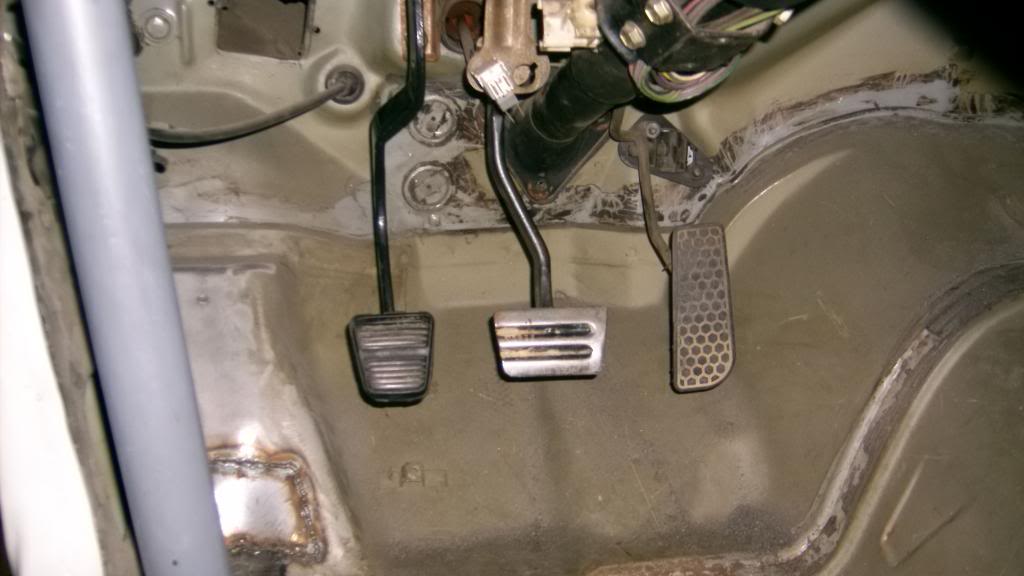
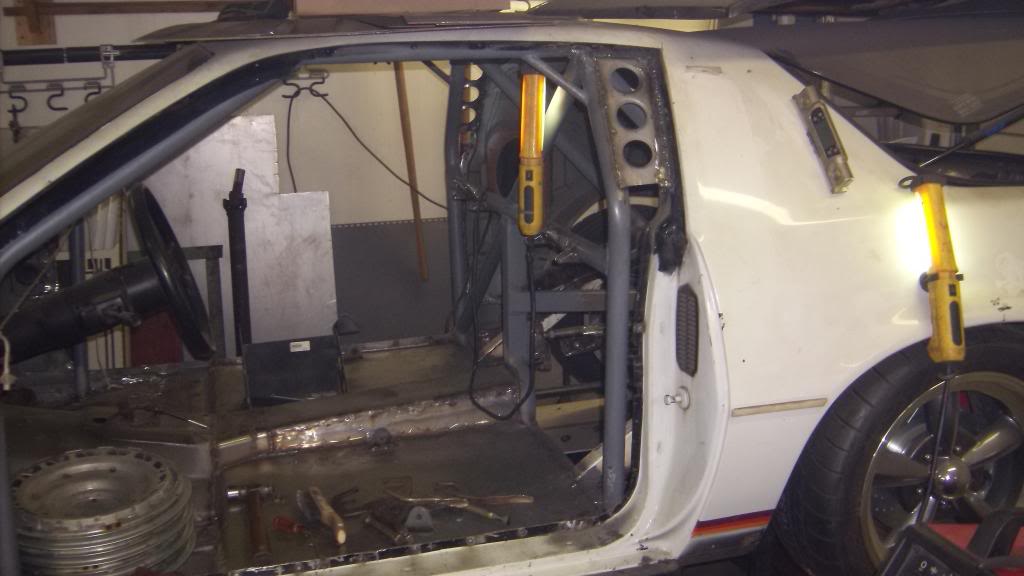
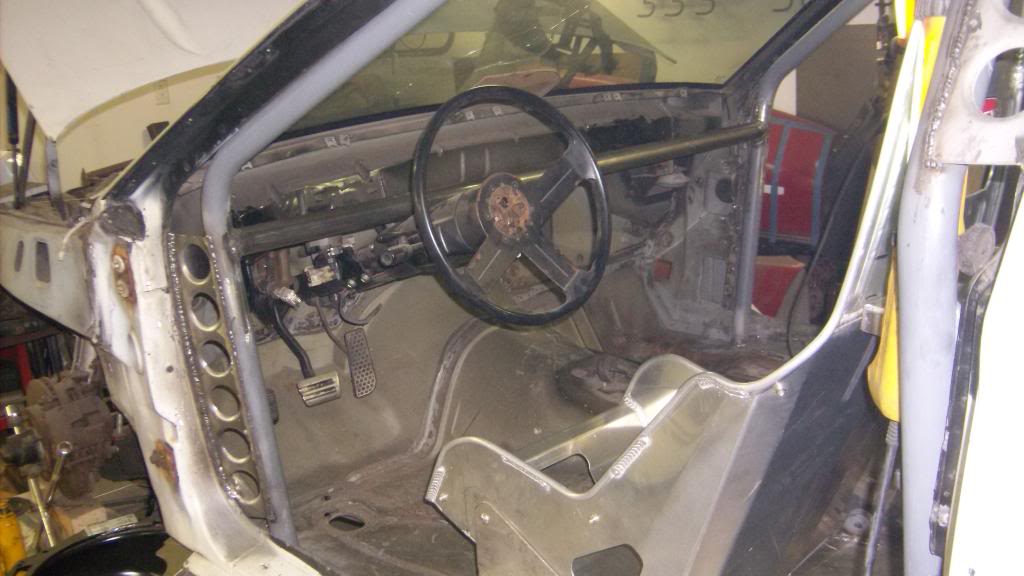
I mocked up the seat, steering wheel and the pedals for the first time. I plan on running manual brakes, no booster, and that will give me room to place the clutch master cyl. beside the brake master cylinder. It looks like i wil need to move the clutch pedal to left about a 1/2 in. from stock to make this work. I've sketched out a simple bracket that will mount both the pedal and clutch master. I'll post pictures when I make it.
I cut down the power brake pedal pad to get some separation from the clutch pedal. I thought I had the right pedal for the stick conversion but couldn't find it.
With muffler even with bottom of SFC there is about 3/4 inch clearance to floor pan.

Mid pipe is higher than OE sub frame

exhaust is simple straights and 45 degree pipes. Will probably make final in stainless to match the Magnaflow mufflers.

driveshaft in tunnel

I mocked up the seat, steering wheel and the pedals for the first time. I plan on running manual brakes, no booster, and that will give me room to place the clutch master cyl. beside the brake master cylinder. It looks like i wil need to move the clutch pedal to left about a 1/2 in. from stock to make this work. I've sketched out a simple bracket that will mount both the pedal and clutch master. I'll post pictures when I make it.
I cut down the power brake pedal pad to get some separation from the clutch pedal. I thought I had the right pedal for the stick conversion but couldn't find it.
 08-05-2013, 10:06 PM
#169
Re: Home brew road racer
I had to put down my trusty but rusty 1995 c1500 pickup truck last week. I pulled the 305TBI and 4L60E out as they were still working great. I also pulled ALL of the wiring and computer, cruise control, wipers and steering column. All or part is for sale. If I can't sell it I can always change plans on the drivetrain for the Z and go with a paddle shift 4L60E and a TBI injected 305 or 350.
Another part I kept was the aluminum drive shaft. This had a fiberglass cover over most of the tube and water and salt seeped in between and corroded the tube to where there are some small holes in it. I am going to see if the local weld shop will cut out the old tube and weld in a new one to the length of my shortened stock steel shaft.
I had hoped to use the under dash a/c unit from the truck but the unit is just way to large. This would have been a great piece as it was totally contained under the dash with no evap case out in the engine compartment. Looks like I will have to fork out some money for a vintage air kit. Maybe I'll look at a FWD malibu or cavalier. Anybody at TGO know what will work for this?
08-12-2013, 08:40 AM
#170
Supreme Member
iTrader: (2)

Join Date: Aug 2002
Location: Western NY State
Posts: 1,018
Likes: 0
Received 1 Like
on
1 Post
Car: 87 bird
Engine: enough to break stuff
Transmission: manual th400
Axle/Gears: 4.10
Re: Home brew road racer
i know late 90's early 2000 h and w bodies have the evap unit inside the car, but dont know how big it is relative to a f-body. i would imagine the w is small as they were trying to fit everything in a pretty tight spot.
09-22-2013, 10:00 PM
#171
Re: Home brew road racer
Its been a while since I have posted but between work and family I just haven't had the time. Good news though the mandatory OT is over so I'll get a little bit of my time back.
On the A/C issue I just finished reading The "Snowbird" article in the heat/cool forums and really like the way the Vintage Air unit fit. Thats probably the way I'll go..but I have all of the C1500 stuff and the original Z parts also. Maybe a hybrid between the two will work.
I haven't worked on the car per say but I did take the C1500 driveshaft ends down to the machine shop. I told them what I wanted and they said no problem. I should have a new 4" diameter aluminum drive shaft using spicer 1330 u-joints in a couple weeks. The 4" diameter is way overkill and actually will be a closer fit in the tunnel and driveshaft loops than I would like but it will clear through full suspension travel so it shouldn't be a problem.
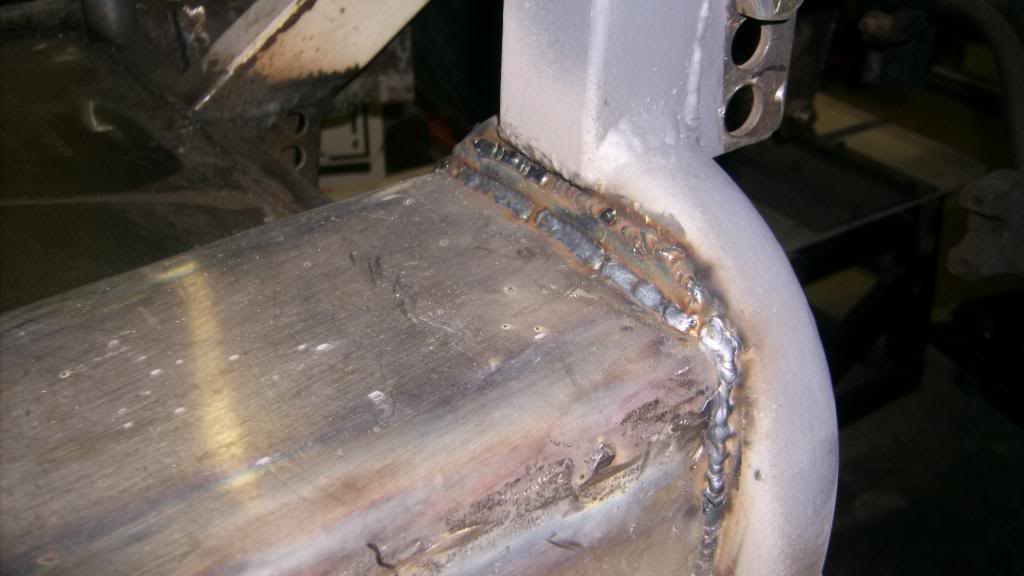
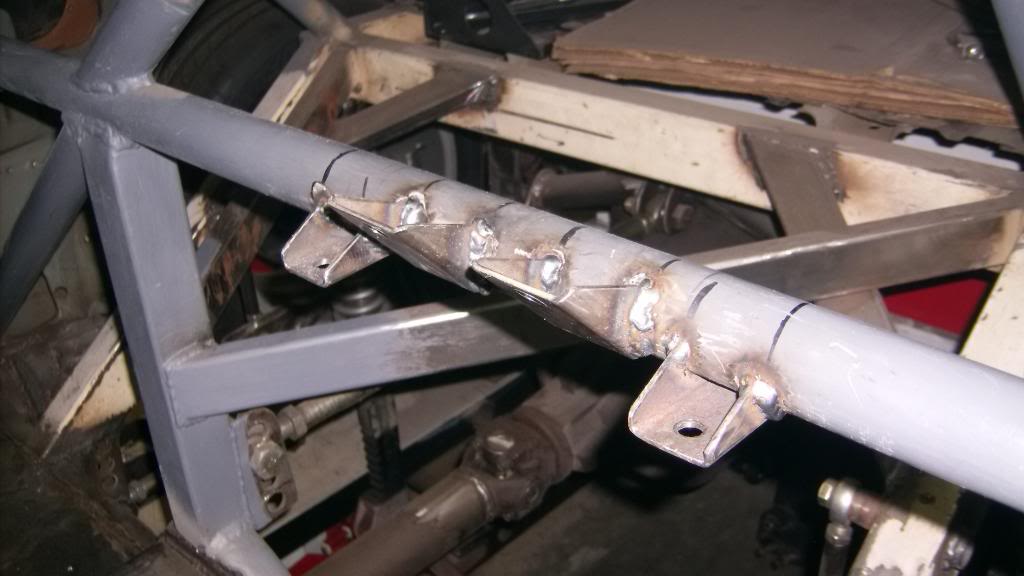
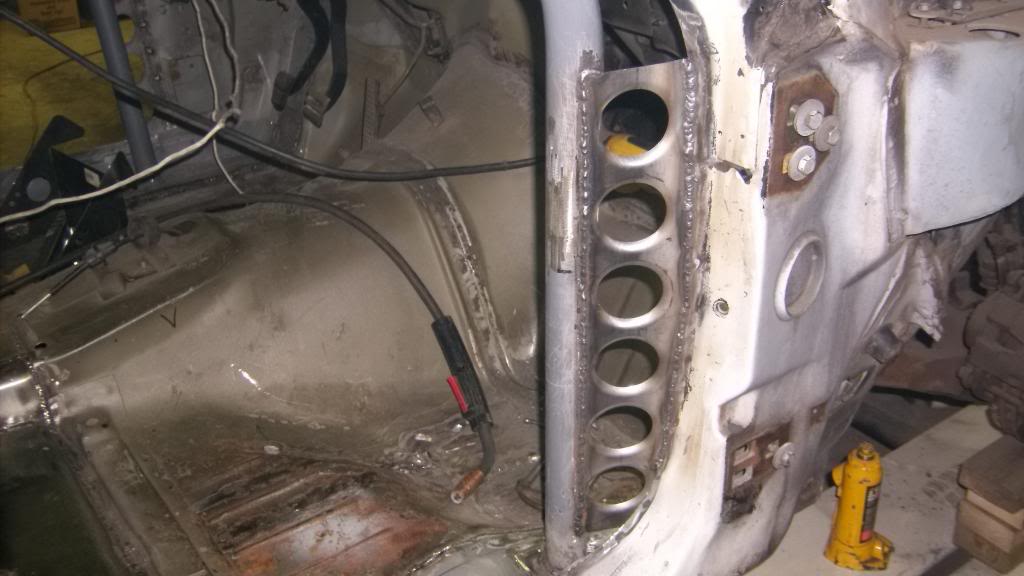
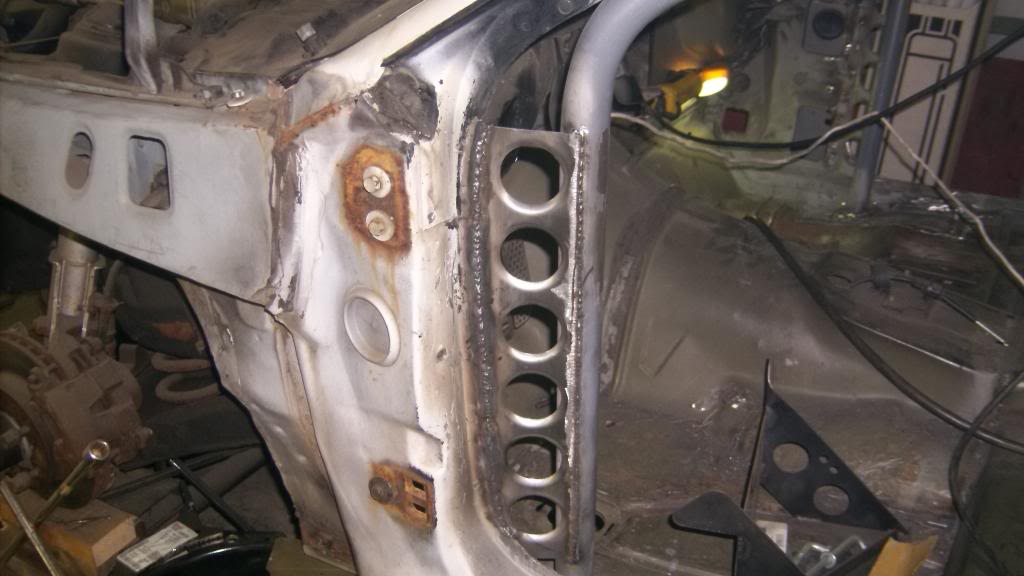
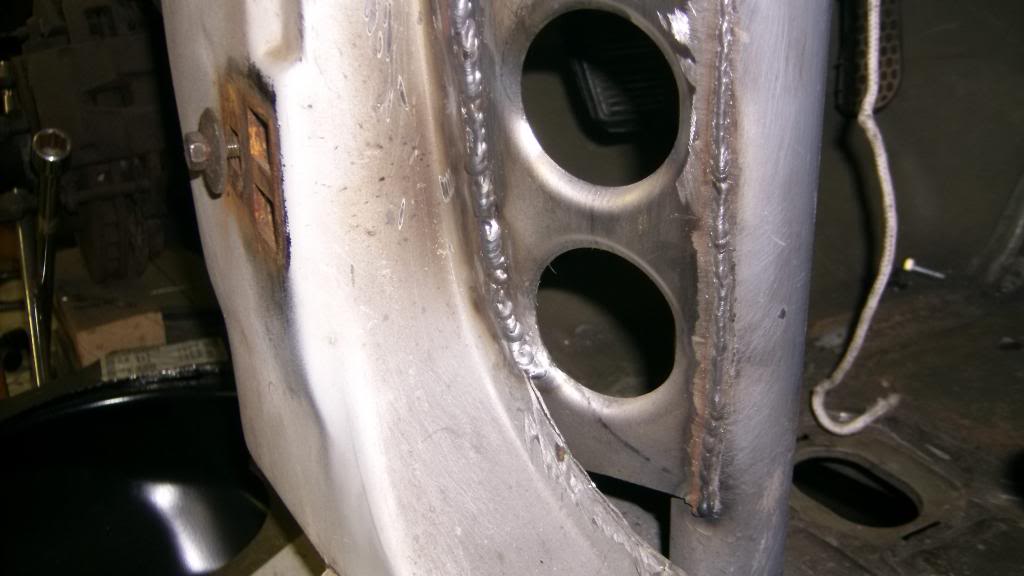
While I was there I also ordered up a 5'x10' sheet of 18ga sheet steel to make the rear fire wall and trunk floor. I am having them cut a little more than half of it into specific width strips all 5' long. Two wide ones, 22" and 27" will make the firewall and rear trunk floor. The rest will be in strips from 1" to 4". These will be used to tie the roll cage to the body. The wider strips will span the gaps between the lower A-pillar and front down tube, between the front of the halo bar and the upper windshield channel, and between the front edge of the C-pillar at the door window and the main hoop. These panels will be lightened and strengthened by punching several 1 3/4 holes in each with a
dimple die. The pic below shows where the body and cage will be joined. with the cage tied in like this and the rockers seam welded to the SFC's it should be one stiff structure.
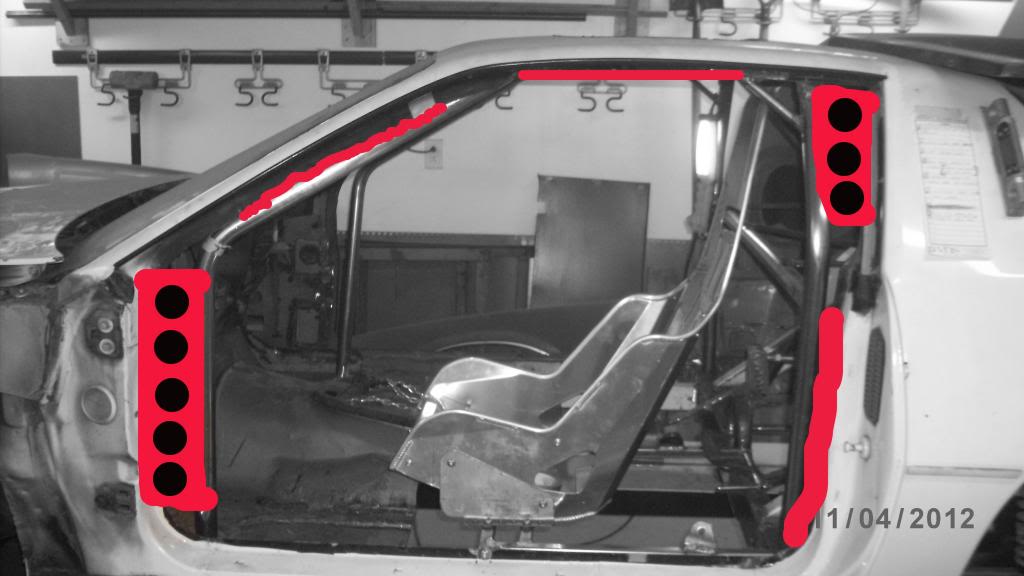
I am thinking that those holes at the c-pillar would make a good place to run air ducts to the rear brakes.
On the A/C issue I just finished reading The "Snowbird" article in the heat/cool forums and really like the way the Vintage Air unit fit. Thats probably the way I'll go..but I have all of the C1500 stuff and the original Z parts also. Maybe a hybrid between the two will work.
I haven't worked on the car per say but I did take the C1500 driveshaft ends down to the machine shop. I told them what I wanted and they said no problem. I should have a new 4" diameter aluminum drive shaft using spicer 1330 u-joints in a couple weeks. The 4" diameter is way overkill and actually will be a closer fit in the tunnel and driveshaft loops than I would like but it will clear through full suspension travel so it shouldn't be a problem.
While I was there I also ordered up a 5'x10' sheet of 18ga sheet steel to make the rear fire wall and trunk floor. I am having them cut a little more than half of it into specific width strips all 5' long. Two wide ones, 22" and 27" will make the firewall and rear trunk floor. The rest will be in strips from 1" to 4". These will be used to tie the roll cage to the body. The wider strips will span the gaps between the lower A-pillar and front down tube, between the front of the halo bar and the upper windshield channel, and between the front edge of the C-pillar at the door window and the main hoop. These panels will be lightened and strengthened by punching several 1 3/4 holes in each with a
dimple die. The pic below shows where the body and cage will be joined. with the cage tied in like this and the rockers seam welded to the SFC's it should be one stiff structure.

I am thinking that those holes at the c-pillar would make a good place to run air ducts to the rear brakes.
09-24-2013, 12:36 AM
#172
Member

Join Date: May 2008
Location: Planet Oahu Hawaii
Posts: 300
Likes: 0
Received 3 Likes
on
3 Posts
Car: 92 RS
Engine: 94 LT1 383
Transmission: T56-6 Speed
Axle/Gears: posi, 3.26:1,
Re: Home brew road racer
How much do you think its going to weigh, when your done? what is your goal?
09-25-2013, 09:45 PM
#173
Re: Home brew road racer
I am more concerned with weight distribution. This car had a true 60/40 split with 1900lb on the front end and 1308 on the rear without a driver. I am hoping to get down to at least a 54/46 split which is only a shift of about 110 lb front to rear. The battery itself weighs about 35 lbs so just moving that gets me 1/3 the way there. The front end will definitely see a diet and I have a few mods that hopefully will shift some weight to the rear as well.
10-23-2013, 09:44 PM
#174
Re: Home brew road racer
I just got a call from the weld shop that my aluminum driveshaft is finished and the sheet metal for the rear floor and wheel wells have been cut to size. I'll pick them up on Saturday and post a pic of the drive shaft.
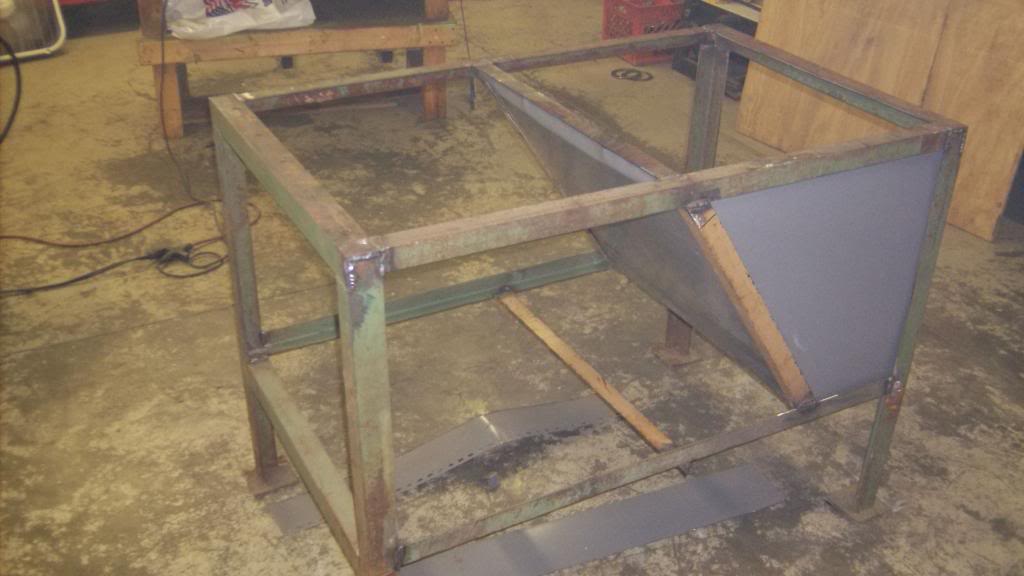
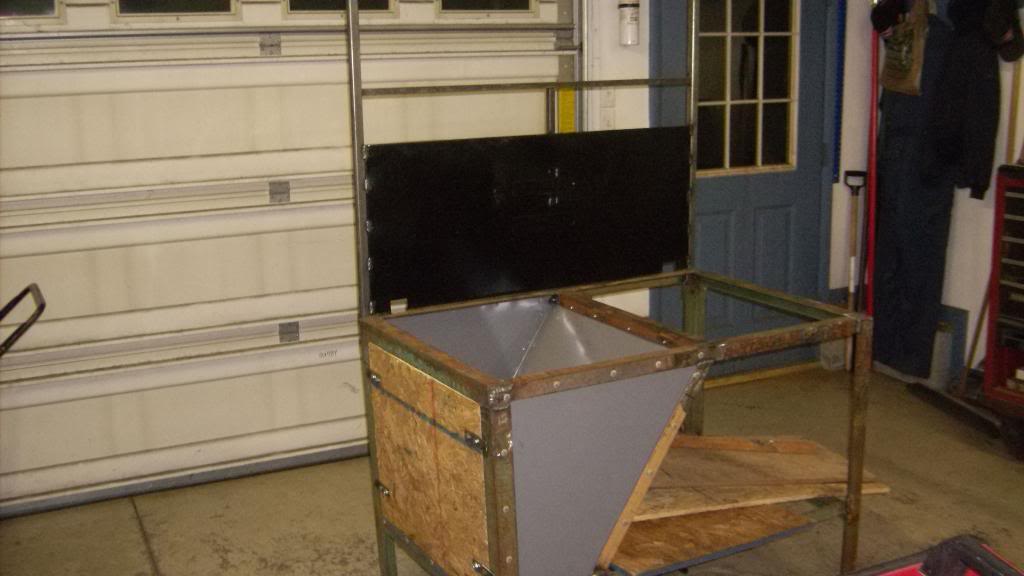
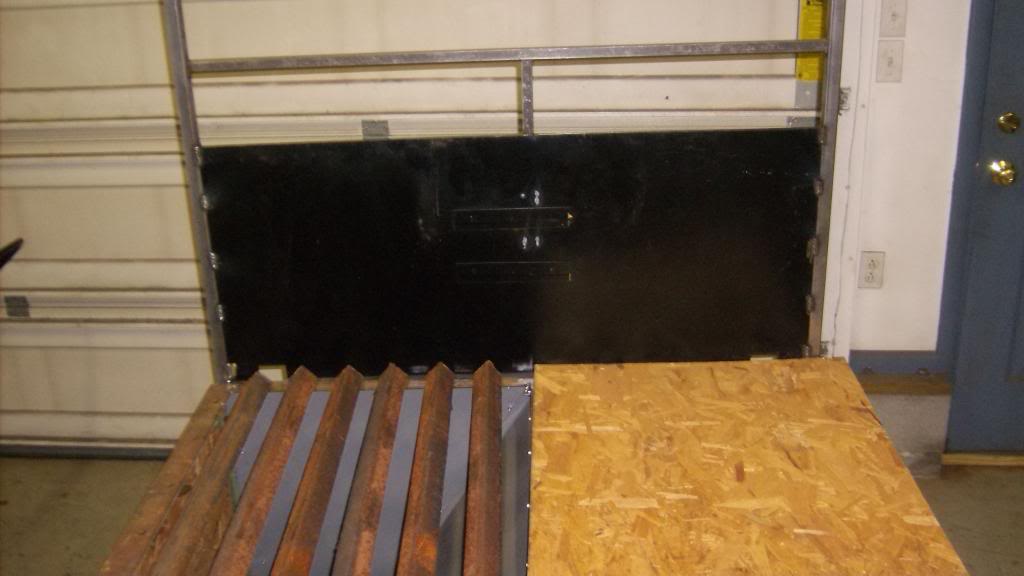
While I have not had any real time to work on the car yet I have managed to use the few odd hours of free time in a productive manner. I have built a welding table that will be a great assit in finishing the rest of the car. It is designed roughly around the weldind table shown in the back of HP Books "WELDERS Handbook". I am sure many of us on this forum have a copy of this book.
The table is 48 x 32 and about 36 high. It has been built totally with materials on hand and that basically dictated the size. One half of the table will give me a place to lay out and or jig up pieces on a 24x32 1/2 thick steel plate which will be needed for the front suspension mods coming this winter. The other half will give me a place to cut, grind and shape steel without having all the slag and grinding dust fly all over the garage.
It is not quite finished yet but here are a few pics.


 10-24-2013, 07:51 AM
#175
Supreme Member
iTrader: (2)
Join Date: Aug 2002
Location: Western NY State
Posts: 1,018
Likes: 0
Received 1 Like
on
1 Post
Car: 87 bird
Engine: enough to break stuff
Transmission: manual th400
Axle/Gears: 4.10
Re: Home brew road racer
pretty cool table. i dont think i would use any wood on it though, seems like a fire hazard. and i built a couple it seems handy to me to have locking wheels on it, which are relatively cheap at harbor freight.
10-24-2013, 08:40 AM
#176
Member
Join Date: May 2001
Location: state of confusion
Posts: 438
Likes: 0
Received 1 Like
on
1 Post
Car: '08 Mustang GT
Engine: 4.6L
Transmission: � � 0 . . . |-|-|
Axle/Gears: 8.8", 3.55
Re: Home brew road racer
Unless the design has changed, I think there will be about 110# of 1/2" steel plate sitting on top of the wood. At least while serious hot work or any heavy hammering is in progress (though I wouldn't want to have to be moving it off/on the table too often - too much of that would prompt me to put up a block and tackle arrangement of some sort).
Norm
Norm
Last edited by Norm Peterson; 10-24-2013 at 08:43 AM.
10-24-2013, 10:16 AM
#177
Supreme Member
iTrader: (2)
Join Date: Aug 2002
Location: Western NY State
Posts: 1,018
Likes: 0
Received 1 Like
on
1 Post
Car: 87 bird
Engine: enough to break stuff
Transmission: manual th400
Axle/Gears: 4.10
Re: Home brew road racer
that would seem fairly unnecessary. you could just put a cheap sheet of whatever on top if you framed it with some angle or whatever. i certainly wouldnt put anything on it that would have to be taken off all the time, especially if it weighed 110#
10-27-2013, 10:34 PM
#178
Supreme Member
iTrader: (1)
Join Date: Oct 2008
Location: Charleston SC
Posts: 1,107
Likes: 0
Received 0 Likes
on
0 Posts
Car: 1987 Trans Am GTA
Engine: 350 TPI
Transmission: T56
Axle/Gears: Posi 3:42
Re: Home brew road racer
This is so awesome, love how you will tie the cage in like the pic ...just a really nice look with a great function advantage.
Def taking notes my friend.
Def taking notes my friend.
10-28-2013, 09:20 PM
#179
Re: Home brew road racer
As for the wheels I am looking for two, 4 to 5 inch diameter fixed wheels to put on the end with the plate. They will allow me to lift the other end and move it around the garage like a wheel barrow.
I have mounted a large, old vise through the grille work on the cutting side of the table. It faces the side where the wooden door is at. I welded three 1/2" nuts to a piece of 1/4 plate and bolted it down through the grille using some long grade 8 bolts. Now I can loosen the three bolts and slide the vise to the back of the table so it is out of the way or slide it forward to the front of the table or anywhere in between. I also mounted a 4' fluorescent light above the table and added a 4 outlet electrical box to the front framework. It still needs wired up and I will be unable to work on it for the next week or so. Maybe the weld shop will have the steel plate ready by then.
On another note the driveshaft came out great!!!! I don't think the bare shaft without any joints weighs more than 3 or 4 pounds. You can pick it up with one finger and very little effort. I'll have pictures later this week.
10-28-2013, 09:37 PM
#180
Re: Home brew road racer
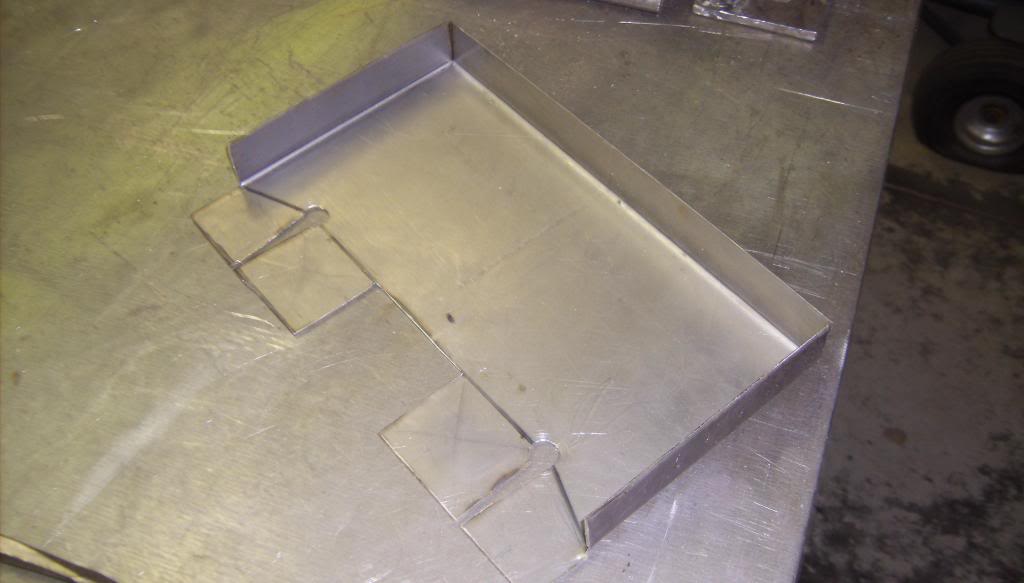
I just got the sheet metal from the weld shop this past weekend to do that. I still need to buy a couple dimple dies (expensive). I now have all the sheet metal needed to replace the trunk floor and wheel tubs I cut out. I am also making a rear firewall that will mount to the back of the main hoop and the trunk floor over the rear axle will extend all the way to there. That should seal off the interior finally.


 11-22-2013, 08:49 PM
#182
Re: Home brew road racer
I welded the steel top to the bench. I had asked for a 24x32 piece of steel and when I got it home and put it on the table realized they had cut it 24x36. I'll leave it at that unless it gets in the way. I have also been looking for an inexpensive sheet metal brake to make up to 90 degree bends in 18ga or lighter sheet steel. Most of what I found was for 20 or 22 gauge and lengths of 18 to 24 long. For anything bigger was over $300.00 and thats not in the budget. I decided to try and make one.
It is still a work in progress but the first test bend came out pretty good. I have never used a metal brake or studied their design. I had to work from pics in catalogs and on the web. The hinged plate is 29x6x 5/16. the hinges are made from 1 5/8 roll bar tubing. I need to make a good way to hold the sheet steel down when bending and make the whole thing removable from the weld table.
It is still a work in progress but the first test bend came out pretty good. I have never used a metal brake or studied their design. I had to work from pics in catalogs and on the web. The hinged plate is 29x6x 5/16. the hinges are made from 1 5/8 roll bar tubing. I need to make a good way to hold the sheet steel down when bending and make the whole thing removable from the weld table.


 11-25-2013, 08:59 PM
#183
Re: Home brew road racer
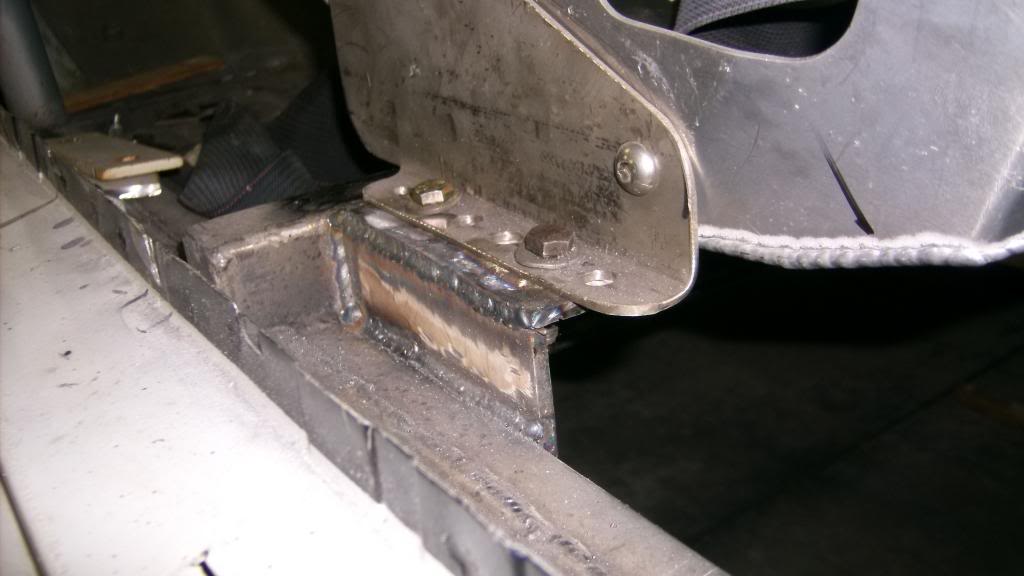
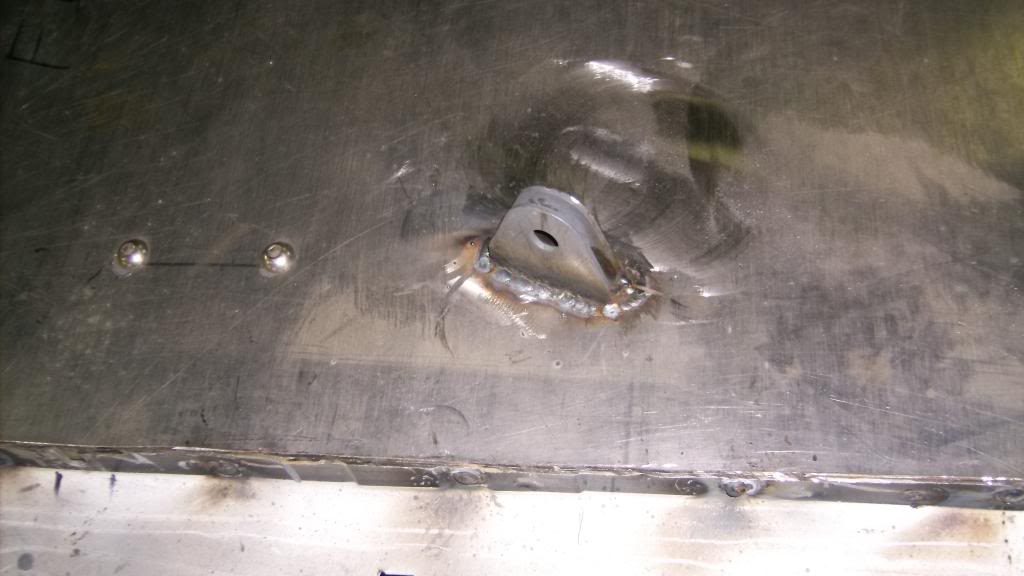
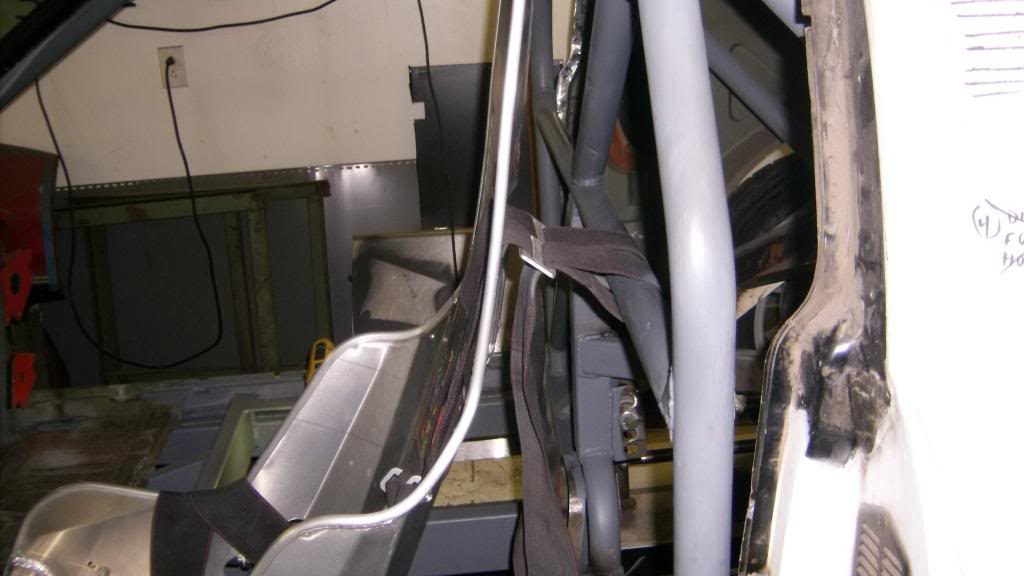
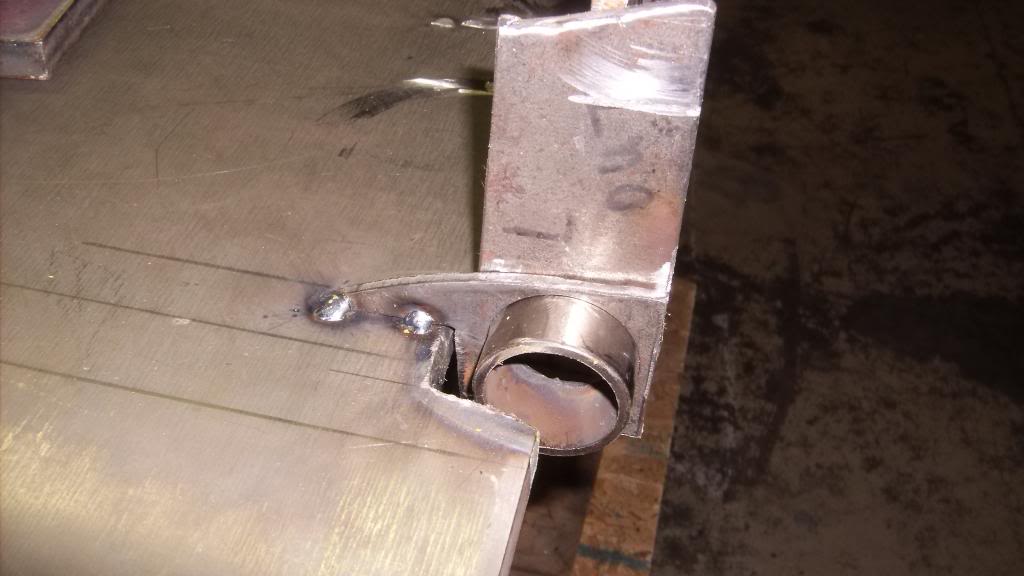
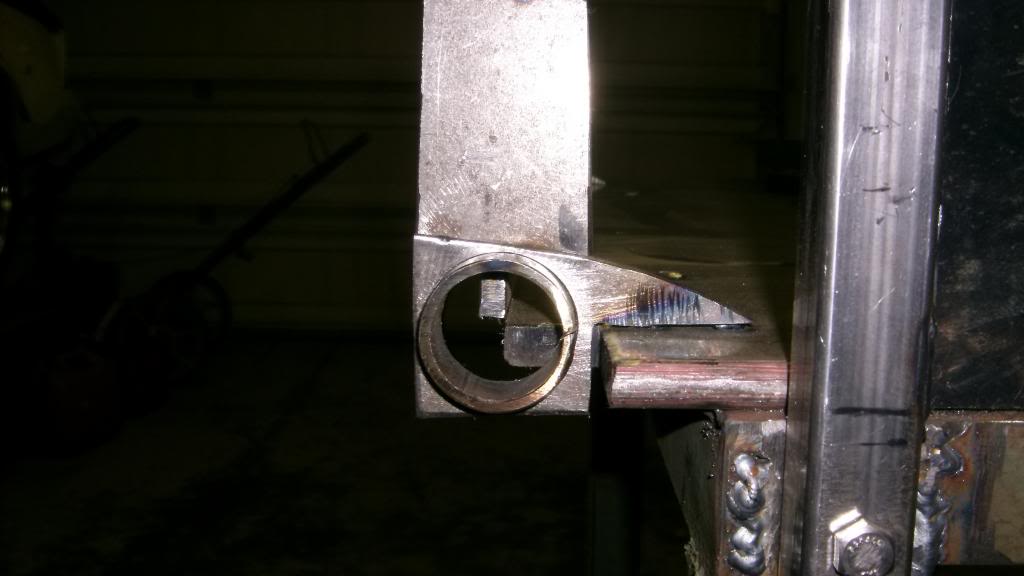
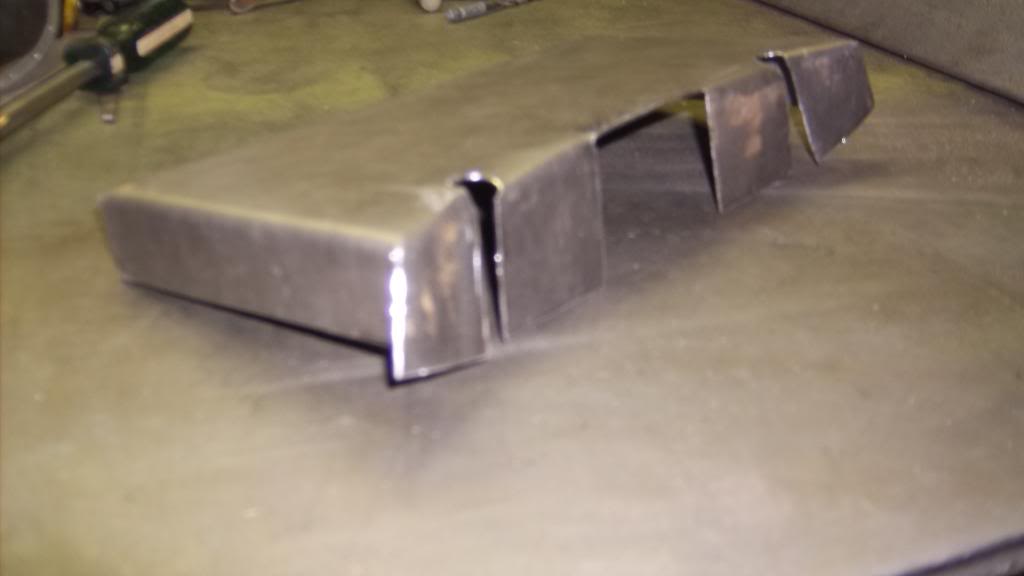
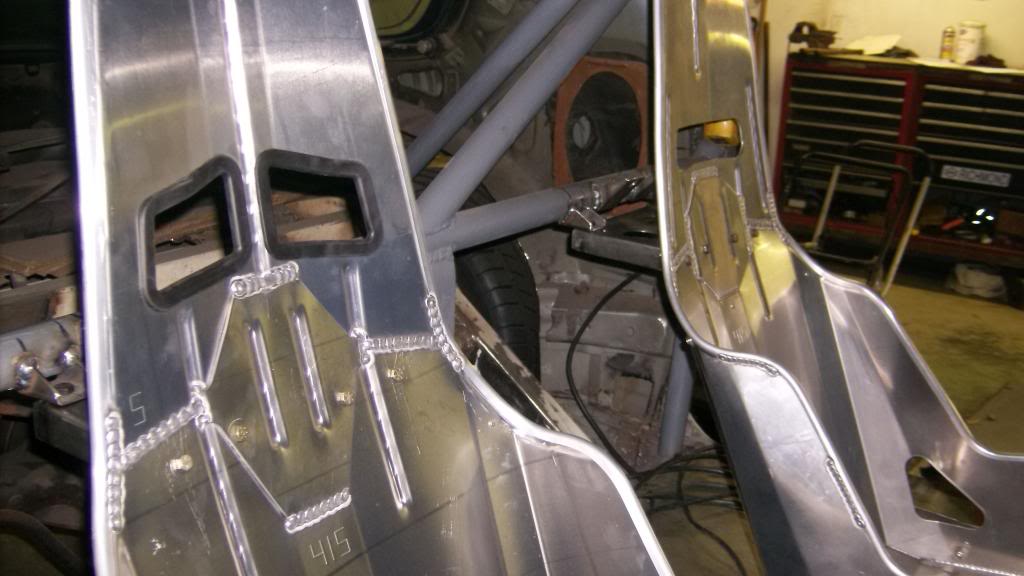
After almost 4 months I actually got to put welder and grinder to the car and make something. I finally made the seat back brace and shoulder strap mounts. The seat brackets were made from 1 1/2 square tubing, 4 inches long that I notched with a 1 5/8 hole saw, cut in half and trimmed. Similar method with the shoulder strap brackets but 2x2 tubing and 6" long.
The pan is 18ga, boxed and welded corners. It took a little effort to get it to conform to the seat back but came out pretty good. It is bolted to the seat back with 4, 1/4-20 screws. I will be adding a few 2" dimpled holes to lighten and stiffen the mount a little.
Not a lot of room between the seat back and cage so belts are about as short as they can be. I tried to keep the angle close to what Simpson recommends for proper installation.
Here is the full install with seat and belts. One goal was to be able to remove and install the seats quickly and have uncluttered interior access with them out. Six, 3/8 bolts hold in each seat and all fasteners are readily accessible. All the nuts are welded to the corresponding panels so just a ratchet is needed for removal. Once the seat is out the only things left behind are the two lap belt anchors on the floor.

The pan is 18ga, boxed and welded corners. It took a little effort to get it to conform to the seat back but came out pretty good. It is bolted to the seat back with 4, 1/4-20 screws. I will be adding a few 2" dimpled holes to lighten and stiffen the mount a little.

Not a lot of room between the seat back and cage so belts are about as short as they can be. I tried to keep the angle close to what Simpson recommends for proper installation.

Here is the full install with seat and belts. One goal was to be able to remove and install the seats quickly and have uncluttered interior access with them out. Six, 3/8 bolts hold in each seat and all fasteners are readily accessible. All the nuts are welded to the corresponding panels so just a ratchet is needed for removal. Once the seat is out the only things left behind are the two lap belt anchors on the floor.
 12-21-2013, 08:16 PM
#184
Re: Home brew road racer
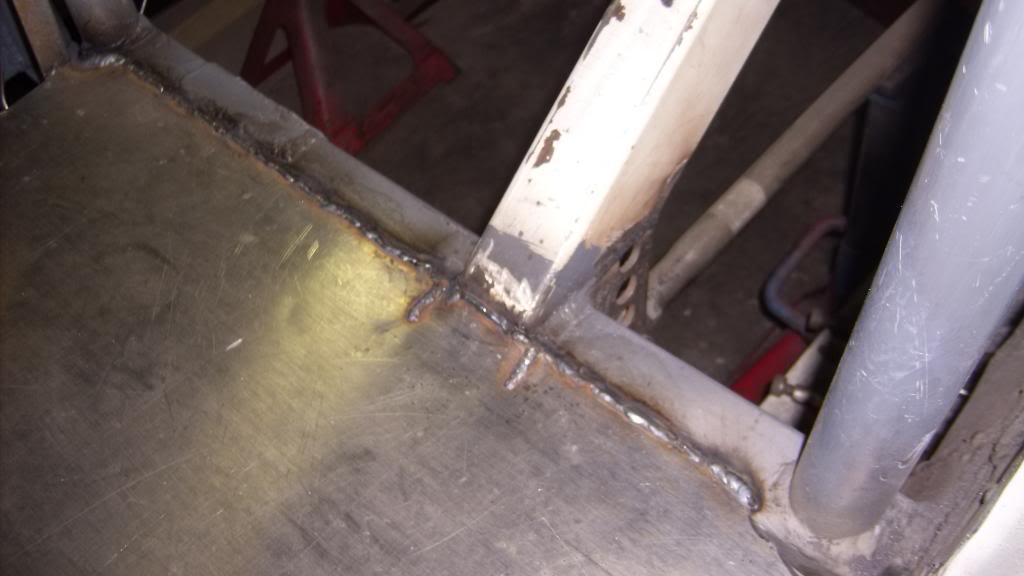
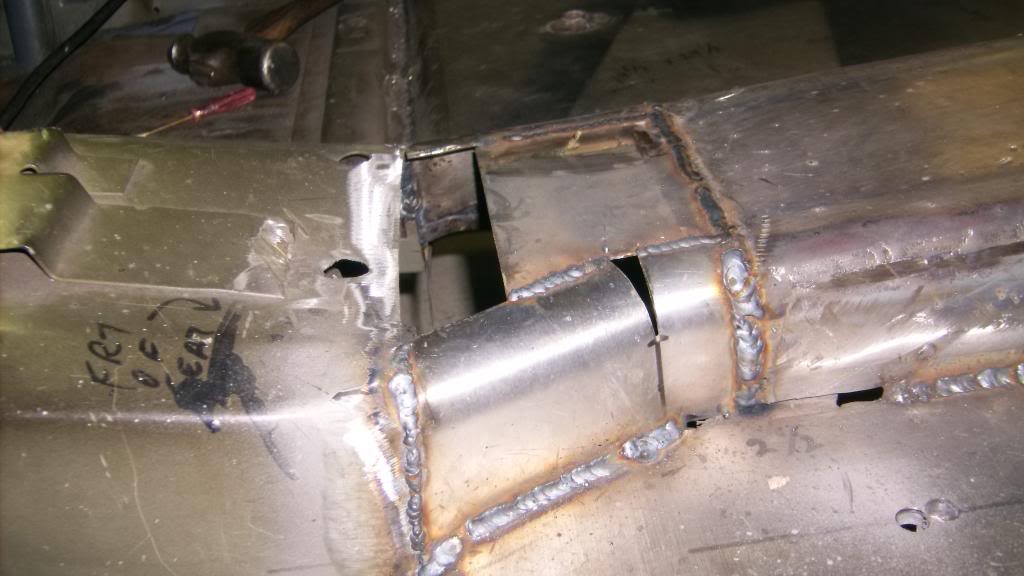
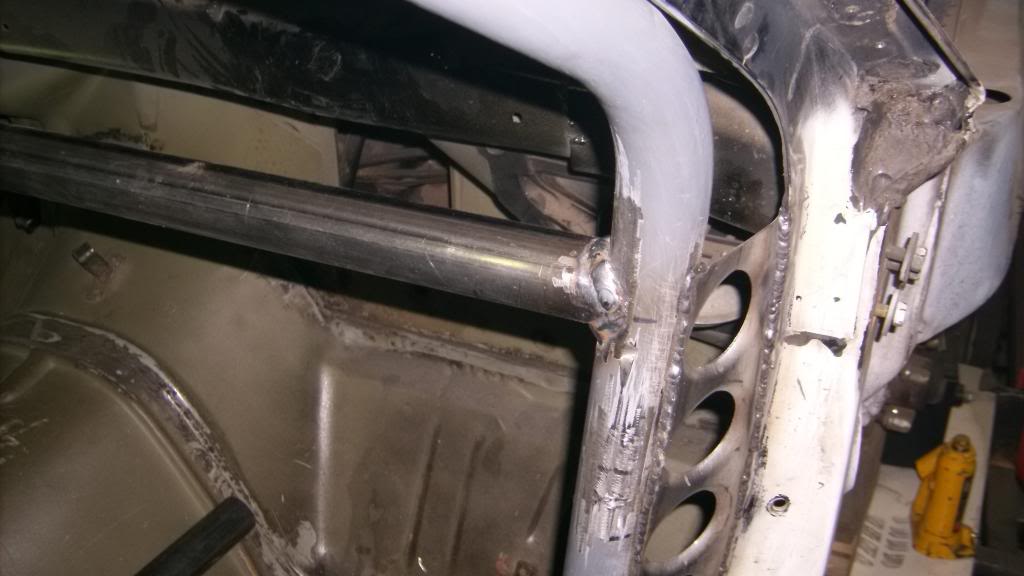
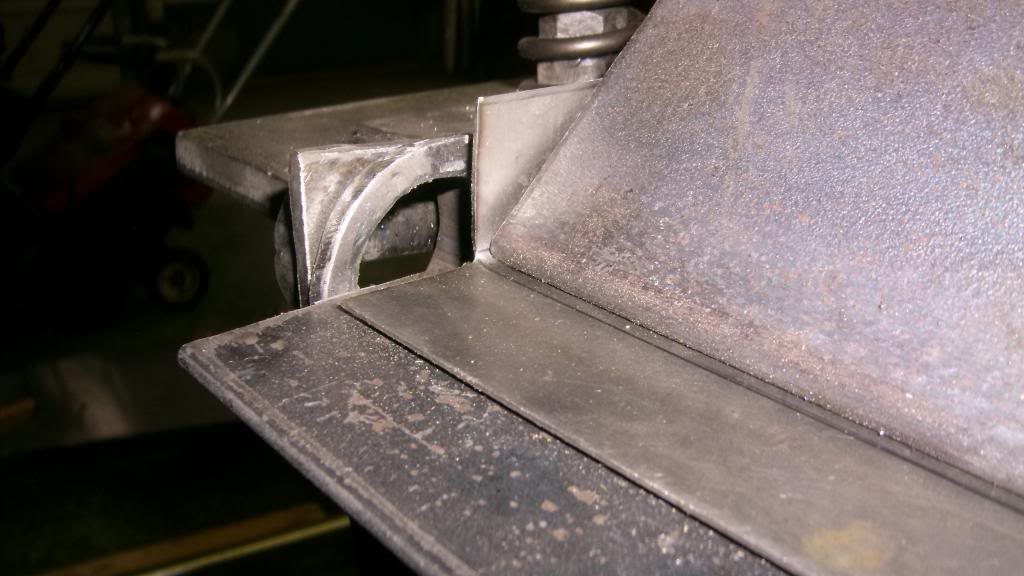
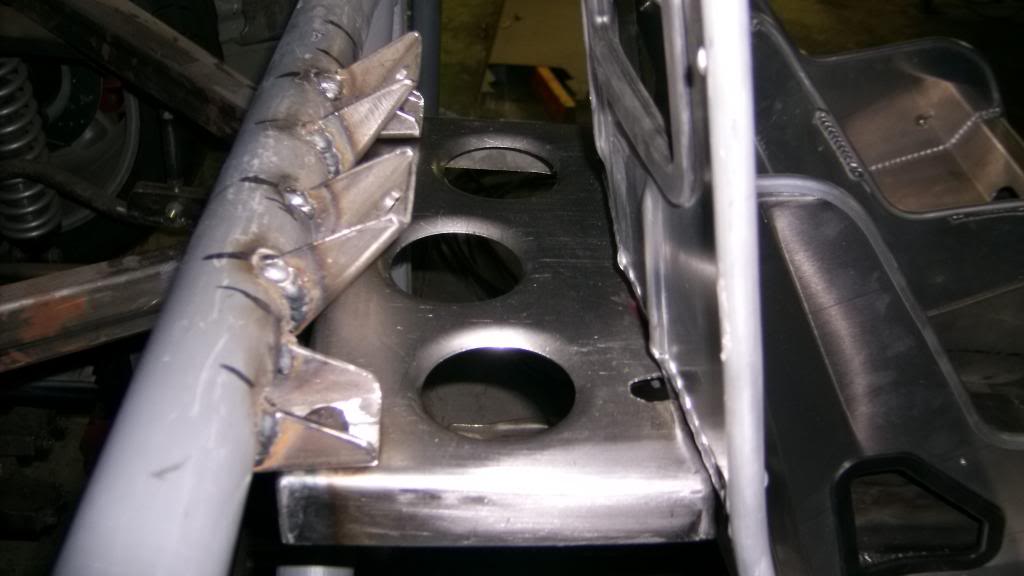
I was able to get some real work done on the car last weekend. I purchased a 2" and 1 1/2" dimple dies from Summit in the allstar brand, about $80.00 each. Tied the body into the cage like I previewed in post #171. All of the holes were made with the 2" die and the centers are spaced 3" apart. The tool is advertised to work on up to the 18ga mild steel that I am using but after the third hole the punch die would not cut completely though the sheet. I ended up cutting the rest of the holes out with a 2" hole saw and just used the dimple die to flare the holes.

Hopefully there won't be anymore of this cracking in the upper rear corner.
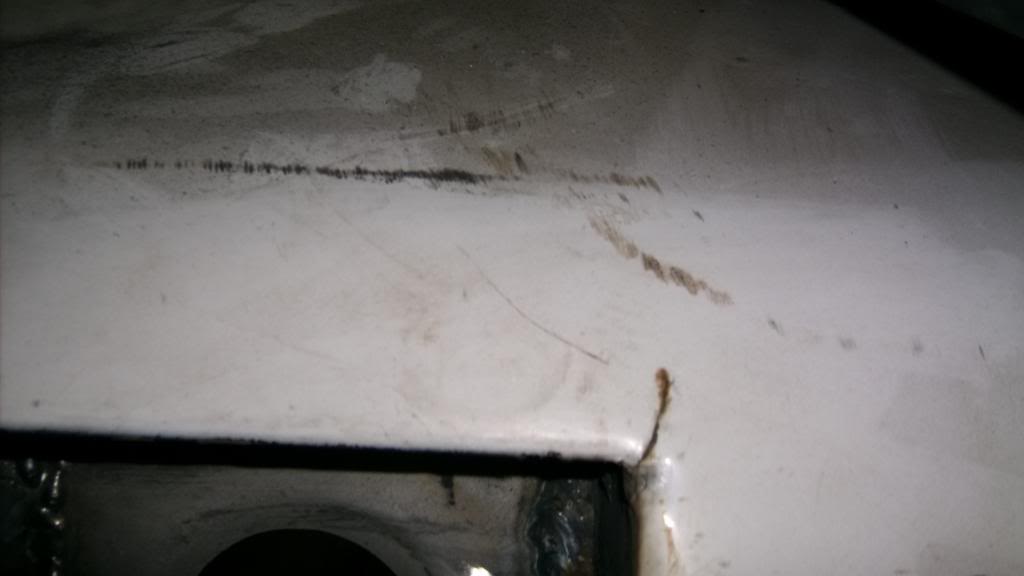


Hopefully there won't be anymore of this cracking in the upper rear corner.
 12-21-2013, 08:37 PM
#185
Re: Home brew road racer
I did the same to the lower front A pillars.
Welding these to the body was a lot harder than I thought it would be. The factory pinch weld is 3 layers of sheet metal, spot welded together. At least one of them is galvanized and there are random sections where the layers don't fit tight against one another. The galvanized coating made the weld spit and spatter and the gaps caused unexpected burn throughs. I ended up welding the entire seam, going back and welding the wholes closed, grinding out most of the weld and then rewelding the entire seam. This had to be done on all 4 pieces. The end result is good but way more time than I thought it would take.
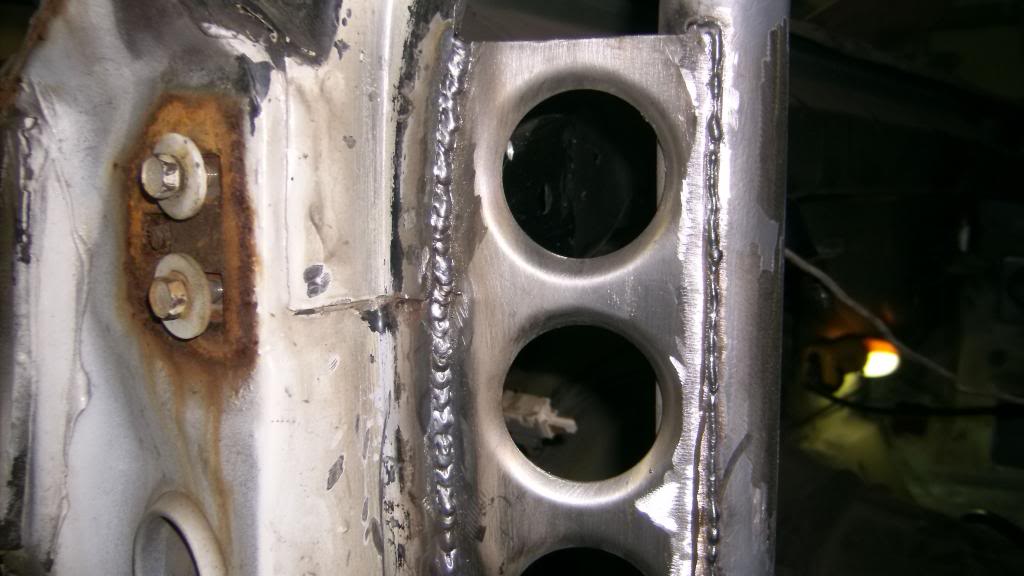
I also plug welded the back side of the plates to the A pillar as well.


Welding these to the body was a lot harder than I thought it would be. The factory pinch weld is 3 layers of sheet metal, spot welded together. At least one of them is galvanized and there are random sections where the layers don't fit tight against one another. The galvanized coating made the weld spit and spatter and the gaps caused unexpected burn throughs. I ended up welding the entire seam, going back and welding the wholes closed, grinding out most of the weld and then rewelding the entire seam. This had to be done on all 4 pieces. The end result is good but way more time than I thought it would take.


I also plug welded the back side of the plates to the A pillar as well.

 12-21-2013, 08:51 PM
#186
Re: Home brew road racer
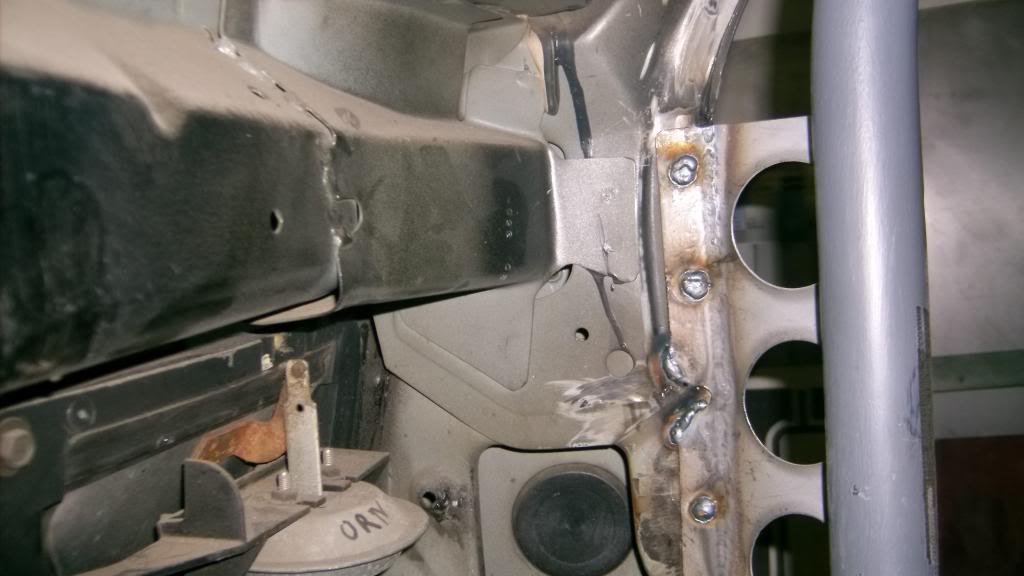
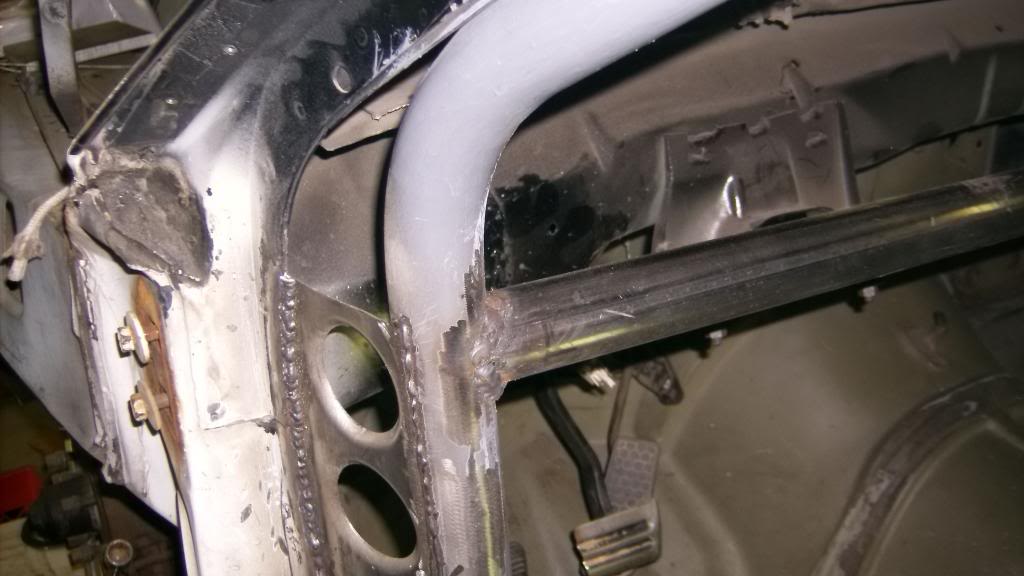
I had a couples hours left and managed to finally get the "knee bar" installed. You really don't want this close to your knee so I mounted it above the steering column.


 12-21-2013, 09:29 PM
#187
Senior Member
Join Date: Feb 2005
Location: Albany NY
Posts: 514
Likes: 0
Received 5 Likes
on
4 Posts
Car: 84 Trans AM (sold), 87 IROC, 09 C6
Engine: Lt1 in IROC
Transmission: 5 speeds
Axle/Gears: Moser 12 bolt tru tracker 3.42
Re: Home brew road racer
should be a really stiff body when your done. When are you painting it?
12-21-2013, 09:40 PM
#188
Re: Home brew road racer
I had a bit of a set back when I went to test fit my new driveshaft. The u-joint center to center length was supposed to be 40 1/4" but when I went to put it in it was too long and bottomed out inside the trans. Turns out they made it 41 inches so it is back at the machine shop. Before I took it back though I weighed it on one of the electronic wheel scales. With two 1330 style U-joints and a cast steel TCI trans yoke the 4" diameter aluminum driveshaft weighed 14lbs. That is 4lbs lighter than my shortened, stock 2 1/2" diameter steel shaft with smaller 1310 u-joints.
I have also pretty much decided to use the 4L60E trans from my old 1995 pickup instead of putting in a TKO 600. The decision is based primarily on cost. There is about a 50lb weight savings with the TKO and the close ratio gear box would probably perform better on open track days. The 4L60E also consumes about 10% more of the engines power than the TKO.
BUT it will cost roughly $3000.00 for the trans, shifter. clutch, and hyd. t/o bearing if all purchased new. I have a good working 4L60E and for less than $1000.00 I can get the TCI stand alone control box, a 2500 stall converter and a ratchet shifter. I can modify the ratchet shifter to operate two micro switches for manual up shifts and down shifts.
If anybody has a better suggestion on this let me know. I have seen 700R4 and the 4L60 trans work well in autocross but don't have any info on how they work at the track. I REALLY do not want to put that behemoth transmission in this car but the money I would save can be used for better brakes and maybe a roller cam for the motor.
12-21-2013, 09:57 PM
#189
Re: Home brew road racer
There are a lot more mods to be done yet so it will be awhile before it gets painted. I have a piece of the roof from the 95 truck to use to fill in the hole left from the aftermarket sunroof. That will be fun to weld in!!!!! I plan to have the whole car media blasted when most of the major mods are done, then primer the whole car and probably paint the interior and the underbody.
01-01-2014, 12:20 PM
#190
Member

Join Date: Sep 2012
Location: North Carolina
Posts: 228
Likes: 0
Received 0 Likes
on
0 Posts
Car: 91 Camaro RS
Engine: 305 TBI
Transmission: T-56 w/hurst short throw
Axle/Gears: unknown
Re: Home brew road racer
I have also pretty much decided to use the 4L60E trans from my old 1995 pickup instead of putting in a TKO 600. The decision is based primarily on cost. There is about a 50lb weight savings with the TKO and the close ratio gear box would probably perform better on open track days. The 4L60E also consumes about 10% more of the engines power than the TKO.
BUT it will cost roughly $3000.00 for the trans, shifter. clutch, and hyd. t/o bearing if all purchased new. I have a good working 4L60E and for less than $1000.00 I can get the TCI stand alone control box, a 2500 stall converter and a ratchet shifter. I can modify the ratchet shifter to operate two micro switches for manual up shifts and down shifts.
If anybody has a better suggestion on this let me know. I have seen 700R4 and the 4L60 trans work well in autocross but don't have any info on how they work at the track. I REALLY do not want to put that behemoth transmission in this car but the money I would save can be used for better brakes and maybe a roller cam for the motor.
I would also suggest that if you don't drive your car on the street that much, it may be more of an advantage to keep the interior bare. You will have the badass race car look and less unnecessary items. The dynamat is a great idea for a street car but I'm not so sure about yours. My Camaro has its interior mostly stripped out and the road noise is louder, but its primary use is not for the street. However, I want to drive it to racing events.
I guess bolt on suspension upgrades have its benefits over fabrication.
01-03-2014, 09:54 PM
#191
Re: Home brew road racer
Homer, thanks for following the build. I am a little leery of getting a used trans from someone. Some how I never quite get what was promised. i know my 4L60E is in great shape and ready to bolt in. That being said I would still entertain offers for a TKO 600 or T56. I would rather have the TKO because of smaller size and really no need for double overdrive.
As for the interior it will be minimal with one of the few concessions to comfort being the dynomat and carpet. This is more for noise and heat control than aesthetics but I would like my wife to feel comfortable riding in the car on road trips or to an AX event. I did mention the car will at least have a defroster, (still debating the a/c trade off) but that is as much for safety as it is for comfort.
As for the interior it will be minimal with one of the few concessions to comfort being the dynomat and carpet. This is more for noise and heat control than aesthetics but I would like my wife to feel comfortable riding in the car on road trips or to an AX event. I did mention the car will at least have a defroster, (still debating the a/c trade off) but that is as much for safety as it is for comfort.
01-03-2014, 10:57 PM
#192
Re: Home brew road racer
"I guess bolt on suspension upgrades have its benefits over fabrication."
I suppose the statement above would be true if I wanted an upgraded stock suspension but I am looking for something better. My 3 link suspension is infinitely more adjustable/tuneable than the torq arm could ever be. The ZR2 rear axle is stronger than anything the factory put in and at 1/5 the cost, is nearly as strong as a 12 bolt that still uses the torq arm.
I have read through hundreds of post on TGO of other members modifications using Spohn, BMR and other good quality parts and they are still saddled with most of the same limitations that GM designed into the car. They still have very little if any adjustment for anti squat, roll center, instant center or roll steer. These parts make an improvement on the original design but can't overcome the basic design flaws of a fixed torq arm suspension and strut front end. I feel I can build better for less. And besides, if your posting on this forum, half the fun is in the build, especially if you designed it yourself.
Yes you can make these cars handle very well working within the stock suspension perimeters but it usually takes excessive static camber and fairly stiff spring rates to minimize body roll to try and keep the tires flat to the road surface. Vetruck posts in the suspension forum is a good example but his car was a 2.8 v6 which gives him a much better front to rear weight bias. Same with LS1 road racer build on this forum. He set his aluminum block LS1 engine back 3 inches and improved the weight distribution from about 58/42 to 53/47. thats a BIG improvement and probably accounts for much of the cars cornering ability when coupled with his other modifications.
01-04-2014, 05:40 PM
#193
Re: Home brew road racer
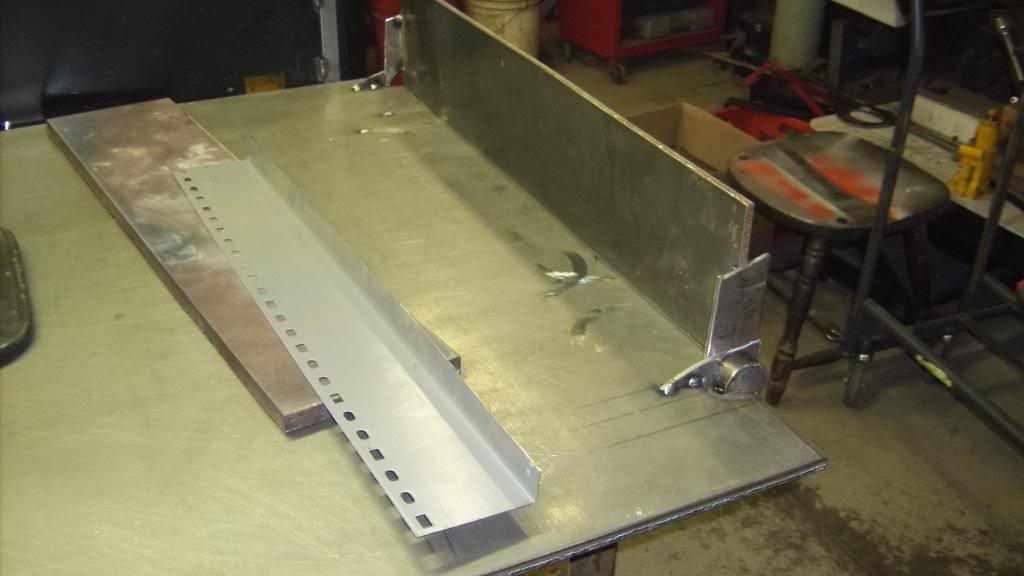
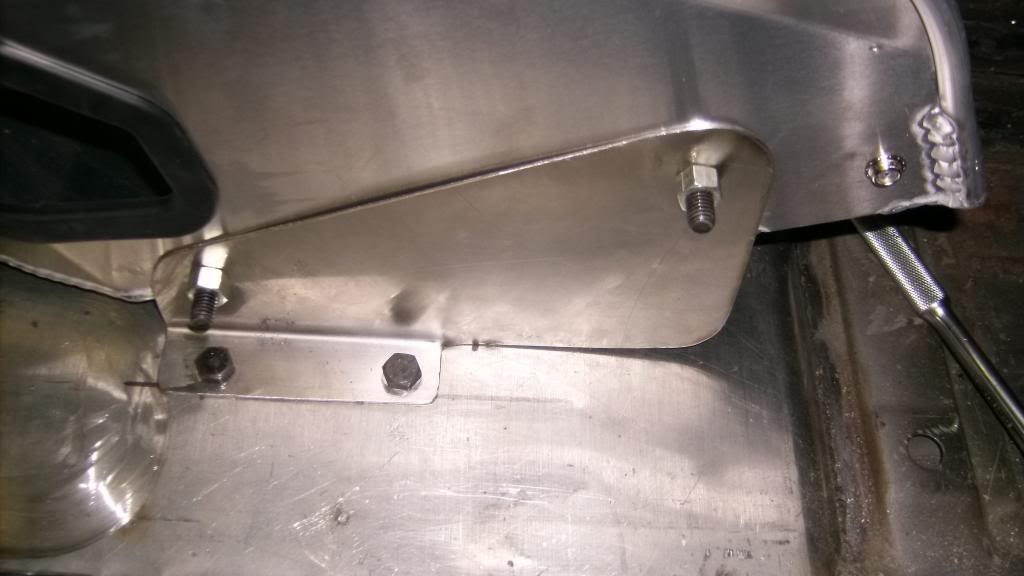
Santa brought me a passenger seat so I was eager to try out my home made sheet metal brake to make the mounts. I have posted pics of the driver side seat mounts and they were bent by and bending the metal in a vice with a hammer or bending the sheet steel over the edge of my welding table. I have to say the brake worked way better than expected and bent 18ga sheet steel an 1/16 stainless with no trouble. Also a last minute design change allowed me change it from a simple brake to a 3 sided box brake.
Making upper seat bracket 18ga sheet steel
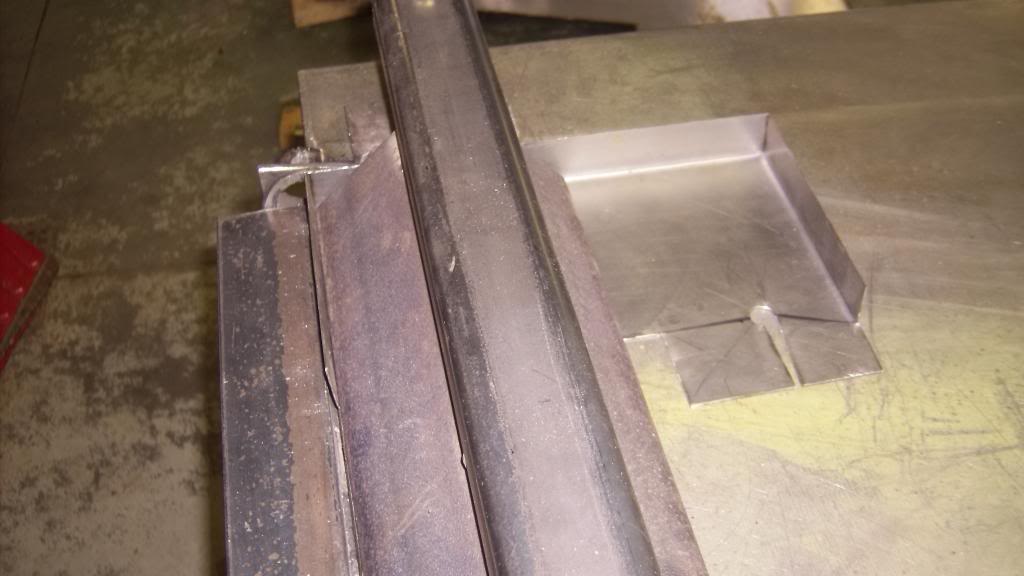
Finished bracket installed in car
Lower seat brackets 1/16 stainless, same material as floor pan.
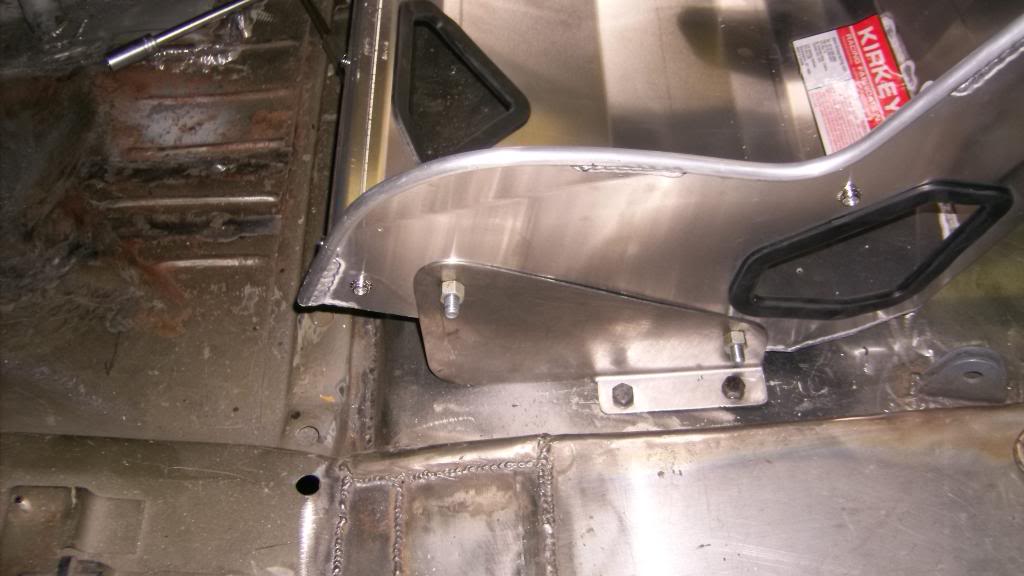
To help with visibility to the right I moved the passenger seat back about 1 1/2 inches. I did this by setting the seat back more upright by about 3 degrees. It still has a comfortable seating angle but I did lose a little head room.
Making upper seat bracket 18ga sheet steel


Finished bracket installed in car

Lower seat brackets 1/16 stainless, same material as floor pan.


To help with visibility to the right I moved the passenger seat back about 1 1/2 inches. I did this by setting the seat back more upright by about 3 degrees. It still has a comfortable seating angle but I did lose a little head room.

 01-04-2014, 05:54 PM
#194
Re: Home brew road racer
I will be taking the rear axle and fuel cell out of the car in preparation of replacing the missing rear firewall, trunk floor and wheel tubs. I'll have to clean up a lot of the metal and do some painting as some areas won't be very accessible once the new panels are in place.
I feel a lot more confident about making the new panels now that I have a working sheet metal brake. I also purchased a Woodward Fab bead roller from Summit before Christmas so I can stiffen up the panels and eliminate any possible "oil can" issues like I have with the front floor pans. With a little luck I'll have most of the tin work done buy end of the month and then I can move onto the front suspension.
I feel a lot more confident about making the new panels now that I have a working sheet metal brake. I also purchased a Woodward Fab bead roller from Summit before Christmas so I can stiffen up the panels and eliminate any possible "oil can" issues like I have with the front floor pans. With a little luck I'll have most of the tin work done buy end of the month and then I can move onto the front suspension.
01-04-2014, 10:51 PM
#195
Supreme Member
iTrader: (1)
Join Date: Oct 2008
Location: Charleston SC
Posts: 1,107
Likes: 0
Received 0 Likes
on
0 Posts
Car: 1987 Trans Am GTA
Engine: 350 TPI
Transmission: T56
Axle/Gears: Posi 3:42
Re: Home brew road racer
Dude, your doijg awesome on this and I think a round of applause is needed, it a lot of work especially with home tool and equipment.
Keep it up, def rooting this on.
Also wanted to know, what are you using to punch the holes in the sheet metal?
Keep it up, def rooting this on.
Also wanted to know, what are you using to punch the holes in the sheet metal?
01-13-2014, 10:02 PM
#197
Re: Home brew road racer
BTK thanks for following along and the encouraging words. The holes were done using a punch and flare die sold through Allstar Performance. Summit Racing caries these. They come in several sizes from 1 1/4 in to 2 5/8 I think. You drill a 1/2 pilot hole and then draw the two piece die together to punch a distortion free whole. Draw it tighter and it rolls the edge into the flare to stiffen the panel. The company claims it will work on metal as thick as 18ga and it did for the first 3 holes and then it would not cust clear through the sheet. I ended up cutting most of the wholes with a 2in whole saw and just using the flare die. I suppose it will work fine on 20ga and thinner.
01-14-2014, 08:49 AM
#198
Supreme Member
iTrader: (1)
Join Date: Oct 2008
Location: Charleston SC
Posts: 1,107
Likes: 0
Received 0 Likes
on
0 Posts
Car: 1987 Trans Am GTA
Engine: 350 TPI
Transmission: T56
Axle/Gears: Posi 3:42
Re: Home brew road racer
BTK thanks for following along and the encouraging words. The holes were done using a punch and flare die sold through Allstar Performance. Summit Racing caries these. They come in several sizes from 1 1/4 in to 2 5/8 I think. You drill a 1/2 pilot hole and then draw the two piece die together to punch a distortion free whole. Draw it tighter and it rolls the edge into the flare to stiffen the panel. The company claims it will work on metal as thick as 18ga and it did for the first 3 holes and then it would not cust clear through the sheet. I ended up cutting most of the wholes with a 2in whole saw and just using the flare die. I suppose it will work fine on 20ga and thinner.
I can see this being just a cool tool to use on everything.
Not to jump to Far a head but you are in the interior....? What are your thoughts on doors and dash?
01-21-2014, 09:18 PM
#199
Re: Home brew road racer
Thanks for the info, I love the look So much and think its a great way to get A stylish feature into the fabrication parts....
I can see this being just a cool tool to use on everything.
Not to jump to Far a head but you are in the interior....? What are your thoughts on doors and dash?
I can see this being just a cool tool to use on everything.
Not to jump to Far a head but you are in the interior....? What are your thoughts on doors and dash?
I don't want the interior to look too industrial.
I was just thinking you could make some nice cup holders with the right size dimple die.
02-09-2014, 09:36 AM
#200
Member

Join Date: Oct 2005
Location: Orillia On,
Posts: 400
Likes: 0
Received 1 Like
on
1 Post
Car: 1986 sports coupe, 1984 F41
Engine: 3.8L Turbo SFI, stock 305
Transmission: 700 R4, 700 R4
Axle/Gears: 3.42:1, 3.08:1
Re: Home brew road racer
This is coming along nicely! I especially like the dimpled seat bracket and roll cage tie in's. Very cool. Your sheet metal brake is pretty neat, and very simple. Sure beats spending big bucks on something that doesn't get used all the time. Welding in that patch for the sunroof will be pretty tricky. I welded in patch panels for my truck box sides, and it was really tough keeping it from warping from the heat. Might it be easier/faster to find a wrecked Camaro and replace the entire roof section? Just a suggestion.