
Doing the shaker assembly mod for real
 06-04-2008, 08:07 AM
#101
Banned
iTrader: (12)
Join Date: Jul 1999
Location: Bertram (outside Austin), TX
Posts: 12,212
Likes: 0
Received 10 Likes
on
10 Posts
Car: 87 GTA
Engine: L98
Transmission: 700R4
Axle/Gears: Dana M78 3.27 posi
Re: Doing the shaker assembly mod for real
The only difference would be, how tall the intake manifold your using , is.
 06-04-2008, 04:44 PM
#102
Junior Member
Join Date: Mar 2008
Posts: 75
Likes: 0
Received 0 Likes
on
0 Posts
Car: 85 transam
Engine: 76 chevy 350 carb
Transmission: t-5 3.23
Re: Doing the shaker assembly mod for real
thanks for the help.
another question, do you have to make the shaker hood piece or is there a company that makes it? cause all the cars that had shakers that are in the junkyard in my town have already been parted out
another question, do you have to make the shaker hood piece or is there a company that makes it? cause all the cars that had shakers that are in the junkyard in my town have already been parted out
06-05-2008, 05:04 PM
#103
Junior Member
Join Date: Dec 2007
Location: Budd Lake, NJ
Posts: 85
Likes: 0
Received 0 Likes
on
0 Posts
Car: 92 25th Anniversary RS
Engine: 305ci 5.0L V8
Re: Doing the shaker assembly mod for real
if by shaker piece u mean the air cleaner assembly, those came from the factory. i havent been able to find a place that makes aftermarket ones.
 08-24-2008, 09:34 AM
#106
 09-14-2008, 02:57 AM
#107
Member

iTrader: (1)
Join Date: Feb 2006
Location: Chicago
Posts: 298
Likes: 0
Received 0 Likes
on
0 Posts
Re: Doing the shaker assembly mod for real
taht is ****ing sweet. i thought about making one for my z28 using a hemi shaker but didn't think it would look right so i got a cowl instead. really nice job
03-15-2009, 11:44 AM
#108
Senior Member
Thread Starter

Re: Doing the shaker assembly mod for real
WOW!... Great to see this site is still out there.. Hey wilyk9 you still following this thread?... I haven't looked at it in 2 years. The T/A still sits in my garage with the shaker and all. Did you ever get yours fully completed? If anyone out there still needs any info on this mod, I'll try my best..I hope to get the car started this spring and get the hood bird decal on and 5.0litr badges on the shaker
03-15-2009, 02:58 PM
#109
Member
iTrader: (13)
Join Date: Aug 2002
Location: Sandusky, OH
Posts: 270
Likes: 0
Received 0 Likes
on
0 Posts
Car: 85 Trans Am
Engine: 305 Carb
Transmission: 700R4
Re: Doing the shaker assembly mod for real
WOW!... Great to see this site is still out there.. Hey wilyk9 you still following this thread?... I haven't looked at it in 2 years. The T/A still sits in my garage with the shaker and all. Did you ever get yours fully completed? If anyone out there still needs any info on this mod, I'll try my best..I hope to get the car started this spring and get the hood bird decal on and 5.0litr badges on the shaker
03-15-2009, 07:09 PM
#110
Senior Member
Thread Starter
Re: Doing the shaker assembly mod for real
yeah, look forward to seeing your finished result someday...Sometime ago i got alot of pm's asking me how to do this. But i'm not sure what else i can add to help those out. I know being a machinist by trade helped me address the angle issue with the aircleaner vs. the hoodline slope. I had to machine an alum.adapter angle ring more than once. Also separating the resin from the metal housing on the shaker allowed great adjustment when fitting back together. I considered the whole thing a wash and did not expect it to really work. The route you chose was also a good option for those with sheet metal and welding skill. When i revisted this thread i was hoping to see a few attempts posted and pics too...So, for anyone wanting to know how to do this mod, please read the thread carefully and i'll try to go further in depth with any ?'s
03-15-2009, 08:01 PM
#111
Supreme Member
Join Date: Jan 2002
Posts: 1,122
Likes: 0
Received 2 Likes
on
2 Posts
Car: 1984 Trans Am 15th anniversary
Engine: L69
Transmission: 700r
Axle/Gears: 3:73
Re: Doing the shaker assembly mod for real
What about the unfiltered/open air/water going down the carb? is there a screen for this?
03-15-2009, 08:22 PM
#112
Senior Member
Thread Starter
Re: Doing the shaker assembly mod for real
I've often wondered about being out in a heavy downpour. Besides the shaker having it's own drain, it appears that water would track down the original air cleaner duct and out the exhaust manifold stove pipe before it could get over the air cleaner base dome. Also the K&N can handle water. At the same time I guess there would be a little water injection going on from the mist. I do remember the first season i run this set and occasionally picking debris out from the air cleaner. A grid or screen would do some good in the suction of airborne trash. Have tossed that idea around before too..
03-21-2009, 09:02 AM
#113
Re: Doing the shaker assembly mod for real
I know this is an old thread, but I have to say that the work done to make it sit right and look "stock" was really awesome. A little creativity and skill goes along way. I'm good on the creativity side, but lacking some on the skill side to do a mod like this. Judging by some of the posts made here one could probably make soem money on the side if they were able to mass produce some of the required parts for the conversion. I'd definatley like to see more pictures of the finished product. Very cool work all the way around.
03-25-2009, 12:13 PM
#114
Member

Join Date: Mar 2009
Location: Indiana
Posts: 119
Likes: 0
Received 0 Likes
on
0 Posts
Car: 1991 camaro rs, 2001 buick century
Engine: 305, 3.1
Transmission: T-5
Re: Doing the shaker assembly mod for real
i have always wanted to do a shaker hood on my camaro its a 91 camaro rs with 305 for now soon to be swapped but how much more work do you think it would be to do to a camaro???? and its also tbi too so would it work corectly?
03-25-2009, 12:48 PM
#115
Member
Join Date: May 2007
Location: Corryton, TN
Posts: 165
Likes: 0
Received 0 Likes
on
0 Posts
Car: 83 Pontiac Trans Am Recaro
Engine: Crossfire 350
Transmission: Auto
Axle/Gears: 4.10 posi
Re: Doing the shaker assembly mod for real
I know this is an old thread, but I have to say that the work done to make it sit right and look "stock" was really awesome. A little creativity and skill goes along way. I'm good on the creativity side, but lacking some on the skill side to do a mod like this. Judging by some of the posts made here one could probably make soem money on the side if they were able to mass produce some of the required parts for the conversion. I'd definatley like to see more pictures of the finished product. Very cool work all the way around.

 NO!
02-20-2010, 02:58 PM
NO!
02-20-2010, 02:58 PM
#118
Supreme Member

Join Date: May 2001
Location: Orange, CT, USA
Posts: 1,074
Likes: 0
Received 4 Likes
on
4 Posts
Car: 1983 Pontiac Firebird
Engine: 400HP 350
Transmission: 700R4
Axle/Gears: 3.42
Re: Doing the shaker assembly mod for real
I'm going to be starting this project son, can anyone give me any tips to what to look for when setting this all up?
Rob...
Rob...
02-20-2010, 04:32 PM
#119
Supreme Member
Join Date: Jan 2002
Posts: 1,122
Likes: 0
Received 2 Likes
on
2 Posts
Car: 1984 Trans Am 15th anniversary
Engine: L69
Transmission: 700r
Axle/Gears: 3:73
Re: Doing the shaker assembly mod for real
Very cool mod. A few years back I saw a 75 t/a that actually had the shaker braced to the hood so it would open when the hood opened. He had a different intake on but wanted the effect of the shaker hood. All he had was two aluminum braces holding it to the hood from the underside , from the outside it looked perfect. This would eliminate the possible clearance issue on our cars.
02-20-2010, 07:51 PM
#120
Junior Member
Join Date: Aug 2009
Location: Ambridge, PA
Posts: 87
Likes: 0
Received 2 Likes
on
2 Posts
Car: 92 TA convertible
Engine: 5.0 TPI
Transmission: 5 speed
Axle/Gears: 3.08 posi
Re: Doing the shaker assembly mod for real
I'm doing one on my '92 vert. It took quite a lot of measuring before I started cutting the hood, and I'm still not quite done, but here's a shot of what I have so far. This is (so far) about 40 hours of work (measure, re-measure, re-re-measure, cut, fabricate mount to fit TPI manifold), and I still have much to do. The scoop was not in the best of condition (cheap, though) but I'm getting there. I decided to cut the hole so it looked best, and then fab the mount to fit. Probably was a lot more work that it should have been, but so far, I'm happy with the look. I still need to adjust the height of the scoop and put a lip on the hood opening.
Rob, If I can help you any let me know.
Rob, If I can help you any let me know.
The following users liked this post:
DEBt/a (02-07-2024)
02-20-2010, 08:02 PM
#121
Supreme Member
Join Date: May 2001
Location: Orange, CT, USA
Posts: 1,074
Likes: 0
Received 4 Likes
on
4 Posts
Car: 1983 Pontiac Firebird
Engine: 400HP 350
Transmission: 700R4
Axle/Gears: 3.42
Re: Doing the shaker assembly mod for real
I'm doing one on my '92 vert. It took quite a lot of measuring before I started cutting the hood, and I'm still not quite done, but here's a shot of what I have so far. This is (so far) about 40 hours of work (measure, re-measure, re-re-measure, cut, fabricate mount to fit TPI manifold), and I still have much to do. The scoop was not in the best of condition (cheap, though) but I'm getting there. I decided to cut the hole so it looked best, and then fab the mount to fit. Probably was a lot more work that it should have been, but so far, I'm happy with the look. I still need to adjust the height of the scoop and put a lip on the hood opening.
Rob, If I can help you any let me know.
Rob, If I can help you any let me know.
02-20-2010, 09:18 PM
#122
Junior Member
Join Date: Aug 2009
Location: Ambridge, PA
Posts: 87
Likes: 0
Received 2 Likes
on
2 Posts
Car: 92 TA convertible
Engine: 5.0 TPI
Transmission: 5 speed
Axle/Gears: 3.08 posi
Re: Doing the shaker assembly mod for real
The measurements went like this....
I made a template of the scoop from corrigated cardboard and positioned it until I came up with this...
Rear edge of hood at centerline to back of opening - 7 inches
Left & right edge of opening to edge of hood
rear of opening - 24"
Front of opening -23.5"
front of opening to front edge of hood at centerline - 32"
I've attached a simple schematic of the measurements I got.
These measurements would only be applicable if a 77 shaker was being used. (obviously)
Hope this helps....
TT
Last edited by TimeTraveller; 02-21-2010 at 01:27 PM. Reason: additional info
The following users liked this post:
DEBt/a (02-07-2024)
 04-24-2010, 07:13 PM
#124
Supreme Member
Join Date: May 2001
Location: Orange, CT, USA
Posts: 1,074
Likes: 0
Received 4 Likes
on
4 Posts
Car: 1983 Pontiac Firebird
Engine: 400HP 350
Transmission: 700R4
Axle/Gears: 3.42
Re: Doing the shaker assembly mod for real
I finally got my hands on a shaker and a hood for $100...lol The hood is way too nice to cut though 
04-24-2010, 07:40 PM
#125
Supreme Member
iTrader: (10)
Join Date: Sep 2000
Location: Moorpark, CA
Posts: 2,433
Likes: 0
Received 166 Likes
on
120 Posts
Car: '91 GTA, '92 T/A Convertible
Engine: GTA: 350 w/Vortec heads, T/A: 305
Transmission: Pro-built 700R4
Axle/Gears: GTA: 3.27, T/A: 2.73
Re: Doing the shaker assembly mod for real
I'm doing one on my '92 vert. It took quite a lot of measuring before I started cutting the hood, and I'm still not quite done, but here's a shot of what I have so far. This is (so far) about 40 hours of work (measure, re-measure, re-re-measure, cut, fabricate mount to fit TPI manifold), and I still have much to do. The scoop was not in the best of condition (cheap, though) but I'm getting there. I decided to cut the hole so it looked best, and then fab the mount to fit. Probably was a lot more work that it should have been, but so far, I'm happy with the look. I still need to adjust the height of the scoop and put a lip on the hood opening.
Rob, If I can help you any let me know.
Rob, If I can help you any let me know.
So that's on a TPI? Any pics of the engine bay? Curious to see what's going on under the hood.
04-27-2010, 08:54 AM
#127
Member
iTrader: (13)
Join Date: Aug 2002
Location: Sandusky, OH
Posts: 270
Likes: 0
Received 0 Likes
on
0 Posts
Car: 85 Trans Am
Engine: 305 Carb
Transmission: 700R4
Re: Doing the shaker assembly mod for real
If it doesn't happen this time, I think I will just paint it myself. With all the distractions and other priorities, this rebuild is taking much longer than planned. Someday...
04-30-2010, 10:35 PM
#128
Senior Member
Thread Starter
Re: Doing the shaker assembly mod for real
Still here, and rebuild still in progress. Paint job fell through last summer, now on the agenda for this summer. Growing old just waiting on that. If it doesn't happen this time, I think I will just paint it myself. With all the distractions and other priorities, this rebuild is taking much longer than planned. Someday...
If it doesn't happen this time, I think I will just paint it myself. With all the distractions and other priorities, this rebuild is taking much longer than planned. Someday...
06-03-2010, 09:25 AM
#130
Supreme Member
Join Date: May 2001
Location: Orange, CT, USA
Posts: 1,074
Likes: 0
Received 4 Likes
on
4 Posts
Car: 1983 Pontiac Firebird
Engine: 400HP 350
Transmission: 700R4
Axle/Gears: 3.42
Re: Doing the shaker assembly mod for real
Anyone have any new pics or anything? Maybe 3/4 shot of the car with the shaker????
08-13-2010, 11:55 PM
#131
Supreme Member
Join Date: May 2001
Location: Orange, CT, USA
Posts: 1,074
Likes: 0
Received 4 Likes
on
4 Posts
Car: 1983 Pontiac Firebird
Engine: 400HP 350
Transmission: 700R4
Axle/Gears: 3.42
Re: Doing the shaker assembly mod for real
Finally picked up a shaker to start my mod..lol Came with a fresh coat of white paint all for $50..lol Its in really nice shape.
08-14-2010, 05:23 AM
#132
Supreme Member
Join Date: Jan 2009
Location: Columbus Ohio
Posts: 1,126
Likes: 0
Received 0 Likes
on
0 Posts
Car: 91 Z28,64ImpalaSS4094spd,67 Galaxy
Engine: Dart 415Profiler hd,cmprlrs,Hlly750
Transmission: Built 700R4, 3200 stall
Axle/Gears: 3:89 Moser 9"
08-14-2010, 12:37 PM
#133
Junior Member
Join Date: Sep 2009
Location: Fayetteville, AR
Posts: 56
Likes: 0
Received 0 Likes
on
0 Posts
Car: 88 Iroc-Z
Engine: 6.2 LS3
Transmission: 4L70E
08-15-2010, 05:47 PM
#135
Junior Member
Join Date: Sep 2009
Location: Fayetteville, AR
Posts: 56
Likes: 0
Received 0 Likes
on
0 Posts
Car: 88 Iroc-Z
Engine: 6.2 LS3
Transmission: 4L70E
Re: Doing the shaker assembly mod for real
Oh... didnt have a clue what speed density was, i thought all TP's required maf's. But I looked it up and learned better. TY
08-16-2010, 10:14 AM
#136
Supreme Member
Join Date: May 2001
Location: Orange, CT, USA
Posts: 1,074
Likes: 0
Received 4 Likes
on
4 Posts
Car: 1983 Pontiac Firebird
Engine: 400HP 350
Transmission: 700R4
Axle/Gears: 3.42
Re: Doing the shaker assembly mod for real
Ne have some ideas on an air box configuration? Plenumed air vs. Non-plenumed air. Or even flat panel air cleaner vs. Round??
08-23-2010, 11:04 PM
#137
Supreme Member
Join Date: May 2001
Location: Orange, CT, USA
Posts: 1,074
Likes: 0
Received 4 Likes
on
4 Posts
Car: 1983 Pontiac Firebird
Engine: 400HP 350
Transmission: 700R4
Axle/Gears: 3.42
Re: Doing the shaker assembly mod for real
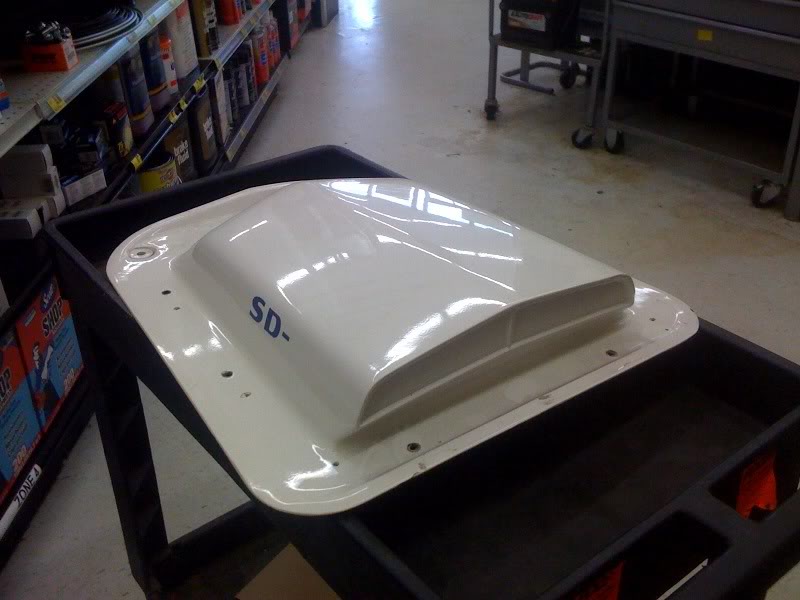
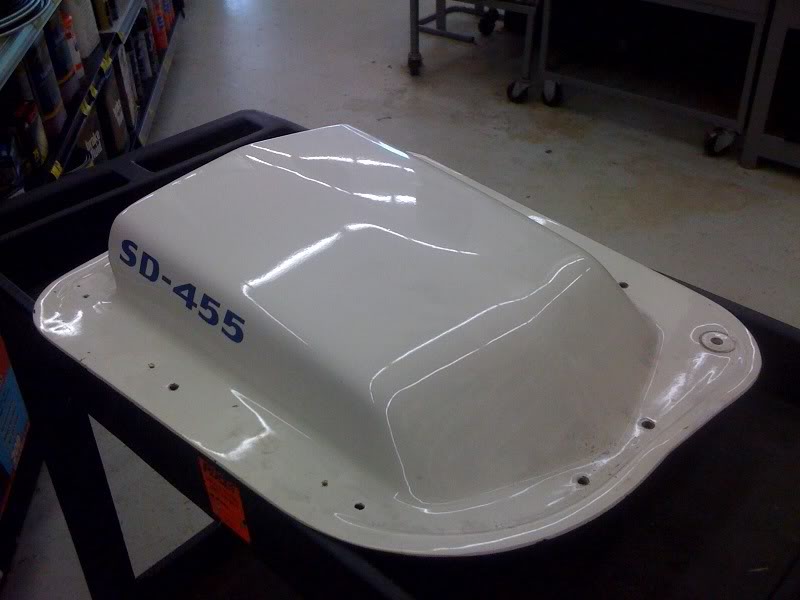
Here's what i'm going to use to mate the drop base of my air cleaner to the bottom of the shaker, I call it "scoopula"...lol
The following users liked this post:
Ariyana Dumon (02-25-2020)
08-25-2010, 08:10 PM
#138
Senior Member
iTrader: (5)
Join Date: Dec 2006
Location: Augusta, Ga
Posts: 2,212
Likes: 0
Received 0 Likes
on
0 Posts
Car: 1987 Trans Am
Engine: 355ci L98 soon to be turbo'd
Transmission: 700R4
Axle/Gears: 2.73 posi
Re: Doing the shaker assembly mod for real
here is a sneak peak of my shaker hood mod, I plan on making a whole thread for my car build once its done (in a few weeks) which will have more pics... It sits on top of a 355 TPI...


10-01-2010, 01:17 AM
#139
Senior Member
Join Date: Sep 2009
Location: PHOENIX/ TOLLESON ARIZONA
Posts: 598
Likes: 0
Received 2 Likes
on
1 Post
Car: 90 IROC 5.7 1LE CLONE 89 GTA 88IROC
Engine: 5.7TPI / 5.7TPI/ 5.7TPI/ 4.3 CMFI
Transmission: 700R4 UPGRADED 700R4STOCK700R4STOCK
Axle/Gears: 3.23 10 BOLT 3.27 9 BOLT 2.77 9BOLT
Re: Doing the shaker assembly mod for real
 NICE WORK.
10-01-2010, 10:42 PM
NICE WORK.
10-01-2010, 10:42 PM
#140
Supreme Member
Join Date: Mar 2001
Location: Renton, WA
Posts: 2,262
Likes: 0
Received 0 Likes
on
0 Posts
Car: 1985 Camaro, 1986 Trans Am
Engine: 5.0L carbed and 5.0L TPI
Transmission: TH700R4
Axle/Gears: 3.23 and 3.27 posi
Re: Doing the shaker assembly mod for real
I'd put one on my T/A TPI, but I'd mount it to the hood as mentioned earlier. It would be just for looks. 
11-05-2010, 06:48 PM
#141
Supreme Member
Join Date: May 2001
Location: Orange, CT, USA
Posts: 1,074
Likes: 0
Received 4 Likes
on
4 Posts
Car: 1983 Pontiac Firebird
Engine: 400HP 350
Transmission: 700R4
Axle/Gears: 3.42
Re: Doing the shaker assembly mod for real
Here are a couple of pics of how I handled the ridge around the scoop opening on my conversion. Kind of an expensive option since I had to sacrifice an original 2nd gen TA hood, but I really wanted it to look like the factory installed the shaker. Besides, I already had a hood off of a 77 TA that I parted out. 
In the first picture you can see that even with sectioning the shaker mount, I still am very close to the hood because of my intake. The TA grilles in the front of the hood will be filled with metal panels as part of the paint job, but I will be keeping the rear vents. I will also be adding a hood bird to complete the 2nd gen style.
In the first picture you can see that even with sectioning the shaker mount, I still am very close to the hood because of my intake. The TA grilles in the front of the hood will be filled with metal panels as part of the paint job, but I will be keeping the rear vents. I will also be adding a hood bird to complete the 2nd gen style.
11-05-2010, 08:48 PM
#142
Member
iTrader: (13)
Join Date: Aug 2002
Location: Sandusky, OH
Posts: 270
Likes: 0
Received 0 Likes
on
0 Posts
Car: 85 Trans Am
Engine: 305 Carb
Transmission: 700R4
Re: Doing the shaker assembly mod for real
Thanks for the compliment. All of the cutting was done with a cutoff wheel on an angle grinder, and the shaping was done with a flap wheel on the same angle grinder.
11-05-2010, 10:50 PM
#143
Supreme Member
Join Date: May 2001
Location: Orange, CT, USA
Posts: 1,074
Likes: 0
Received 4 Likes
on
4 Posts
Car: 1983 Pontiac Firebird
Engine: 400HP 350
Transmission: 700R4
Axle/Gears: 3.42
Re: Doing the shaker assembly mod for real
LOL, sorry for all the spam, just really interested..lol
11-29-2010, 07:20 PM
#144
Junior Member
Join Date: Feb 2010
Location: Independence, MO
Posts: 56
Likes: 0
Received 0 Likes
on
0 Posts
Car: 1987 Formula
Engine: 350 TPI
Transmission: 700 R4
Axle/Gears: 3.42 L/S
Re: Doing the shaker assembly mod for real

I picked up the hood today and the shaker scoop should be here Wed 12/1/10. I think I will just attach it to my hood since I am running a TPI Set up. For $100 bucks for both a little experimenting can't hurt.
12-16-2010, 09:48 AM
#145
Supreme Member
Join Date: May 2001
Location: Orange, CT, USA
Posts: 1,074
Likes: 0
Received 4 Likes
on
4 Posts
Car: 1983 Pontiac Firebird
Engine: 400HP 350
Transmission: 700R4
Axle/Gears: 3.42
Re: Doing the shaker assembly mod for real
what do you guys think about this for my hood???.....lol
The following users liked this post:
DEBt/a (02-07-2024)

 06-12-2012, 01:02 AM
#150
Junior Member

Join Date: Feb 2012
Location: NM
Posts: 78
Likes: 0
Received 0 Likes
on
0 Posts
Car: 89 Camaro RS (lawn ornament)
Engine: 327 sbc
Transmission: TH350
Axle/Gears: Stock for now
Re: Doing the shaker assembly mod for real
Hi, I just picked up a shaker on ebay and want to do this to my car down the road. How did you guys attach the top half to the bottom half. I don't think anyone ever said. I know the original ones had a big ring that held the 2 halves together. I will probably be copying the guy that took the other 305 air cleaner and flipped it upside down since I bought a shaker with a 400 base on it. It will be too big to fit if I use my original 305 air cleaner base. I hope someone replies.