
Complete audio build up and results, with pics
 08-01-2009, 05:56 PM
#51
Supreme Member
iTrader: (4)
Join Date: Mar 2009
Location: Pepperell, MA
Posts: 3,079
Likes: 0
Received 3 Likes
on
3 Posts
Car: 1987 Trans Am
Engine: LQ9/L92
Transmission: 4L60E
Re: Complete audio build up and results, with pics
Beautiful work on the car. Doing a stereo right takes a lot more work that most people think. Half of my last install was spent pulling out carpeting and laying deadener. I'm sure its a night and day difference from the OE setup 
 08-02-2009, 07:05 PM
#52
Senior Member
Join Date: Sep 2008
Location: Minnesota
Posts: 278
Likes: 0
Received 0 Likes
on
0 Posts
Car: 89 IROC Z28 Vert
Engine: 305 TPI
Re: Complete audio build up and results, with pics
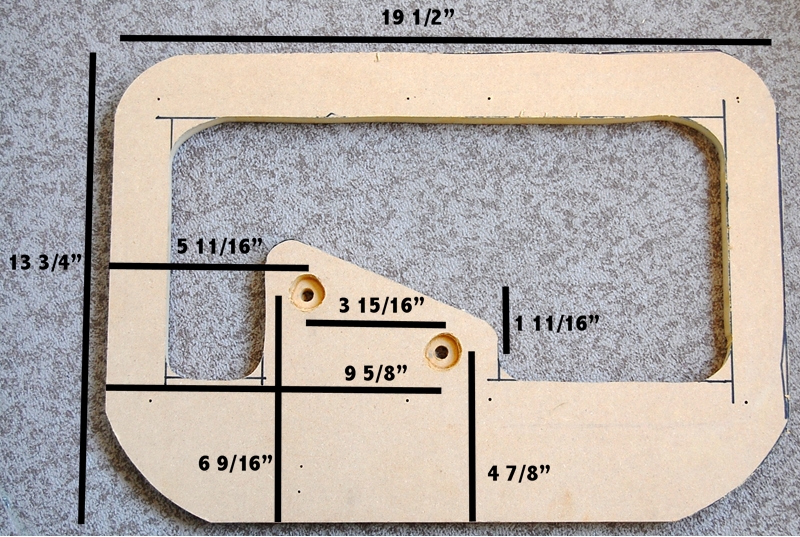
could you possibly throw up some dimensions for that sub box? that is exactly what i want. thanks
08-04-2009, 06:27 PM
#53
Supreme Member

Thread Starter
iTrader: (2)

Join Date: May 2002
Location: Everett, WA
Posts: 4,449
Likes: 0
Received 8 Likes
on
8 Posts
Car: 87' IROC
Engine: L98
Transmission: T56
Re: Complete audio build up and results, with pics
Rick,
The HUmount comes with a thick plastic install kit. It should be everything you need to physically install you headunit. It does not include a wire harness of course. And you will have to figure out how you want to wire up the HUmount lights. I wired them to my shift plate indicator light. I don't believe I have any pics of the mount not installed, I will have to check. You will also need to remove the metal bracket from behind the stock radio, not a big deal, a few bolts. Depending on how deep you headunit is, it may or may not contact the climate control vents in that area. Mine just touched, I sort of pushed them back while I installed the 4 main screws, you will know what I mean when you get there.
TheMuskr,
I will get the dimensions up soon.
08-04-2009, 07:14 PM
#54
Junior Member

Join Date: Jul 2009
Location: Wichita, Kansas
Posts: 68
Likes: 0
Received 0 Likes
on
0 Posts
Car: 1985 Z28
Engine: 305ci 4barrel
Transmission: 5-speed
Re: Complete audio build up and results, with pics
thanks 87350IROC! i ordered my HUmount kit. can't wait to get everything installed. what did you do for a wiring harness? or did you just splice into the original harness. i would prefer not to trash the original set-up if possible, in case someone wants to go original again in the future. rick
08-04-2009, 10:20 PM
#55
Supreme Member
Thread Starter
iTrader: (2)
Join Date: May 2002
Location: Everett, WA
Posts: 4,449
Likes: 0
Received 8 Likes
on
8 Posts
Car: 87' IROC
Engine: L98
Transmission: T56
Re: Complete audio build up and results, with pics
Yeah, whatever you do don't hack into the stock harness, it will just cause a bunch of headaches. You can get adapter harnesses to adapt whatever headunit you have to the stock harness.
Depending on how you decide to connect the HUmount lights, you may have to do some hacking. Just do it right and you won't have any problems. So the HUmount will come with two wires sticking out of it, power and ground. Connect power to any power wire you want and connect ground to a good ground.
Depending on how you decide to connect the HUmount lights, you may have to do some hacking. Just do it right and you won't have any problems. So the HUmount will come with two wires sticking out of it, power and ground. Connect power to any power wire you want and connect ground to a good ground.
 08-10-2009, 02:45 PM
#57
Supreme Member
iTrader: (6)

Join Date: Oct 2006
Location: West of Toronto
Posts: 3,041
Likes: 0
Received 7 Likes
on
7 Posts
Car: 89 IROC
Engine: 305 TPI / ZZ4 cam
Transmission: Stage 2 700R4, LS1 driveshaft
Axle/Gears: Strange 3.42 w/ Auburn
Re: Complete audio build up and results, with pics
VERY cool install 
Just an FYI...Dynamat or Ramaat should be rolled on for the best results. Any simple roller (wood or plastic) will do.
Just put 36 sq ft in my 89....more to come
Just an FYI...Dynamat or Ramaat should be rolled on for the best results. Any simple roller (wood or plastic) will do.
Just put 36 sq ft in my 89....more to come
08-10-2009, 04:02 PM
#58
Supreme Member
Thread Starter
iTrader: (2)
Join Date: May 2002
Location: Everett, WA
Posts: 4,449
Likes: 0
Received 8 Likes
on
8 Posts
Car: 87' IROC
Engine: L98
Transmission: T56
Re: Complete audio build up and results, with pics
Yeah I picked up a hard rubber wallpaper roller for doing the Raammat. I found it somewhat useful for flat panels. I understand the old original Dynamat really needed one to go on right. I think the Raammat would be fine without a roller, but for $5 you might as well get one.
08-24-2009, 10:13 AM
#59
Member
Join Date: Jul 2009
Location: Lebanon, Pennsylvania
Posts: 123
Likes: 0
Received 0 Likes
on
0 Posts
Car: 1984 Berlinetta,'82 and '86 Camaro
Engine: Rebuilt 350
Transmission: Automatic. =[
Axle/Gears: Stock
Re: Complete audio build up and results, with pics
How much sq ft of dynamat or other sound deadening material do you need to cover the what you did? It looks really nice.
08-24-2009, 11:34 AM
#61
Member
Join Date: Jul 2009
Location: Lebanon, Pennsylvania
Posts: 123
Likes: 0
Received 0 Likes
on
0 Posts
Car: 1984 Berlinetta,'82 and '86 Camaro
Engine: Rebuilt 350
Transmission: Automatic. =[
Axle/Gears: Stock
Re: Complete audio build up and results, with pics
Did you use it all? was there enough to have alittle leftover for screwups?
09-01-2009, 03:29 PM
#62
Senior Member
iTrader: (1)
Join Date: Dec 2008
Location: Dallas, Tx
Posts: 600
Likes: 0
Received 0 Likes
on
0 Posts
Car: 1991 camaro rs
Engine: 305 tbi
Transmission: t5
Axle/Gears: stock
Re: Complete audio build up and results, with pics
any chance u have the dimensions of your sub box?
09-01-2009, 11:40 PM
#63
Supreme Member
Thread Starter
iTrader: (2)
Join Date: May 2002
Location: Everett, WA
Posts: 4,449
Likes: 0
Received 8 Likes
on
8 Posts
Car: 87' IROC
Engine: L98
Transmission: T56
Re: Complete audio build up and results, with pics
19Chevrolet84,
Yes I did use it all. I used a double layer on the door skins and the top middle of the gas tank hump.
ellocojorge,
I do plan to get the dimensions up. I am in the middle of a move right now and have to travel this weekend but hope to get them up fairly soon.
Yes I did use it all. I used a double layer on the door skins and the top middle of the gas tank hump.
ellocojorge,
I do plan to get the dimensions up. I am in the middle of a move right now and have to travel this weekend but hope to get them up fairly soon.
 09-24-2009, 04:24 PM
#65
Junior Member

Join Date: Sep 2009
Location: Iowa
Posts: 57
Likes: 0
Received 0 Likes
on
0 Posts
Car: 89 Camaro RS
Engine: 383 Stroker in the works
Transmission: TH-350 Auto
Re: Complete audio build up and results, with pics
Wow great work man, I love that HUmount, I'm gonna order one for my RS very soon
Definitely going to have to track this for future reference when I do my audio, looks like the best way to go, your hard work really paid off.
Definitely going to have to track this for future reference when I do my audio, looks like the best way to go, your hard work really paid off.
10-14-2009, 01:51 AM
#67
Senior Member
iTrader: (1)
Join Date: Dec 2008
Location: Dallas, Tx
Posts: 600
Likes: 0
Received 0 Likes
on
0 Posts
Car: 1991 camaro rs
Engine: 305 tbi
Transmission: t5
Axle/Gears: stock
Re: Complete audio build up and results, with pics
so any chance i could get the measurements of that box? pretty please....
01-15-2010, 10:57 AM
#68
Junior Member
Join Date: Dec 2009
Location: Ohio
Posts: 80
Likes: 0
Received 0 Likes
on
0 Posts
Car: 1988 Camaro IROC-Z and 91 Z28
Engine: 305 TPI and 350 TPI
Transmission: 700r4
Axle/Gears: unsure of ratio but POSI (:
Re: Complete audio build up and results, with pics
beautifull car man! and nice install. looks very clean. just curious. whats the paint code of your 87 iroc.? i have a 88 im wanting to paint that exact same color.
 02-09-2010, 12:52 PM
#72
02-09-2010, 06:29 PM
#73
Supreme Member
Thread Starter
iTrader: (2)
Join Date: May 2002
Location: Everett, WA
Posts: 4,449
Likes: 0
Received 8 Likes
on
8 Posts
Car: 87' IROC
Engine: L98
Transmission: T56
Re: Complete audio build up and results, with pics
I can confirm the site was down earlier. With a hacker message. It appears to be back up.
02-16-2010, 03:07 PM
#74
Supreme Member
iTrader: (6)
Join Date: Oct 2006
Location: West of Toronto
Posts: 3,041
Likes: 0
Received 7 Likes
on
7 Posts
Car: 89 IROC
Engine: 305 TPI / ZZ4 cam
Transmission: Stage 2 700R4, LS1 driveshaft
Axle/Gears: Strange 3.42 w/ Auburn
Re: Complete audio build up and results, with pics
Do you use anything else to secure the MDF to the body or is it just the two bolts?
 02-16-2010, 05:53 PM
#75
Supreme Member
Thread Starter
iTrader: (2)
Join Date: May 2002
Location: Everett, WA
Posts: 4,449
Likes: 0
Received 8 Likes
on
8 Posts
Car: 87' IROC
Engine: L98
Transmission: T56
Re: Complete audio build up and results, with pics
Just those two bolts. When tightened down the lower left corner does contact the wheel well. The corner is tight on the Raammat on the wheel well and does not rattle. I hammer on the car pretty good and can say I believe this mount is plenty strong.
07-10-2010, 06:56 PM
#76
Junior Member

Join Date: Apr 2007
Posts: 17
Likes: 0
Received 0 Likes
on
0 Posts
Re: Complete audio build up and results, with pics
I am going to bump this up to the top since this is really nice and someone might have missed it.
Also I need to ask since I can't find the PM function on here. Where did you get those bolts for the tire rack mount. I went to my local Lowes and they have 9999 different bolt but none with the thread pattern I need. Can you give me some numbers on those things so I can order them off the internet or something? It would be a waist that I have everything cut and ready to go in but I can't find the bolts to fit it.
Edit: Oh I was not signed in that is why I could not PM. ^_^ to late now.
 07-13-2010, 11:27 PM
#78
Member

Join Date: Jan 2010
Location: Big Sandy, TX
Posts: 207
Likes: 0
Received 0 Likes
on
0 Posts
Car: 1985 z28, 1994 Sierra
Engine: 350, 350
Transmission: T-5, 4L60E
Re: Complete audio build up and results, with pics
It is actually really good you mounted the tweeter close to the woofer part on the front speakers. The basic idea for best sound is to mount each component within 6 inches of one another. The reasoning behind this is because the further you spread them apart the more likely the sound waves are to cancel out one another from the speakers and you will have flat spots or dead sounding notes coming from your speakers. I don't know if this made sense, if it didn't I'll try to draw something up on paint to illistrate it.
07-14-2010, 01:59 AM
#79
Junior Member
Join Date: Apr 2007
Posts: 17
Likes: 0
Received 0 Likes
on
0 Posts
Re: Complete audio build up and results, with pics
So, 87350IROC can you tell me where you got those bolts or what size thread they are or better yet a link to some I can buy off the interweb?
07-14-2010, 12:12 PM
#80
Supreme Member
Thread Starter
iTrader: (2)
Join Date: May 2002
Location: Everett, WA
Posts: 4,449
Likes: 0
Received 8 Likes
on
8 Posts
Car: 87' IROC
Engine: L98
Transmission: T56
Re: Complete audio build up and results, with pics
I got the bolts from ACE hardware. My local Ace has a really good supply of hardware. I think somewhere above I gave the specs on the bolts. A local hardware store should be able to help.
Sorry for the delay on the measurements of the box. I will try to get them tonight.
Sorry for the delay on the measurements of the box. I will try to get them tonight.
07-20-2010, 04:43 AM
#82
Member

Join Date: Jun 2010
Location: Glendale AZ
Posts: 141
Likes: 0
Received 0 Likes
on
0 Posts
Car: 87 formula
Engine: LG4
Re: Complete audio build up and results, with pics
I got the bolts from ACE hardware. My local Ace has a really good supply of hardware. I think somewhere above I gave the specs on the bolts. A local hardware store should be able to help.
Sorry for the delay on the measurements of the box. I will try to get them tonight.
Sorry for the delay on the measurements of the box. I will try to get them tonight.
They only bolt i could not find there was an idle screw for a 2001 dodge intriped
That is a long wait for the measurements of the box
I was wondering what you used to cut out the holes in the a pillers
Really Nice Work
07-20-2010, 10:33 AM
#83
Supreme Member
Thread Starter
iTrader: (2)
Join Date: May 2002
Location: Everett, WA
Posts: 4,449
Likes: 0
Received 8 Likes
on
8 Posts
Car: 87' IROC
Engine: L98
Transmission: T56
Re: Complete audio build up and results, with pics
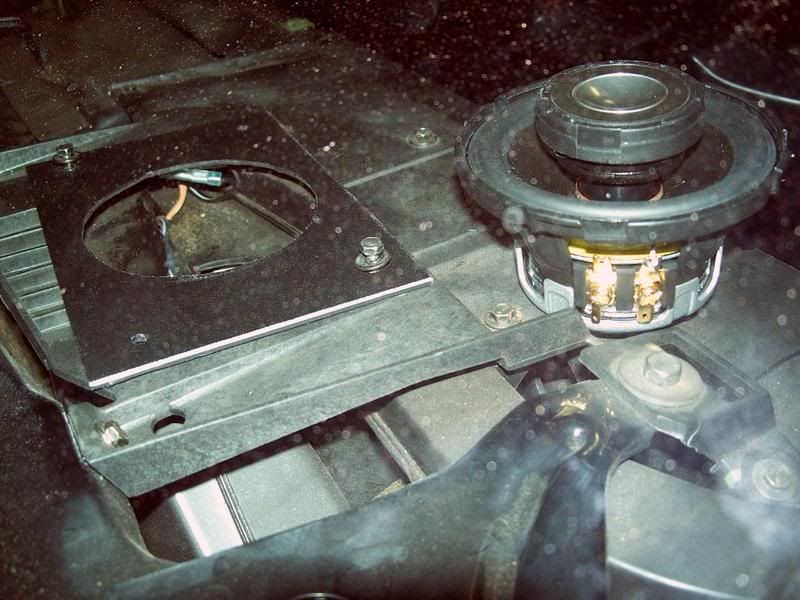
To cut the tweeter holes I used a hole saw from Home Depot.
As far as dimensions, yes guys I am planning on measuring one of these days. I get home from work and completely forget about it.
As far as dimensions, yes guys I am planning on measuring one of these days. I get home from work and completely forget about it.
07-20-2010, 01:28 PM
#84
Member
iTrader: (4)

Join Date: Jun 2008
Location: 18326
Posts: 230
Received 0 Likes
on
0 Posts
Car: 86 Iroc
Engine: Soon to be LS 6.0
Transmission: Soon to be mn12
Axle/Gears: Strange 9in 4.10
Re: Complete audio build up and results, with pics
Honestly, whats so hard about using a tape measure and figuring it out yourself? It's not hard, plus you can use cardboard to mock it up with. Come on guys, if the internet weren't here would there be no initiative?
07-21-2010, 02:23 AM
#85
Junior Member

Join Date: May 2010
Posts: 33
Likes: 0
Received 0 Likes
on
0 Posts
Re: Complete audio build up and results, with pics
Nice build... now you got me pumped cant wait to get the body done on my bird so i can start the sterio install... Not sure what im puting in it yet for components... all i have figured out is the dash layout and teh sub enclosure... taking out the back seats and doing a custom box in that area... should be fun
11-21-2010, 08:05 PM
#86
Junior Member

Join Date: Oct 2010
Posts: 89
Likes: 0
Received 0 Likes
on
0 Posts
Re: Complete audio build up and results, with pics
87350IROC -
I am from Seattle and my mother still lives up in Everett on Casino Rd. I was doing some research and I have a question. I love the Humount cover plate you used, it looks great. The receiver I am going to use says it will stick out about 1/2 from my dash. Will the Humount cover still work? If so, how do I get it flush like you did. Thank you for any help you can give me.
I am from Seattle and my mother still lives up in Everett on Casino Rd. I was doing some research and I have a question. I love the Humount cover plate you used, it looks great. The receiver I am going to use says it will stick out about 1/2 from my dash. Will the Humount cover still work? If so, how do I get it flush like you did. Thank you for any help you can give me.
11-22-2010, 11:49 AM
#87
Supreme Member
Thread Starter
iTrader: (2)
Join Date: May 2002
Location: Everett, WA
Posts: 4,449
Likes: 0
Received 8 Likes
on
8 Posts
Car: 87' IROC
Engine: L98
Transmission: T56
Re: Complete audio build up and results, with pics
87350IROC -
I am from Seattle and my mother still lives up in Everett on Casino Rd. I was doing some research and I have a question. I love the Humount cover plate you used, it looks great. The receiver I am going to use says it will stick out about 1/2 from my dash. Will the Humount cover still work? If so, how do I get it flush like you did. Thank you for any help you can give me.
I am from Seattle and my mother still lives up in Everett on Casino Rd. I was doing some research and I have a question. I love the Humount cover plate you used, it looks great. The receiver I am going to use says it will stick out about 1/2 from my dash. Will the Humount cover still work? If so, how do I get it flush like you did. Thank you for any help you can give me.
11-22-2010, 12:50 PM
#88
Junior Member
Join Date: Oct 2010
Posts: 89
Likes: 0
Received 0 Likes
on
0 Posts
Re: Complete audio build up and results, with pics
I am using a Dual XDMA6415, with Pioneer GM-6400F amp, 60 watts x 4 at 4ohms. I was able to get these free brand new from a sales contest I won at work. I just ordered them today. The Dual will sit-out about 1/2" from the dash.
For the speakers, I was thinking of using the JL Audio TR400-CXi 4 x 6 for the dash and JL Audio TR690-TXi 6 x 9 for the rear side panels.
I would like to use the faceplate you did but I don't know if it will work in this application because I need an extension kit.
Thanks for getting back to me.
For the speakers, I was thinking of using the JL Audio TR400-CXi 4 x 6 for the dash and JL Audio TR690-TXi 6 x 9 for the rear side panels.
I would like to use the faceplate you did but I don't know if it will work in this application because I need an extension kit.
Thanks for getting back to me.
11-22-2010, 09:29 PM
#89
Supreme Member
Thread Starter
iTrader: (2)
Join Date: May 2002
Location: Everett, WA
Posts: 4,449
Likes: 0
Received 8 Likes
on
8 Posts
Car: 87' IROC
Engine: L98
Transmission: T56
Re: Complete audio build up and results, with pics
Are you sure it HAS to sit 1/2" out? All head units will stick out 1/2" with a normal installation kit. I'm willing to bet you can get it to mount flush with the HU mount.
11-22-2010, 10:46 PM
#90
Junior Member
Join Date: Oct 2010
Posts: 89
Likes: 0
Received 0 Likes
on
0 Posts
Re: Complete audio build up and results, with pics
Not sure, I will check it when I have it put in - maybe it will work.
The front dash speakers, what is the depth I need to make then fit?
thank you
The front dash speakers, what is the depth I need to make then fit?
thank you
11-23-2010, 05:35 AM
#93
Junior Member
Join Date: Oct 2010
Posts: 89
Likes: 0
Received 0 Likes
on
0 Posts
Re: Complete audio build up and results, with pics
for the 6-1/2 speaker you used in the dash, because it is 1-3/4, so shallow, what brand did you end up using? model number? I like what you did there.
about the rear side panels - does a 6-1/2 offer any better sound than the stock 6 x 9? Couldn't I use the same as in the dash?
thank you
about the rear side panels - does a 6-1/2 offer any better sound than the stock 6 x 9? Couldn't I use the same as in the dash?
thank you
02-08-2011, 12:45 PM
#95
Supreme Member
Thread Starter
iTrader: (2)
Join Date: May 2002
Location: Everett, WA
Posts: 4,449
Likes: 0
Received 8 Likes
on
8 Posts
Car: 87' IROC
Engine: L98
Transmission: T56
Re: Complete audio build up and results, with pics
for the 6-1/2 speaker you used in the dash, because it is 1-3/4, so shallow, what brand did you end up using? model number? I like what you did there.
about the rear side panels - does a 6-1/2 offer any better sound than the stock 6 x 9? Couldn't I use the same as in the dash?
thank you
about the rear side panels - does a 6-1/2 offer any better sound than the stock 6 x 9? Couldn't I use the same as in the dash?
thank you
I used Infinity Reference 6020cs for both the front and rear of the car. The 6X9 have a greater cone area so they should produce better bass however in theory a circular speaker sounds better. I would say you are fine going either way.
02-08-2011, 10:55 PM
#96
Senior Member

Join Date: Oct 2010
Location: bellingham WA
Posts: 885
Likes: 0
Received 0 Likes
on
0 Posts
Car: 85 Z28
Engine: 327
Transmission: 700R4
Axle/Gears: 3.23
Re: Complete audio build up and results, with pics
Hey tis ensolite stuff you got. Is it used in place of jute pad, and can you get it at car toys or someplace simular.??
 02-09-2011, 11:31 AM
#98
Supreme Member
Thread Starter
iTrader: (2)
Join Date: May 2002
Location: Everett, WA
Posts: 4,449
Likes: 0
Received 8 Likes
on
8 Posts
Car: 87' IROC
Engine: L98
Transmission: T56
Re: Complete audio build up and results, with pics
I used it in addition to the jute. It shouldn't break down and hold moisture like jute does. But Jute sure is an effective sound barrier. I bought mine from Raammat. I have never seen it anywhere else. I doubt it would be available locally.
03-07-2011, 06:32 AM
#99
Member
iTrader: (3)

Join Date: Feb 2004
Location: Jenison, mi
Posts: 138
Likes: 0
Received 0 Likes
on
0 Posts
Car: 1987 Iroc-z camaro
Engine: 5.7 Liter
Re: Complete audio build up and results, with pics
What are the advantages of laying ensolite on top of raamat? Is it worth it? Did you use 16 gauge wire to wire up your component speakers? What amp fuses did you use in your distribution block? By the way I love you set up! Great job!
Last edited by sweet_87_iroc; 03-07-2011 at 02:28 PM.
03-16-2011, 04:40 AM
#100
Supreme Member
iTrader: (35)
Join Date: Aug 2006
Location: Mississauga,Ont,Canada
Posts: 1,470
Likes: 0
Received 1 Like
on
1 Post
Car: 89 IROC
Engine: LSX 6.0 370, TU2 Cam, Fast intake
Transmission: T56 w/ lots of goodies
Axle/Gears: 8.8, Posi, 4.10, 31 Spline
Re: Complete audio build up and results, with pics
Wow awsome build and great pics. Is there a blueprint for the box that fit in the bottom of the trunk area lik in the first couple posts anywhere??