
WHERE CAN I GET THESE WICKED SICK TAIL LIGHTS?!?!?!


 07-01-2012, 02:35 AM
#2
Member

iTrader: (1)

Join Date: Apr 2006
Location: Washington
Posts: 356
Likes: 0
Received 0 Likes
on
0 Posts
Car: 1985 Sport Coupe
Engine: 3800 Series II Turbo
Transmission: 4th-gen WC T5
Axle/Gears: 3.27 BW Limited
Re: WHERE CAN I GET THESE WICKED SICK TAIL LIGHTS?!?!?!
Where can you get stock GM grids and a can of opaque red paint? ")
07-01-2012, 03:06 AM
#3
Member
Thread Starter
Join Date: Feb 2012
Location: Wisconsin
Posts: 116
Likes: 0
Received 0 Likes
on
0 Posts
Car: 1991 Camaro RS
Transmission: 700R4
Re: WHERE CAN I GET THESE WICKED SICK TAIL LIGHTS?!?!?!
07-02-2012, 09:56 PM
#5
Supreme Member
iTrader: (3)
Join Date: Sep 2007
Location: St.cloud fl.
Posts: 1,027
Likes: 0
Received 0 Likes
on
0 Posts
Car: 90RS Conv.
Engine: 383 w/ small shot
Transmission: th400
Axle/Gears: moser 9in
Re: WHERE CAN I GET THESE WICKED SICK TAIL LIGHTS?!?!?!
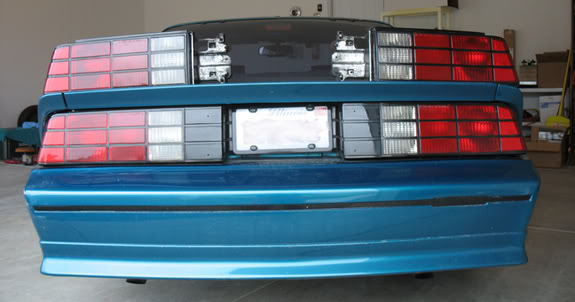
those could be made by klearz. search it. last i heard they dont make them anymore.
fwiw i bought a complete set of dark red smoked. i get a ton of people that want to know where i got mine
fwiw i bought a complete set of dark red smoked. i get a ton of people that want to know where i got mine
07-02-2012, 10:04 PM
#6
Member
Thread Starter
Join Date: Feb 2012
Location: Wisconsin
Posts: 116
Likes: 0
Received 0 Likes
on
0 Posts
Car: 1991 Camaro RS
Transmission: 700R4
Re: WHERE CAN I GET THESE WICKED SICK TAIL LIGHTS?!?!?!
I knew they were aftermarket. The middle black parts look great too. Thanks for the info I'll search it. Also it's pretty funny how that other guy was a smart a** and he was wrong
07-02-2012, 11:07 PM
#7
Supreme Member
iTrader: (5)
Join Date: Mar 2011
Location: Central Texas
Posts: 2,893
Likes: 0
Received 4 Likes
on
4 Posts
Car: GTA
Engine: 350 TPI
Transmission: 700R4
Axle/Gears: Aussie 9-bolt/3.27 posi
Re: WHERE CAN I GET THESE WICKED SICK TAIL LIGHTS?!?!?!
Testors Opaque Red model spray paint will give you that look & I honestly think that those are that kind & not the ones that Klearz used to make because the lens does not look like the one on the Klearz.
These are Testors red painted ones....

These are Testors red painted ones....
Trending Topics
07-02-2012, 11:19 PM
#8
Member
Thread Starter
Join Date: Feb 2012
Location: Wisconsin
Posts: 116
Likes: 0
Received 0 Likes
on
0 Posts
Car: 1991 Camaro RS
Transmission: 700R4
Re: WHERE CAN I GET THESE WICKED SICK TAIL LIGHTS?!?!?!
The others ones look better then these and more clear
07-02-2012, 11:28 PM
#9
Supreme Member
iTrader: (5)
Join Date: Mar 2011
Location: Central Texas
Posts: 2,893
Likes: 0
Received 4 Likes
on
4 Posts
Car: GTA
Engine: 350 TPI
Transmission: 700R4
Axle/Gears: Aussie 9-bolt/3.27 posi
Re: WHERE CAN I GET THESE WICKED SICK TAIL LIGHTS?!?!?!
Well...They are also at a much better angle, straight on not down at an angle. And maybe they were polished out better too, who knows.
I just think they are the same & not Klearz. Have you seen the Klearz ones? They were like $200 for just the lenses only that people had to take their stock lenses off & put the Klearz ones on. Way too much for just the lenses, IMHO.
I just think they are the same & not Klearz. Have you seen the Klearz ones? They were like $200 for just the lenses only that people had to take their stock lenses off & put the Klearz ones on. Way too much for just the lenses, IMHO.
07-04-2012, 11:37 AM
#10
Re: WHERE CAN I GET THESE WICKED SICK TAIL LIGHTS?!?!?!
I know where you can get just the lens. But they are around $180 a piece.
http://www.classicdiscountparts.com/...ed=0CEsQgwgwBA
http://www.classicdiscountparts.com/...ed=0CDUQgwgwAg
http://www.classicdiscountparts.com/...ed=0CEsQgwgwBA
http://www.classicdiscountparts.com/...ed=0CDUQgwgwAg
07-04-2012, 12:52 PM
#11

Re: WHERE CAN I GET THESE WICKED SICK TAIL LIGHTS?!?!?!
how would u go about painting them?! i wana do this on both my camaros but wont the amber make it look odd with the red over top of it?
07-04-2012, 12:57 PM
#13
Supreme Member
iTrader: (5)
Join Date: Mar 2011
Location: Central Texas
Posts: 2,893
Likes: 0
Received 4 Likes
on
4 Posts
Car: GTA
Engine: 350 TPI
Transmission: 700R4
Axle/Gears: Aussie 9-bolt/3.27 posi
Re: WHERE CAN I GET THESE WICKED SICK TAIL LIGHTS?!?!?!
As for "looking odd"? Do the lights on the black Camaro I posted above look odd? Those were done using the model car spray paint method.
07-04-2012, 12:58 PM
#14
Re: WHERE CAN I GET THESE WICKED SICK TAIL LIGHTS?!?!?!
check out wat amazon has, i bought a set of EAGLE brand light for my cavy and they wer EXTREMLY good quality, better then my oem ones imo
heres what i found for camaros thos, some better searching and u might find more
http://www.amazon.com/Depo-332-1664P...2+Chevy+Camaro
http://www.amazon.com/1982-1992-FIRE...2+Chevy+Camaro
http://www.amazon.com/CHEVROLET-CAMA...2+Chevy+Camaro
heres what i found for camaros thos, some better searching and u might find more
http://www.amazon.com/Depo-332-1664P...2+Chevy+Camaro
http://www.amazon.com/1982-1992-FIRE...2+Chevy+Camaro
http://www.amazon.com/CHEVROLET-CAMA...2+Chevy+Camaro
07-04-2012, 07:53 PM
#15
Supreme Member
iTrader: (6)

Join Date: Oct 2006
Location: West of Toronto
Posts: 3,041
Likes: 0
Received 7 Likes
on
7 Posts
Car: 89 IROC
Engine: 305 TPI / ZZ4 cam
Transmission: Stage 2 700R4, LS1 driveshaft
Axle/Gears: Strange 3.42 w/ Auburn
Re: WHERE CAN I GET THESE WICKED SICK TAIL LIGHTS?!?!?!
Always wanted to do this. Picked up a spare set of tail lights to practice on. 
07-04-2012, 08:22 PM
#17
 07-05-2012, 10:26 AM
#21
Supreme Member
iTrader: (5)
Join Date: Mar 2011
Location: Central Texas
Posts: 2,893
Likes: 0
Received 4 Likes
on
4 Posts
Car: GTA
Engine: 350 TPI
Transmission: 700R4
Axle/Gears: Aussie 9-bolt/3.27 posi
Re: WHERE CAN I GET THESE WICKED SICK TAIL LIGHTS?!?!?!
07-05-2012, 03:17 PM
#24
Senior Member

Join Date: Jul 2009
Posts: 752
Likes: 0
Received 0 Likes
on
0 Posts
Car: 1991 Z28
Engine: 5.7 TPI
Transmission: 700R4
Re: WHERE CAN I GET THESE WICKED SICK TAIL LIGHTS?!?!?!
This is my Z28. I opened the lights up, sprayed the amber with Testor's Candy Red and tinted them once it was reassembled.
The original lens when I got them had that VHT or some other crap just misted over them- no double while it was on the car- I had overspray all over the place. Polished it off.
I had my local paint store mix up some tint and load it in a spray can. I then tinted them till I was satisfied and then put 3 good coats of clear over it. It looks factory and I hope good enough to not attract the cops. I think driving with my lights on in the day will help!
What do you think?
07-05-2012, 03:35 PM
#25
COTM Editor
iTrader: (11)
Join Date: Mar 2006
Location: WINDSOR, CO
Posts: 4,098
Likes: 0
Received 13 Likes
on
13 Posts
Car: 91 Z28, 87 SC, 90 IROC, 92 RS
Engine: LS1, 305 TPI, L98, NADA
Transmission: T56, 700r4's, and NADA
Axle/Gears: 3.89, 3.42, 3.23, NADA
Re: WHERE CAN I GET THESE WICKED SICK TAIL LIGHTS?!?!?!
These are the aftermarket Klearz brand lenses.... No black lines to create the "grid", and came all one color.

Just saying
07-05-2012, 06:44 PM
#26
Member
iTrader: (2)
Join Date: Mar 2005
Location: Killingly, CT
Posts: 140
Likes: 0
Received 0 Likes
on
0 Posts
Car: '82 Camaro Z28 (Former Pace car)
Engine: 85 5.7L Small Block
Transmission: WC T5
Axle/Gears: 96 disc LT1 3.23 Auburn 10 bolt.
Re: WHERE CAN I GET THESE WICKED SICK TAIL LIGHTS?!?!?!
Nice touch. i like the painted OE lenses
07-06-2012, 06:15 PM
#27
Re: WHERE CAN I GET THESE WICKED SICK TAIL LIGHTS?!?!?!
all the old threads with pics taking apart the lenses are long gone, so how do we do that again? bought a mint set off ebay for some $$ and have the red testors paint, just haven't done them yet
07-06-2012, 09:09 PM
#28
Supreme Member
iTrader: (3)
Join Date: Sep 2007
Location: St.cloud fl.
Posts: 1,027
Likes: 0
Received 0 Likes
on
0 Posts
Car: 90RS Conv.
Engine: 383 w/ small shot
Transmission: th400
Axle/Gears: moser 9in
Re: WHERE CAN I GET THESE WICKED SICK TAIL LIGHTS?!?!?!
Place the housing in the oven at the lowest setting. I believe mine is 170. For about 10 mins. SLOWLY. Work the sealant with a butter knife or scraper.
All your looking to do is warm the sealant to make it malleable.
All your looking to do is warm the sealant to make it malleable.
07-06-2012, 10:39 PM
#29
Re: WHERE CAN I GET THESE WICKED SICK TAIL LIGHTS?!?!?!
That is WAY TOO uncontrollable. It's better to use a hair blow dryer. That way you can control and focus on a certain spot. Believe me, it works. That's what I do when I seperate the itouch and iPhone digitizer screens from its plastic frames.
07-07-2012, 04:19 PM
#30
Senior Member
Join Date: Jul 2009
Posts: 752
Likes: 0
Received 0 Likes
on
0 Posts
Car: 1991 Z28
Engine: 5.7 TPI
Transmission: 700R4
Re: WHERE CAN I GET THESE WICKED SICK TAIL LIGHTS?!?!?!
There are 3 plastic pins on the top of each lens. Pull this out- if you break them or the are gone, PM me, I can sell you replacements.
Use the hair dryer as suggested to soften the adhesive and SLOWLY start levering them apart.
Watch that you carefully unlock the clips on the bottom- they break easily. If you can slip a thin putty knife into each, that should allow them to slip apart as you work the lens from the housing.
GO SLOWLY AND CAREFULLY.
Once you get one end to seperate a little, gently insert a wedge between the two, but resist the temptation to try and tear them apart further- use the hair dryer to soften the adhesive around the entire lens. It should start to release and let you gradually move the wedges further into the gap until the whole thing comes apart.
Then, remove all the old adhesive, CLEAN the whole thing, mask off the inside of the red lenses, tint the amber and reassemble with silicon adhesive.
I tinted my entire lens as well, as shown above, but shooting the outside with clear at a minimum really helps make them look new again too!
07-07-2012, 04:47 PM
#31
Member
iTrader: (1)
Join Date: Apr 2006
Location: Washington
Posts: 356
Likes: 0
Received 0 Likes
on
0 Posts
Car: 1985 Sport Coupe
Engine: 3800 Series II Turbo
Transmission: 4th-gen WC T5
Axle/Gears: 3.27 BW Limited
Re: WHERE CAN I GET THESE WICKED SICK TAIL LIGHTS?!?!?!
Thanks to Badnblk for some pics of those overpriced turds Klearz puts out. Love how they still can't even get a picture of them up on their own website, just "photoshop prototypes"
 07-08-2012, 12:35 PM
#32
Re: WHERE CAN I GET THESE WICKED SICK TAIL LIGHTS?!?!?!
There are 3 plastic pins on the top of each lens. Pull this out- if you break them or the are gone, PM me, I can sell you replacements.
Use the hair dryer as suggested to soften the adhesive and SLOWLY start levering them apart.
Watch that you carefully unlock the clips on the bottom- they break easily. If you can slip a thin putty knife into each, that should allow them to slip apart as you work the lens from the housing.
GO SLOWLY AND CAREFULLY.
Once you get one end to seperate a little, gently insert a wedge between the two, but resist the temptation to try and tear them apart further- use the hair dryer to soften the adhesive around the entire lens. It should start to release and let you gradually move the wedges further into the gap until the whole thing comes apart.
Then, remove all the old adhesive, CLEAN the whole thing, mask off the inside of the red lenses, tint the amber and reassemble with silicon adhesive.
I tinted my entire lens as well, as shown above, but shooting the outside with clear at a minimum really helps make them look new again too!
Use the hair dryer as suggested to soften the adhesive and SLOWLY start levering them apart.
Watch that you carefully unlock the clips on the bottom- they break easily. If you can slip a thin putty knife into each, that should allow them to slip apart as you work the lens from the housing.
GO SLOWLY AND CAREFULLY.
Once you get one end to seperate a little, gently insert a wedge between the two, but resist the temptation to try and tear them apart further- use the hair dryer to soften the adhesive around the entire lens. It should start to release and let you gradually move the wedges further into the gap until the whole thing comes apart.
Then, remove all the old adhesive, CLEAN the whole thing, mask off the inside of the red lenses, tint the amber and reassemble with silicon adhesive.
I tinted my entire lens as well, as shown above, but shooting the outside with clear at a minimum really helps make them look new again too!


Thread
Thread Starter
Forum
Replies
Last Post