
"Custom" T/A tail lights
 01-27-2008, 04:41 PM
#1
Supreme Member
Thread Starter
Join Date: Jan 2007
Location: Bastrop, TX
Posts: 1,002
Likes: 0
Received 12 Likes
on
11 Posts
Car: 1988 SC Convertible
Engine: LT-1
Transmission: 700R4
Axle/Gears: 3.23 posi w/PBR's
"Custom" T/A tail lights
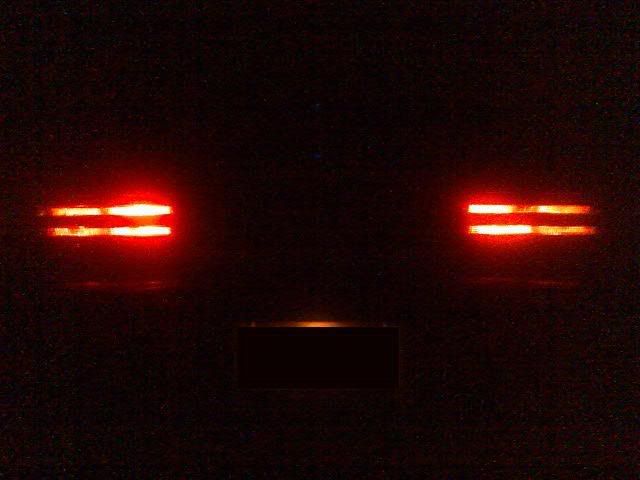
I picked up this set of T/A lights dirt cheap from the junk yard over a year ago. I thought I could fix the discoloration/delamination of the black grid behind the lenses. They were beyond repair so I ended up breaking the grid section out.
I've been thinking about doing something like this for several months now and I finally got around to it yesterday. I wanted to go with something a little different than the just the square/rectangle type grid pattern. My original plan was to do the hexagon honeycomb pattern like the 4th gen T/A's. I thought it would flow with my 4th gen wing. But, after alot of thought I decided it would be a major PITA to get the hexagon cut outs right. So, I went with plain old circles.
Opinions?
Questions?
Cussings?
 01-27-2008, 05:02 PM
#2
Junior Member
Join Date: Aug 2004
Location: Ames area, IA
Posts: 9
Likes: 0
Received 0 Likes
on
0 Posts
Car: 1988 Pontiac Trans Am GTA
Engine: 350 TPI
Transmission: None at the Moment
Axle/Gears: 3.73
Re: "Custom" T/A tail lights
Yeah, I think that looks pretty cool. I guess the only thing that looks weird to me is how some of the circles are cut off.
01-27-2008, 05:13 PM
#3
Senior Member
iTrader: (5)
Join Date: Jul 2006
Location: Kentucky
Posts: 882
Likes: 0
Received 0 Likes
on
0 Posts
Car: 1979 Z28 / 1990 RS
Engine: Matching 350 / 305 TBI
Transmission: Built TH350, 3000 Stall / 700r4
Axle/Gears: 3.73
Re: "Custom" T/A tail lights
heck man i love it, looks killer. If i had a TA than id either be sending my tails to yuo or having you explain how to do it man. they look great!
01-27-2008, 06:10 PM
#5
Supreme Member
Thread Starter
Join Date: Jan 2007
Location: Bastrop, TX
Posts: 1,002
Likes: 0
Received 12 Likes
on
11 Posts
Car: 1988 SC Convertible
Engine: LT-1
Transmission: 700R4
Axle/Gears: 3.23 posi w/PBR's
Re: "Custom" T/A tail lights
I was going to go with Firebat's idea, but then I would have had to buy an extra set of base bird lights to cut up. I already had these and this was basically a "free mod" since I used stuff that I already had.
01-27-2008, 06:37 PM
#6
Junior Member
Join Date: Dec 2007
Location: Toronto
Posts: 81
Likes: 0
Received 0 Likes
on
0 Posts
Car: 1989 Firebird Formula 350
Engine: 350
Transmission: Auto
Re: "Custom" T/A tail lights
that looks awesome... i wouldent do that tho.. id just do a straght black out.. but how did u take out the grid?
01-27-2008, 07:18 PM
#7
Supreme Member
Thread Starter
Join Date: Jan 2007
Location: Bastrop, TX
Posts: 1,002
Likes: 0
Received 12 Likes
on
11 Posts
Car: 1988 SC Convertible
Engine: LT-1
Transmission: 700R4
Axle/Gears: 3.23 posi w/PBR's
Re: "Custom" T/A tail lights
The first one I just broke out the grid piece by piece by pulling it away from the clear part with needle nose pliers. It took about an hour to do it that way. The second one I basically did the same thing, but used a heat gun to loosen it up and weaken the grid. The second one took maybe 5 minutes.
Trending Topics
01-27-2008, 07:29 PM
#9

 01-27-2008, 07:33 PM
#10
Supreme Member

iTrader: (15)
Join Date: Aug 2006
Location: Central NJ
Posts: 12,666
Likes: 0
Received 50 Likes
on
48 Posts
Car: 86 Trans Am, 92 Firebird
Engine: 408 sbc, 3.1L of raw power
Transmission: TKO600, T5
Axle/Gears: Moser 9", 3:70 trutac, 3:23 torsion
Re: "Custom" T/A tail lights
i've got 2 sets of TA tail lights that are delaminated bad, one set even cost me 160bux from an ebay douchebag.
I might have to do something that you did, they look pretty good. Good Job
from an ebay douchebag.I might have to do something that you did, they look pretty good. Good Job
01-27-2008, 10:23 PM
#12
01-28-2008, 08:29 AM
#13
Supreme Member

Join Date: Jan 2001
Location: Pittsburgh, PA
Posts: 1,374
Likes: 0
Received 2 Likes
on
2 Posts
Car: 06 SRM M6 GTO, 98 Grand Prix GTP
Re: "Custom" T/A tail lights
thats pretty awesome. I'm not a fan of the pattern, but the idea is excellent. How are you gonna put the circles on? Paint, plastic tint type cover?
I have an extra set of lights too, I may try to break them off and then redo the stock looking grill look, see how that looks.
Btw, I missed Firebats idea, what was it?
I have an extra set of lights too, I may try to break them off and then redo the stock looking grill look, see how that looks.
Btw, I missed Firebats idea, what was it?
01-28-2008, 09:39 AM
#14
Supreme Member
Join Date: Jun 2000
Location: NJ,USA
Posts: 1,300
Likes: 0
Received 1 Like
on
1 Post
Car: 1984 Trans Am
Engine: GMPP 350 V8
Transmission: 700R4
Axle/Gears: 3.23
Re: "Custom" T/A tail lights
Pretty interesting. It reminds me of the honeycomb of the 98-02 Birds. Goes well with the spoiler.
The only thing I dont like is all the circles, compared to the "square" lines of the thirdgen bumper.
The only thing I dont like is all the circles, compared to the "square" lines of the thirdgen bumper.
01-28-2008, 04:44 PM
#15
Supreme Member
Thread Starter
Join Date: Jan 2007
Location: Bastrop, TX
Posts: 1,002
Likes: 0
Received 12 Likes
on
11 Posts
Car: 1988 SC Convertible
Engine: LT-1
Transmission: 700R4
Axle/Gears: 3.23 posi w/PBR's
Re: "Custom" T/A tail lights
Thanks for all the good words guys.
Orinackra-
What you see is what it is. The circles are are done. I taped the whole inside of the lenses and traced around a quarter with a pencil. Then I went back and cut around each circle with a razor blade and pulled all of the surrounding tape out of the lenses leaving the tape circles. I painted the inside with gloss black spray paint and then pulled the tape circles out. I've got pics through just about every step so I could eventually right up a "how to" on it. You can do any design you want this way. Firebat's idea was in the fabrication forum. He had base bird lights with 3 red strips on each side and 2 round reverse lights.
TAdan-
I was originally planning on doing the honeycomb pattern. I got the idea from the 4th gen T/A's. I decided to go with the circles because it was alot easier. I've got a 91, so there's really not much "squareness" to my rear, especially with the 4th gen wing.
 01-28-2008, 05:04 PM
#17
Senior Member
iTrader: (1)

Join Date: Jan 2007
Location: CT
Posts: 711
Likes: 0
Received 0 Likes
on
0 Posts
Car: 1985 Trans Am
Engine: 305 TPI
Transmission: 700-R4
Axle/Gears: 3.23
Re: "Custom" T/A tail lights
a write up w/ pics would be awesome, im more of a visual learner....
01-28-2008, 10:27 PM
#18
Supreme Member
Thread Starter
Join Date: Jan 2007
Location: Bastrop, TX
Posts: 1,002
Likes: 0
Received 12 Likes
on
11 Posts
Car: 1988 SC Convertible
Engine: LT-1
Transmission: 700R4
Axle/Gears: 3.23 posi w/PBR's
Re: "Custom" T/A tail lights
I'll get all my pics rounded up and sorted through and get you a write up within the week. It's a fairly easy process, just time consuming.
01-29-2008, 11:20 AM
#19
Supreme Member
Join Date: Jan 2001
Location: Pittsburgh, PA
Posts: 1,374
Likes: 0
Received 2 Likes
on
2 Posts
Car: 06 SRM M6 GTO, 98 Grand Prix GTP
Re: "Custom" T/A tail lights
ok, thats cool. I see how that works. Heres an idea that may make things easier. make a template from a block or cookie cutter type deal, and just insert the little square or hexagons in there instead of cutting them in place?
Either way, nice work!
Either way, nice work!
01-29-2008, 02:35 PM
#20
Supreme Member
Join Date: Sep 2005
Location: Osceola Indiana
Posts: 2,151
Likes: 0
Received 0 Likes
on
0 Posts
Car: 92 RS(sold) 1989 IROC-Z
Engine: 350 TPI
Transmission: 700R4
Axle/Gears: ones that turn
Re: "Custom" T/A tail lights
I like it you know what you could do just make a template on the computer, and the trace out the honeycomb shape
01-29-2008, 02:51 PM
#21
Supreme Member
iTrader: (5)
Join Date: Aug 2006
Location: Cleveland, Ohio
Posts: 2,491
Likes: 0
Received 6 Likes
on
6 Posts
Car: 89' IROC-Z
Engine: LO3
Transmission: 700R4
Axle/Gears: 10-Bolt/2.73
Re: "Custom" T/A tail lights
To bad you dont work for a graphics company, you could measure the tail lights, make your little hexagon shapes in the pattern desired and print out on masking laminate which is sticky on 1 side and smooth on the other...
This way you could just match corners of the lenses to the masking sheet, peel off the mask and paint through the hexagons in a perfect setup.
This is something I have thought about doing when I get my GTA. But I have an 89 Camaro and wont expect my GTA for many many years down the road.
Maybe look into getting this done sometime, just ask them for a masking with die-cutted hexagon shaped cut out and boom, you have precision design on its own masking.
P.S. Looks good anyway though....
01-29-2008, 07:00 PM
#22
Supreme Member
Thread Starter
Join Date: Jan 2007
Location: Bastrop, TX
Posts: 1,002
Likes: 0
Received 12 Likes
on
11 Posts
Car: 1988 SC Convertible
Engine: LT-1
Transmission: 700R4
Axle/Gears: 3.23 posi w/PBR's
Re: "Custom" T/A tail lights
Here's a little how to on it:
The lenses were delaminated really bad, sorry I don't have any pics before I took the grid out or how to take the grid out. The black behind the clear was really bad on the ends towards the center of the car. There was no way to get the black plastic out so I had to paint the outside which is covered later.
All pics are attached below.
Removing the plastic grid:
The first one I just broke out the grid piece by piece by pulling it away from the clear part with needle nose pliers. It took about an hour to do it that way. The second one I basically did the same thing, but used a heat gun to loosen it up and weaken the grid. The second one took maybe 5 minutes. I broke it out as close to the outer edges of the lens as I could.
Sanding:
When the grid is removed, there will be indentions in the clear plastic that need to be removed if you plan on going with a pattern different than stock. If you plan on going back with the stock look you can leave them there and use them as a masking guide. I used 100 grit dry paper to get the marks out, then followed up with 220 wet, 320 wet, 600 wet, 1000 wet. Then I used Turtle wax rubbing compound followed by Mother's wheel polish.
Masking the outside:
As stated before the outside of the lenses that I had needed to be painted or you would be able to see all the delamination/discoloration of the black behind the clear that wasn't removable. I used masking tape to cover the area that I wanted to remain clear.
Masking and cutting the pattern inside:
I masked the entire inside of the lens. I used a quarter to get my pattern. All I did was trace the quarter with a pencil in the pattern that I wanted. When I was finished tracing and laying out the pattern I cut around each circle with a razor blade (it would have been much easier with an exacto knife). Once the circles were cut I removed the excess masking around each circle. Starting at one end the surrounding tape pulled off fairly easy.
Painting:
With everything masked off I painted the lenses inside and out with gloss black spray paint. I used Rust-O-Leum since that was what I had at the time. I applied 4 coats inside and out. When everything was dry I removed the masking tape. The outside is quick, the inside takes a little more time to get every circle out. The pics of it on the cooler show the outside tape removed and the tape circles on the inside still in place. Once all the masking is removed you can put the light assemblies back together and install.
All in all it's not that hard to do, I have about 8 hours +/- in the whole process. I also masked off the bird in the center section and gave it a few coats to match .
02-01-2008, 10:11 PM
#25
Supreme Member
iTrader: (7)
Join Date: Jul 2002
Location: Chicago
Posts: 1,948
Likes: 0
Received 2 Likes
on
2 Posts
Car: 1989 Camaro IROC-Z
Engine: L98 350 TPI
Transmission: Built TH-700 R4 (Vilgilante 2800)
Axle/Gears: 9 bolt w/ PBR's
Re: "Custom" T/A tail lights
A honeycomb look like on LS1 Firebird/TA would look cool.
Kevin
Kevin
02-03-2008, 10:14 PM
#26
Junior Member
Join Date: Mar 2007
Location: Columbus,Ga
Posts: 48
Likes: 0
Received 0 Likes
on
0 Posts
Car: 1985 pontiac trans am
Engine: sbc 355 with comp cam and promag ro
Transmission: 700r4 with 2500 stall
Axle/Gears: stock 9 bolt for now.
Re: "Custom" T/A tail lights
LOOKS GOOD! Gives me an idea.
 02-03-2008, 10:38 PM
#28
Banned
iTrader: (12)
Join Date: Jul 1999
Location: Bertram (outside Austin), TX
Posts: 12,212
Likes: 0
Received 10 Likes
on
10 Posts
Car: 87 GTA
Engine: L98
Transmission: 700R4
Axle/Gears: Dana M78 3.27 posi
Re: "Custom" T/A tail lights
He had asked me about making a honeycomb pattern template (I do vinyl, and make all the local club window lettering, decals & such) but my machine is down, and I can't get the manufacturer to even RESPOND, much less help diagnose my problem.
But it woulda be simple. I could have gotten paint mask material, applied it, then it would have peeled off EASILY.
But it woulda be simple. I could have gotten paint mask material, applied it, then it would have peeled off EASILY.
02-04-2008, 12:46 AM
#29
Senior Member
Join Date: Jul 2007
Location: Manchester, CT + Nashua, NH
Posts: 1,461
Likes: 0
Received 1 Like
on
1 Post
Car: 90 Firebird Formula
Engine: LO3
Transmission: T5
Axle/Gears: 3.08 one wheel peel
Re: "Custom" T/A tail lights
Looks good, I think the circles go pretty good with the later GFX like yours. Honeycomb would be cool, too. What I probably would have done, is use those little tag sale dot stickers, from the dollar store.
Another idea would be, get a roll of that 3/4" masking tape, and that 1/4" masking tape. Lay it in alternating every one, right edge to edge no overlap. Then yank out the 1/4" strips and paint. It would give that old school look, but not like the ones you had before. Kinda like a modern 82-84 light. You could VHT it afterwards too.
Another idea would be, get a roll of that 3/4" masking tape, and that 1/4" masking tape. Lay it in alternating every one, right edge to edge no overlap. Then yank out the 1/4" strips and paint. It would give that old school look, but not like the ones you had before. Kinda like a modern 82-84 light. You could VHT it afterwards too.
02-04-2008, 01:24 AM
#30
Senior Member
Join Date: Nov 2006
Location: Adelaide, Australia.
Posts: 651
Likes: 0
Received 0 Likes
on
0 Posts
Car: 1984 Trans-Am WS6
Engine: WAS: 5.0HO, SOON: ZZ383-425HP.
Transmission: 700R4 with shift kit
Re: "Custom" T/A tail lights
Another idea would be, get a roll of that 3/4" masking tape, and that 1/4" masking tape. Lay it in alternating every one, right edge to edge no overlap. Then yank out the 1/4" strips and paint. It would give that old school look, but not like the ones you had before. Kinda like a modern 82-84 light. You could VHT it afterwards too.
You mean like this?
Excuse the **** quality camera phone photo
02-04-2008, 11:45 AM
#31
Senior Member
iTrader: (1)
Join Date: Jan 2007
Location: CT
Posts: 711
Likes: 0
Received 0 Likes
on
0 Posts
Car: 1985 Trans Am
Engine: 305 TPI
Transmission: 700-R4
Axle/Gears: 3.23
Re: "Custom" T/A tail lights
He had asked me about making a honeycomb pattern template (I do vinyl, and make all the local club window lettering, decals & such) but my machine is down, and I can't get the manufacturer to even RESPOND, much less help diagnose my problem.
But it woulda be simple. I could have gotten paint mask material, applied it, then it would have peeled off EASILY.
But it woulda be simple. I could have gotten paint mask material, applied it, then it would have peeled off EASILY.
you siad you painted the outside of the lens as well?
02-04-2008, 11:59 AM
#32
Supreme Member
Thread Starter
Join Date: Jan 2007
Location: Bastrop, TX
Posts: 1,002
Likes: 0
Received 12 Likes
on
11 Posts
Car: 1988 SC Convertible
Engine: LT-1
Transmission: 700R4
Axle/Gears: 3.23 posi w/PBR's
Re: "Custom" T/A tail lights
Yeah, I had to paint the outside of the lenses. I wasn't able to get the black out around the edges and on the ends. The delaminated black was still visible through the clear plastic and it looked really bad so I painted the edges of the lenses black on the outside.
01-22-2010, 07:22 PM
#33
Junior Member
iTrader: (1)
Join Date: Feb 2009
Location: Church Hill, TN
Posts: 43
Likes: 0
Received 0 Likes
on
0 Posts
Car: 1986 Trans Am
Engine: V8 305, nothing big.
Re: "Custom" T/A tail lights
I hate to Necro, but are the '92 tail lights made the same way? I've been thinking about doing something like this for mine, to give it that TA look again. Alot of people won't belive me that it's a TA just because I switch tail lights... 
07-30-2011, 09:11 AM
#34
Senior Member
Join Date: Mar 2011
Location: dothan, al
Posts: 668
Likes: 0
Received 0 Likes
on
0 Posts
Car: 1988 pontiac trans am
Engine: None
Transmission: None
Axle/Gears: 10 Bolt


Thread
Thread Starter
Forum
Replies
Last Post