
How to machine a fuel rail (pics)
 05-27-2005, 08:39 AM
#1
Member
Thread Starter

Join Date: Sep 2001
Location: Boston
Posts: 230
Likes: 0
Received 0 Likes
on
0 Posts
How to machine a fuel rail (pics)
Hey Joe, Glad to see you are the moderator of this board! I've bought a few parts from you in the past. Anyway I sold my TA and bought an old C4 vette. The induction plans are Megasquirt with wideband, mercuriser EFI dual plane, L-98 throttle body, and 48lb injectors. It should be running in the next few weeks.
First gently clamp the rail into the vice with a couple of spacers.
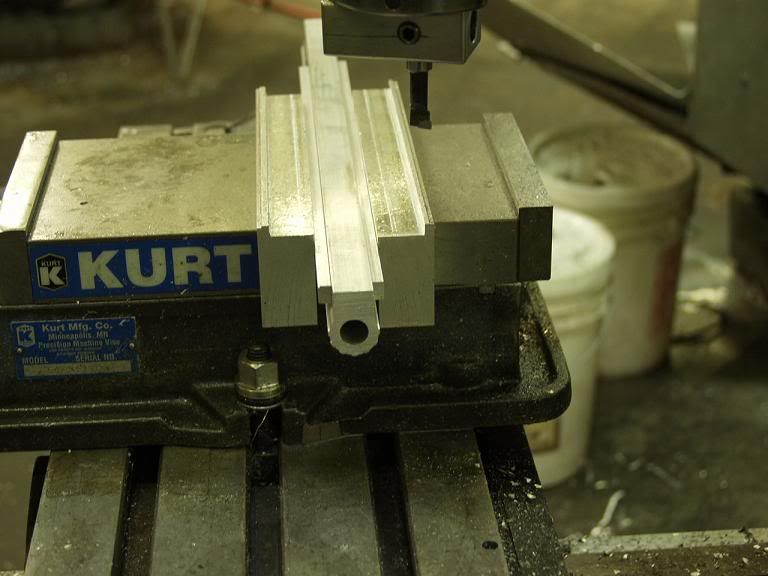
Then you have to index the rail to ensure its square to the bridgeport's table and chuck. This is done on both edges.


After the rail is indexed, move the chuck to the centerline and zero the readout. Move the table to the first injector and start drilling the holes. I used a .040 undersize drill for this step.
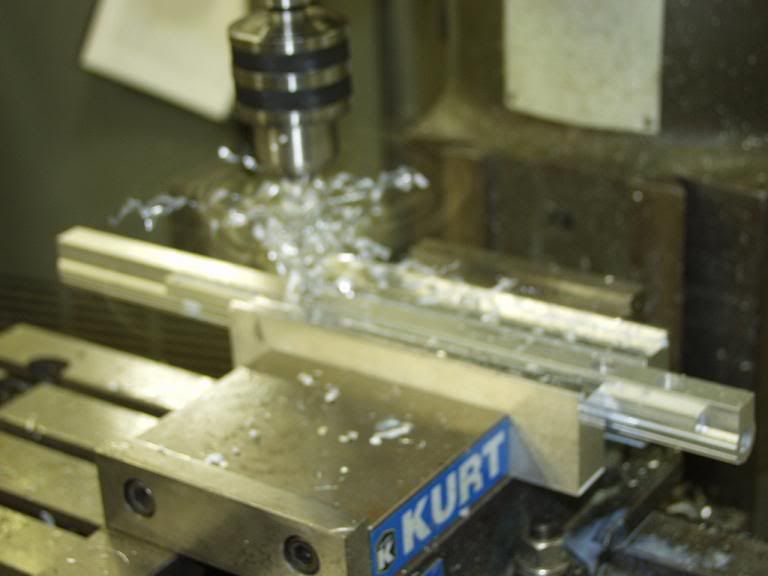
After the holes are drilled I need to finish the bores to the correct size and ensure a nice finish in the hole. The wall finish is important to allow the O-ring to compress and prevent any fuel leakage, this is why you can't just drill the hole to the final dimension.
To finish the bores a boring bar is used, this picture shows me setting the bar.

And the boring bar going at it...

And the final product before deburring...

First gently clamp the rail into the vice with a couple of spacers.
Then you have to index the rail to ensure its square to the bridgeport's table and chuck. This is done on both edges.
After the rail is indexed, move the chuck to the centerline and zero the readout. Move the table to the first injector and start drilling the holes. I used a .040 undersize drill for this step.
After the holes are drilled I need to finish the bores to the correct size and ensure a nice finish in the hole. The wall finish is important to allow the O-ring to compress and prevent any fuel leakage, this is why you can't just drill the hole to the final dimension.
To finish the bores a boring bar is used, this picture shows me setting the bar.
And the boring bar going at it...
And the final product before deburring...
Last edited by mhaskell; 05-27-2005 at 08:48 AM.
 05-27-2005, 09:22 AM
#2

Add a chamfer and then run a deburring tool around the edges to smooth the transitions. Tt is a ton easier to install injectors, I could not install the injectors in my custom rails without them. By the way you can also use a reamer instead of the boring bar. I ended up with a 32 finish using a reamer.
05-27-2005, 09:57 AM
#3
Member
Thread Starter
Join Date: Sep 2001
Location: Boston
Posts: 230
Likes: 0
Received 0 Likes
on
0 Posts
Originally posted by 355SS
Add a chamfer and then run a deburring tool around the edges to smooth the transitions. Tt is a ton easier to install injectors, I could not install the injectors in my custom rails without them. By the way you can also use a reamer instead of the boring bar. I ended up with a 32 finish using a reamer.
Add a chamfer and then run a deburring tool around the edges to smooth the transitions. Tt is a ton easier to install injectors, I could not install the injectors in my custom rails without them. By the way you can also use a reamer instead of the boring bar. I ended up with a 32 finish using a reamer.

The reamer is a great idea also.
05-27-2005, 10:45 AM
#4
TGO Supporter/Moderator

iTrader: (12)
Join Date: Jul 1999
Location: SALEM, NH
Posts: 11,785
Likes: 0
Received 94 Likes
on
79 Posts
Car: '88 Formula, '94 Corvette, '95 Bird
Engine: LC9, LT1
Transmission: TKX, 4L60E
Axle/Gears: 3.42, 3.23
Re: How to machine a fuel rail (pics)
Originally posted by mhaskell
Hey Joe, Glad to see you are the moderator of this board! I've bought a few parts from you in the past. Anyway I sold my TA and bought an old C4 vette. The induction plans are Megasquirt with wideband, mercuriser EFI dual plane, L-98 throttle body, and 48lb injectors. It should be running in the next few weeks.
Hey Joe, Glad to see you are the moderator of this board! I've bought a few parts from you in the past. Anyway I sold my TA and bought an old C4 vette. The induction plans are Megasquirt with wideband, mercuriser EFI dual plane, L-98 throttle body, and 48lb injectors. It should be running in the next few weeks.
The merc efi intake. I looked at a lot of those on ebay. They are all cast iron, right?
Bring it by my shop when you got it running. Would love to see it in person.
I've been considering jumping on the C4 bandwagon myself lately. But I wanna see how the car runs at the track this year.
-- Joe
05-27-2005, 12:41 PM
#5
Member
Thread Starter
Join Date: Sep 2001
Location: Boston
Posts: 230
Likes: 0
Received 0 Likes
on
0 Posts
Re: Re: How to machine a fuel rail (pics)
Originally posted by anesthes
Thanks for the good words. And thanks for the post! I'm really excited about this board. We've got a lot of talented people on here showing off what their designing and building. Thats really cool!
The merc efi intake. I looked at a lot of those on ebay. They are all cast iron, right?
Bring it by my shop when you got it running. Would love to see it in person.
I've been considering jumping on the C4 bandwagon myself lately. But I wanna see how the car runs at the track this year.
-- Joe
As for these rails...
At inlet pressure of 45PSI, 255lph (pump max),0.540 rail ID, 30in length, 0delta Z, density of 803 kg/m3, and viscosity of 1cP the pressure drop is 0.02 PSI from the inlet to outlet of the rail. Reynolds number is 5370, which is just past the transistional flow range.
This pressure drop is pretty insignificant compared to the P drop across the filter, and hopefully I never actually use this much fuel, because it equals 1.14 gallons per minute, about 15 minutes between fill ups
05-27-2005, 05:44 PM
#6
TGO Supporter/Moderator
iTrader: (12)
Join Date: Jul 1999
Location: SALEM, NH
Posts: 11,785
Likes: 0
Received 94 Likes
on
79 Posts
Car: '88 Formula, '94 Corvette, '95 Bird
Engine: LC9, LT1
Transmission: TKX, 4L60E
Axle/Gears: 3.42, 3.23
Re: Re: Re: How to machine a fuel rail (pics)
Originally posted by mhaskell
The intake is aluminum, I posted some pics in my other thread. If you are thinking about the vette, go for it. The difference between my 92 TA and the 84 vette is just astounding, it would take huge dollars to get the third gen to the vettes level in terms of suspension to handle big power, and cornering.
The intake is aluminum, I posted some pics in my other thread. If you are thinking about the vette, go for it. The difference between my 92 TA and the 84 vette is just astounding, it would take huge dollars to get the third gen to the vettes level in terms of suspension to handle big power, and cornering.

I thought all thost boat intakes were cast iron. Weird. I'll have to find your other thread.
-- Joe
05-27-2005, 06:46 PM
#7
Member
Thread Starter
Join Date: Sep 2001
Location: Boston
Posts: 230
Likes: 0
Received 0 Likes
on
0 Posts
Re: Re: Re: Re: How to machine a fuel rail (pics)
Originally posted by anesthes
I was considering going the vette route this winter. There is only one, and I mean ONE reason I have a problem with the vette: my motor is not a direct bolt in. You can't double up on the crank pully on the vette, because the rack is in the way. So the blower would be an issue. I'd have to get different brackets, and run it off the same pullys as the accesories, which means the belt will slip in the higher boost ranges.
I thought all thost boat intakes were cast iron. Weird. I'll have to find your other thread.
-- Joe
Trending Topics
06-24-2005, 05:23 PM
#8
Senior Member
iTrader: (1)

Join Date: Jul 2000
Location: New Berlin Wi
Posts: 570
Likes: 0
Received 0 Likes
on
0 Posts
Car: 88 Iroc
Engine: 94 lt1 modded
Transmission: t 56
This is a great thread. I wish I would have seen it before my machinist wrecked my fuel rails because he was in a hurry.
Kory
Kory
06-24-2005, 06:57 PM
#9
Supreme Member
iTrader: (1)

Join Date: Apr 2001
Location: Southwest Chicago 'burbs
Posts: 2,031
Likes: 0
Received 0 Likes
on
0 Posts
Any chance you'd want to make me a set of rails? If your up to it, shoot me an email with turnaround time and $$$.
I'm using modified stock rails at the moment, but I'd like to step up to some nicer aftermarket ones if the price is right.
quiktrp@cbcast.com
I'm using modified stock rails at the moment, but I'd like to step up to some nicer aftermarket ones if the price is right.
quiktrp@cbcast.com
06-29-2005, 03:26 PM
#10
Junior Member

Join Date: Apr 2004
Location: Williamsport PA
Posts: 29
Likes: 0
Received 0 Likes
on
0 Posts
Originally posted by 355SS
Add a chamfer and then run a deburring tool around the edges to smooth the transitions. Tt is a ton easier to install injectors, I could not install the injectors in my custom rails without them. By the way you can also use a reamer instead of the boring bar. I ended up with a 32 finish using a reamer.
Add a chamfer and then run a deburring tool around the edges to smooth the transitions. Tt is a ton easier to install injectors, I could not install the injectors in my custom rails without them. By the way you can also use a reamer instead of the boring bar. I ended up with a 32 finish using a reamer.
What size reamer did you use and where did you get it from? Did you do it by hand or with a machine?
Thanks,
-Matt
06-30-2005, 08:38 AM
#12
Junior Member
Join Date: Apr 2004
Location: Williamsport PA
Posts: 29
Likes: 0
Received 0 Likes
on
0 Posts
Originally posted by 355SS
We have reamer in 0.010 increments, I don't remember what size I used but it was close to the stock hole dia. All machine work was done in a bridgeport
We have reamer in 0.010 increments, I don't remember what size I used but it was close to the stock hole dia. All machine work was done in a bridgeport
From what I have found the hole diamater needs to be somewhere between .540 and .550 to allow for .020 to .035 of 0-ring crush.
With a reamer do you have to make the entire hole the same diameter or can you just ream the first .550 or so to create a ridge? I have read that its a good idea to have a ridge(smaller diamater at top of hole) to prevent the injectors from riding up to far in the hole.
One more question... before using the reamer would you just drill a hole very close to the final size(17/32=.531) then use a 35/64=.546 reamer to make the final hole?
Thanks,
-Matt
Last edited by mattjw; 06-30-2005 at 12:16 PM.

Thread
Thread Starter
Forum
Replies
Last Post
ambainb
Camaros for Sale
11
04-25-2016 09:21 PM