Raven's Build Dairy (Turbo)
 07-06-2005, 08:12 PM
#1
Member

Thread Starter

Join Date: Nov 2002
Location: Katherine, Australia
Posts: 309
Likes: 0
Received 0 Likes
on
0 Posts
Car: 1990 Camaro IROC-T
Engine: L98 Turbo (GT40)
Transmission: THO400
Axle/Gears: Forged axles, 3.23 rear
Raven's Build Dairy (Turbo)
Well the turbo build has been going for a couple of days now and since im doing a little dairy on another site id thought id put it here in case anyone gave half a ****. Firstly i thought id through up a quick pictorial time-line of the car...
Just got her;
Juiced;
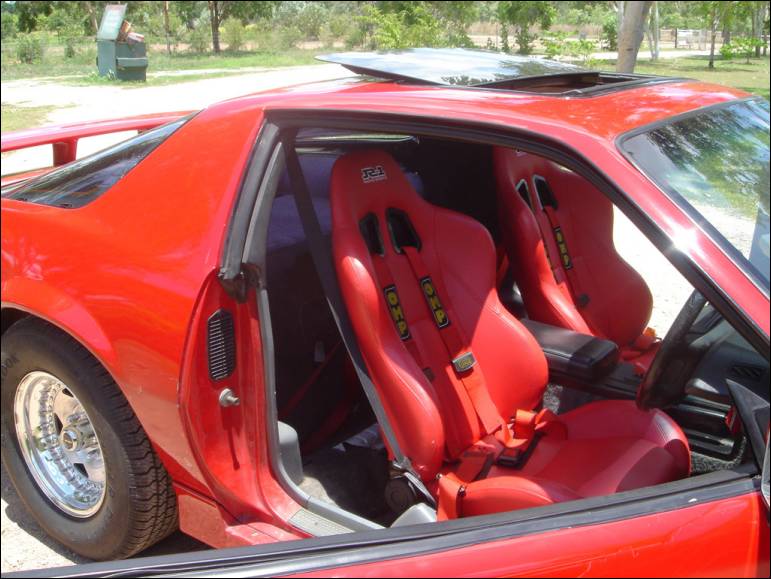
New Wheels and interior;
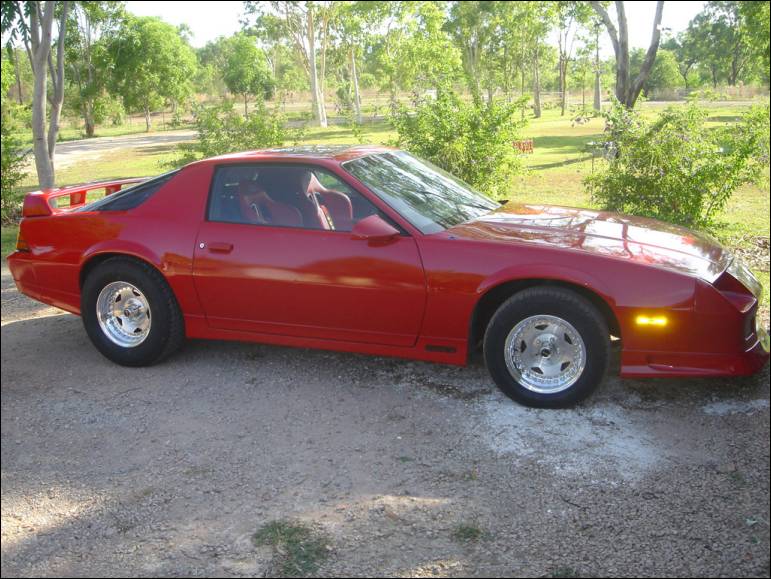
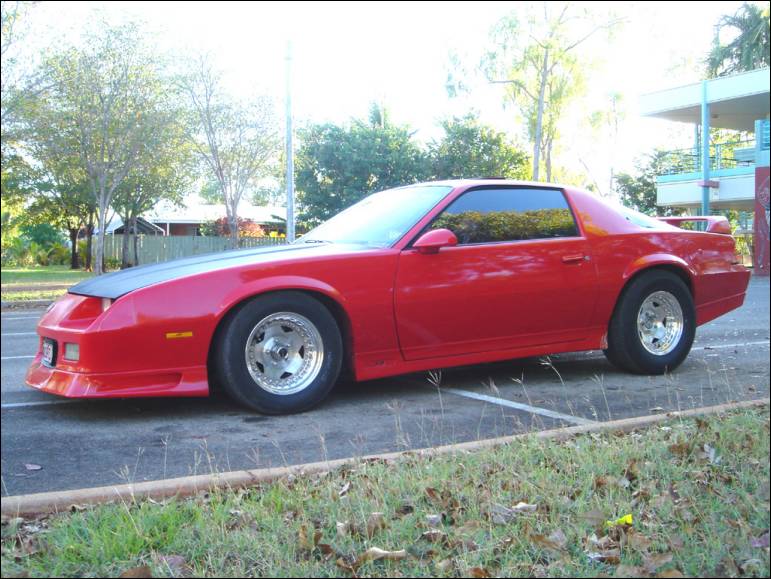
New paint;

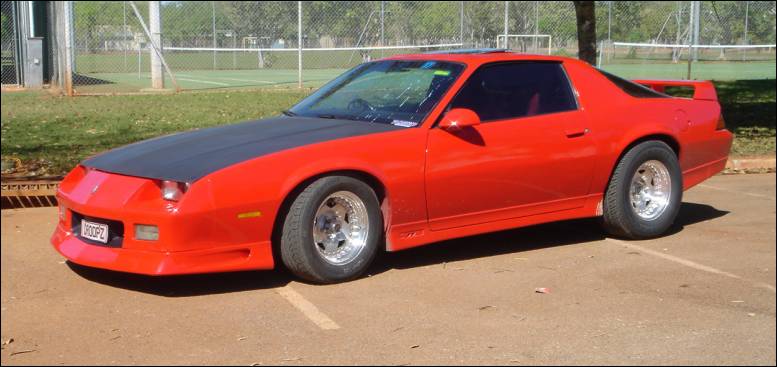
New stance;
Thats about it untill earlier today. Shes now OFFICIALLY in pieces getting the turbo treatment. I hope that while I'm working on it the parts i'm waiting for arrive as my window for this to be done is closing alot faster than im happy about. But it shouldn't be too long.... (fingers crossed)
Ill update with pics most days as the build progresses....
Just got her;
Juiced;
New Wheels and interior;
New paint;
New stance;
Thats about it untill earlier today. Shes now OFFICIALLY in pieces getting the turbo treatment. I hope that while I'm working on it the parts i'm waiting for arrive as my window for this to be done is closing alot faster than im happy about. But it shouldn't be too long.... (fingers crossed)
Ill update with pics most days as the build progresses....
 07-06-2005, 08:13 PM
#2
Member
Thread Starter
Join Date: Nov 2002
Location: Katherine, Australia
Posts: 309
Likes: 0
Received 0 Likes
on
0 Posts
Car: 1990 Camaro IROC-T
Engine: L98 Turbo (GT40)
Transmission: THO400
Axle/Gears: Forged axles, 3.23 rear
Day 1
Well basicly the last 2 nights have simply been getting the headers off.
The passenger side was a snap, and came off in no time at all.
The drivers side became a big mission since I had no way of reaching the back 2 manifold bolds with the steering shaft in the way. So 3 bolts on the inside of the firewall, 2 under the dash and 1 onto the intermediate shaft and that was out of the way.
After pulling the shaft up a few inches access was a breeze and the manifold came right off.
I also pulled the intermediate shaft out as i have a newer one to put in but i also noticed my steering box was leaking. That combined with my sloppy steering has prompted me to replace the box. Can anyone tell me what box is used in RHD conversions or how to ID this one?
Tomorrow: Test fitting of headers (without spark plugs )
07-06-2005, 08:13 PM
#3
Member
Thread Starter
Join Date: Nov 2002
Location: Katherine, Australia
Posts: 309
Likes: 0
Received 0 Likes
on
0 Posts
Car: 1990 Camaro IROC-T
Engine: L98 Turbo (GT40)
Transmission: THO400
Axle/Gears: Forged axles, 3.23 rear
Day 2
OK... day (night) 2 is done.
I got the rest ofthe exhausts system off and began the test fitting of the headers. Naturally, nothing quite fits.
Firstly, the drivers side header. This was always going to be the scary one since it needs to dodge the block, starter, brake lines and steering shaft. Oddly enough it fits better than anything else. I'm not 100% sure if it will clear the steering shaft fully untill i put it back in, but right now the only mod it needs is where the white dot is in this pic needs to be bashed/crushed in about 15mm as its fouling on the top of a LCA mount.
** EDIT: Turns out i marked it wrong. Its fouling further up on the collector and is actually hitting the cross memeber **
OK.. next. The turbo header. Firstly I could tell just visually that it wasnt going to fit my big *** turbo in without removing the heater blower, so off it came. Im a little worried since Ive heard of cars failing rego without a heater, even up here. Something to do with de-misting i guess. Anyway, I tore out all the hoses and controls ages ago so its gone too.
The header itself bolted straight on without any dramas and looked the goods. BUT.... 2 major problems are present.
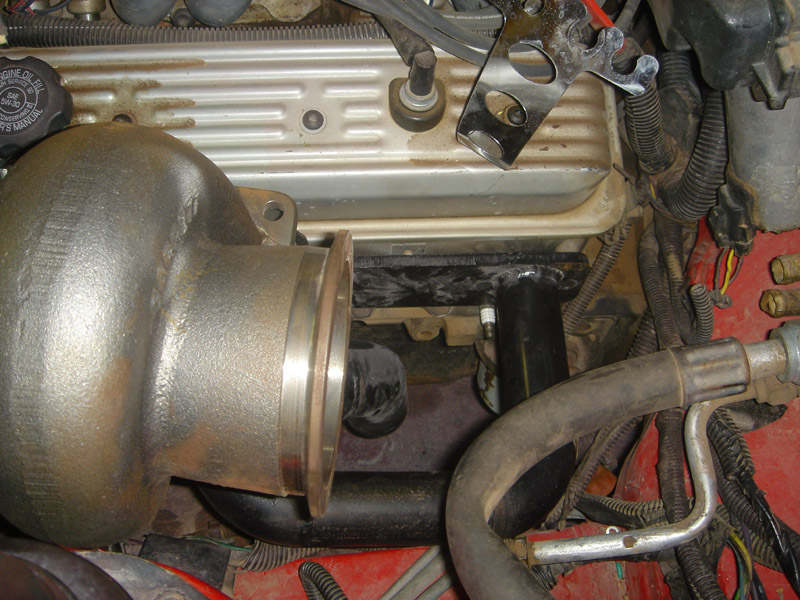
1. My turbo is too big, and hits the strut tower.
2. The V-Band Neck on the turbo is so long, it half passes over the gap mad for the dump pipe.
Here you can see the mark on the paint where it hits.
This I HOPE I cant solve by taking the header in and getting the flage cut off, and a spacer/angle put under it to raise it slightly and tilt it back in towards the middle. That would solve problem number 1.
Problems number 2 is a little mor tricky as it involves a very difficult to shape dump-pipe. I had hoped to use 4" until i got underthe car, but in order to get the initail "S" bend i need to bring the pipe forward under the turbo ill have to imidiatly go the 3" and have some very sharp turns. ALmost crushed I fear.
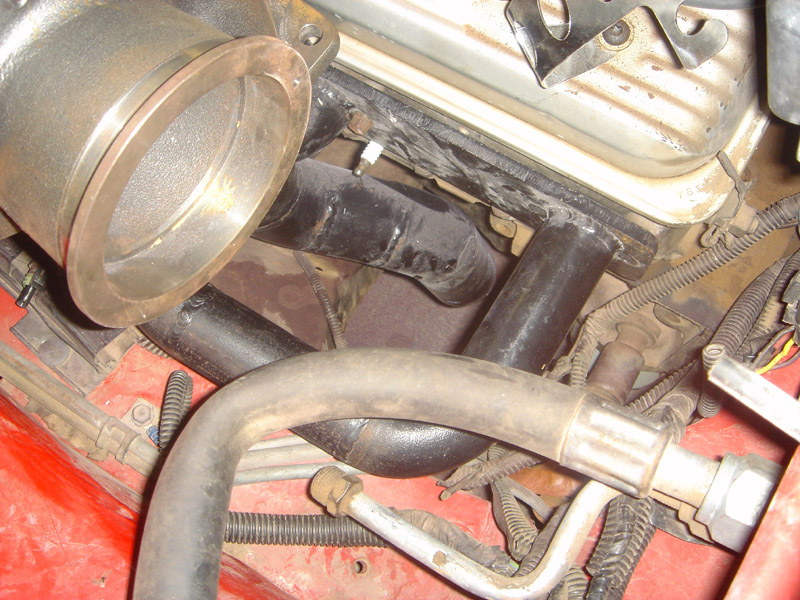
These pics kind of show where its gonna have to go. I'm not too stressed about number 2 right now as I need to find out exaclty where the turbo is going to end up before I can fit anything.
Another drama I just noticed last night is the bolt pattern on the turbo (GT40) doesnt match the both pattern on the header flange or supplied gasket.
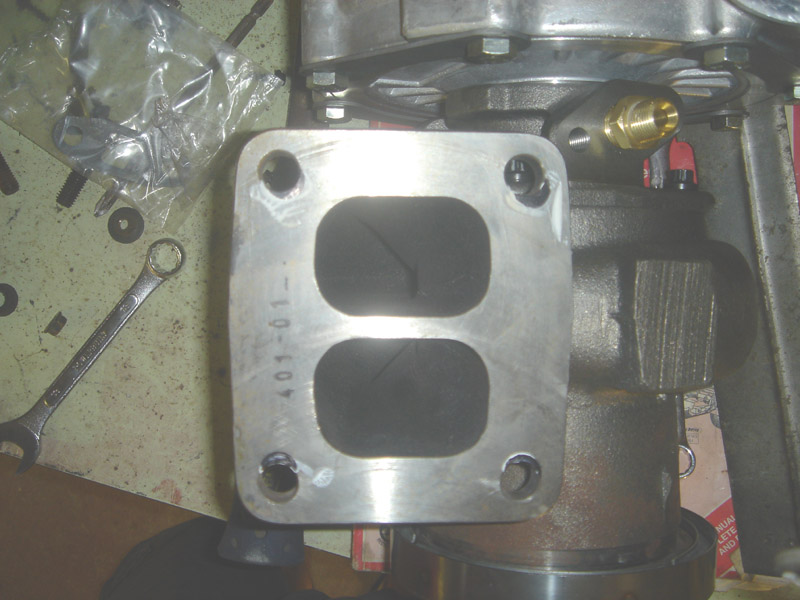
After tracing the bolt holes onto the turbo with the gasket as a template you can see the black marks that need to be drilled/machined out.
Finally, with the help of this lovely ***....istant :moon: , I was able to get a shot of where its all gonna end up. Should be awsome. :beer:
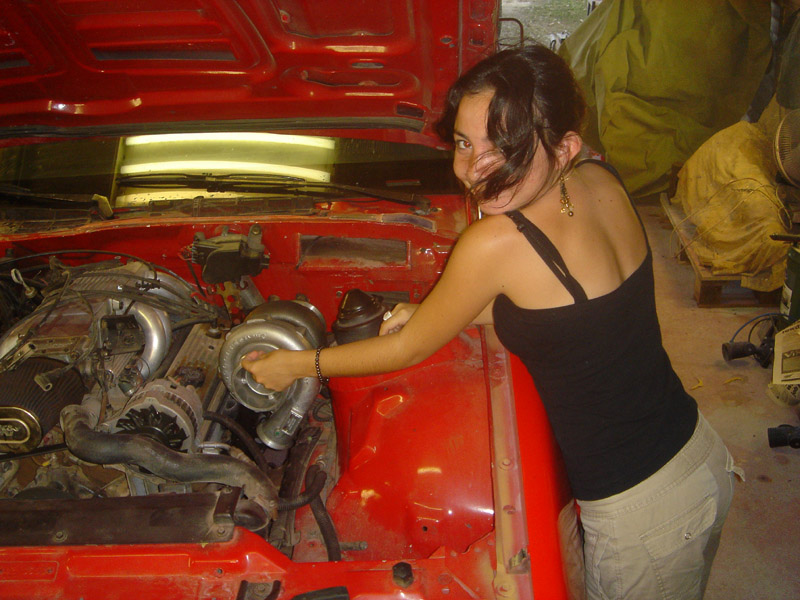
Big Engine + Big Turbo + Hot Chick = Teh WINNAR!!!!
I got the rest ofthe exhausts system off and began the test fitting of the headers. Naturally, nothing quite fits.
Firstly, the drivers side header. This was always going to be the scary one since it needs to dodge the block, starter, brake lines and steering shaft. Oddly enough it fits better than anything else. I'm not 100% sure if it will clear the steering shaft fully untill i put it back in, but right now the only mod it needs is where the white dot is in this pic needs to be bashed/crushed in about 15mm as its fouling on the top of a LCA mount.
** EDIT: Turns out i marked it wrong. Its fouling further up on the collector and is actually hitting the cross memeber **
OK.. next. The turbo header. Firstly I could tell just visually that it wasnt going to fit my big *** turbo in without removing the heater blower, so off it came. Im a little worried since Ive heard of cars failing rego without a heater, even up here. Something to do with de-misting i guess. Anyway, I tore out all the hoses and controls ages ago so its gone too.
The header itself bolted straight on without any dramas and looked the goods. BUT.... 2 major problems are present.
1. My turbo is too big, and hits the strut tower.
2. The V-Band Neck on the turbo is so long, it half passes over the gap mad for the dump pipe.
Here you can see the mark on the paint where it hits.
This I HOPE I cant solve by taking the header in and getting the flage cut off, and a spacer/angle put under it to raise it slightly and tilt it back in towards the middle. That would solve problem number 1.
Problems number 2 is a little mor tricky as it involves a very difficult to shape dump-pipe. I had hoped to use 4" until i got underthe car, but in order to get the initail "S" bend i need to bring the pipe forward under the turbo ill have to imidiatly go the 3" and have some very sharp turns. ALmost crushed I fear.
These pics kind of show where its gonna have to go. I'm not too stressed about number 2 right now as I need to find out exaclty where the turbo is going to end up before I can fit anything.
Another drama I just noticed last night is the bolt pattern on the turbo (GT40) doesnt match the both pattern on the header flange or supplied gasket.
After tracing the bolt holes onto the turbo with the gasket as a template you can see the black marks that need to be drilled/machined out.
Finally, with the help of this lovely ***....istant :moon: , I was able to get a shot of where its all gonna end up. Should be awsome. :beer:
Big Engine + Big Turbo + Hot Chick = Teh WINNAR!!!!
Last edited by Raven90IROC; 07-07-2005 at 05:50 AM.
07-07-2005, 12:54 AM
#5
Member
Thread Starter
Join Date: Nov 2002
Location: Katherine, Australia
Posts: 309
Likes: 0
Received 0 Likes
on
0 Posts
Car: 1990 Camaro IROC-T
Engine: L98 Turbo (GT40)
Transmission: THO400
Axle/Gears: Forged axles, 3.23 rear
Heres the turd-blow

Specs (from memory);
GT40;
Comp wheel diam 82mm, 50 trim, 0.58 A/R
Turbine 77mm, 73 trim, 0.94 A/R
I'll ask the SO if I can post some more of her posing later....
Specs (from memory);
GT40;
Comp wheel diam 82mm, 50 trim, 0.58 A/R
Turbine 77mm, 73 trim, 0.94 A/R
I'll ask the SO if I can post some more of her posing later....
Last edited by Raven90IROC; 07-07-2005 at 01:04 AM.
07-07-2005, 05:28 AM
#6
Member
Thread Starter
Join Date: Nov 2002
Location: Katherine, Australia
Posts: 309
Likes: 0
Received 0 Likes
on
0 Posts
Car: 1990 Camaro IROC-T
Engine: L98 Turbo (GT40)
Transmission: THO400
Axle/Gears: Forged axles, 3.23 rear
Can anyone tell me if its an F-body mortal sin to cut a chunk (about 1' x 1') out of a section of the crossmember? Is it going to loose too much strength? 
Day 3
Not much today unfortunatly. Took teh turbo-side header in to the machining shop for them to have a look. The up-shot is that they're gonna make an angled spacer to weld onto the current flange-face. The result is that the turbo is raised about 10mm and rotated back towards the motor.
My new worry is that the drivers side header is fouling too much on the cross member to be 'dinted in' enough. So now I have to look at possibly taking a small chunk out of the edge of the cross member, or almost totally re-making that header.
Last edited by Raven90IROC; 07-07-2005 at 05:51 AM.
07-07-2005, 12:42 PM
#7
Member

Join Date: Jul 1999
Location: ElDorado,Arkansas
Posts: 127
Likes: 0
Received 0 Likes
on
0 Posts
I don't know if you can do the same or not but the long tube headers on my V-8 S-10 interfered in a couple of places so I marked the spots ,pulled the motor and heated the areas with a torch then whamed the **** out of it for a nice fit.
Trending Topics
 07-11-2005, 06:51 PM
#9
Member
Thread Starter
Join Date: Nov 2002
Location: Katherine, Australia
Posts: 309
Likes: 0
Received 0 Likes
on
0 Posts
Car: 1990 Camaro IROC-T
Engine: L98 Turbo (GT40)
Transmission: THO400
Axle/Gears: Forged axles, 3.23 rear
Quick update
The non turbo header has being going back and forward between myself and the shop, geting cut, moved, tack-ed then test fitted. We're getting it very close so hopefully no k member mods will be needed.
The non turbo header has being going back and forward between myself and the shop, geting cut, moved, tack-ed then test fitted. We're getting it very close so hopefully no k member mods will be needed.
07-13-2005, 12:45 AM
#10
Member
Thread Starter
Join Date: Nov 2002
Location: Katherine, Australia
Posts: 309
Likes: 0
Received 0 Likes
on
0 Posts
Car: 1990 Camaro IROC-T
Engine: L98 Turbo (GT40)
Transmission: THO400
Axle/Gears: Forged axles, 3.23 rear
???
Justa quick question for the 'experts' out there 
Because of the extra heat generated by a turbo siting on the header, would it be a smart idea to run some cuts through the manifold plate (where it bolts onto the ports) to help stop the gilliteening (sp?) of the studs when the metal expands?
Or is my logic flawed in some way?
Because of the extra heat generated by a turbo siting on the header, would it be a smart idea to run some cuts through the manifold plate (where it bolts onto the ports) to help stop the gilliteening (sp?) of the studs when the metal expands?
Or is my logic flawed in some way?
07-13-2005, 12:10 PM
#11
Member
iTrader: (1)
Join Date: Apr 2003
Location: SoCal
Posts: 153
Likes: 0
Received 0 Likes
on
0 Posts
Car: 1982 Camaro Z28
Engine: electric
Transmission: powerglide
Axle/Gears: 10 bolt
Re: ???
Originally posted by Raven90IROC
Justa quick question for the 'experts' out there
Because of the extra heat generated by a turbo siting on the header, would it be a smart idea to run some cuts through the manifold plate (where it bolts onto the ports) to help stop the gilliteening (sp?) of the studs when the metal expands?
Or is my logic flawed in some way?
07-13-2005, 03:36 PM
#12
Supreme Member

Join Date: Jan 2003
Location: Ontario, Canada
Posts: 1,931
Likes: 0
Received 1 Like
on
1 Post
Car: 1989 IROC-Z
Engine: 5.7L EFI LTR setup
Transmission: T-5 World Class
Re: ???
Originally posted by Raven90IROC
Because of the extra heat generated by a turbo siting on the header, would it be a smart idea to run some cuts through the manifold plate (where it bolts onto the ports) to help stop the gilliteening (sp?) of the studs when the metal expands?
Because of the extra heat generated by a turbo siting on the header, would it be a smart idea to run some cuts through the manifold plate (where it bolts onto the ports) to help stop the gilliteening (sp?) of the studs when the metal expands?
Can you elaborate on this ? Cut's through the manifold ?
07-13-2005, 06:25 PM
#13
Member
Thread Starter
Join Date: Nov 2002
Location: Katherine, Australia
Posts: 309
Likes: 0
Received 0 Likes
on
0 Posts
Car: 1990 Camaro IROC-T
Engine: L98 Turbo (GT40)
Transmission: THO400
Axle/Gears: Forged axles, 3.23 rear
I was thinking just running a grinder through these lines to giveit some expansion ability.
07-13-2005, 07:31 PM
#14
Supreme Member
Join Date: Jan 2003
Location: Ontario, Canada
Posts: 1,931
Likes: 0
Received 1 Like
on
1 Post
Car: 1989 IROC-Z
Engine: 5.7L EFI LTR setup
Transmission: T-5 World Class
ohhhhh . LOL Thats what made these SLP's so great . Here is a pic . also they had nice 3/8 thick flanges .... your seem really thin . But I have no idea if thats a good thign or a bad thing for turbo setup's
...It's a shame mine have to come off for the new kit , they were really made well !
...It's a shame mine have to come off for the new kit , they were really made well !
07-13-2005, 07:33 PM
#15
Senior Member
Join Date: Feb 2004
Location: Isla del Encanto, P.R.
Posts: 608
Likes: 0
Received 3 Likes
on
2 Posts
Car: GTA
Engine: Bone Stock 350ci HSR T-76 Turbo
Transmission: T56 6-speed
Axle/Gears: Stock
Re: ???
Originally posted by Raven90IROC
Justa quick question for the 'experts' out there
Because of the extra heat generated by a turbo siting on the header, would it be a smart idea to run some cuts through the manifold plate (where it bolts onto the ports) to help stop the gilliteening (sp?) of the studs when the metal expands?
Or is my logic flawed in some way?
fast pit stop: If you do this you'll see as soon as you finish the cut how the flange will deform, making installation and removal a pain in the neck. You could probbably do this after some cookups running on the engine giving time so that the steel on the header with the aid of the heat will come to a definite shape.
07-13-2005, 11:34 PM
#16
Exactly, with the flanges cut after you heat cycle them once or 2x you�ll get stuck jumping through all sorts of hoops to line them up and seal them if you ever take them off again.
Given the choice I usually prefer making the bolt holes slightly bigger as the you go further away from the center of the flange
Given the choice I usually prefer making the bolt holes slightly bigger as the you go further away from the center of the flange
07-14-2005, 08:03 PM
#17
Supreme Member

Join Date: Feb 2005
Location: Fort Lauderdale, FL
Posts: 1,034
Likes: 0
Received 0 Likes
on
0 Posts
Car: 91 Camaro RS
Engine: 305 TBI
Transmission: 700R4
Axle/Gears: 2.73 Posi w/Disc
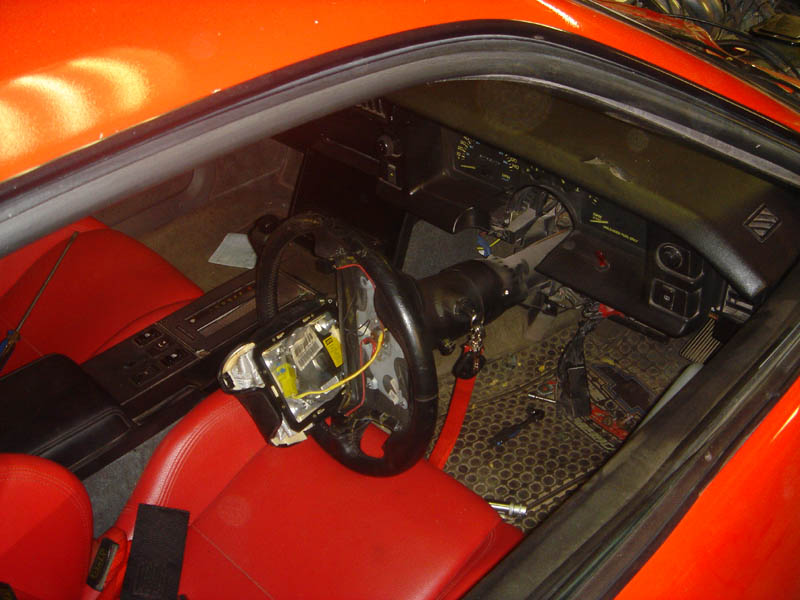
Great looking ride! This will be the first F-body I've seen with the steering column/brake assembly on the right side of the vehicle. I'm in the States, but work almost daily with a guy out of Perth (I think). Whenever he has to tweak something out to make it work as you are with the turbo, he says "I'll have to jiggerypokery around with it."...I love that word!
** Quote Of The Day **
"Big Engine + Big Turbo + Hot Chick = Teh WINNAR!!!!"
I love it.
Good luck with the install...this car is gonna FLY with the turbo.
Oh...and what's a "T700" transmission?
** Quote Of The Day **
"Big Engine + Big Turbo + Hot Chick = Teh WINNAR!!!!"
I love it.
Good luck with the install...this car is gonna FLY with the turbo.
Oh...and what's a "T700" transmission?
07-15-2005, 07:36 AM
#18
Member
iTrader: (1)
Join Date: Apr 2003
Location: SoCal
Posts: 153
Likes: 0
Received 0 Likes
on
0 Posts
Car: 1982 Camaro Z28
Engine: electric
Transmission: powerglide
Axle/Gears: 10 bolt
Originally posted by 83 Crossfire TA
Exactly, with the flanges cut after you heat cycle them once or 2x you�ll get stuck jumping through all sorts of hoops to line them up and seal them if you ever take them off again.
Given the choice I usually prefer making the bolt holes slightly bigger as the you go further away from the center of the flange
Last edited by browncamaroz28; 07-15-2005 at 07:38 AM.
07-17-2005, 08:59 PM
#19
Member
Thread Starter
Join Date: Nov 2002
Location: Katherine, Australia
Posts: 309
Likes: 0
Received 0 Likes
on
0 Posts
Car: 1990 Camaro IROC-T
Engine: L98 Turbo (GT40)
Transmission: THO400
Axle/Gears: Forged axles, 3.23 rear
Weekend Upadte:
Well a fair bit managed to get done this weekend. Not too many pics since the parents took my camera to bali but a few phone ones to keep the masses happy.
The headers have all been tacked up to where they need to be and are in getting finished today. For the turbo header modification, instead of cutting up teh header to move the flange up and in, we made up and angled spacer that effectivly rolles the turbo back in towards the engine and gives my the clearance i need from teh strut tower. It ended up being a very expencive way to do it due to the labour involved but it turned out well. It DOES however look like some minor hood modifications will ahve to be made in order to keep everything covered, which is a shame but not really unexpected.
Since alot of the this weekend was wasted waiting for parts to be made/modified, i focused on a few other bits of the car that i wanted to work on. I finally got around to installing my new Superior Forged Axles from the states and I must say they fit alot more snug that my old stock ones and are definatly made to a higher standard and should hold together a fair bit better.
We test fitted my FMU, external fuel pump and surge tank and it all looks like it will fit well. I need to fabricate up a peice of steel to box off and enclose the rear boot 'hole' to close it off from the cabin so i can run fuel in and out of there, but thats no major drama.
I also managed to install the Energy Suspension polyurethane bushes for the front and rear swaybars. While I was looking at it all, i decided it would be a good time to start boxing some braces.
In no time at all we have boxed both the trailing arms and re-enforced the panhad rod with tubular steel.
Note: We here and Droopz Customz are all about workplace safety.


Everything we pulled off also got cleaned up and coated in a nice Volcano Orange to match the K-mac springs and its all starting to look fairly trick.
And one more for the sake of it...

That was about it for the weekend. Now we begin work on the intake piping and downpipe.
Well a fair bit managed to get done this weekend. Not too many pics since the parents took my camera to bali but a few phone ones to keep the masses happy.
The headers have all been tacked up to where they need to be and are in getting finished today. For the turbo header modification, instead of cutting up teh header to move the flange up and in, we made up and angled spacer that effectivly rolles the turbo back in towards the engine and gives my the clearance i need from teh strut tower. It ended up being a very expencive way to do it due to the labour involved but it turned out well. It DOES however look like some minor hood modifications will ahve to be made in order to keep everything covered, which is a shame but not really unexpected.
Since alot of the this weekend was wasted waiting for parts to be made/modified, i focused on a few other bits of the car that i wanted to work on. I finally got around to installing my new Superior Forged Axles from the states and I must say they fit alot more snug that my old stock ones and are definatly made to a higher standard and should hold together a fair bit better.
We test fitted my FMU, external fuel pump and surge tank and it all looks like it will fit well. I need to fabricate up a peice of steel to box off and enclose the rear boot 'hole' to close it off from the cabin so i can run fuel in and out of there, but thats no major drama.
I also managed to install the Energy Suspension polyurethane bushes for the front and rear swaybars. While I was looking at it all, i decided it would be a good time to start boxing some braces.
In no time at all we have boxed both the trailing arms and re-enforced the panhad rod with tubular steel.
Note: We here and Droopz Customz are all about workplace safety.
Everything we pulled off also got cleaned up and coated in a nice Volcano Orange to match the K-mac springs and its all starting to look fairly trick.
And one more for the sake of it...
That was about it for the weekend. Now we begin work on the intake piping and downpipe.
07-19-2005, 01:38 AM
#20
I take it that you were trying to avoid the whole �ouch ouch, OUCH OUCH! I�ve got hot slag in my shoe�� phenomenon by skipping the shoes? How many steel splinters did you pull out of your foot (fwiw, NEVER try this if you�re working in stainless or if you�re using carbide burrs in steel� both will cause sharp little shards of metal that you�ll be pulling out of your feed for days)
07-19-2005, 03:01 PM
#22
Member
Join Date: Apr 2004
Location: on the street
Posts: 467
Likes: 0
Received 1 Like
on
1 Post
Car: 92 Formula 350
Engine: L98 with a T-76
Transmission: ArtCarr 700-R4
Axle/Gears: Bone stock 10bolt and 3.23's
Originally posted by 83 Crossfire TA
I take it that you were trying to avoid the whole �ouch ouch, OUCH OUCH! I�ve got hot slag in my shoe�� phenomenon by skipping the shoes? How many steel splinters did you pull out of your foot (fwiw, NEVER try this if you�re working in stainless or if you�re using carbide burrs in steel� both will cause sharp little shards of metal that you�ll be pulling out of your feed for days)
I take it that you were trying to avoid the whole �ouch ouch, OUCH OUCH! I�ve got hot slag in my shoe�� phenomenon by skipping the shoes? How many steel splinters did you pull out of your foot (fwiw, NEVER try this if you�re working in stainless or if you�re using carbide burrs in steel� both will cause sharp little shards of metal that you�ll be pulling out of your feed for days)
Last edited by TurboedTPI; 07-30-2005 at 10:03 AM.
07-19-2005, 07:24 PM
#23
Member
Thread Starter
Join Date: Nov 2002
Location: Katherine, Australia
Posts: 309
Likes: 0
Received 0 Likes
on
0 Posts
Car: 1990 Camaro IROC-T
Engine: L98 Turbo (GT40)
Transmission: THO400
Axle/Gears: Forged axles, 3.23 rear
Nah... we just breed em tough here in the northern parts of Oz!! 
Finally gotthe camera back so here are a few pics of the weekends results.
Here shows the final colour of the boxed LCAs and also the shinny new Superior axles.

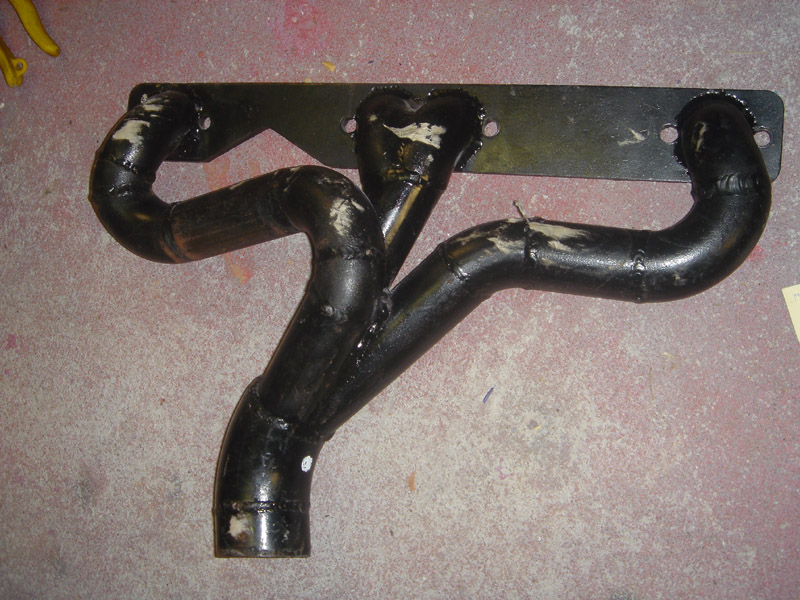
Here are a couple of pics of the finished turbo header, with its angled spacer plate. All still needs to be tidied up and such but it give you an idea of what was done.


This is a pic of the non turbo header. If you compare it to the pic further up in this thread, you can see how much it was modified to fit. Even as it is now, I may still have to 'oval' some parts of it to give it enough clearnace from the K member and starter motor once the engine torques.

Finally gotthe camera back so here are a few pics of the weekends results.
Here shows the final colour of the boxed LCAs and also the shinny new Superior axles.
Here are a couple of pics of the finished turbo header, with its angled spacer plate. All still needs to be tidied up and such but it give you an idea of what was done.
This is a pic of the non turbo header. If you compare it to the pic further up in this thread, you can see how much it was modified to fit. Even as it is now, I may still have to 'oval' some parts of it to give it enough clearnace from the K member and starter motor once the engine torques.
07-19-2005, 10:10 PM
#24
Member
Thread Starter
Join Date: Nov 2002
Location: Katherine, Australia
Posts: 309
Likes: 0
Received 0 Likes
on
0 Posts
Car: 1990 Camaro IROC-T
Engine: L98 Turbo (GT40)
Transmission: THO400
Axle/Gears: Forged axles, 3.23 rear
Here are the gauges that just arrived in all there digital goodness....

Handy for when im rev-ing past 10grand and boosting 2 bar.
Handy for when im rev-ing past 10grand and boosting 2 bar.
Last edited by Raven90IROC; 07-19-2005 at 10:17 PM.
07-24-2005, 09:56 PM
#25
Member
Thread Starter
Join Date: Nov 2002
Location: Katherine, Australia
Posts: 309
Likes: 0
Received 0 Likes
on
0 Posts
Car: 1990 Camaro IROC-T
Engine: L98 Turbo (GT40)
Transmission: THO400
Axle/Gears: Forged axles, 3.23 rear
Looks like i'm going to have to tap into the sump for the oil return. Unfortunatly the turbo isnt high enough to feed back into the rocker cover 
I have 2 questions I need help with...
1. What is the easiest way to get the sump off? To i need to lift the motor etc....?
2. How high up the sump do I put the return feed? So that it safely drains ontop of the oil thats in there?
Any help here would be awsome.
I have 2 questions I need help with...
1. What is the easiest way to get the sump off? To i need to lift the motor etc....?
2. How high up the sump do I put the return feed? So that it safely drains ontop of the oil thats in there?
Any help here would be awsome.
07-25-2005, 02:52 AM
#26
Download the vortech instructions online off of their website (even for any small block vehicle). They have a drawing with an exact location to put the thing, which has to be above the oil level, clear of the crank throws or anything else that could restrict the return or get in the way.
07-25-2005, 06:19 PM
#27
Member
Thread Starter
Join Date: Nov 2002
Location: Katherine, Australia
Posts: 309
Likes: 0
Received 0 Likes
on
0 Posts
Car: 1990 Camaro IROC-T
Engine: L98 Turbo (GT40)
Transmission: THO400
Axle/Gears: Forged axles, 3.23 rear
Thanks heaps for that mate. Can anyone vouch for the 'hole-punch + threading' method recommended by vortech? Seems alot easier than dropping my sump off.
07-25-2005, 11:22 PM
#29
Senior Member
Join Date: Feb 2004
Location: Isla del Encanto, P.R.
Posts: 608
Likes: 0
Received 3 Likes
on
2 Posts
Car: GTA
Engine: Bone Stock 350ci HSR T-76 Turbo
Transmission: T56 6-speed
Axle/Gears: Stock
Oil return
Originally posted by Raven90IROC
Thanks heaps for that mate. Can anyone vouch for the 'hole-punch + threading' method recommended by vortech? Seems alot easier than dropping my sump off.
Thanks heaps for that mate. Can anyone vouch for the 'hole-punch + threading' method recommended by vortech? Seems alot easier than dropping my sump off.
Luke, making a thread on the oil pan is not the best. There's always the chance for metal shavings to get into the inside of the pan when making the tap. What I always recommend is to punch a hole and then install a bulkhead connector. First; make the punch hole as high as possible near the pan's flange but between the holes for the pan's bolts, watch out for the block internals!. Now remove the distributor cap, remove the two engine mount bolts and lift the engine as much as possible. After you have lifted the engine place the mounting bolts again into the engine mounts(the bolts will work as stoppers). Now get some thin nose pliers to flatten the metal that the punch hole created inside the pan. Remove the oil pan nuts and bolts, all of them. Loosen the pan and now you will have sufficient space to get your fingers inside the pan so that you can get the bulkhead connector to pass the pan from the inside out. With all the metal inside the pan all flatten out the bulkhead connector should make a good seal with the aid of some silicon sealant. Put the sealant on the outer side of the pan, not on the inside. Place the bulkhead's nut on place and tight'em very well. If the bulkhead turns hold it with your fingers until the very friction stops the bulkhead from turning and tights itself. The good thing about this method is that there's no need for a complete pan removal, no risk for metal shavings to get into the engine and if for some reason the nut on the bulkhead becomes loose there's nothing to fall into the pan(sealant will keep the nut from loosening). I've always done this method on vehicles that I havent removed the pan and never had any kind of problems.
Good luck!
07-30-2005, 08:57 AM
#30
Member
Thread Starter
Join Date: Nov 2002
Location: Katherine, Australia
Posts: 309
Likes: 0
Received 0 Likes
on
0 Posts
Car: 1990 Camaro IROC-T
Engine: L98 Turbo (GT40)
Transmission: THO400
Axle/Gears: Forged axles, 3.23 rear
Well, the latest is all from my good friends workshop at Rattla Racing. I needed an experianced exhaust fabricator and a hoist to get this little project into its closing stages.
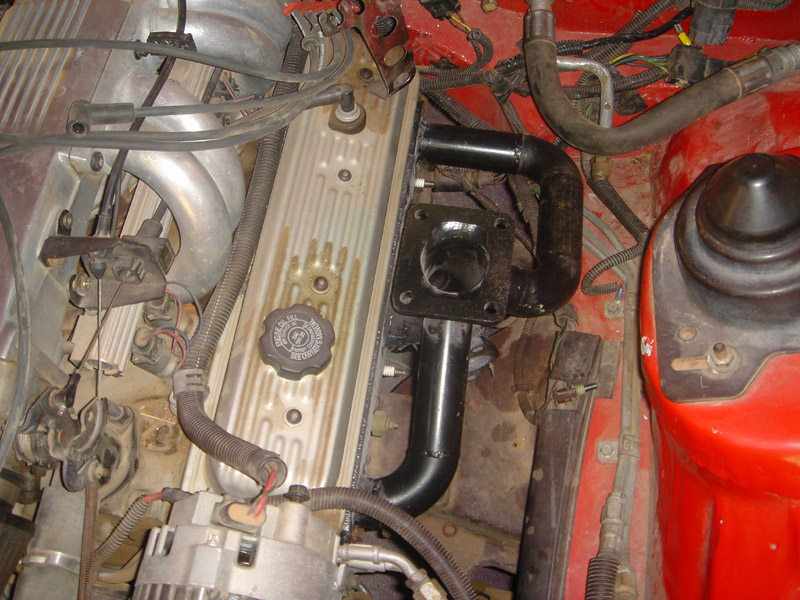
Firstly, we have the awsome down pipe John made up for me. Its 3" mandrel bent from the turbo's V-clamp (even though it uses a 4" outlet, it would be unrealistic to try and fit 4" of pipe through everything...) The black pipe is the lower connection over to the other header, and the silver one is the bottom of the down-pipe.

Another shot of the downpipe but here you can see the braided line running from above the oil filter that will lead to a block for the turbo feed, oil pressure and oil temp.

Here are a couple of shots of the drivers side sub-frame connectors. Me and the old man welded them in while John was making the downpipe.


And one last shot of the whole lot so far. Boxed LCA's, boxed Panhard rod, poly bushes and SFCs.

Well that was it for today. With the exception of the silicone reducer I need to hook it up to the throttle body, she'll be bloody close to done my the end of the long weekend. All that left is plumbing the wastegate to the down pipe, tapping the sum for the oil return and thats about it. Stay tuned folks....
Firstly, we have the awsome down pipe John made up for me. Its 3" mandrel bent from the turbo's V-clamp (even though it uses a 4" outlet, it would be unrealistic to try and fit 4" of pipe through everything...) The black pipe is the lower connection over to the other header, and the silver one is the bottom of the down-pipe.
Another shot of the downpipe but here you can see the braided line running from above the oil filter that will lead to a block for the turbo feed, oil pressure and oil temp.
Here are a couple of shots of the drivers side sub-frame connectors. Me and the old man welded them in while John was making the downpipe.
And one last shot of the whole lot so far. Boxed LCA's, boxed Panhard rod, poly bushes and SFCs.
Well that was it for today. With the exception of the silicone reducer I need to hook it up to the throttle body, she'll be bloody close to done my the end of the long weekend. All that left is plumbing the wastegate to the down pipe, tapping the sum for the oil return and thats about it. Stay tuned folks....
07-30-2005, 01:07 PM
#32
Heh, that�s some heavy plate you used to box the LCA�s, in the future, it would probably be both stronger and lighter if you used lighter plate and boxed everything, including the ends. Looks like you warped the PHR running the bead� that�s OK as long as it�s not twisted (which would cause some binding with the poly bushings).
As far as the oil return goes� I�ve never seen anyone do any damage with the tapping procedure like that, the trick is to actually use the punch thing and have a lip of steel to tap into, cover the tap with grease to hold the chips, and then clean everything well when you�re done (drain the oil, pore some kerosene thorough it to wash out any chips after draining the oil and dissolve some of the grease, clean the immediate area around the threads with a strong degreaser to allow whatever sealant you use on the threads to stick�).
If you�re going to go as far as using a bulkhead fitting, then just drill the hole so you have a flat surface to seal against, but I wouldn�t do it because even with some adhesive on the inside I�d be worried about the nut dropping into the pan. For that matter, if you�ve gone as far as pulling all the pan bolts, you have the exhaust off to run the turbo plumbing (or the original crossover is gone) then it�s only 5 min more to pull the pan (5 min to find the position for the crank to sit in that all the counterweights are out of the way of slipping the pan out). If you�ve gone that far pull the pan and weld the fitting.
07-30-2005, 06:52 PM
#33
Member
Thread Starter
Join Date: Nov 2002
Location: Katherine, Australia
Posts: 309
Likes: 0
Received 0 Likes
on
0 Posts
Car: 1990 Camaro IROC-T
Engine: L98 Turbo (GT40)
Transmission: THO400
Axle/Gears: Forged axles, 3.23 rear
Thanks guys. The PHR was alread bent slightly from the punishments it recieved prior to being boxed. The bushes slid in fine and offered little resistance so I don't think its twisted.
The LCA's were honestly and after thought. While the car was in the air I had a quite look around the shed and found those lengths of steal, and whacked them on.
Most if not EVERYTHING should be done by monday. All im missing to driver the car way isa 4" reducer (which I might just get made out of steal) and the 'lug' that needs to be tapped into the sump.
He said its my call, but John (the guy with teh shop) mentioned he has a powerful magnetic drill bit that he's used to drill into auto-sumps and such without any dramas before. So yet another offered sollution.
 08-02-2005, 08:20 PM
#35
Member
Thread Starter
Join Date: Nov 2002
Location: Katherine, Australia
Posts: 309
Likes: 0
Received 0 Likes
on
0 Posts
Car: 1990 Camaro IROC-T
Engine: L98 Turbo (GT40)
Transmission: THO400
Axle/Gears: Forged axles, 3.23 rear
Just a few pics of what is fast becoming a knot of exhaust pipes....
The bay without the intake piping.

The downpipe that I was convinced wouldnt fit... and the wastegate plumbing lined up...

The knot.... You can see here on this shot how close a few bits ended up to the body. Even though the engine will torque the other way, just vibrations with mean it hits. So it looks like ill put the solid mounts in and run turn-buckled torque chains/cables on both sides.

Downpipe again...

And finally, the drivers side. Plenty of room now.

Ill head back later today and see if its ready to go home.
The bay without the intake piping.
The downpipe that I was convinced wouldnt fit... and the wastegate plumbing lined up...
The knot.... You can see here on this shot how close a few bits ended up to the body. Even though the engine will torque the other way, just vibrations with mean it hits. So it looks like ill put the solid mounts in and run turn-buckled torque chains/cables on both sides.
Downpipe again...
And finally, the drivers side. Plenty of room now.
Ill head back later today and see if its ready to go home.
08-02-2005, 11:23 PM
#36
Member
Thread Starter
Join Date: Nov 2002
Location: Katherine, Australia
Posts: 309
Likes: 0
Received 0 Likes
on
0 Posts
Car: 1990 Camaro IROC-T
Engine: L98 Turbo (GT40)
Transmission: THO400
Axle/Gears: Forged axles, 3.23 rear
Can anyone tell me the sort of temps id be looking at from the turbo's dump-pipe? Im asking as the header wrap i am using for the rest of the system is only rated at 600degC. It that going to be too much under the temps we're talking about here?
EDIT:Its ok... i have found a supplier of heat wrap that is rated to 2000degF (933degC).
EDIT:Its ok... i have found a supplier of heat wrap that is rated to 2000degF (933degC).
Last edited by Raven90IROC; 08-03-2005 at 12:44 AM.
08-03-2005, 09:16 AM
#37
Member
iTrader: (1)
Join Date: Apr 2003
Location: SoCal
Posts: 153
Likes: 0
Received 0 Likes
on
0 Posts
Car: 1982 Camaro Z28
Engine: electric
Transmission: powerglide
Axle/Gears: 10 bolt
i've been coating the pipes on my car with turboX ceramic coating (got it from summit), it does the job of the heat wrap, but doesn't make your pipes rot.... so that might be another route you may want to take, if not heat wrap is still good stuff. btw the project looks really great
oh btw what size wastegate are you running, i have a gt40 on the way so its time to start thinking about it....
oh btw what size wastegate are you running, i have a gt40 on the way so its time to start thinking about it....
Originally posted by Raven90IROC
Can anyone tell me the sort of temps id be looking at from the turbo's dump-pipe? Im asking as the header wrap i am using for the rest of the system is only rated at 600degC. It that going to be too much under the temps we're talking about here?
EDIT:Its ok... i have found a supplier of heat wrap that is rated to 2000degF (933degC).
Last edited by browncamaroz28; 08-03-2005 at 11:34 AM.
08-03-2005, 08:29 PM
#38
Member
Thread Starter
Join Date: Nov 2002
Location: Katherine, Australia
Posts: 309
Likes: 0
Received 0 Likes
on
0 Posts
Car: 1990 Camaro IROC-T
Engine: L98 Turbo (GT40)
Transmission: THO400
Axle/Gears: Forged axles, 3.23 rear
Thanks mate, Ill keep an eye out for the coating gear.
My wastegate is a 35mm as recommended my BBS Designs when he sent me the headers. If its too small, no-biggy. Ive got a 45mm one here too.
My wastegate is a 35mm as recommended my BBS Designs when he sent me the headers. If its too small, no-biggy. Ive got a 45mm one here too.
08-07-2005, 08:15 PM
#40
Member
Thread Starter
Join Date: Nov 2002
Location: Katherine, Australia
Posts: 309
Likes: 0
Received 0 Likes
on
0 Posts
Car: 1990 Camaro IROC-T
Engine: L98 Turbo (GT40)
Transmission: THO400
Axle/Gears: Forged axles, 3.23 rear
Well, the car came back to my place on friday.
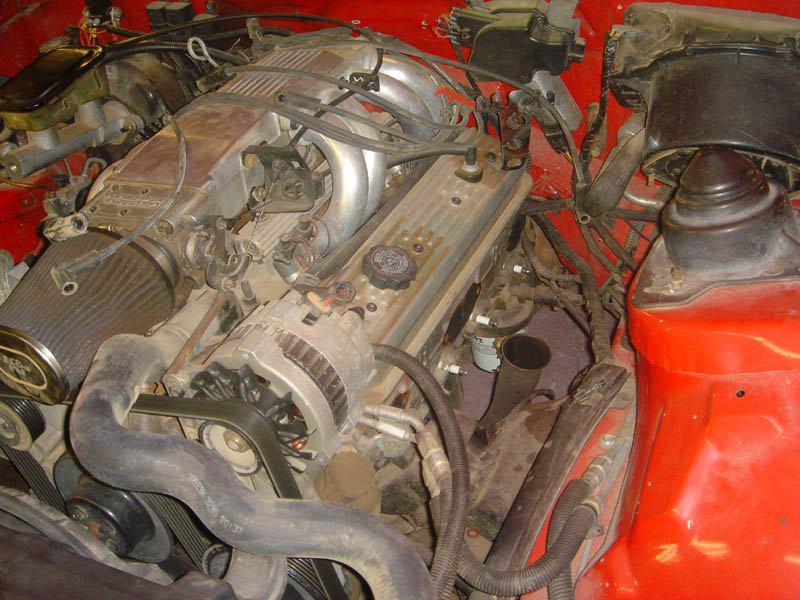
SPent the weekend sorting out the intake piping and bolting everything together. There were a few last minute "****! That doesnt fit!" moments but they are all sorted out now. Things that i havnt even thought about until now were done, like making a port for the o2 sensor and modifying the dipstick to fit. Only real drama I have right now is that on both headers, heat-wrapping them is going to be difficult as clearances are not being forgiving at all.
First turn-key should be this afternoon. So we can test there arnt any leaks anywhere. If it goes well i'll post a video or something....
08-08-2005, 08:08 PM
#41
Member
Thread Starter
Join Date: Nov 2002
Location: Katherine, Australia
Posts: 309
Likes: 0
Received 0 Likes
on
0 Posts
Car: 1990 Camaro IROC-T
Engine: L98 Turbo (GT40)
Transmission: THO400
Axle/Gears: Forged axles, 3.23 rear
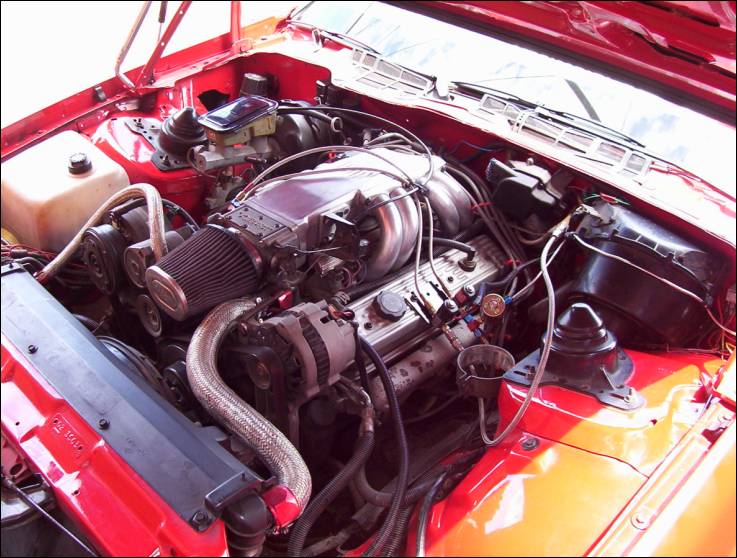
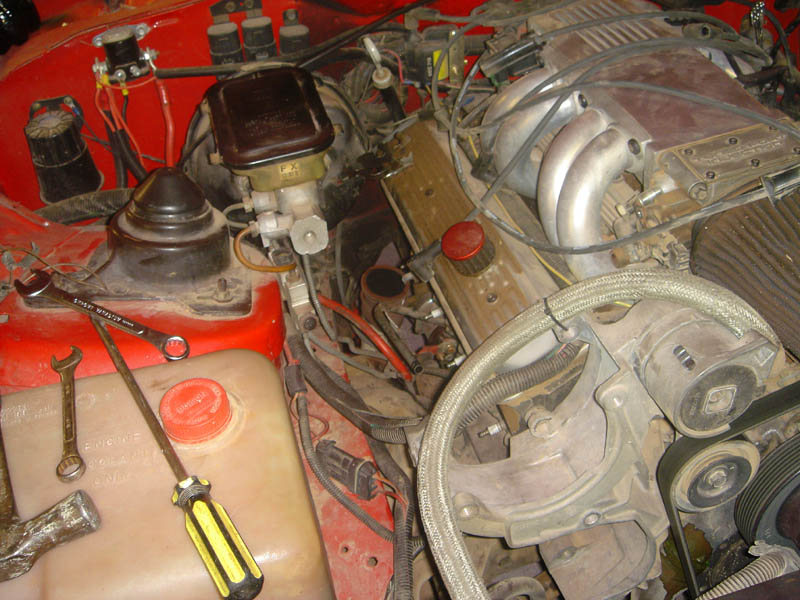
Finished the intake piping. Turns out I had no really good way to get the cross-over pipe connected under the car without a hoist, so thats getting done today.
And NO.... thats not me....

And NO.... thats not me....
 08-08-2005, 11:16 PM
#44
Member
Thread Starter
Join Date: Nov 2002
Location: Katherine, Australia
Posts: 309
Likes: 0
Received 0 Likes
on
0 Posts
Car: 1990 Camaro IROC-T
Engine: L98 Turbo (GT40)
Transmission: THO400
Axle/Gears: Forged axles, 3.23 rear
Yeah i hope so, its of a mack truck apparently and is very thick and fairly hard. Should hold together ok.
The freak is a mate of mine. Don't mind him, he drives a Silvia.... I mean, thats all that really needs to be said.
The freak is a mate of mine. Don't mind him, he drives a Silvia.... I mean, thats all that really needs to be said.
Last edited by Raven90IROC; 08-08-2005 at 11:21 PM.
08-09-2005, 08:25 AM
#46
Member
Thread Starter
Join Date: Nov 2002
Location: Katherine, Australia
Posts: 309
Likes: 0
Received 0 Likes
on
0 Posts
Car: 1990 Camaro IROC-T
Engine: L98 Turbo (GT40)
Transmission: THO400
Axle/Gears: Forged axles, 3.23 rear
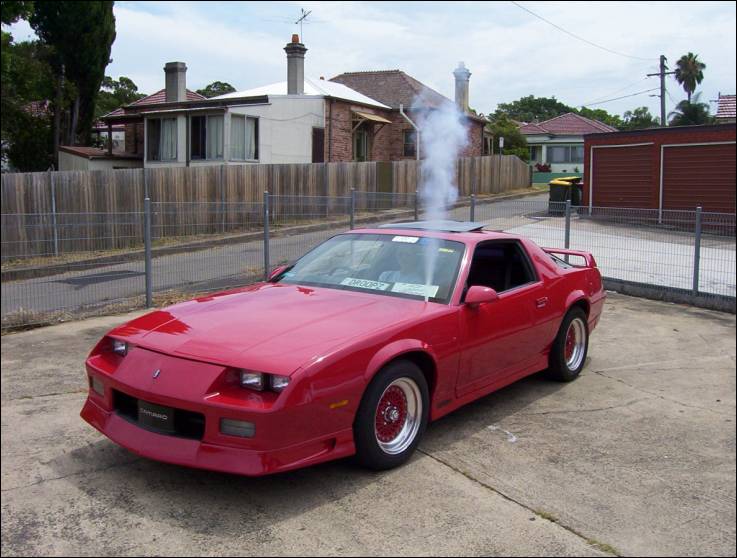
YAY!!! Had the first drive of the car today!! I drive her about 10kms from the exhaust shop I was using to my house. Unfotunatly I couldn't have too much fun. I blew the back out of one of the extractor gaskets. I think the back bolt mustn't have been up tight enough and some exhaust got in and melted a big chunk of the gasket out.
BUT!!!.... even with the big *** leak I could hear teh turbo spooling and the few times I though "f**k it" and kicked it in the guts, it came on boost FAST. From what I could tell from the gauge, full boost came on even before teh auto had time to kick down. Mind you, I have only got it set at about 3-4psi.
Hopefully I can find a metalic gasket tomorrow and bolt it all back up again, and get some footage.
Only other dramas I saw was a few wires melting still... I might have to really go nuts with the wrap and shielding.
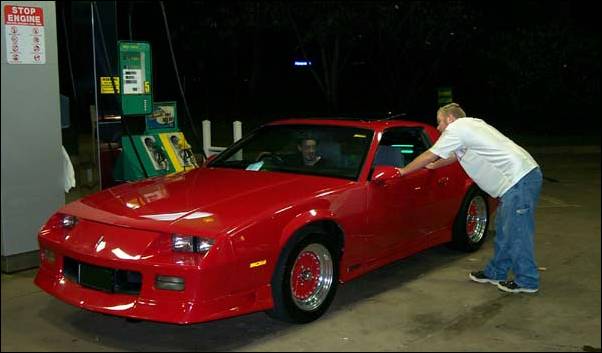
This was how I drove it today. Got some good looks driving through the main street at 4pm with no bonnet on.

BUT!!!.... even with the big *** leak I could hear teh turbo spooling and the few times I though "f**k it" and kicked it in the guts, it came on boost FAST. From what I could tell from the gauge, full boost came on even before teh auto had time to kick down. Mind you, I have only got it set at about 3-4psi.
Hopefully I can find a metalic gasket tomorrow and bolt it all back up again, and get some footage.
Only other dramas I saw was a few wires melting still... I might have to really go nuts with the wrap and shielding.
This was how I drove it today. Got some good looks driving through the main street at 4pm with no bonnet on.
08-10-2005, 12:42 AM
#47

Keeping the plug wires from melting was the biggest problem I had with my kit. They just kept falling and melting and arching... and I would always melt those plastic retainers for the wires. I got a cut to fit set of wires and made them extra long so I could route them as I needed.
08-10-2005, 07:42 AM
#48
Member
Thread Starter
Join Date: Nov 2002
Location: Katherine, Australia
Posts: 309
Likes: 0
Received 0 Likes
on
0 Posts
Car: 1990 Camaro IROC-T
Engine: L98 Turbo (GT40)
Transmission: THO400
Axle/Gears: Forged axles, 3.23 rear
**** YEAH!!!!!!!!!!!!!!!!!!!!!!!!!!!!!!!!!!!!!!!!!!!!!!!!!!!!!!!!!!!!!!!!!!!!
Goes hard!
Video's soon!
Goes hard!
Video's soon!
08-10-2005, 10:36 AM
#49
 08-10-2005, 06:29 PM
#50
Member
Thread Starter
Join Date: Nov 2002
Location: Katherine, Australia
Posts: 309
Likes: 0
Received 0 Likes
on
0 Posts
Car: 1990 Camaro IROC-T
Engine: L98 Turbo (GT40)
Transmission: THO400
Axle/Gears: Forged axles, 3.23 rear
Nah the stock hood isnt going to close on any of that. The oil feed will be moved to come in at a 90degree angle. Im going to modify my steal hood to fit it all under. Essentially its going to be a cowl hood, except the cowl is going to start and end about 3" from the edges of the hood.
Ive got a filter on it, its just everytime i took a pic id have it off
This was how it ran last night....

Ive got a filter on it, its just everytime i took a pic id have it off
This was how it ran last night....