100psi. Fuel Pressure gauge w/ Isolator installation
I want to take this time to walk everybody through this the best way I can. Feel free to print this up for underhood reference. If anyone has any questions regarding the installation of the fuel pressure gauge, Feel free to call me directly at work. My phone number here is (815)895.8141 x293.
The Auto Meter Products you will need for the installation are:
1 – Gauge pn. XXXX 1 – Isolator pn. 5280 (High and low pressure) 1 – 4 ft. braided line (Underhood)pn. 3229 1 – 3 ft. braided line (Under dash) pn. 3227 1 – Pressure restrictor (Recommended) pn. 3277 X – Misc. Fittings depending on year. 1 – Friend to assist you.
I would strongly recommend using braided lines for safety.
Before starting the installation, make sure the lines are not pressurized. The pressure can be released by pushing the center core of the schrader valve in while holding a folded towel over the valve for safety.
 The first step is to locate and decore the schrader valve. The center section of the schrader valve unscrews and becomes an open fitting. If you have a TPI the fitting size should be -4AN. This is the size fitting on the end of the braided line. If you having trouble decoring the schrader valve, a replacement can purchased (exc. LT-1). Replacement style schrader valves that are color coded and have a larger diameter opening can be purchased from popular Nitrous companies such as NOS and Compucar. I have found that 90 degree fittings come in very handy during the installation, especially on the LT-1. Fittings can be purchased from companies such as Aeroquip or Earls. Check with their tech. guys regarding which will work for your application.
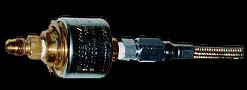 Once the schrader valve is free flowing the braided line can be connected. At this time (optional) connect the restrictor fitting to the fuel side of the isolator. Make sure you use teflon pipe thread sealing tape.(Very Important) Once the restrictor is installed into the isolator, use the eraser side of a pencil and push the isolator diaphragm towards the fuel side of the isolator, via the gauge side.
Once you are sure the diaphragm is properly seated, seal off the fuel side of the isolator, with a piece of electrical tape to produce a vacuum and hold the diaphragm still. Remove the bleeder screw from the gauge side.(Don’t lose it – its small.) Attached supplied fitting to gauge side of the isolator. Make sure you use teflon tape once again. (All NPT fittings!)
Once the fittings are attached to the isolator connect the 3ft. piece of braided line to the isolator on the gauge side.
Note: AN fittings do not require teflon sealing tape.
At this time attach the fill tube to the fill bottle supplied with the isolator. Fill the bottle with a 50/50 mix of ethylene glycol and water. (Coolant/Antifreeze and water).
Note: The 5280 includes a kit to assist in the filling of the line and isolator. This kit consists of a bottle and other miscellaneous parts. If you do not have this kit, you may request one from Auto Meter via E-Mail at Service@autometer.com, or you can call the service dept. directly.
Attach the fitting from the fill kit to the braided line and forcefully start to run the coolant into the lines and isolator – pushing all of the air out of the lines. This is where your friend will come in handy.
Once the line and isolator are full and no more air bubbles are coming out of the bleeder fitting – close off the fill line and have your friend tighten the bleeder screw.
Once the bleeder screw is tightened you can remove the fill kit and the braided line should be filled to the top. If it is not full, I would recommend refilling the line and isolator because there is probably an air bubble in the lines. I realize this is not easy. No one ever said it was.
Once the line and gauge are full and there are no bubbles in the line, cap off the line with the supplied -4AN block off fitting. Now that the isolator is pressurized and equalized drill a hole in the firewall where you want the line to go through.
Next connect the line from the schrader valve to the fuel side of the isolator/restrictor fitting. Route the lines under the hood away from the exhaust manifolds/headers and through the firewall.
Once you decide where you want to mount the gauge, route the line to the point of connection to the gauge. To remove the restrictor/dust cover from the inside/back of the pressure port, on the back of the gauge, use a screw that is supplied with the kit and slowly remove the restrictor.
Next, attached the supplied fitting to the back of the gauge using plenty of teflon sealing tape. This is where 90% of the leaks start. Once you think you have enough – put one more layer on. (5 or 6 layers should be plenty!).
Continue on to fill the back of the gauge -slowly- with the coolant mix using the brown fill tube supplied with the isolator. Tap the side of the gauge a few time to make sure there are no air bubbles in the bottom of the gauge pressure port.
Once the gauge is full you are ready the attach it to the line. If you are using a mounting cup make sure you run the line through it first. (I have forgotten this step and had to start all over!!!!). Remove the block off fitting from the line and top off with mixture if necessary.
Once the line is topped off and the gauge is full flip the gauge over and quickly connect the gauge to the line. Try not to spill any of the coolant. This is easier than it sounds because there will be a slight vacuum produced by the gauge and the coolant will not come rushing out. A few drops is acceptable, although be careful. An air bubble in the line will give a false reading. Usually low. Once the gauge is attached, the volume of fluid in the line will hold the diaphragm back, allowing you to remove the electrical tape.
Finally, go through and tighten down all of the AN and NPT fittings. Once you are sure all of your connections are secure, turn the key on to activate the fuel pump and check for leaks. If you find a leak, shut off fuel pump and retighten and refill gauge line. If any of the coolant leaks out at this time you will need to refill the gauge line. Use caution when removing fuel line, and follow previous instruction to release pressure.
Please allow yourself approx. 4 hours to properly install the gauge. If you do not get it right the first time – Do not get discouraged. It took me an honest 8 tries to get it right.
If you have any problems or questions call me. I am very willing to help. Once the gauge is properly installed it will work flawlessly forever. Despite what you may have heard there is no maintenance, upkeep, or routine refilling of the lines. I have personally had this system set up in my car for about 2 years and have not had a single problem. I hope this helps out anyone who has had troubles before.
The phone numbers for the companies I mentioned above are:
Thank You,
-=Eddie=- ADICTEDZ28@aol.com